The Fresh Loaf

A Community of Amateur Bakers and Artisan Bread Enthusiasts.

Vermont Sourdough with Increased Whole Grain

Tuirgin's picture
Tuirgin

On my last two bakes I’ve used the 3-stage Detmolder process from Hamelman’s Bread. I decided I would try to use it with a white sourdough.

3-stage build Stage 1—Freshening

5 hours at ~78ºF. Room temperature in SW Florida.

IngredientsWeightPercentage1
KA ap flour.3 oz100%
water.4 oz150%
mature starter.1 oz50%
 Stage 2—Basic Sour

15 hours at ~78ºF.

IngredientsWeightPercentage
KA ap flour3.2 oz100%
Water2.4 oz76%
stage 1 starter.8 oz24%
 Stage 3—Full Sour

3 hours at ~85ºF. This was achieved using 2 large plastic bins in a stack, with the bottom stack containing 5 inches of water and a submersible aquarium heater.

IngredientsWeightPercentage
KA ap flour7.7 oz100.0%
water7.7 oz100.0%
stage 2 starter6.4 oz82.6%

I mixed the Basic Sour at 10:30 P.M. on Friday and by 9:30 A.M. on Saturday it had already fallen. I stirred the starter and watched it closely until I found that it was rising again. It continued rising for the full 15 hours.

The directions call for an autolyse with all ingredients but the salt. In the past I’ve had problems integrating the salt into the dough by hand, so I held back an amount of flour and water from the autolyse. I disolved the salt in the retained water, then made a second dough with just the water, flour, and salt. After the autolyse, the two doughs were incorporated.

AutolyseAutolyse dough

62.5% hydration (figuring on the levain being 100% for 5.5 oz each flour and water)

IngredientsWeight
KA ap flour19.0 oz
whole rye4.8 oz
water12.8 oz
levain11.1 oz
 Salt dough

64% hydration

IngredientsWeight
KA ap flour5.0 oz
water3.2 oz
salt.6 oz
Bulk Fermentation

2.5 hours at 78ºF with a single fold at 1:15.

Shaping

I made use of my new bench board from New York Bakers. What an improvement over my hideous counter top! I think far less extra flour was incorporated into my dough, and it was far easier to work with.

I made a concerted effort to not over-work the dough during the pre-shaping and shaping stages. I have a bad tendency to work the dough too much and I think the end result may be a crumb that’s more dense than it should be.

With the loaves shaped into boules, they went into bannetons floured with a mixture of rice flour and ap, into a large plastic bag, and into the refrigerator.

Final Fermentation

The entire final fermentation was conducted in the refrigerator. At 14 hours the loaf closer to the front of the fridge seemed fully proofed, or close to it. The loaf toward the back of the fridge still felt somewhat dense, but I decided to go ahead and start the bake as I’ve never gone straight from fridge to oven before. My concern was that perhaps the proofed loaf was overproofed. I knew one of the two loaves would not be ideal, but hoped that one of them would be good and that I would learn something from the difference between them.

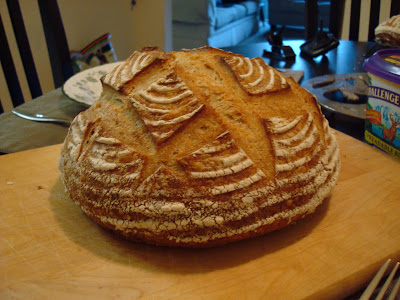
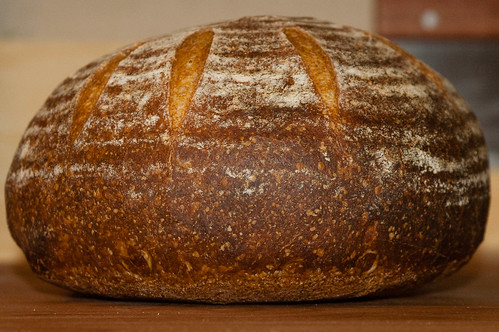
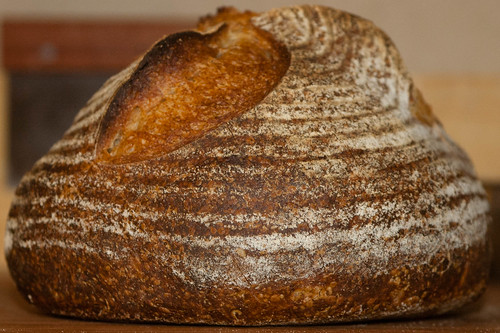
I scored the lesser proofed loaf with straight slashes radiating from aproximately 2–3 inches from center. The more fully proofed loaf was scored with arcing slashes radiating from the center. I’ve used this cut before on boules, but it proved to be an unfortunate choice.

Bake

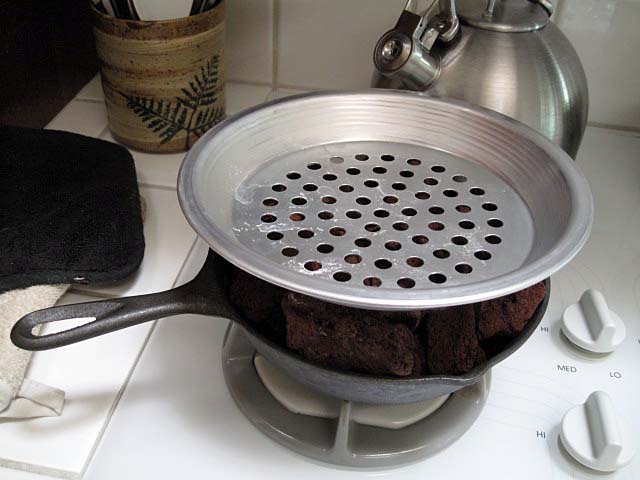
The target bake temperature is 460ºF, so I headted the oven to 500ºF, with my new cordierite bake stone (also from New York Bakers), and my trusty rusty cast iron skillet on the bottom.

I steamed the oven with boiling water, misted the loaves, and loaded them. 30 seconds later I poured more boiling water into the cast iron skillet and found that the oven was already below 460ºF so I turned it up to 550ºF. The under-proofed bool shaped up nicely, but with insufficient rise. The fully proofed loaf’s poor slashing caused structural weakness in the top of the loaf, and it erupted into a volcano shape. I withdrew the cast iron skillet after 10 minutes and tended the oven until it caught back up to 460ºF.

In the past, I’ve cranked the temp up to 550ºF because my oven loses heat so quickly, but I’ve always ended up with a crust that’s too thick. Starting at a lower temp seemed to work better even though I was fighting with the oven to keep the temperature up.

At 43 minutes the lesser proofed boule registered an internal temperature of 208ºF. I gave the bread 5 more minutes of bake time, then turned off the oven, opened the door, and left the bread for another 10 minutes in the cooling oven. When I removed the loaves, they were both at 214ºF. The crust was quite dark brown, with the edges of the arced cuts appearing black. The less proofed loaf was convex on the bottom, while the fully proofed loaf was more flat. Both crackled as they cooled.

I was concerned about the density of the lesser-proofed loaf, because it sounded solid when thumped. The proofed loaf had a nice hollow sound.

Introverted boule, crust:

Volcanic boule, crust:
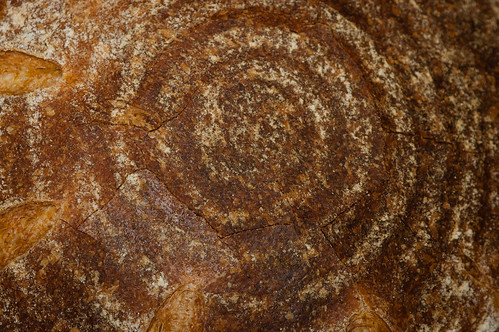
Cracklin’ crust:

Cutting and Eating

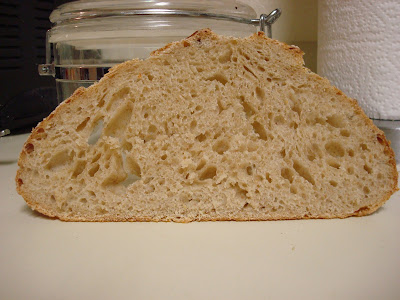
3 hours later, I found that the under-proofed loaf had a more hollow sound to it—this gave me hope. I cut into both loaves to compare. I was successful in getting a less-thick crust, though they could perhaps be even thinner. On cutting, both loaves sent crumbs everywhere.

The crumb from the under-proofed loaf was too tight, but not as tight as I had feared it would be:

The volcanic loaf’s crumb showed the poorly channeled energy caused by the inappropriate scoring. You can see how the dough gasses were straining to make an escape:

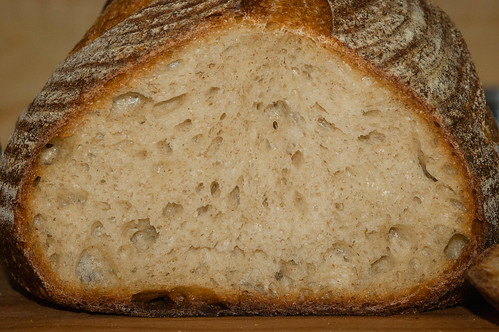
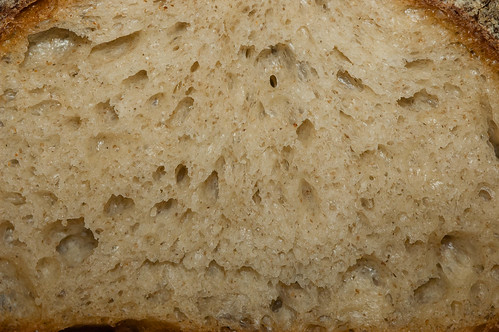
A closer view, showing the translucent, glossy holes from the long ferment:

Both loaves are delicious. On the first day, there was little sense of sour. A nutty, earthy scent and flavor is predominant, with just the slightest tang beneath it. The mouth feel, even on the denser loaf, isn’t bad, and rather enjoyably chewy. The crust is a tad thick, but dark and full of flavor and crunchy rather than tough—at least for the first day.

Conclusion

I suspect that had I scored the proofed loaf with the straight radiating cuts I gave the under-proofed loaf, I would have had a nearly perfect loaf. I could be wrong, but will enjoy the one and only way of finding out.

I’m curious to see how the sour taste develops. On the first day I don’t notice much difference in the 3-stage build and the 1-stage build called for in the formula.

Questions

There are two things I’d like to learn more about—the autolyse and the bulk ferment. The purpose of the autolyse is to enhance extensibility. The instructions call for 20–60 minutes. How do I know how long to leave it? When is the autolyse done, and how will the dough feel at that time? And for the bulk ferment, I admit I slavishly follow the times given—how do I know when to shorten or prolong the bulk ferment time? How do I know when the dough has reached its maximum benefit from the bulk ferment?

[The Flickr photo gallery of this bake can be found here: http://www.flickr.com/photos/tuirgin/sets/72157631716753259/]

  1. Percentages as printed in Bread, which do not quite work out for the amounts here.

MadAboutB8's picture
MadAboutB8


I made both Vermont Sourdough and Vermont Sourdough with Whole Wheat several times in the past year but this was the first time I attempted this recipe (Vermont Sourdough with Increased Whole Grain). There were serious typos in the formula for home-bake. Mixing the dough by following the ingredient list, I ended up with a pancake batter. I have heard about the big errata sheet for the book, but this was the first time I came across the recipe error myself. Thank God that at least there was no typo in Baker’s Percentage and liquid levain built. At least, I prepared starter built correctly and I corrected the ingredient errors by using the Baker’s Percentage.


  Before and after ingredient correction

Thanks to the new baking stone (one-inch thick paving bluestone bought from Bunning), my bread came out singing loudly (really really loudly). It sang with crackling tunes for several minutes (no joke!).


As you would expect from Vermont Sourdough, the bread was lovely with pronounced tang from increased rye and percentage of levain. 

Full post and more photos are here

Sue

http://youcandoitathome.blogspot.com

Juergen Krauss's picture

Vermont (or WhereEver) Sourdough side by side

May 11, 2011 - 1:07pm -- Juergen Krauss

Studying Hanelman's book Bread I wondered about the differences in taste of the diverse wheat levains and sourdoughs.

As a home baker I usually do one batch at a time, and by the time I bake another formula I might have forgotten the subtle characteristics.

Today I had the idea to make 2 batches - one Vermont Sourdough (p153, VS for reference), and one Vermont Sourdough with Increased Whole Grain (p156, call it IS).

Of each batch I made 2x 500g boules and 2x 250g batards, and the remaining dough I combined in a kind of double-fendu:

dmsnyder's picture
dmsnyder

When I took the Artisan I workshop at the San Francisco Baking Institute last August, Miyuki demonstrated the method of oven steaming they recommend for home bakers.

The oven is not pre-steamed (before loading the loaves). A cast iron skillet filled with steel pieces (nuts and bolts, rebar pieces) is pre-heated in the oven along with two baking stones. One stone is placed on a rack above the stone and rack on which the loaves will be loaded.

When the loaves are loaded, a perforated pie tin filled with ice cubes is set atop the skillet. As the ice melts, water drips through the perforations and turns to steam when it hits the metal pieces.

I had a hard time finding the perforated pie tins, so I hadn't been able to try this method until today. I did two bakes: One was two loaves of a very familiar bread – Hamelman's “Vermont Sourdough with Increased Whole Grain” from “Bread.” The other was a new bread to me - Chad Robertson's “Basic Country Bread” from “Tartine.” I made two large boules of the Country Bread. One was baked using the “Magic Bowl” technique and the other with the SFBI steaming method, minus the second baking stone and using lava rocks in place of metal pieces.

My current baking method is to pre-heat the oven to 500ºF with the baking stone and skillet in place. When I load my loaves, I turn down the oven to whatever temperature the recipe specifies, using the conventional bake setting. After 10-15 minutes (depending on the total length of the bake), I change the oven setting to convection bake but 25ºF lower. I find, in my oven, conventional baking retains steam well, but convection dries the crust better.

Using the SFBI steaming method, the Vermont Sourdoughs came out substantially similar to how they come out with my previous method – pouring boiling water over the lava rocks. I could not detect any difference in oven spring, bloom, crust color or the texture of either the crust or crumb.

Vermont Sourdough with Increased Whole Grain

Crust Crackles

Vermont SD with Increased Whole Grain crumb

The Basic Country Breads were different from each other. The one baked in under a stainless steel bowl was a bit shinier. The crust softened quicker with cooling. It did not sing when cooling. I don't think there was any real difference in oven spring or bloom.

Basic Country Bread baked with the "Magic Bowl" method

Basic Country Bread baked with the SFBI steaming method

Basic Country Bread crumb

My conclusion is that the SFBI method is effective. It does not require that water be boiled and poured into the hot skillet. To me, it seems a bit easier than the method I've been using. That said, the breads baked using the SFBI method for steaming the oven seem pretty much identical to those I get using my previous technique.

I don't have the kind of covered cast iron skillet/shallow dutch oven that Chad Robertson recommends be used to bake his Basic Country Bread. I do have enameled cast iron ovens that should perform similarly. Perhaps I should try one of them, although my expectation would be that they perform similarly to the "Magic Bowl" method.

David


Ryan Sandler's picture
Ryan Sandler

This is a three bake weekend for me, and I thought I'd offer this shot of the midpoint of it all.

From right to left: Poolish Baguettes, fresh out of the oven.  A bag of sourdough bagels (the BBA formula), baked this morning for breakfast.  And a batch of dough for Vermont Sourdough with Increased Whole Grain, currently in the bulk fermentation stage to be baked tomorrow.

Ryan Sandler's picture
Ryan Sandler

Inspired by dmsnyder's post about Hamelman's Vermont Sourdough with Increased Whole Grain, and is recommendation of it to those seeking "a more sour sourdough" (sign me up!), I decided to make that my Sunday bake.  Friday morning I refreshed my firm starter, and changed some of it to a 125% liquid starter, then made the preferment levain friday night, and was all ready to mix the dough Saturday morning.

What I did not realize, at first anyway, is that the amounts of ingredients in my printing of Bread are horribly, horribly wrong. The dangers of not consulting Hamelman's errata before making a new formula, I guess.  The percentages, as given in the book, are supposed to be 85% bread flour, 15% whole rye, 65% water, 1.9% salt, with 20% of the total flour prefermented in the liquid levain, and is supposed to be based on 2lbs of flour.  If you follow the home-baker amounts, however, you'd end up with 70% bread flour, 30% rye, 3.8% salt and a ridiculous 30% water, based on 1 lb of flour.  If figured this out in stages.

It was pretty easy to figure out something was wrong when I did the initial mix and had a 4.8 oz. of water in 16 oz. of flour.  Doesn't make much of a dough, funnily enough :P.  So I add some more water to bring it up to 65% hydration.  But something seemed off.  The dough seemed kinda pasty.  At this point it occurred to me to check the math on the rye percentage.  I wasn't really wanting to deal with a 30% rye bread so I improvised, threw in more bread flour and water to make the bread to make 2lbs of flour with 65% hydration.

But then I only had 10% of the flour prefermented, and only half as much levain as the formula needed.  Improvisation again! I still had about 4oz of firm starter in the fridge from the day before, so I threw about 3 oz in when I added the salt (the formula is made with an autolyze.

I ended up bulk fermenting for much longer than the 2.5 hours Hamelman calls for, more like 4 hours, and even then it seemed pretty sluggish.  But I eventually went ahead and shaped two big loaves, placed them in brotforms and retarded overnight.  I baked them this morning and...drumroll...


It actually worked!  Great crumb, pleasant flavor.  Not overly sour, but I imagine that will change when I have some for breakfast tomorrow.  I got so much oven spring on the boule that I was sure there was just a single giant hole at the top and nothing else.  I was pleasantly surprised, to say the least!

dmsnyder's picture
dmsnyder


I can't believe six months have gone by since I made Hamelman's Vermont Sourdough with Increased Whole Grains. (See Vermont Sourdough with Increased Whole Grain, from Hamelman's "Bread") I liked it so much the first time, I promised myself I would bake it again soon to see if was consistently so good. So, I forgot about it. I'll blame the NY Baker's test baking pre-occupation of the Summer.

A few days ago, I was thumbing through “Bread,” deciding what to bake this weekend, when I re-discovered this formula. A happy moment.

My second bake of the Vermont Sourdough with Increased Whole Grain confirmed the wonderfulness of this bread and my personal preference for it over the basic Vermont Sourdough.

OVERALL FORMULA


Bread flour

1 lb 11.2 oz.

85.00%

Whole Rye

4.8 oz

15.00%

Water

1 lb 4.8oz

65.00%

Salt

.6 oz

1.90%

TOTAL YIELD

3 lbs 5.4 oz

169.90%


LIQUID LEVAIN BUILD


Bread flour

6.4 oz

100.00%

Water

8 oz

125.00%

Mature culture (liquid)

1.3 oz

20.00%

TOTAL

15.7 oz.


FINAL DOUGH

Bread flour

1lb 8 oz

Whole Rye

4.8 oz

Water

12.8 oz

Liquid levain

14.4 oz

(all less 3 T)

Salt

.6 oz

TOTAL

3 lbs 5.4 oz


METHOD

  1. The night before mixing the final dough, feed the liquid levain as above. Ferment at room temperature overnight.

  2. Mix the final dough. Place all ingredients except the salt in the bowl and mix to a shaggy mass.

  3. Cover the bowl and autolyse for 20-60 minutes.

  4. Sprinkle the salt over the dough and mix using the paddle of a stand mixer for 2 minutes at Speed 1. Add small amounts of water or flour as needed to achieve a medium consistency dough.

  5. Switch to the dough hook and mix at Speed 2 for 6-8 minutes. There should be a coarse window pane.

  6. Transfer the dough to a lightly oiled bowl and ferment for 2.5 hours with one stretch and fold at 1.25 hours.

  7. Divide the dough into two equal parts and form into rounds. Place seam side up on the board.

  8. Cover with plastic and allow the dough to rest for 20-30 minutes.

  9. Form into boules or bâtards and place in bannetons or en couch. Cover well with plasti-crap or place in food safe plastic bags.

  10. Refrigerate for 12-18 hours.

  11. The next day, remove the loaves from the refrigerator.

  12. Pre-heat the oven at 500ºF with a baking stone and steaming apparatus in place.

  13. After 45-60 minutes, pre-steam the oven. Transfer the loaves to a peel. Score them.

  14. Load the loaves onto the stone and pour ½ cup boiling water into the steaming apparatus. Turn the oven down to 460ºF.

  15. After 15 minutes, if you have a convection oven, turn it to convection bake at 435ºF. If you don't, leave the oven at 460ºF. Bake for another 25 minutes.

  16. Remove the loaves to a cooling rack.

  17. Cool completely before slicing.

I got the same crackled, crunchy crust and moist, chewy crumb as I did the first time. The flavor was more assertively sour than I remember, which is fine with me. The overall flavor was delicious. The sourness did not detract from the lovely complex wheat-rye flavor that is my favorite.

This is indeed a wonderful bread, and I promise to not let so much time go by between bakes again! I heartily recommend it to those seeking a “more sour sourdough.”

David

Submitted to YeastSpotting


dmsnyder's picture
dmsnyder

Vermont Sourdough with Increased Whole Grain

I felt like baking something new this weekend, but I like the breads I make most often. That's why I bake them most often. So, I wanted something I would really like as much as those, but different. I settled on the Vermont Sourdough with Increased Whole Grain from Hamelman's “Bread.”

In the sidebar of this recipe, Hamelman talks about the “two small changes” in this formula compared to the “regular” Vermont Sourdough resulting in “surprisingly large” effects. The two changes are an increase in the whole grain flour from 10 to 15% and in the pre-fermented flour from 15 to 20%. These changes result in “a sharper tang and more or a whole-grain taste.” Well, that sounded terrific.

Then, I recalled the errata sheet for “Bread” that Paul (rainbowz) got from Jeff Hamelman and shared with us. I consulted it and found that the corrections decreased the pre-fermented flour which seemed in conflict with the description in the sidebar. Not having a clear sense of how to deal with this discrepancy, I ended up using the ingredient amounts as printed, resulting in a larger batch of dough than that printed in the book.

The Vermont Sourdough with Additional Whole Grain was made with KAF Bread Flour and 15% KAF Medium Rye Flour. It had 20% pre-fermented flour in the form of a 125% hydration starter fed with a mix of 70% AP, 20% WW and 10% whole rye flour. The total dough was 65% hydration. The loaves were scaled to 810 gms and shaped as boules.

The oven was pre-heated to 500ºF on convection bake for 60 minutes, with a baking stone on the middle shelf, pushed to the left, and a 7 inch cast iron skillet filled with lava rocks at the right front of the lower shelf. The oven was pre-steamed by pouring about 1/3 cup of boiling water over the lava rocks. The loaves were then transferred to a peel, scored and loaded onto the stone. Another ½ cup of water was poured over the lava rocks and the oven door quickly closed. The oven was immediately turned down to 460ºF, conventional bake. The skillet was removed after 15 minutes, and the oven was re-set to 435ºF, convection bake. The loaves were baked for an additional 25 minutes. Then, the oven was turned off, and the loaves were left on the stone with the oven door ajar for another 7 minutes before being transferred to a cooling rack.

I baked this bread as part of an experiment to see if I could reliably produce a crackly crust. My results were most satisfactory. (See Consistent Crackly Crust Conundrum Conquered?)

Crackly Crust

The crumb was fully aerated but without huge holes - good for a 65% hydration sourdough.

The crust was crunchy with a caramel-like nutty sweetness. The crumb was tender-chewy. The flavor had both a sweetness and a moderately assertive sourness. This is a bread that is quite sour, but there is a lot of complexity that also comes through. I'll have to make it again, but based on today's bake, I prefer it to the "regular" Vermont Sourdough.


David

Submitted to YeastSpotting


Subscribe to RSS - Vermont Sourdough with Increased Whole Grain