The Fresh Loaf

A Community of Amateur Bakers and Artisan Bread Enthusiasts.

Tartine

pongze's picture

Hi from Redlands, CA

July 4, 2012 - 1:01am -- pongze

Hi from southern California, particularly, Redlands, CA!  Happy 4th of July to those of you in the USA.  I'm fairly new into baking, less than a year.  I got the somewhat-maligned Artisan Bread in 5 minutes a Day first and was pretty happy with the results.  Then I was fortunate enough to find this website and started to do a lot of reading and watched a lot of videos.

baybakin's picture
baybakin

Oakland sourdough:

This is the basic sourdough that I keep around the house. Nearly every sourdough bread that I do is an edit on this basic recipe, which is sort of a combination of Daniel Leader's Pain de campagne and Chad Robertson's Country Bread.

Ingredients:

310g Sourdough Starter (130% hydration)
250g Water
440g Good quality unbleached AP/Bread Flour
60g Whole Grain Flour (I use whatever I have, WW/Rye/Spelt, etc)
12g salt (I use course grey sea salt)
(50g boiling water)

Method:

In a large bowl, mix sourdough with water and flours until a shaggy dough forms. Let autolysis.

Measure out salt into a small bowl, pour boiling water over the salt to dissolve it. let the salt water come to room temp.

After 45 mins mix the salt water into the dough. (I do this all by hand within the bowl, ala tartine)

S&F the dough a few more times over the course of the rising time (about 2-4 hours, depending on the temp of the house). At this time I either retard the dough in the fridge (on a weekday, so I can go to work), or proceed to pre-shape.

Pre-shape the dough into a round (If removing from fridge, let dough reach room temp before pre-shape).  Let pre-shaped dough bench rest for 15 mins, then shape into a round and place in a cast-iron dutch oven to rise.

30 mins before bread is proofed pre-heat oven to 500F.  Place lid on DO and put into pre-heated oven.  Bake for 20 mins covered.  Remove lid, turn down to 450F and bake for 15 mins.

Take bread out of DO (carefully) and let cool on a rack. Enjoy!


The pictured bread is cracked wheat/White Whole Wheat as the whole grain part.

jarkkolaine's picture
jarkkolaine

For about two months, I had had my sourdough starter sitting on the kitchen counter covered with a kitchen towel. Last week, when I finally found time to look at it again, it looked like a dry cracker cookie. 

I had no idea if I could still restore the starter or not, but I decided to give it a try.

I added some water to dilute the dried starter. When most of the starter had turned into a milk-like fluid, I removed the remaining pieces of dry dough and added just enough flour to get it back to the normal consistency of my starter (at 100% hydration, 50/50 full grain and all purpose flour). I then left the starter on the kitchen counter and waited. The next morning, the starter was full of life!

Just look at this before and after photo:

After a couple of days of daily feeding cycles, I finally had the time to try to bake something with the starter.

--

About two weeks ago, I visited Viipurilainen kotileipomo, a family run bakery in Lahti, about 100 kilometers from Vantaa where I live to meet with the bakers and see how they work on their full-grain rye bread (among other things). The four baking brothers I met that night where some of the friendliest people I have ever met, and their rye "limppu" is delicious! So, inspired by seeing them at work, although I didn't ask for their recipe, I decided to try my luck with creating my own version of this Finnish tradition called "ruislimppu." 

At about the same time as I started reviving my old wheat starter, I created a 100% rye starter by mixing a handful of dark rye flour and some water. I didn't write down the exact measurements but it resulted in a rather wet and sticky dough to start with. I fed the starter daily, slowly increasing the mass of the dough, until it felt really sour and light. Ready for use. That was the night before the bake. Last week's Saturday. 

On that night, I made the rye "limppu" dough by mixing the starter with about 1.5 kilograms of rye flour and 1 kilograms of water. As I don't know the amount of flour and water in the starter, I can't give exact figures. I will try to be more exact the next time I make this bread... I didn't knead the dough at this point, just mixed the ingredients to a consistent mass. 

On Sunday morning, I mixed in the salt and did a very brief kneading for the dough. The dough was quite wet and it was practically impossible to knead, so I didn't spend much time on it. At the same time, I also prepared a batch of my favorite dough for two loaves of Basic Country Bread from Tartine Bread. 

I was baking for most of the day, and here are the results. I'm pretty happy with them: even the rye limppu tastes right. The rye loaves could be a bit lighter (it's definitely denser and flatter than the one from Viipurilainen kotileipomo), but that's not necessarily a requirement: most of the time they look just like this when you buy them from Finnish grocery stores: dense and dark, but full of flavor (especially with a thick layer of real, creamy butter on top!).

Basic Country Bread:


Rye Limppu:

Alvaremj's picture

Tartine method in my life

March 25, 2012 - 3:35pm -- Alvaremj

I’ve never been one to follow a recipe to a tee. I recently read Tartine Bread and it got me thinking how to manage my time so I can bake on days I work as well as days off.  So essentially, what I out of the book was that the baker can manipulate time and temperature to make any time frame work to make bread.

wayne on FLUKE's picture
wayne on FLUKE

I just made the Tartine Country Bread for a second time. I do not have a combo cooker and thought I would share my results with alternatives.

Both times I followed Chad's recipe and process carefully, but was afraid to add all the additional water the first attempt so used about half. The first attempt I did final proof in a colander lined with floured towel, pre-heated oven with Fibrament stone and baked in 8" cake pan with stainless "magic" bowl to hold in moisture. This worked OK, and had good oven spring and slashes (square pattern) opened nicely. Crumb was not as open as I hoped based on the oven spring.

For the second attempt, I decided to try my Romertopf #111 Clay Baker. I did add all the extra water and I proofed the first loaf in the clay baker and baked starting in cold oven. Since the dough is pretty slack it spread to take the shape of the clay baker in spite of my attempt to shape with good surface tension, but had nice spring and I removed the cover after 30 min (450) and baked another 25 min which gave pretty nice color.

The second loaf was retarded in floured towel in oval wicker basket (in refer inside plastic bag) for about 6 hours to fit my schedule. I let sit on the counter for about an hour before transfering to the clay baker and baking starting in cold oven. The transfer was not as smooth as I hoped as it landed a bit sideways, but I left it alone and slashed it, one long slash which again was not perfect, but I resisted the temptation to mess with it.

Again uncovered after 30 minutes. This loaf had great oven spring and since it didn't have time to settle down into the baker it was a much more attractive shape and the slash opened and created a fantastic ear. Almost as nice as some of David's (dmsnyder) :-). Really! Both loaves had nice blistered crust.

This loaf was taken to a neighbor's for dinner and served with seasoned olive oil dipping sauce. It was a big hit! Proudest moment for a home baker is to have others compliment the results.

To summarize, best results were from proofing in basket and baking in clay baker (cold oven). I will now try this technique with Teresa's Basic White Sourdough using 100%Hydration Starter

wayne

dabrownman's picture
dabrownman

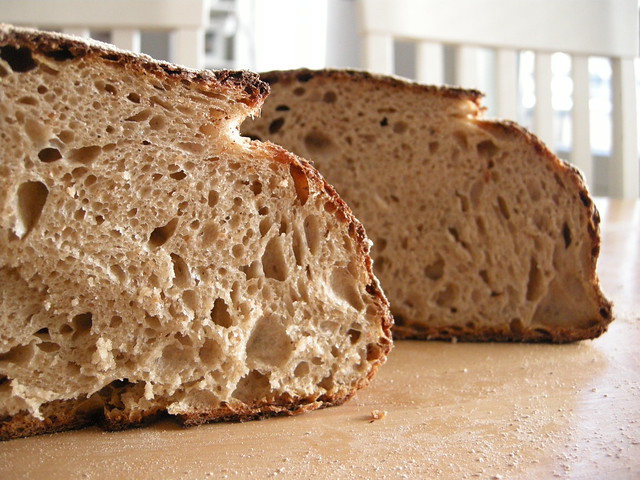
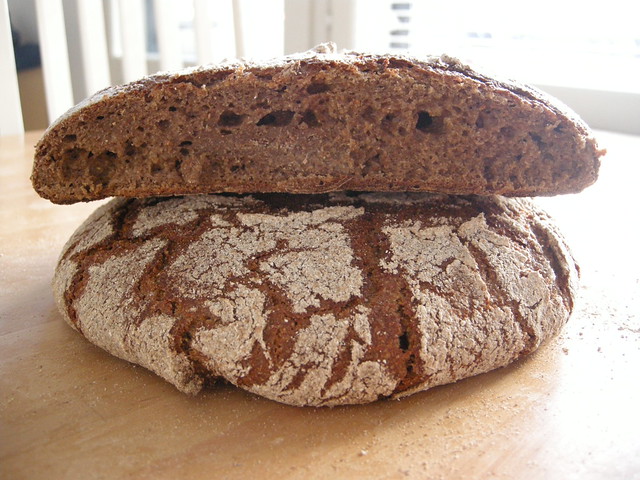
Here is an everyday Tartine method DO sourdough with 30% rye, WW, bulgar and farro in the levine, boilded soaker and dough.

This loaf was only retarded 4 hours.  The cold DO was placed in a 500 F oven.   The spring was about 75% in the DO after 20 minutes c0vered.  The bread was then baked at 425 F convection oven uncovered for 10 minutes and then the bread was taken out of the DO and placed on the stone and baked until the internal temperature was 205 F.  It was then left in the off oven with the door ajar for 12 minutes to further crisp the crust.  The crust was dark and crisp. The crumb came out light, airy, soft moist and moderately open with the cracked berries coming through.  The taste is its best quality with a medium sour note.  This will make a nice sandwich loaf.  Recipe follows Pix's

Everyday Rustic Country Sourdough

Yield: one 850 g Loaf

Ingredients

Levain Build

50 g KA AP flour

25 g Whole wheat flour

25 g Whole rye flour

75 g water, cool (60 For so)

25 g active starter (100% hydration)

Boiled Soaker

10 g rye berries cracked

10 g WW berries cracked

10 g farro

10 g bulgar

Final Dough (77% hydration, including levain excluding the soaker)

25 g rye

25 g whole wheat

15 g bulgar

15 g farro

170 g KA AP flour

170 g KA bread flour

325 g warm water (80 For so)

1 tsp barely malt syrup

8 gpink Himalayan sea salt (1.5%)

Boil and Soak – soaker ingredients in twice as much water by volume. Bring to a boil and turn off heat and let soak until cool.

Directions

1. Levain : Make the final build 10-12 hours before the final mix.

2. Mix: Add all the ingredients to the mixing bowl, including the levain, but not the salt or the soaker. Mix just until the ingredients are incorporated into a shaggy mass. Correct the hydration as necessary. Cover the bowl and let stand for an autolyse phase of 60 minutes. At the end of the autolyse, sprinkle the salt over the surface of the dough, and knead 8 minutes with dough hook on KA 3. The dough should have a medium consistency. Add the scalded and caramelized berries and mix on KA 3 for 1 minute

3. Ferment with S&F: 2 hours. Stretch and fold the dough in the bowl 4 strokes at  15 minute intervals for  1 hour. Stretch and fold again, 4 strokes, at the one hour mark folding it into a ball in lightly oiled bowl. Do 1 S &F two more times at 90 and 120 minutes. Form into ball stretching the skin tight and place in floured benetton or shape into a batard leave to ferment 1-2 more hours until the dough is at least 75% larger than when you started the ferment. Remove from bennetton and bake as below.

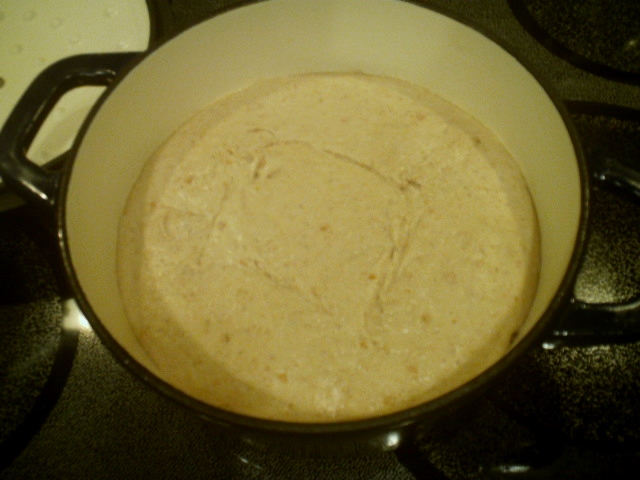
If doing DO Tartine method form into ball and place in DO for final rise and bake as below.

4. If retarding: do 1 S&F in the lightly oiled bowl forming the dough into a ball again. Refrigerate 8-20 hours, depending on how much time you have and sour your taste.

5. Take dough out of refrigerator and let it come to room temperature about 1 ½ hours.  Pre-shape, then shape into boules or batards 20 minutes later. OR, if doing Tartine method, form into ball and place into cast iron DO for final proof.  Bake as below.

6. Proof: Approximately 1.5 to 2.5 hours at 82 F. Ready when poke test dictates.

7. Pre-heat: oven to 500 with steam apparatus in place - 45 minutes minimum. I use a loaf pan half full of water and a dry 12”cast iron skillet that go in the bottom rack of the oven at the beginning of pre heat and the stone on the rack above. When the loaf goes in,  throw 1 cup of boiling water into the cast iron skillet right after loading the bread on the stone.

8. Bake: Do not slash loaf. Bake seam side up on stone at500 Ffor 5 minutes, turn down temperature to 450 F and bake for another 10 minutes. Remove steaming apparatus after 15 minutes. Turn down oven to425 Fconvection now and bake 15 minutes more, turning loaf every 5 minutes for browning evenness as necessary. When done (205 F internal temp), leave loaf on stone with oven door ajar, oven off for 10 minutes. Move to cooling rack until loaf is room temperature.

If doing DO, Bake at 20 minutes at500 Fremove lid and turn down oven to 425 F convection and bake for 10 minutes.  Remove from DO and place on stone to bake until loaf is205 Fon the inside.  Turn off oven, keep door ajar and let loaf rest on the stone for 12 minutes before removing to cooling rack.

bredtobake's picture

Friends, Romans, countrymen, lend me your ears...

March 4, 2012 - 6:12pm -- bredtobake

Hi Everyone,

I'm seeking advice on how to get those really nice "ears" that tartine bread is known for. I am using the standard country bread recipe. I seem to get a pretty good oven spring, but my score marks seem to just "stretch" rather than "burst", if that makes any sense. Anyway, I've attached a photo of my last bread to show you what I mean. How do I get those nice "ears"?

Cheers,

Jon

(http://bredtobake.blogspot.com)

Pages

Subscribe to RSS - Tartine