The Fresh Loaf

A Community of Amateur Bakers and Artisan Bread Enthusiasts.

spelt

loydb's picture
loydb

Last week I finally found the elusive box that had my DLX bowl & paddles in it. Although my KA makes an appearance here for its whipping prowess, it has now been relegated back to the pantry until I next need it for grinding meat or extruding pasta. I've really been enjoying Hanne Risgaard's Home Baked: Nordic Recipes and Techniques for Organic Bread and Pastry. It has some great looking recipes, many of which use grains other than the standard wheat. The first one I've tried is her Spelt-Durum bread.

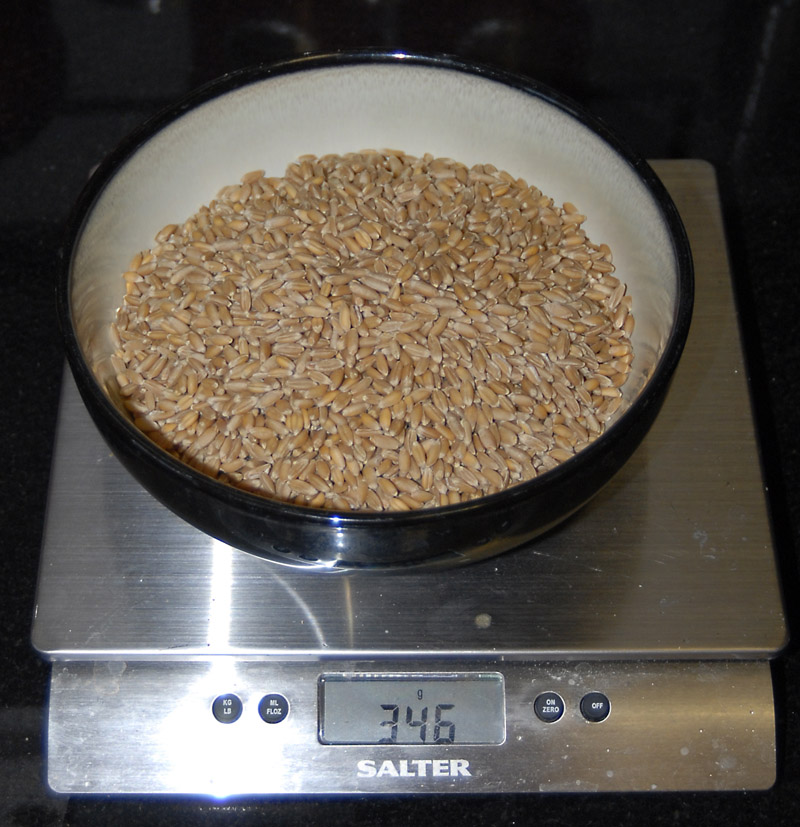
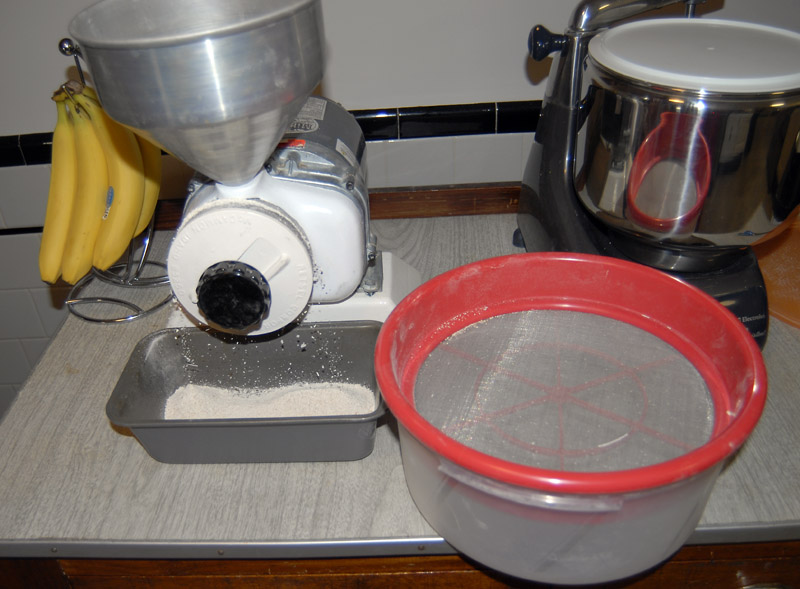
I had durum flour on hand, and got some of Bob's Mill's spelt. This is the first time I've milled it. The recipe calls for both sifted and whole spelt flour. For the sifted, I used a #30 mining seive. I don't know if the spelt grinds differently, or if I just had the stones set further apart than normal, but instead of the 15% extraction I get with wheat, I got right at 20% extraction with the spelt.


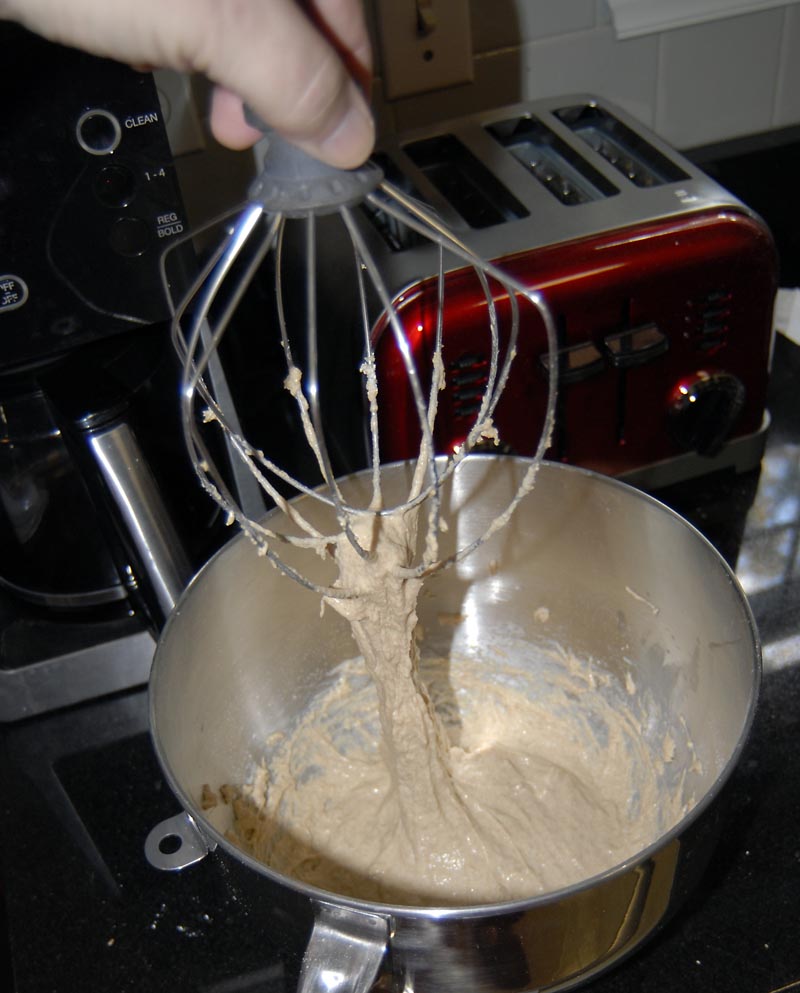
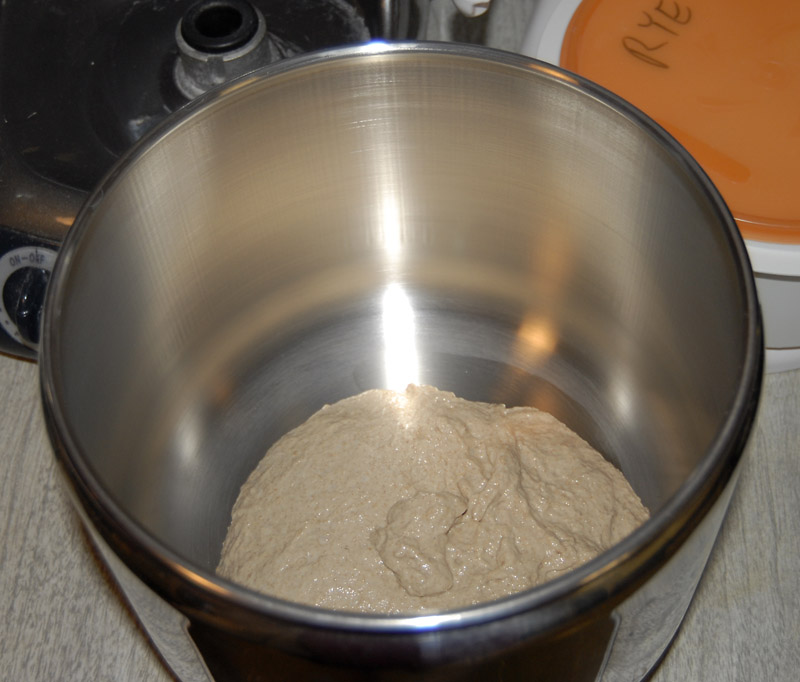
The bread uses a poolish, and calls for it to be "whipped." When I think whip, I think Kitchenaid (well, I actually think Catwoman, but that's a whole 'nuther thing). I used the KA wire whisk to beat the hell out of the 100% hydration starter. When it was done, it was like pancake batter. I poured it into a small bucket to sit overnight.


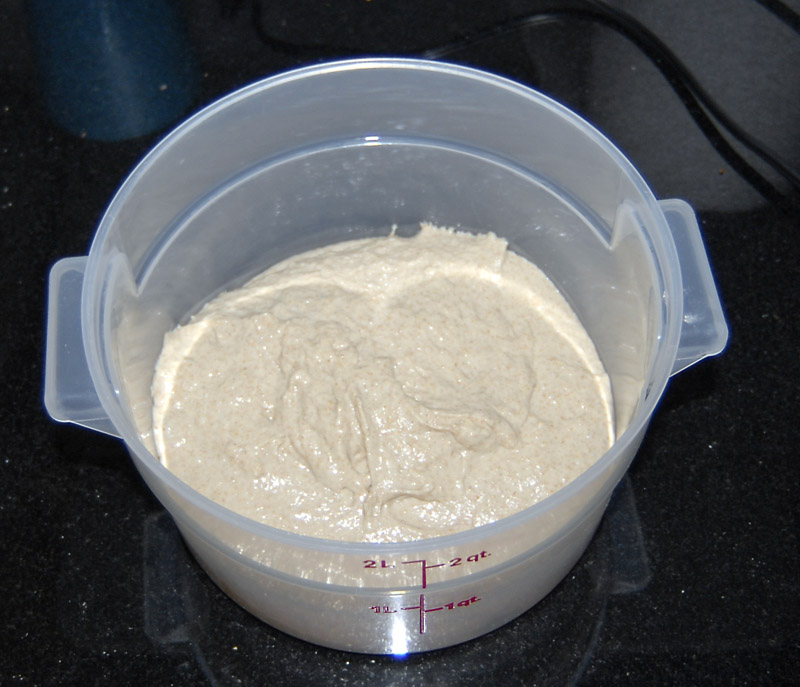
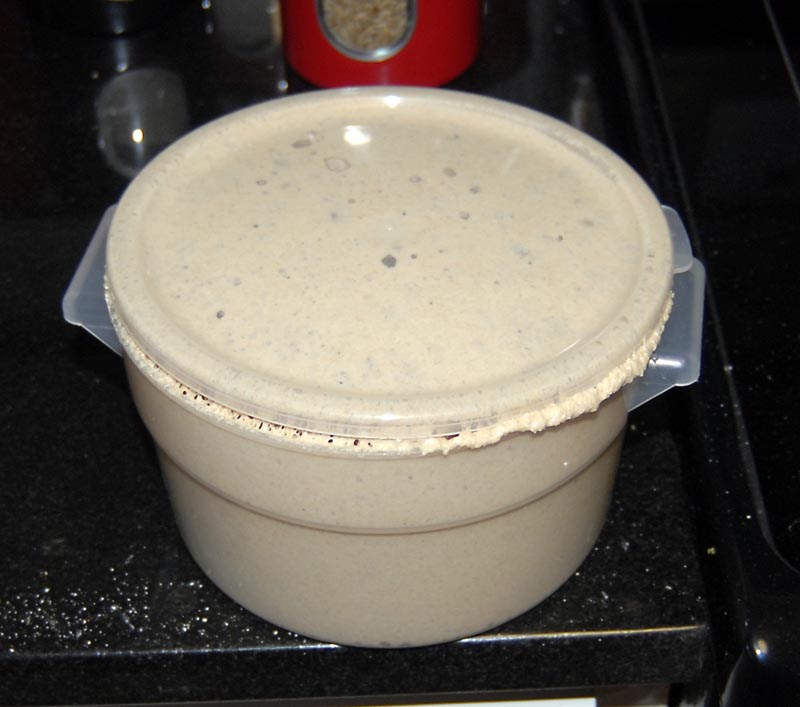
Fortunately, about 6 hours later, before going to bed, I happened to glance at it to see how things were going... Good thing I did, the top was swollen up and it was about to explode. After enduring the Great Homebrew Cherry Stout Kitchen Explosion of 1997 (a debacle that sent fermenting stout spraying across the ceiling, blinds, and cabinets -- stout that we still found traces of 5 years later when we moved out), which nearly led to murder and/or divorce, I was happy to catch this one before it decorated our new kitchen. I dumped it into the DLX bowl, covered it with a damp cloth, and went to bed.


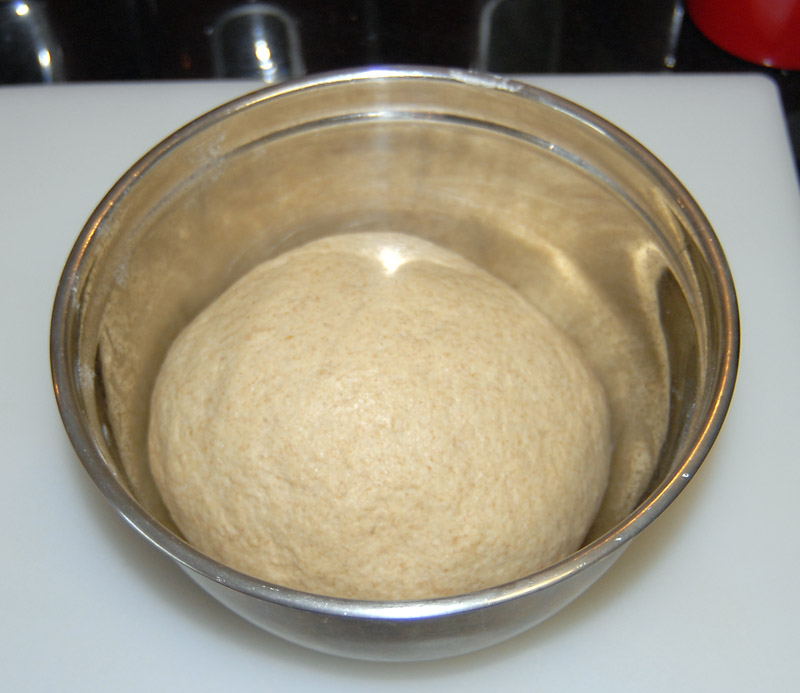
The next morning, it was nice and bubbly. I added the rest of the water and the dry ingredients and began to mix the final dough. As you can see, it was very dry at the end, and I added just enough water with a spray bottle to get it to come together. First takeaway from this batch is that I need to add more water, as you'll see later.

As per instructions, I proofed for an hour, did a stretch and fold, and proofed for another hour. The dough felt pliant, but a little dry, and was prone to the type of small surface tears I get when I do a whole grain challah.


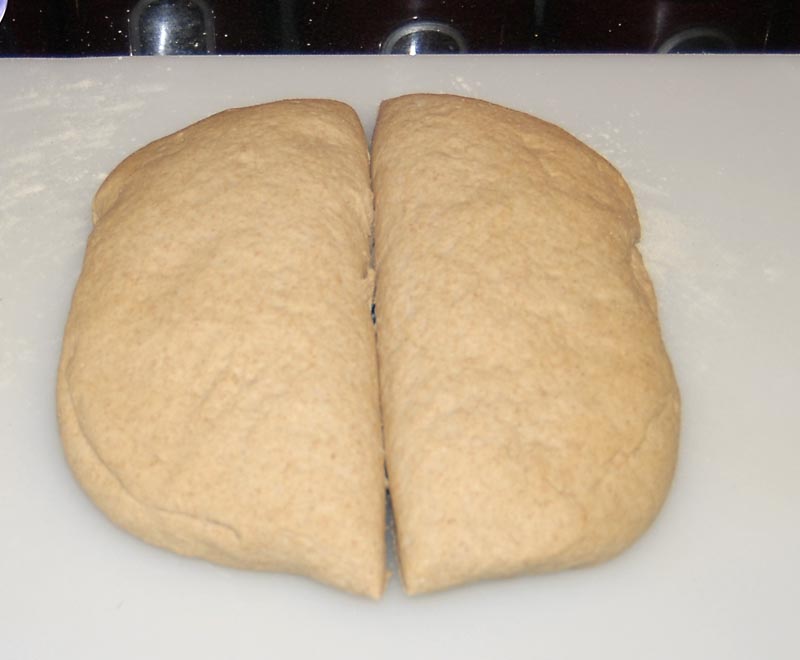
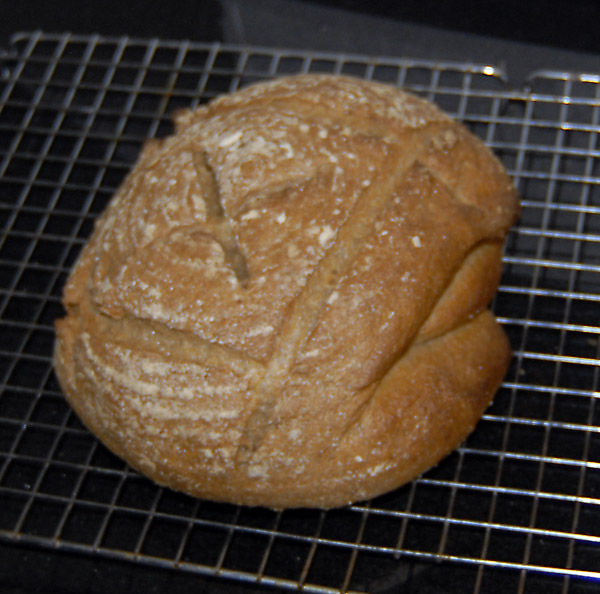
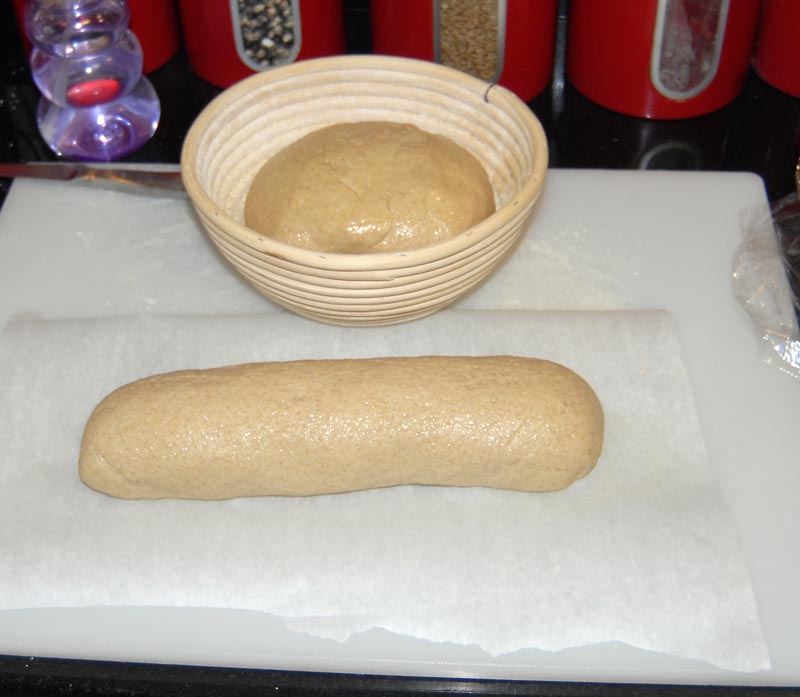
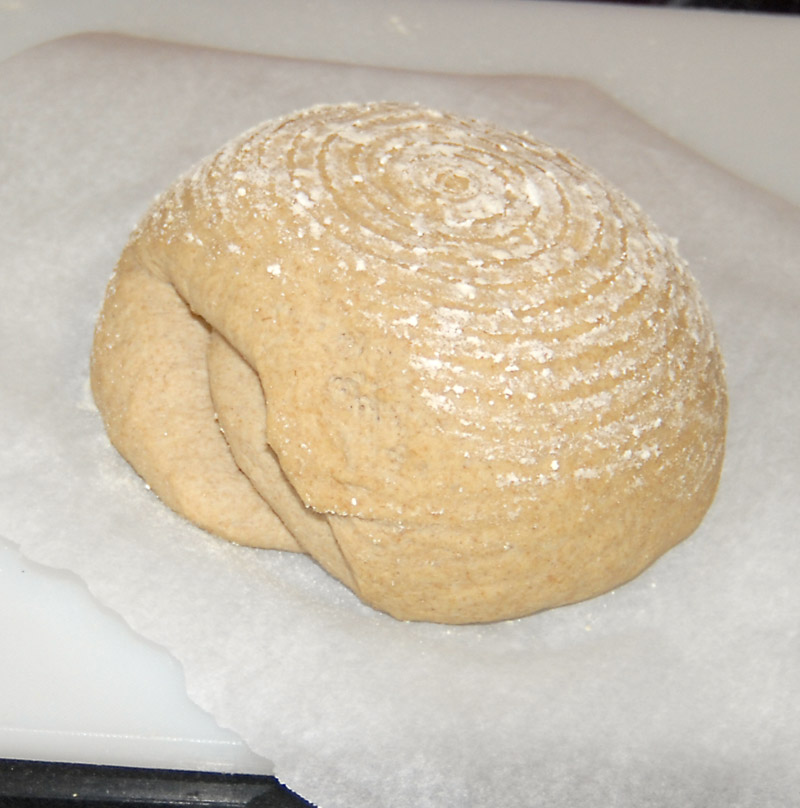
Finally it was time to shape. I had a really hard time getting the bottom of the bread to seal -- it just didn't want to form a homogenous mass. With the long loaf, I put the seams on the bottom and hoped for the best (and it ended up working. For the round loaf, the seams went up, which didn't work too well.

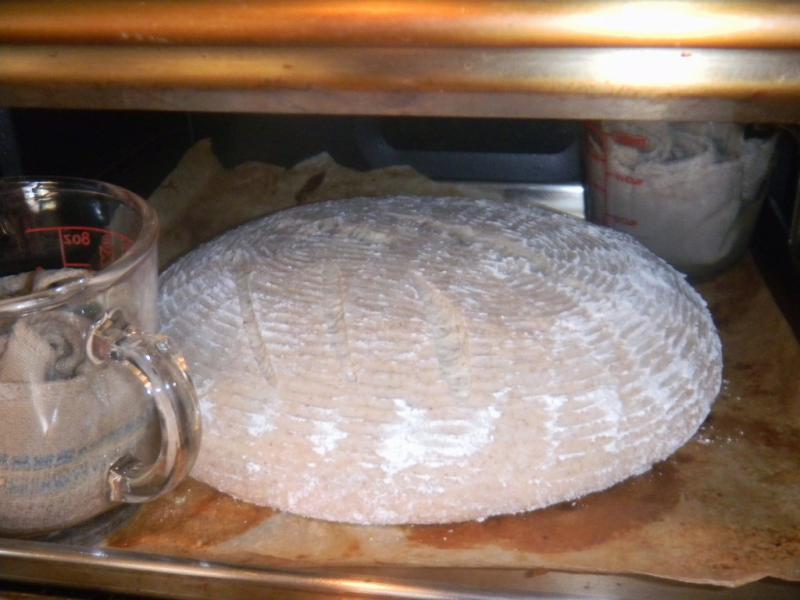
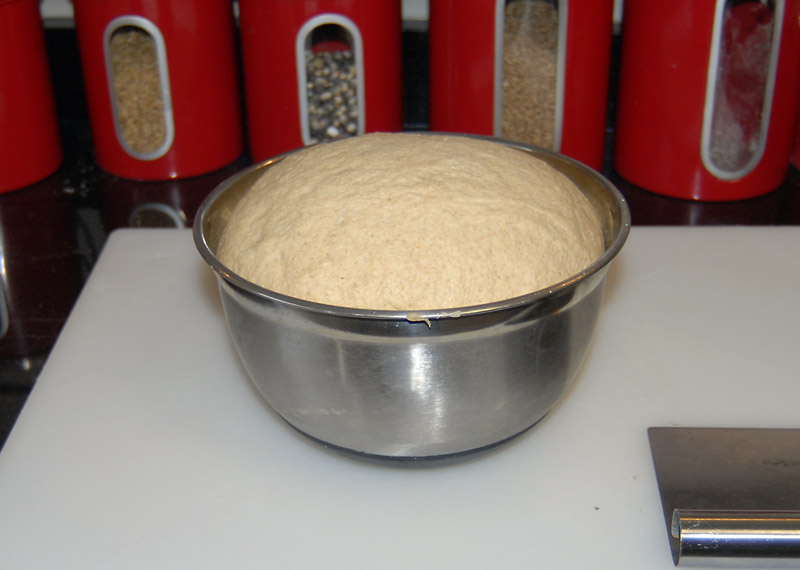
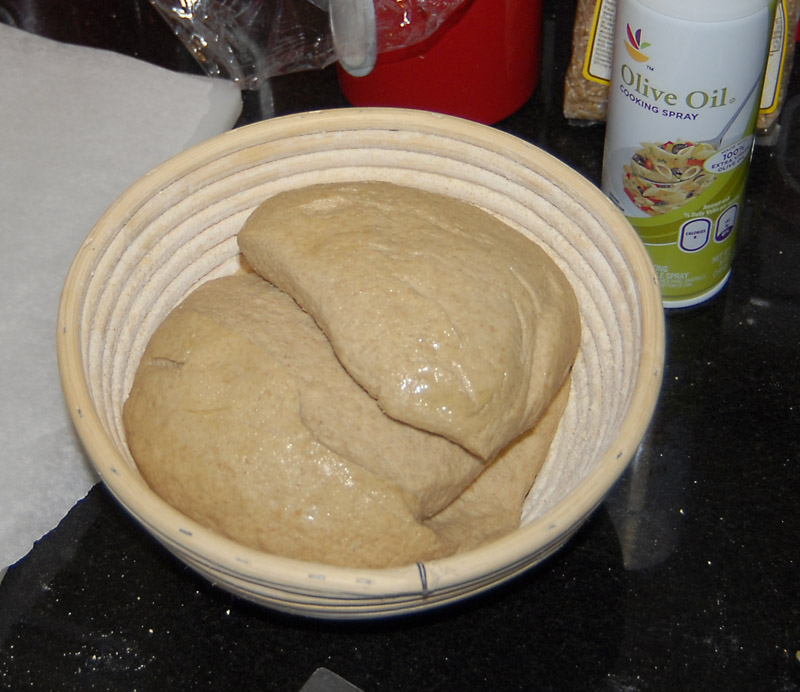
When I lifted the cloth in the proofer, I was greeted with this:

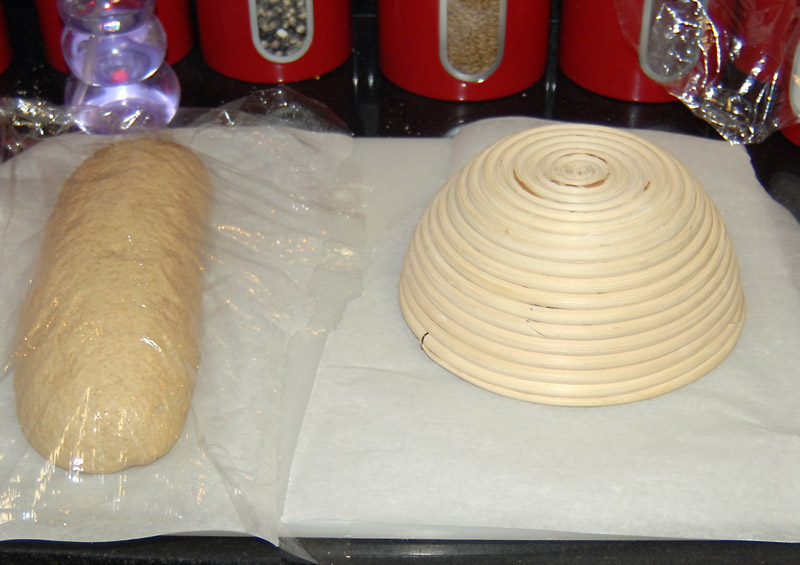
I decided to try and use its own weight to work it together (which worked with the long loaf), and inverted it on the board to finish rising.

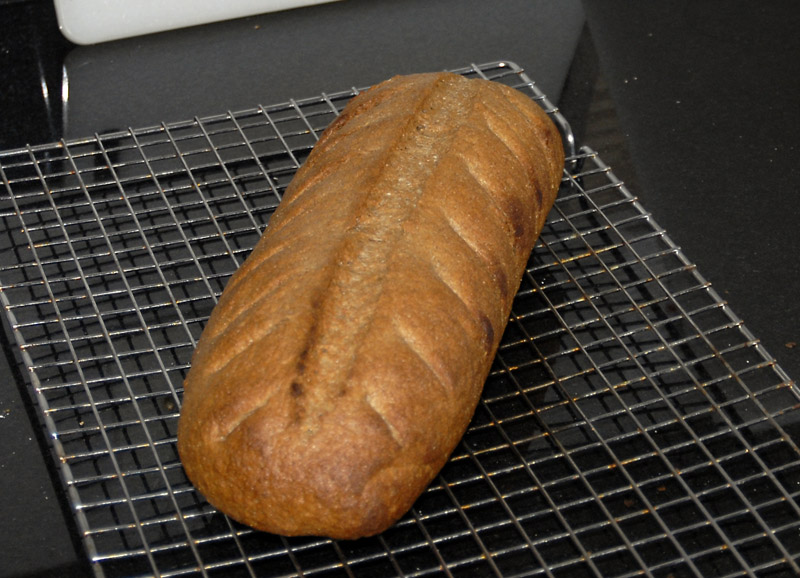
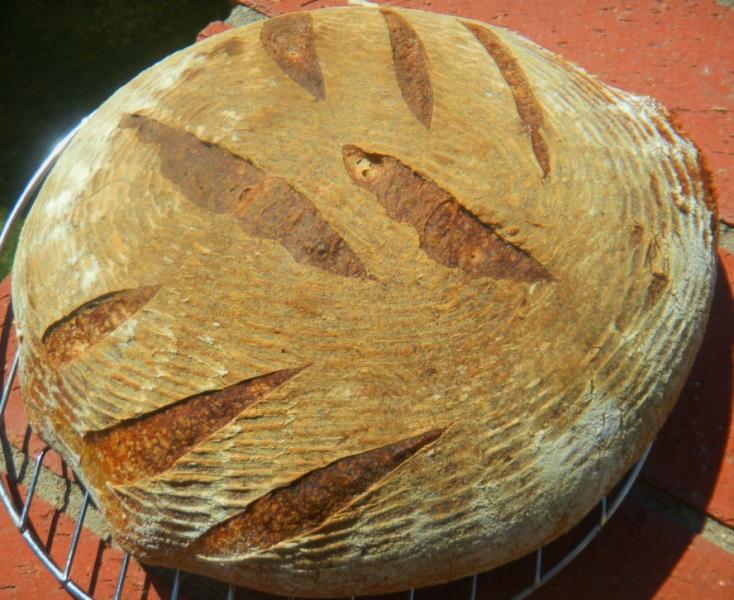
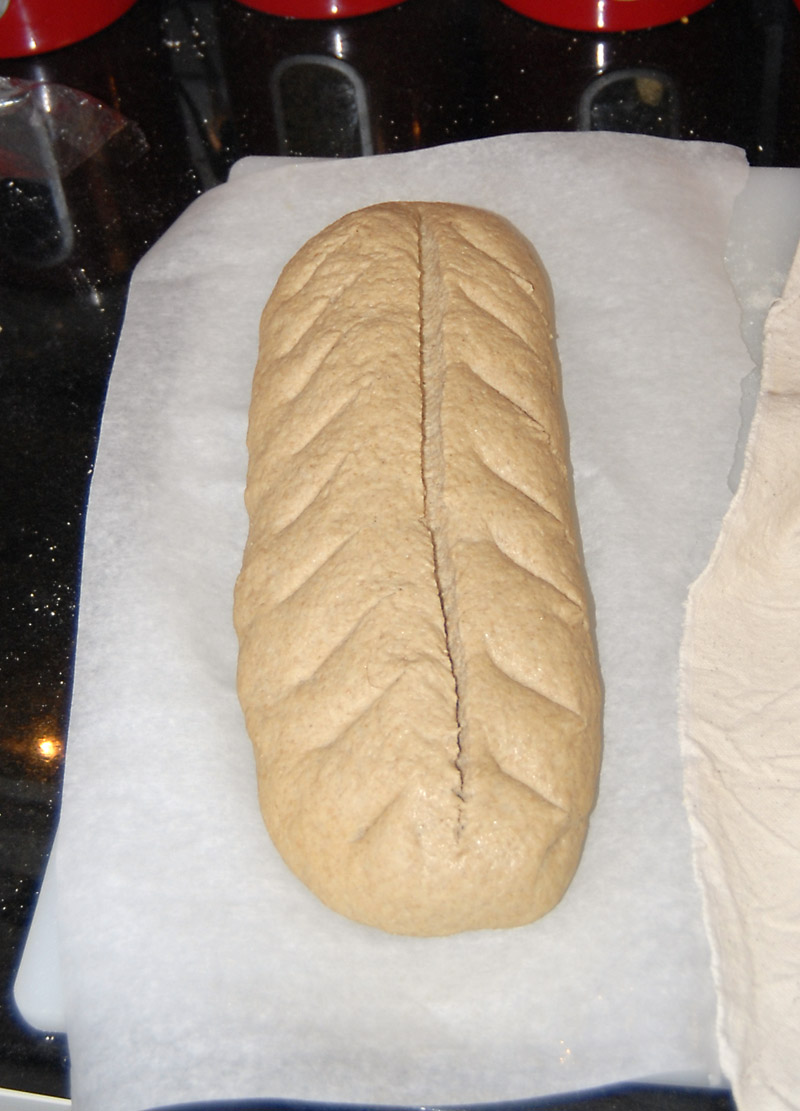
The long loaf did well. I scored it and stuck it in the oven.

I let the other loaf continue to rise for the 25 minutes of cooking, but still had this to deal with:

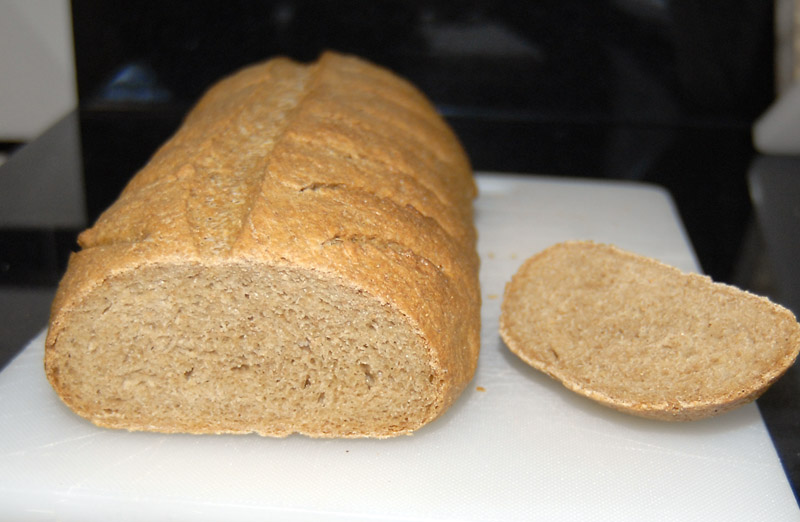
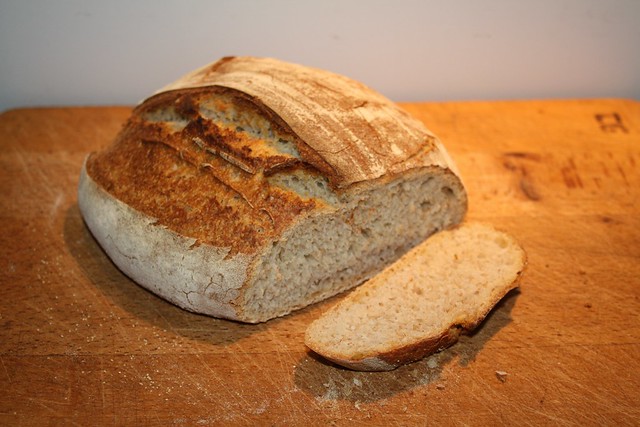
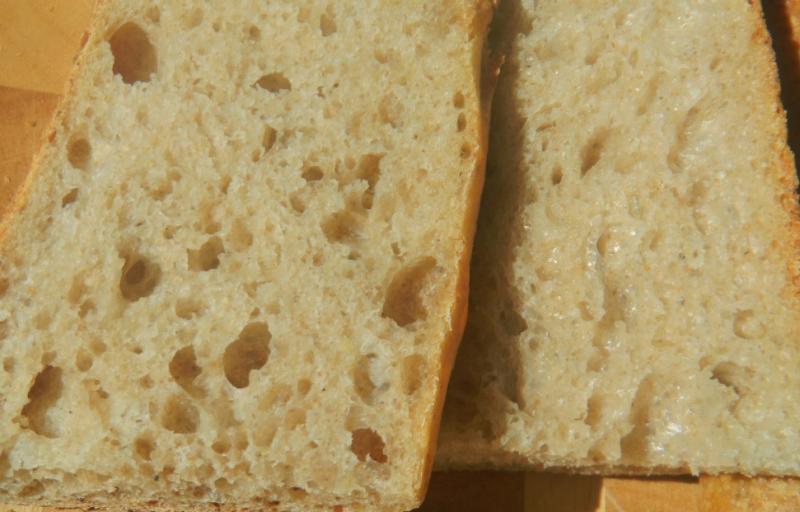
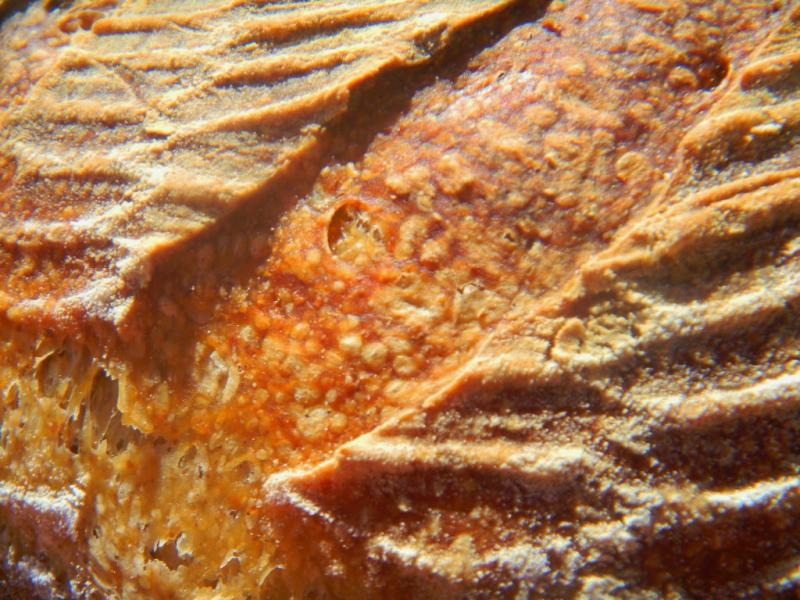
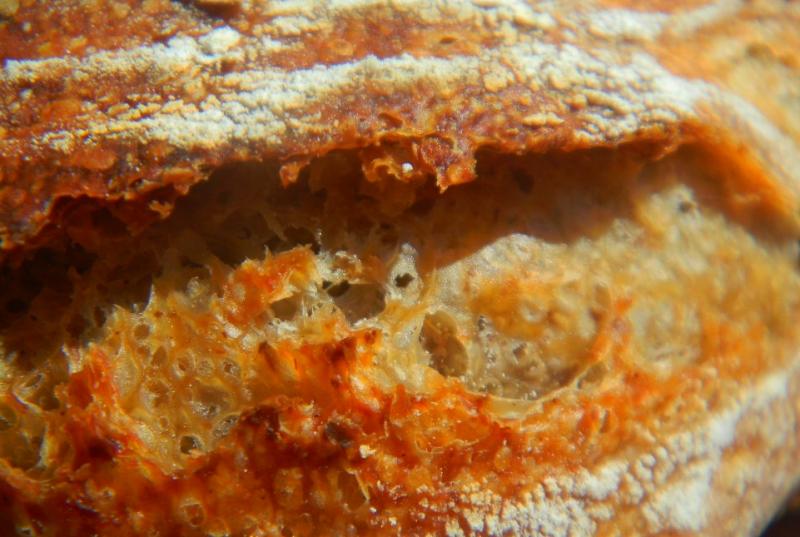
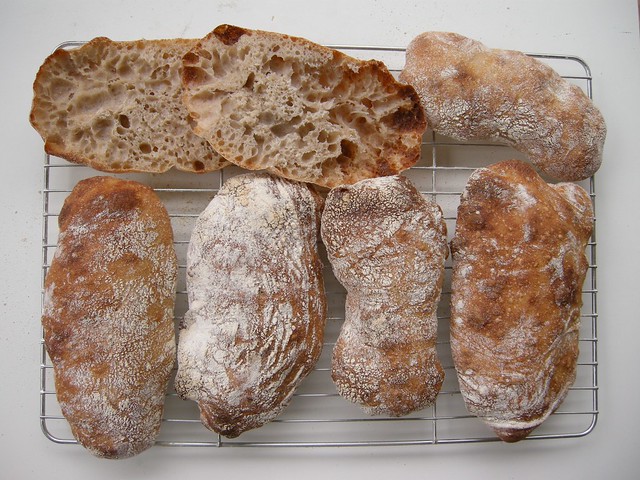
Here are the final results. One good, one not so good. Fortunately, the taste is fantastic -- I'm just not entering the second loaf in the county fair :). The bread almost tastes like it has cornmeal in it to me, and doesn't need any butter at all. I'm going to try this again in a couple of weeks, but this time make a spelt sourdough starter to use instead of the poolish, and then spike it with yeast in the final dough. I'll also add more water...


Anomalous's picture
Anomalous

I've experimented a lot with sourdoughs but this is my first 100% spelt effort. I used 60g wholemeal stoneground rye starter from the fridge to make a levain with 80g white spelt flour and 80g water and left it at room temperature for about 3 hours until it was nice and bubbly.


Then I added another 220g of white spelt and 60g water, mixed thoroughly and left covered for 15 minutes. Next, I added 5g salt and a good glug of olive oil and mixed thoroughly then put it onto an oiled worktop and did a bit of folding and stretching for about a minute and formed it into a round. I waited 15 minutes and did another minute of folding and stretching and shaping into a round, and repeated the process another couple of times before forming it into a slightly longer shape and putting it into a floured towel with its ends held together by bulldog clips to form a kind of hammock shape. 

After about four hours it seemed to have risen enough so I turned it out into my preheated combo cooker, slashed it and put it into the preheated oven at 230C. I took the lid off after 18 minutes and baked it for a further 20 minutes at the same temperature.

I'm very pleased with the result. The crumb is soft and light and the crust is very crunchy; much more so than with wheat flour. 

The starter was about 120% hydration, so the 60g that I used was probably about 27g rye and 33g water, so I think the overall hydration of the loaf, starter included, is about 64%. Next time I'll try it with a cold final proving in the fridge.


dabrownman's picture
dabrownman


It has been a while since we did our Hemp Bag take on Empress Ying’s 36 hour baguettes.  The last time the hemp seeds made for some pretty dopey baking according to Hanseata.  She is rarely wrong when it comes to seeds and especially  ….eeerrrr…. baking with them.   They were delicious baguettes but lacked full depth of flavor and tasty character of a bread that has at least 15% whole grains in it.


Luckily EY (Empress Ying) has already set the standard for multi-grain baguettes here like she has for 36 hour baguettes galaxy wide here:  They are terrific!


http://www.thefreshloaf.com/node/21809/36-hours-sourdough-baguette-increased-whole-grain-how-much-too-much#comment-230831

 Of course I didn't find her perfect post until after my bake was done so all of the good things I learned from it were not used :-)  Her experiment starts at 20% whole grain and moves up to 40% and she increases her hydration as the whole grain rise with 80% hydro for her 20% whole grain version.


I kept my hydration at 75% for this 16% version but would have used 78% had I thought properly even without her post.  I know it sounds like a lot to expect from a doofus like me but my apprentice has been testy of late and asleep at the oven much of the time.


My whole grains were different than txfarmer’s too.  We used spelt, rye and whole wheat.  Our 36 hours was different than hers too and wasn't even 36 hours either.   We just can’t seem to stick to any kind of schedule since we retired.  Instead of a 12 hour autolyse, we did a 6 hour room temperature one with the salt.


After the mix of levain and autolyse came together, we did 8 minutes of French slap and folds because my apprentice loves the sound of the dough smacking the marble - makes her go insane and start barking very loudly until things quiet down.  After a 15 minute rest we continued on with (3) S&F’s every 30 minutes for the next hour and a half.   We allowed the dough to ferment for an hour before we retarded it for 20 hours instead of 24.  We then took it out of the fridge with the intent of baking it but after 1 hour of warm up, pre-shape, final shape (16” long) and into a rice floured basket for final proof, we only let it proof for an hour and then chucked it into a plastic trash can liner and into the fridge for another 14 hours of retard. 


EY said that she thought it could stand some more hours of retard and Ian just gave it 30 so we though a total of 34 hours of retard instead of 24 might be OK if the bread gods were too drunk on godliness to notice. 


After the 2nd retard was done we let the dough, still inside the trash can liner sit on the counter for 3 hours before firing up Old Betsy at 500 F for a 45 minute pre-heat with 2 of Sylvia’s steaming bread pans on the bottom rack with the stone on the rack above.

The baguettes were upturned onto the parchment lined peel, poorly slashed 4 times each, this type of massacre should be illegal by the way,  and slid onto the stone with a ½ cup of water thrown into the bottom of the oven as we closed to door to make sure the steam was maximized. We immediately turned the oven down to 450 F and let the bread steam for 10 minutes.


The steam was removed, the oven turned down to 425 F convection this time, and the baguettes were baked for another 15 minutes.  The baguettes were turned 180 degrees every 5 minutes for the last 15 minutes to make sure they baked evenly.


When we test them for temperature they were already at 210 F so we took then out of the oven and put them on the cooling rack.  They were very crispy (and stayed that way), blistered, nicely browned and we could hold them up by the ears – well at least 1 of the 2 we could.  The slashing was still primitive - practice isn't helping much  -  but no giving up is allowed :-)


What surprised us was the crumb was not as open as we wanted and thought we would get after our last baguette bake and the even our last boule bake for that matter.  Well you can’t have everything, every time like Empresses do unless you know what you are doing and do it :-)  Maybe starting off with 8 minutes of French Slap and folds was not the right thing to do. 

Do you think it would help if we followed txfarmer’s directions exactly?  Possibly!  Well, tell that to my apprentice!These baguettes do taste great, much better than plain white ones or even ones with hemp seeds in them with our taste buds.  Can’t wait to have some bruschetta tonight.

16% Whole Multi-grain Baguettes


 Starter

Build 1

%

Rye Sour Starter

15

3.75%

Rye

10

2.50%

WW

10

2.50%

AP

50

12.50%

Spelt

10

2.50%

Water

80

20.00%

Total Starter

175

43.75%


Total Starter


Hydration

100.00%


Levain % of Total

20.40%


Dough Flour


%

AP

360

90.00%

Whole Spelt

13

3.25%

Dark Rye

14

3.50%

Whole Wheat

13

3.25%

Dough Flour

400

100.00%


Salt

8

2.00%

Water

275

68.75%

Dough Hydration

68.75%


Total Flour

487.5


Water

362.5


T. Dough Hydration

74.36%


Whole Grain %

15.90%


Total Weight

858


Isand66's picture
Isand66

I just received my delivery from KAF and I wanted to use some of the new flours and ingredients I purchased.  I decided to make a multi-flour bread using white spelt, whole spelt, rye chops (chopped up rye berries) and some black cocoa. The black cocoa is the darkest version you can buy and really turned the dough a beautiful chocolate color.  The final dough was a nice dark color with a chewy crumb that was also just light enough to be perfect.

You don't really taste the cocoa very much but with the  addition of the rye chops and the 2 different spelt flours I was very happy with how the crumb and crust came out.

I used my standard 65% AP starter for this recipe.

Directions

AP Starter

227 grams AP Flour

71 grams AP Seed Starter

151 grams Water at Room Temperature (80-90 degrees F.)

Mix ingredients in a bowl until thoroughly combined.  Cover the bowl and let it sit at room temperature for around 8 hours.  The starter should almost double when ready to proceed.  You can either mix in final dough or put in refrigerator for at most 1 day before using.  If your kitchen is warmer than mine which is usually about 70-72 degrees with my air-conditioning you can proceed sooner.

Main Dough Ingredients

425 grams Refreshed AP Starter (65% hydration) from above

110 grams White Spelt Flour (KAF )

110 grams Whole Spelt Flour (KAF)

300 grams European Style Flour (KAF, you can substitute bread flour with a little whole wheat mixed in)

50 grams Potato Flour (KAF)

70 grams Rye Chops (KAF)

15 grams Dark Cocoa (KAF)

25 grams Olive Oil

16 grams Sea Salt or Table Salt

400 grams Water  (Room temperature)

797 grams Total Flour

551 grams Total Liquid

69% Hydration

Procedure

Mix the flours, dark cocoa and rye chops with the water (leave out about 50 grams for later) in your mixer or by hand for 1 minute. Let it rest covered in your bowl for 20 minutes.   Next cut the starter into small pieces and put in bowl and also add oil, salt and the rest of the water.  Mix for 5 minute to incorporate all the ingredients. I mixed on speed #1 for 3 minutes and speed #2 for 2 minutes.   The dough should have come together in a ball and be tacky but not too sticky.

Next take the dough out of the bowl and place it on your work surface or as in this case place it in an oiled bowl or container.  Do a stretch and fold and rest the dough uncovered for 10 minutes.  After the rest do another stretch and fold and cover the dough and let it rest for 10 minutes.  Do one more stretch and fold and put the dough into a lightly oiled bowl and let it sit at room temperature covered for 2 hours (if it is already in a bowl just make sure to cover it).   After 2 hours you can put the dough into the refrigerator for 24 hours or up to 2 days before baking.  Feel free to do some additional S & F's if you feel it is necessary.  I baked the bread about 24 hours later.

The next day (or when ready to bake) let the dough sit out at room temperature for 2  hours.

Next, form the dough into your desired shape and put them in floured bannetons, bowls or on a baking sheet and let them rise covered for 2 hours or until they pass the poke test.  Just make sure to not let them over-rise.

Score the loaves as desired and prepare your oven for baking with steam.

Set your oven for 500 degrees F. at least 30 minutes before ready to bake.  When ready to bake place the loaves into your on  your oven stone with steam and lower the temperature immediately to 450 degrees.    When both loaves are golden brown and reached an internal temperature of 200 degrees F. you can remove them from the oven.

Let the loaves cool down for at least an 6 hours or so before eating as desired.

Feel free to visit my other blog at www.mookielovesbread.wordpress.com for all of my recipes.

Justkneadit's picture

Monstrous Bloom Again...Need help

September 20, 2012 - 5:08pm -- Justkneadit

Well, I did it again. Crazy bloom that has me scratching my head. I will list the process I used to make this Lavender Hazelnut Sourdough Boule, but could this bloom be a product of my stater being young..(12 days)? I will say the taste turned out much better than I anticipated. The hazelnut gave a smooth nutty flavor and the lavender didn't creep in until close to swallowing (well it did reach the nose first). Neither ingredient was overpowering, which was pleasing. Would be fitting to slather with honey!

dabrownman's picture
dabrownman

Typo after typo,  My left fnger doesn't know what my right finger is doing.  This is way worse than dyslexia, which I had but sold to Lebanese rug trader and a lot more painful too.

With plenty of rye, WW and semolina bread in the freezer we baked off another as close to white bread as we ever make for the bread winners daily lunches.   My wife prefers Oroweat whole wheat bread but we are slowly winning her over to SD bread in the 25%-35 % whole grain range.


This one was 25% home ground whole grain bread with spelt, rye and WW ground from berries.   The remainder of the flours used for the bread were grocery bought bread flour and AP milled by KAF.


The bread baked up nicely browned with small to medium blisters.  The crust came out crisp but went soft and chewy as it cooled.  The bloom and spring were OK but nothing special.   The crumb was moderately open, soft, chewy and slightly glossy.  This bread had a bolder SD tang right after being cooled and we assume it will get better tomorrow. 


If you like David Snyder’s Pugliesi Capriosso and San Joaquin or Pierre Nury’s Rustic Light Rye you will like this bread.  For a nearly white bread it sure is tasty.  Just delicious.


The formula follows the pictures.

Method

The levain starter was equal amounts of rye sour, desem and spelt (a new one that we will soon convert to Kamut) and built up over (2) 3 hour and (1) 2 hour build.

The levain was refrigerated overnight after nit had doubled along with the autolysed flours which included the entire formula less the levain.  There were no sprouts, scald, soaker or add ins with the exception of the red and white home made malts, some ground flax seed and a tiny bit of honey.

The next day the autolyse and the levain were removed from the fridge and sat on the counter for 1 hour to warm.  The two were combined in the KA mixing bowl and kneaded with the dough hook for 8 minutes on KA2.  The dough pulled away from the sides at the 7 minute mark.  It came together easily for the 75% hydration dough.

It was rested in an oiled plastic tub, sized for a 836 g loaf, for 20 minutes before (4) sets of S& F’s were performed all in the tub.  The first set was 25 stretches with a ¼ turn each time.  The next set was 5 stretches less all the way down to the last one of 10 for a total of 70 stretches.

After the last S&F the dough was rested for 60 minutes before being pre-shaped and then shaped into a boule and placed into a rice floured basket seam side up.  The basket was sized to allow the dough to double when it reached the top.

Sandwixh on the left made with last bakes Semolina Bread - good but not great like this bake.

The boule was them placed into a plastic trash can liner, the end closed with a rubber band.  The tented and basketed boule was placed in the refrigerator for a 12 hour retard.

Makes a great grilled hot dog bun! cantaloupe, cherries, black grapes, chips and pico de gillo. 1/2 ea plum and peach, 3 kinds of pickles and some Mexican beans - a typical but still a nice lunch to feature this  fine bread.

After 12 hours the mini oven was preheated to 500 F and (2) of Sylvia’s steaming cups with dish rage rolled up were micro waved until boiling.  The dough was covered with parchment and then the bottom of the mini’s supplied broiler pan.  The whole stack was overturned and the basket removed.

It was quickly slashed ¼” deep with a single sided razor blade, the steaming cups placed in the corner and the whole apparatus loaded into the mini oven’s bottom rack for 15 minutes of steam as the oven was turned down to 450 F.   When the steaming cups were removed at the 15 minute mark the oven was turned down to 400 F convection this time.

The boule was rotated every 5 minutes for the next 20 minutes when the boule was tested for temperature.   It was at 208 F and deemed done.   The mini oven was turned off and the bread allowed to sit in it with the door ajar for another 10 minutes to further crisp the skin.  It was then removed to a cooking rack.


Multi grain SD Starter - 25% Whole Grain Sourdough Boule     
      
Mixed StarterBuild 1Build 2 Build 3Total%
Multi-grain SD Starter **4500459.54%
AP025255014.12%
Dark Rye1500154.24%
WW1500154.24%
Spelt1500154.24%
Water452507019.77%
Total Starter135502521059.32%
** 15 g each Rye Sour, Desem & Spelt SD Starters   
      
Starter     
Hydration78.72%    
Levain % of Total25.12%    
      
Dough Flour      %   
Non - Diastatic Red  Malt20.56%   
Wheat Germ102.82%   
Dark Rye102.82%   
Spelt 102.82%   
Ground Flax Seed102.82%   
WW102.82%   
AP20056.50%   
Diastatic White Malt20.56%   
Bread Flour10028.25%   
Dough Flour354100.00%   
      
Salt71.98%   
Water 26073.45%   
Dough Hydration73.45%    
      
Total Flour471.5    
Water352.5    
T. Dough Hydration74.76%    
Whole Grain %25.77%    
      
Hydration w/ Adds75.29%    
Total Weight836    
      
Honey51.41%   


voyager_663rd's picture

Watery (like batter) Spelt dough

August 31, 2012 - 9:37am -- voyager_663rd
Forums: 

I've been trying to find a spelt recipe that prior to baking, the dough looks like dough and not glutinous batter.

I found this one (amts are halved from original recipe):

6 C spelt flour

3 C water

1/3 C oil

1/3 C honey

1T Saf yeast

1T salt

Using Universal plus mixer, after having added all those ingredients, I still had to add another cup and a half of white flour (no more ground spelt at that point) and it was still like very glutinous batter.  I used a ladle and spatula to get it into the loaf pans.


Isand66's picture
Isand66

My wife fried up some fresh plantains as a nice accompaniment to dinner the other night.  Since she made too many I figured I would try adding some to my next bread.  In retrospect I think it would have been better to boil some plantains instead of using fried ones but overall the bread turned out pretty good.  I can say that the plantains are certainly not overpowering and add a nice flavor and texture to the final bread.

I used my standard stock AP starter and added some Durum, Oat, First Clear, Spelt and White Whole Wheat flours to the mix along with some olive oil.  The overall hydration of this dough is 68%.

Starter

71 grams Seed (Mine is 65% AP Flour Starter)

227 grams AP Flour

151 grams Water (85 - 90 degrees F.)

Mix seed with water to break up for a few seconds and then mix in flour until the starter forms a smooth dough consistency.  Put it in a lightly oiled bowl and loosely cover and leave at room temperature for at least 10 hours.  The starter should double in volume.  Put the starter in the refrigerator for up to 1-2 days or use it immediately.

Main Dough

Ingredients

425 grams Starter from above

180 grams Bread Flour (KAF)

100 grams Durum Flour (make sure not to use Fancy Semolina as it is too gritty)

100 grams Oat Flour (KAF)

150 grams First Clear (This is used in Rye breads but I like the crumb this helps make in other breads as well)

75 grams Spelt Flour (Bob's Red Mill)

50 grams White Whole Wheat (KAF)

195 grams Plantains (Fried, or boiled and mashed)

395 grams Water (85 - 90 degrees F.)

16 grams Sea Salt (or table salt)

10 grams Olive Oil

Procedure

Mix the flours  with all the water except for 50 grams for 1 minute.  Let the dough rest covered for 15 minutes to 1 hour which will allow the flour to absorb the water.    Next add the salt, starter, oil and mashed plantains.  Mix on low for 1 minute and then add the remainder of your water unless you feel the dough is already too hydrated.  Mix on low-speed or by hand for 4 minutes.  Remove the dough from your mixing bowl to your work surface.  The dough will be very sticky so you may want to use a bench scraper to help you do 4-5 stretch and folds.  Leave the dough uncovered for 10 minutes on your work surface or put it in a slightly oiled bows.  After 10 minutes either on your work surface or in your bowl do another stretch and fold, cover the dough and let it rest for 10 minutes.  Repeat this S & F procedure one more time and let it rest another 10 minutes.  Do one last S & F  and put the dough in a lightly oiled bowl for 2 hours.  If you don't feel the dough has developed enough feel free to do some additional stretch and folds while the dough is in the bowl and then put it in the fridge overnight.

The next day when I returned from work I removed the dough from the refrigerator and  I let the dough sit out at room temperature for 1.5 hours.  I then formed it into loaves and put them in floured bannetons and let them rise covered for 2 hours.

Score the loaves as desired and prepare your oven for baking with steam.

I then baked on my oven stone with steam at 450 degrees until both loaves were golden brown and reached an internal temperature of 205 - 210 degrees F.  I left them in the oven for 15 minutes with the heat turned off and the door open a crack to get the crust a little harder.

This bread has been submitted to Yeast Spotting here at http://www.wildyeastblog.com/

jarkkolaine's picture
jarkkolaine

After making my first yeast water bread, I discarded most of the yeast water, leaving about two table spoons, added a big handful of raisins and a table spoon of honey, and then filled the jar about two thirds with water. I’m not sure if this is how it’s usually done, but it worked very well: In a couple of days, the mixture had developed a very fruity and inviting smell with lots of bubbles.

I wanted to drink the liquid but resisted and started a new bread dough instead.

Following the lead of Ian and others, this time it was time to mix in some of my sourdough starter to play with the taste a bit. I was hoping to make a boule quite similar to the one I had made the first time (and usually love to make), but because of some mistakes in calculating the proportions of water and flour (I forgot to account for the water in the starter!), ended up with Ciabatta—which was actually good, as we were just about to leave on a two day trip to Tallinn, and Ciabatta makes delicious picnic sandwiches…

Anyhow, here’s the recipe. 

First build of YW starter: (evening)

  • 60 g Yeast water
  • 60 g White flour

Second build of YW starter: (about 8-10 hours after previous step, I forgot to time everything properly…)

  • All of the starter from previous step
  • 200 g Yeast water
  • 200 g White flour

Final dough: (About 4 hours later, in the afternoon)

  • 400 g YW starter (which at this point looked a lot like a regular poolish starter)
  • 100 g Sourdough starter (100% hydration, refreshed the night before)
  • 750 g Fine, rather white spelt flour
  • 700 g Water
  • 20 g Salt

The dough was quite wet, so I gave it an autolyse (it was only about 15 minutes, as I was itching to get my hands in the dough) and worked it for 20 minutes on the table.

After that, the dough rested for 4 stretch and folds at 30 minute intervals. Then I cut pieces of the dough and let them rest on a heavily floured couche for about an hour or so as the oven heated up. I baked the breads on a baking stone for 35 minutes.

...And here’s what came out from the oven:

I am very happy with the resulting flavor:  I can’t say I taste any of the fruit anymore, but it’s a little sweet, not really sour at all. And the boys liked it (filled with some salami, cheese, boiled eggs and cucumber):

Let’s see what happens next time, as the yeast is now feasting on some fresh fruit… (And looks and smells more and more like a drink! I might have to start making cider or something, soon ;))

breaducation's picture
breaducation

In my last post, I experimented with spelt flour in a country bread. The flavor was very appealing with slight nutty undertones and the bread came out great! However, I'm never satisfied with my last bread and always want to push into new areas. So I decided to increase the spelt in the formula from 10% to 20%.

I didn't stop there however, as at the last second I decided to add in polenta. I've tried using polenta in bread before and liked the result. There are a few steps to take when adding polenta or any grain for that matter into a bread.

Soft grains and seeds need to be soaked in water first so that they don't steal water from the dough and change the dough composition. With a hard grain like polenta you may need to go a step further and either use a boiling water soaker or just cook the grain beforehand. I elected to cook the polenta as I didn't have time to let it soak in hot water for 2+ hours. Once the polenta was cooled off I simply hand mixed it into my dough.

The loaf was dusted with cornmeal to hint at the polenta on the inside.

But that is not all! Like I said, I had put polenta in bread before and liked it but this time I really wanted to try something new. I decided to consult The Flavor Bible which is one of my absolute favorite books for cooking and baking. It is essentially a list of just about every ingredient you can think of and then under each ingredient is another list of all the other things that pair well with that ingredient. I simply looked up polenta and found a number of options that would go great with it. I decided on roasted garlic.


The still-warm crumb.

If you've never added roasted garlic to your bread I highly recommend it! Think garlic bread except the garlic is built into the bread instead of spread on top. It created a wonderful aroma throughout the apartment while baking. How to add roasted garlic to bread you ask? Simply roast the garlic with your preferred method and allow to cool. Then chop up and mix into your dough by hand. I went with four medium to large sized cloves in my 500g. loaf. I think I could have doubled that though and been fine(the garlic flavor I got was mild and subtle).

All in all this loaf was quite delicious and I would definitely bake it again especially if I was making bread for an Italian dinner.

Pages

Subscribe to RSS - spelt