The Fresh Loaf

A Community of Amateur Bakers and Artisan Bread Enthusiasts.

sourdough rye bread

dmsnyder's picture
dmsnyder


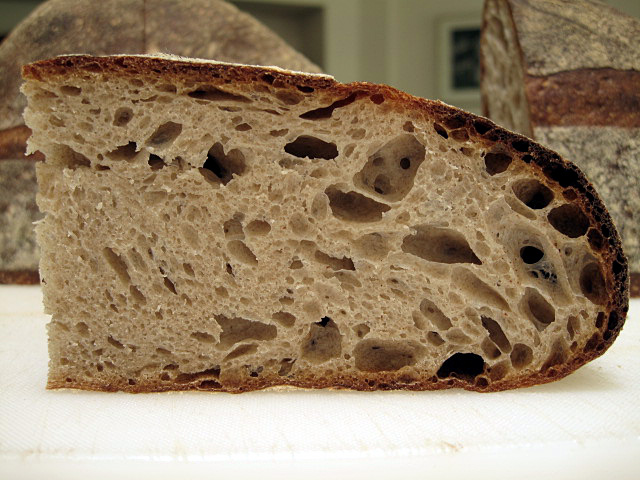
Last week, hansjoakim's blog included a gorgeous rye bread that he referred to as his “favorite 70% rye.” I asked him for his formula, and he generously provided it. I baked “hansjoakim's favorite 70% rye” today.

I grew up eating rye bread, but it was what is commonly called “Jewish Light Rye” or “Jewish Sour Rye.” We just called it “rye bread.” I had no exposure to breads made with whole rye flour or those made with a preponderance of rye flour. I was aware that there were countries where rye breads had a long history and an important place in the culture – Russia, Poland, Germany, Switzerland, Austria, and the Scandinavian countries. But I had no experience with these breads. It was only when I started baking rye bread myself and started reading bread baking books – notably Hamelman's “Bread” and Leader's “Local Breads” - that I began to appreciate the rich diversity of rye breads and the technical differences between making great mostly-wheat flour sourdoughs and great mostly-rye flour breads. I'm also just starting to get a sense of the cultural differences in taste that determine “what is great rye bread” to some one who grew up eating these rye breads.

So, being endlessly curious about culture and values, including the aesthetics of food, how could I not want to see what hansjoakim, a man with quite evident refined aesthetic sensibilities, judged to be his “favorite 70% rye?”

The following formula is that provided by hansjoakim. The procedures are also his but with additional details. Any errors introduced by my extrapolations are, obviously, mine.


Total formula

Amount

Baker's percentage

Medium rye flour

436 gms

70

All purpose flour

187 gms

30

Water

467 gms

75

Salt

11 gms

1.8


Rye sour final build

Amount

Baker's percentage

Medium rye flour

218 gms

100

Water

218 gms

100

Ripe rye sour

11 gms

5


Final dough

Amount

Baker's percentage

Medium rye flour

218 gms

54

All purpose flour

187 gms

46

Water

249 gms

61.5

Salt

11 gms

2.7

Rye sour (all of the above)

447 gms

110

Note: 35% of the total flour is from the rye sour.

Procedures:

  1. The day before baking, mix the final rye sour build. This should ferment at room temperature for 14-16 hours, so figure backwards from when you want to mix the the dough. For example, I wanted to mix the dough at around 2 pm today, so I mixed the final rye sour build at 8 pm yesterday evening. In fact, I started the process two days ago by activating my white rye sour by feeding it, fermenting it 8 hours and refrigerating it for a day.

  2. I used a KitchenAid stand mixer, but these procedures could be done by “hand.” Mix all the ingredients in the final dough in a large bowl. If using a stand mixer, mix for 3 minutes with the paddle at Speed 1. Switch to the dough hook and mix for 2-3 minutes more at Speed 2. The dough at this point is a thick paste with little strength (gluten development providing extensibility and elasticity). Optionally, after mixing, you can knead briefly on a floured board with well-floured hands.

  3. Transfer the dough to an oiled bowl, cover it tightly, and ferment for 1 hour.

  4. Transfer the dough to a floured board and pre-shape it into a single round. Cover with plasti-crap or a damp kitchen towel and rest for 5 minutes.

  5. Shape the dough into a boule and transfer to a well-floured brotform or banneton.

  6. Cover the boule with plasti-crap or a damp towel and proof for two hours. (My loaf was fully proofed in 1 hr and 45 min.)

  7. One hour before baking, pre-heat the oven to 250C/480F with a baking stone and your steaming method of choice in place.

  8. When ready to bake the bread, pre-steam the oven. Then transfer the boule to a peel. Score or dock it. (hansjoakim proofed his boule seam-side down and did not score or dock it, resulting in a lovely chaotic pattern of cracks on the loaf surface. I proofed my boule seam-side up and docked it using a bamboo chop stick.) Transfer the boule to the baking stone. Steam the oven.

  9. After 10 minutes, remove your source of steam from the oven.

  10. After 15 minutes, turn the oven down to 225C/440F.

  11. Bake another 45 minutes. Monitor the loaf color, and, if it is darkening too quickly, turn the oven temperature down further. It would be well within the rye baking tradition to do this planfully in steps, ending up as low as 205C/400F for the last 10-15 minutes.

  12. The loaf is done when the crust feels firm, it gives a “hollow sound” when the bottom is thumped and the internal temperature is 205F or greater.

  13. When the loaf is done, turn off the oven, but leave the loaf in it with the door ajar for an additional 10 minutes.

  14. Transfer the loaf to a cooling rack and cool thoroughly before slicing. It will be best to leave it 24 hours, loosely wrapped in linen, before slicing.

Comments:

I baked this loaf at 460f convection-bake for 15 minutes, then 440F bake for 30 minutes, then 400F bake for 10 minutes. I believe I should have turned down the temperature from 440F sooner.

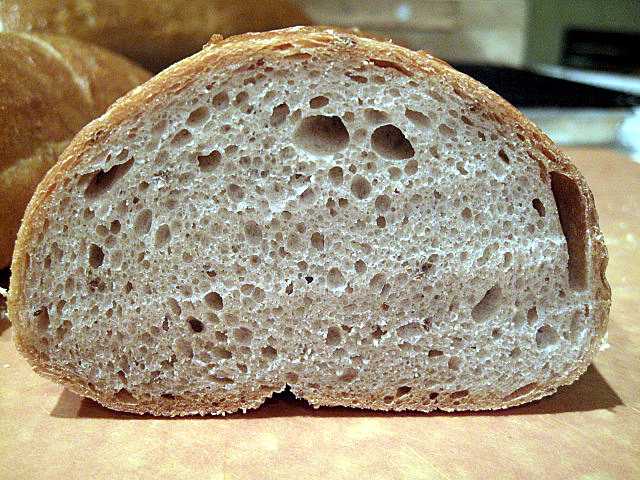
I got less oven spring than hansjoakim. I believe this is due to over-proofing. In hindsight, I should have baked 15-30 minutes sooner. I suspect my kitchen environment was near 80F which accelerated the proofing.

The bread smells lovely while cooling – a characteristic, earthy rye aroma.

The profile of the cut loaf was better than I had expected, although I didn't get the oven spring hansjoakim did.

hansjoakim's Favorite 70% Rye crumb

The crust was substantial and crunchy-chewy. The crumb was tender. This bread is very similar to the Detmolder 70% Rye from Hamelman I made a few weeks ago. It has a very nice hearty rye flavor with a touch of sweetness and a touch of sour when tasted about 20 hours after baking. I expect the flavor to evolve over the next several days.

Because hansjoakim's procedures are so straightforward and the bread is quick to make, I would recommend it to anyone, but especially those wanting to make a high percentage rye bread but not ready to tackle the time and temperature rigors of the Detmolder 3-stage method.

This is a wonderful rye bread! Thanks, hansjoakim!

David


dmsnyder's picture
dmsnyder

This bread is a rye with 66 percent rye flour and the remainder high-gluten flour. A rye sour is elaborated using whole rye. The sour is 80% hydration, which ends up being a very thick paste, due to how much water the whole rye absorbs. This is fermented for 14-16 hours and is then mixed with Medium rye flour, high-gluten flour, more water, salt and instant yeast.

The resulting dough is very loose. Hamelman says to mix it (in a professional spiral mixer) for only 3 minutes at first speed and 2 minutes on second speed. He says you should have "a bit of gluten strength, but ... not much." I aimed for "a bit" of gluten development but had to mix for 16 minutes in my KitchenAid. The dough was extremely sticky and still rough and pasty. It had enough elasticity after fermenting to form into loaves, using more flour dusting on the bench and my hands than is necessary with lower-percentage rye doughs.

Fermentation was only 45 minutes and proofing was 50 minutes. Proofing is tricky with this type of rye. Under-proofing contributes to excessive oven spring and blow-outs. Over-proofing leads to the loaf collapsing when it is scored or when it is loaded into the oven. I think I hit it about right. <whew!>

I wasn't sure about scoring a bread like this. I considered not scoring at all or making rounds and docking them. In the end, I decided to make oval loaves and score one in the "sausage" cut and the other in the "chevron" cut.

Hamelman prescribes a 24 hour rest after baking before slicing. I wrapped the loaves in linen and left them on the counter overnight.

When sliced, this rye has a fairly thick, chewy (but not hard) crust. The crumb is fairly dense and quite moist. It is tender to chew. The aroma is assertively rye, as is the flavor with a mild sourdough tang.

The taste is good when eaten plain. It is strong enough to come through when eaten with a slice of aged gruyère cheese. Just as a light rye seems to call for corned beef, this rye calls for stronger cheeses and fatty fish such as herring or salmon. I wish I could get some smoked sable. 

David

dmsnyder's picture
dmsnyder

After last week's 70% rye bread, which I thoroughly enjoyed, I wanted to return to the first rye I had made – Jewish Sour Rye – to see if my tastes had shifted. I made the Jewish Sour Rye from “Secrets of a Jewish Baker,” by George Greenstein.

This is a classic “deli rye,” or “light rye.” It is made with a white rye sour. Rye snobs (who will remain nameless) turn up their noses at white rye because it has so little rye flavor. In fact, most of the time, I make this bread with whole rye. But, this time I made it “by the book.”

Well, not exactly by the book. Greenstein's book provides volume measurements for all ingredients. It has been criticized for this. Last year, I worked out the ingredient weights for the Sour Rye recipe, and these are provided below.


Ingredients


Rye Sour

750 gms

First Clear Flour

480 gms

Warm Water (80-100F)

240 gms

Sea Salt

12 gms

Instant Yeast

7 gms

Altus (optional but recommended)

½ cup

Caraway Seeds

1 Tablespoon

Cornmeal for dusting the parchment or peel.

Cornstarch glaze for brushing the breads before and after baking.


Method

  1. If you have a white rye sour, build it up to a volume of 4 cups or so the day before mixing the dough. If you do not have a rye sour but do have a wheat-based sourdough starter, you can easily convert it to a white rye starter by feeding it 2-3 times with white rye flour over 2-3 days.

  2. In a large bowl or the bowl of an electric mixer, dissolve the yeast in the water, then add the rye sour and mix thoroughly with your hands, a spoon or, if using a mixer, with the paddle.

  3. Stir the salt into the flour and add this to the bowl and mix well.

  4. Dump the dough onto the lightly floured board and knead until smooth. If using a mixer, switch to the dough hook and knead at Speed 2 until the dough begins to clear the sides of the bowl (8-12 minutes). Add the Caraway Seeds about 1 minute before finished kneading. Even if using a mixer, I transfer the dough to the board and continue kneading for a couple minutes. The dough should be smooth but a bit sticky.

  5. Form the dough into a ball and transfer it to a lightly oiled bowl. Cover the bowl and let it rest for 15-20 minutes.

  6. Transfer the dough back to the board and divide it into two equal pieces.

  7. Form each piece into a pan loaf, free-standing long loaf or boule.

  8. Dust a piece of parchment paper or a baking pan liberally with cornmeal, and transfer the loaves to the parchment, keeping them at least 3 inches apart so they do not join when risen.

  9. Cover the loaves and let them rise until double in size. (About 60 minutes.)

  10. Pre-heat the oven to 375F with a baking stone in place optionally. Prepare your oven steaming method of choice.

  11. Prepare the cornstarch glaze. Whisk 1-1/2 to 2 Tablespoons of cornstarch in ¼ cup of water. Pour this slowly into a sauce pan containing 1 cup of gently boiling water, whisking constantly. Continue cooking and stirring until slightly thickened (a few seconds, only!) and remove the pan from heat. Set it aside.

  12. When the loaves are fully proofed, uncover them. Brush them with the cornstarch glaze. Score them. (3 cuts across the long axis of the loaves would be typical.) Transfer the loaves to the oven, and steam the oven.

  13. After 5 minutes, remove any container with water from the oven and continue baking for 30-40 minutes more.

  14. The loaves are done when the crust is very firm, the internal temperature is at least 205 d

    egrees and the loaves give a “hollow” sound when thumped on the bottom. When they are done, leave them in the oven with the heat turned off and the door cracked open a couple of inches for another 5-10 minutes.


  15. After the loaves are out of the oven, brush them again with the cornstarch solution.


  16. Cool completely before slicing.


Jewish Sour Rye


Jewish Sour Rye crumb


Well, the verdict is: I like rye bread – white rye, dark rye, whatever. Each has it's place. The Jewish Sour Rye I had toasted for breakfast with Salami and Eggs was just right. The 70% Sourdough Rye I had for lunch with slices of Smoked Gouda and Cotswold cheese was perfect.


It's not such a hardship, having to make these choices.


David


Submitted to Yeast Spotting on Susan FNP's  Wild Yeast blog (This week, hosted by Nick at imafoodblog)


dmsnyder's picture
dmsnyder

I haven't baked the Polish Cottage Rye from Daniel Leaders "Local Breads" for a year! In the past, I have used First Clear Flour or another high extraction flour as a substitute for the bread flour called for in Leader's formula. This time, I followed the formula exactly.

The dough was very wet and sticky, even with very good gluten development. I actually enjoyed working with this dough, which must indicate I've reached a new level of comfort with slack doughs. In spite of the slackness, it had enough integrity to take my slashes without any dragging. I think proofing the loaf in a linen-lined banneton resulted in just enough drying of the surface.

The resulting bread was similar in profile to the Polish Cottage Ryes I had made before, but the crumb was much more open and chewy. I attribute this to the flour I used, in large part, but also to the better gluten development.

This is a "sourdough rye." There is no added yeast. It is made with a rye sour. I made my sour from my usual starter by giving it two feedings with whole rye flour. All the rye in the dough is from the rye sour.


Polish Cottage Rye -2-1/2 pound boule

As you can see, this bread has a rather low profile. The slack dough spreads once it is dumped from the banneton onto the peel. It has only moderate oven spring. I should have put a ruler on the cutting board to provide a sense of scale, but this bread is just about 11" across. 

Polish Cottage Rye - Crumb close-up

As with most sourdough rye breads, this one benefits from deferring slicing until at least 12 hours after it has baked. I am so proud of myself! This is the first time I actually had the self-control to leave the bread uncut for 12 hours!

The flavor of this bread is marvelous. It is moderately sour with a complex flavor. The rye flavor is very much "there," but it does not dominate. 

I recommend this bread to any rye-lover who wants to explore beyond "Deli Rye" but isn't quite ready for the 70-100% ryes. Because it has a high percentage of bread flour, the dough acts like a "regular" sourdough, not like the sticky dough of a high-percentage rye. I also recommend it to any sourdough lover. There are so many things to be said about adding some rye flour to a "white" sourdough, the topic deserves it's own entry.  For now, I'll just leave it at, "Try it! You'll like it!"

David

dmsnyder's picture
dmsnyder

Greenstein's Sour Rye

Greenstein's Sour Rye

Greenstein's Sour Rye Crumb

Greenstein's Sour Rye Crumb


Back in May, 2007, there was an extended discussion about Greenstein's book and how come he provided only volume and not any weight measurements for ingredients. For anyone interested in that discussion, the link is: http://www.thefreshloaf.com/node/3042/keep-secrets-jewish-baker-better-secret.

I have made Jewish Sour Rye from Greenstein's recipe many times. It's one of my favorite breads. But, although I always weigh ingredients when the recipe gives weights, I have always made this bread according to the volume measurements in the book – that is, with adjustments to achieve the desired dough characteristics.

Today, I actually weighed the ingredients and can provide them for those who get all upset when they encounter a recipe that instructs them to use, for example, “4 to 5 cups of flour.” By the way, if you make this bread using ingredient weights, and the dough doesn't seem right, I advise you to add a little bit more water or flour accordingly. (Irony intended.)

Ingredients

750 gms Rye Sour

480 gms First Clear Flour

240 gms Warm Water (80-100F)

12 gms Sea Salt

7 gms Instant Yeast

½ cup Altus (optional but recommended)

1 Tablespoon Caraway Seeds

Cornmeal for dusting the parchment or peel.

Cornstarch glaze for brushing the breads before and after baking.

Method

  1. If you have a white rye sour, build it up to a volume of 4 cups or so the day before mixing the dough. If you do not have a rye sour but do have a wheat-based sourdough starter, you can easily convert it to a white rye starter by feeding it 2-3 times with white rye flour over 2-3 days.

  2. In a large bowl or the bowl of an electric mixer, dissolve the yeast in the water, then add the rye sour and mix thoroughly with your hands, a spoon or, if using a mixer, with the paddle.

  3. Stir the salt into the flour and add this to the bowl and mix well.

  4. Dump the dough onto the lightly floured board and knead until smooth. If using a mixer, switch to the dough hook and knead at Speed 2 until the dough begins to clear the sides of the bowl (8-12 minutes). Add the Caraway Seeds about 1 minute before finished kneading. Even if using a mixer, I transfer the dough to the board and continue kneading for a couple minutes. The dough should be smooth but a bit sticky.

  5. Form the dough into a ball and transfer it to a lightly oiled bowl. Cover the bowl and let it rest for 15-20 minutes.

  6. Transfer the dough back to the board and divide it into two equal pieces.

  7. Form each piece into a pan loaf, free-standing long loaf or boule.

  8. Dust a piece of parchment paper or a baking pan liberally with cornmeal, and transfer the loaves to the parchment, keeping them at least 3 inches apart so they do not join when risen.

  9. Cover the loaves and let them rise until double in size. (About 60 minutes.)

  10. Pre-heat the oven to 375F with a baking stone in place optionally. Prepare your oven steaming method of choice.

  11. Prepare the cornstarch glaze. Whisk 1-1/2 to 2 Tablespoons of cornstarch in ¼ cup of water. Pour this slowly into a sauce pan containing 1 cup of gently boiling water, whisking constantly. Continue cooking and stirring until slightly thickened (a few seconds, only!) and remove the pan from heat. Set it aside.

  12. When the loaves are fully proofed, uncover them. Brush them with the cornstarch glaze. Score them. (3 cuts across the long axis of the loaves would be typical.) Transfer the loaves to the oven, and steam the oven.

  13. After 5 minutes, remove any container with water from the oven and continue baking for 30-40 minutes more.

  14. The loaves are done when the crust is very firm, the internal temperature is at least 205 degrees and the loaves give a “hollow” sound when thumped on the bottom. When they are done, leave them in the oven with the heat turned off and the door cracked open a couple of inches for another 5-10 minutes.

  15. Cool completely before slicing.

 Notes:

  • Comparing Greenstein's recipe to Norm's, the former is a wetter dough and also has a higher proportion of rye sour to clear flour. Both recipes make outstanding sour rye bread. Interestingly, Greenstein says, if you want a less sour bread, use less rye sour.
  • Having never weighed Greenstein's ingredients before, I've never even thought about baker's percentages and the like. FYI, the rye sour is 156% of the clear flour. A rough calculation of the ratio of rye to clear flour indicates that this bread is a "50% rye."

Enjoy!

David

dmsnyder's picture
dmsnyder

Hamelman's 40% Rye with Caraway

Hamelman's 40% Rye with Caraway

Hamelman's 40% Rye with Caraway Crumb

Hamelman's 40% Rye with Caraway Crumb

This is the second of Hamelman's rye breads I've made. The first was his Flaxseed Bread, which I thought was pretty terrific.

 Eric Hanner's photos of Hamelman's 40% rye looked so great (as did SteveB's), and others who had made it gave it such rave reviews, well! How could I not make it?

Eric and Steve both used AP flour and Medium Rye Flour. On reading Hamelman's formula, I found he calls for Whole Rye Flour and High-gluten flour. Since I had both of those, I used them. (Actually, I chickened out and used 2/3 high-gluten and 1/3 bread flour for the wheat flour.)

The good news is that this is one of the best tasting rye breads I've ever had. It is moderately sour with a pronounced flavor of rye and  caraway. The crust was chewy, except the "ear" which was crunchy. The crumb was rather dense in appearance but with a lovely mouth feel and chew.

The bad news is that I think I must have under-proofed the loaves. I let them expand by about 50% before baking them, and I got explosive oven spring and bloom. The loaf I do not show had the biggest side-blowout I've ever had (and I have had pretty extensive blowouts with my ryes before).

I expect I'll be making this one again. Maybe I'll let it double before baking next time, though.

David

dmsnyder's picture

Norm's formula for Jewish Corn Bread

August 24, 2008 - 5:08pm -- dmsnyder

There was a request for Norm's formula for Jewish Corn Rye recently. It is in an old blog entry that is hard to find, but I flushed it out.

Norm's formula for Jewish Corn Bread, along with his descriptions of how this bread was made in the bakery, can be found in the following thread

http://www.thefreshloaf.com/node/6103/craving-crackly-crust-sour-rye-bread

Pages

Subscribe to RSS - sourdough rye bread