The Fresh Loaf

A Community of Amateur Bakers and Artisan Bread Enthusiasts.

sourdough bread

dmsnyder's picture
dmsnyder

When I started baking bread again about four years ago, one of my principal reasons was to bake a good Jewish Sour Rye, a favorite bread I could not get locally. Greenstein's Secrets of a Jewish Baker was one of the first bread books I acquired, and I found his Jewish Sour Rye Bread at least as good as any I could remember eating.

His book was criticized by a number of TFL members for providing only volume measurements for ingredients. So, in October, 2008, I made the Sour Rye, carefully weighing the ingredients. I've used that formula since with consistently good results. I still love this bread.


Ingredients

Wt (g)

First Clear flour

500

Water (80-199ºF)

240

Sea salt

12

Ripe rye sour (100% hydration)

750

Instant yeast

7

Altus (optional)

1/2 cup

Caraway seeds

1 T

Cornmeal for dusting parchment


Cornstarch glaze


Notes on Ingredients

  • Rye Sour A sourdough starter or levain fed with rye flour is called a “rye sour.” Note that all the rye flour in the formula is pre-fermented. Traditionally, Jewish Sour Rye or New York-style Deli Rye is made with white rye flour. This is the equivalent of white flour milled from wheat. The bran and germ is removed, and the flavor is much milder than whole grain rye flour. I happen to like the flavor of whole grain rye and for years have used either dark rye or medium rye rather than white rye flour in this bread. If you use white rye, you may want to reduce the water, since this is less absorbent flour.

  • Building the rye sour If you make rye bread frequently, it is worthwhile keeping a rye sour. Otherwise, you can build one starting with a wheat or mixed flour starter. When I am going to be making this bread, I generally build up my rye sour in three feeding, at least doubling the volume with each feeding. I wrote a tutorial on “the care and feeding of a rye sour” which illustrates some of the special techniques involved. (See: Greenstein's Sourdough Rye (Rye Sour) care and feeding, illustrated.)

  • Altus This is “old bread.” It's origin is said to have been a way for the baker to recycle the rye bread he hadn't sold the day before, but, besides being a thrifty practice, the incorporation of some old bread in the dough is felt to enhance both the flavor and texture of rye bread. Its use is optional but recommended. To prepare altus, take a few thick slices of previously baked rye bread. Cut them into cubes and put them in a small bowl, covered with water. After a few hours, squeeze the water out of the bread and add it to your dough before mixing it.

  • Instant yeast As with many sourdough breads, the addition of commercial yeast makes the fermentation and proofing times more predictable. However, it is not necessary to make good bread. Since so much of this bread's flavor comes from the rye sour, I don't think the addition of yeast has any adverse impact on the quality of the bread. I generally use it.

  • Cornstarch glaze Dissolve 1 1/2 – 2 T cornstarch in 1/4 cup cold water. Heat 1 cup of water to a boil in a small sauce pan. Slowly pour the dissolved cornstarch into the boiling water, whisking constantly. Continue to stir until it is somewhat thickened. Remove from heat and reserve.

    Note on the formula: This formula was derived from the recipe provided by Greenstein, with ingredient volume measurements only. If you are interested in the formula including baker's percentages of ingredients, I have written a tutorial on baker's math, using this formula as a model. The baker's percentages can be found there. (See: Baker's Math: A tutorial )

Method

  1. If you have a white rye sour, build it up to a volume of 4 cups or so the day before mixing the dough. If you do not have a rye sour but do have a wheat-based sourdough starter, you can easily convert it to a white rye starter by feeding it 2-3 times with white rye flour over 2-3 days.

  2. In a large bowl or the bowl of an electric mixer, dissolve the yeast in the water, then add the rye sour and mix thoroughly with your hands, a spoon or, if using a mixer, with the paddle.

  3. Stir the salt into the flour and add this to the bowl and mix well.

  4. Dump the dough onto the lightly floured board and knead until smooth. If using a mixer, switch to the dough hook and knead at Speed 2 until the dough begins to clear the sides of the bowl (about 20 minutes). You may need to add a few tablespoons additional First Clear flour to get the right dough consistency. Add the flour, if needed, as early as possible in the mix. Add the Caraway Seeds about 1 minute before finished kneading. Even if using a mixer, I transfer the dough to the board and continue kneading for a couple minutes. The dough should be smooth but a bit sticky.

  5. Form the dough into a ball and transfer it to a lightly oiled bowl. Cover the bowl and let it rest for 15-20 minutes. Even after this short period, the dough is significantly less sticky.

  6. Transfer the dough back to the board and divide it into two equal pieces.

  7. Form each piece into a pan loaf, free-standing long loaf or boule.

  8. Dust a piece of parchment paper or a baking pan liberally with cornmeal, and transfer the loaves to the parchment, seam side down, keeping them at least 3 inches apart so they do not join when risen.

  9. Cover the loaves with plasti-crap or a tea towel and let them rise until almost double in size. (About 60 minutes.)

  10. Pre-heat the oven to 375F with a baking stone in place optionally. Prepare your oven steaming method of choice.

  11. Prepare the cornstarch glaze. Whisk 1-1/2 to 2 Tablespoons of cornstarch in ¼ cup of water. Pour this slowly into a sauce pan containing 1 cup of gently boiling water, whisking constantly. Continue cooking and stirring until slightly thickened (a few seconds, only!) and remove the pan from heat. Set it aside.

  12. When the loaves are fully proofed, uncover them. Pull the sides of the parchment apart to separate the loaves from each other. Brush them with the cornstarch glaze. Score them. (3 cuts across the long axis of the loaves would be typical.) Transfer the loaves, still on the parchment, to the oven, and steam the oven.

  13. After 5 minutes, remove any container with water from the oven and continue baking for 30-40 minutes more.

  14. The loaves are done when the crust is very firm, the internal temperature is at least 205 degrees and the loaves give a “hollow” sound when thumped on the bottom. When they are done, leave them in the oven with the heat turned off and the door cracked open a couple of inches for another 5-10 minutes.

  15. Move the loaves to a cooling rack and brush again with the cornstarch glaze.

  16. Cool completely before slicing.

Parchment paper on peel, folded down the middle and dusted with coarse corn meal

Loaves on parchment. Note the fold separating the loaves and the rolled up towels supporting the sides of the loaves.

Loaves covered for proofing.

Crumb

Crumb close-up

I let the final build of the rye sour get really ripe. In fact, it was starting to collapse when I mixed the final dough. The resulting bread was extremely sour and very delicious. If you don't like very sour rye bread, either use the sour when it is younger, or, if your timing demands, you can refrigerate it over-night, until you are ready to mix your dough.

 David

Submitted to YeastSpotting


dmsnyder's picture
dmsnyder

Sourdough Bread made with Liquid Levain fed twice a day

from the SFBI Artisan II Workshop

Probably the key experience provided in the SFBI Artisan II workshop on sourdough baking was baking a series of breads with liquid versus firm starters, starters fed either once or twice a day and breads with different proportions of starter. Each variation produced breads with noticeably different flavor profiles.

Our instructor made it quite clear that he and his colleagues at the SFBI had a clear consensus that the best-tasting bread was produced using a liquid levain fed twice a day and with the liquid levain constituting 40-50% (baker's percentage) of the final dough. The dough had an overall hydration of 68%.

The characteristics of bread made in this manner were a very mild sourdough tang with a predominance of the “milky” sourness provided by lactic acid but a dominance of sweet, wheaty flavor over acidity.

It has been quite a while since I have made bread using this formula, although I did like it a lot. I made it again this weekend. I have made some minor modifications in the procedures prescribed by the SFBI. Note: Apparent discrepancies in the ingredient weights are due to scaling down from the original formula for a much larger dough batch and rounding.


Total Dough Formula

Baker's %

Wt (g)

AP flour

95

641

Rye flour

0.83

5

Water

68

438

Instant yeast (optional)

0.1

0.5

Salt

2.1

13

Total

166.03

1097.5


Levain

Baker's %

Wt (g)

AP flour

95

102

Rye flour

5

5

Water

100

108

Liquid starter

40

43

Total

240

258

Note: for the starter feedings, including the levain mix, I actually used my usual starter feeding mix of 70% AP, 20% WW and 10% Rye. So, in the levain, rather than the AP and Rye specified in the SFBI formula, I used 107 g of the above mix.

  1. Mix ingredients thoroughly.

  2. Ferment 12 hours at room temperature. (Note: Because of my own scheduling needs, I refrigerated the levain overnight before mixing the final dough. This was not the procedure at the SFBI, and it would be expected to make the bread somewhat more sour. If you can, omit this levain retardation.)

Final Dough

Baker's %

Wt (g)

AP flour

100

517

Water

60

310

Instant yeast (optional)

0.1

0.06

Liquid starter

50

259

Salt

2.5

13

Total

212.6

1099.06

Procedures

  1. Mix all ingredients except the salt (and the yeast, if you are using it) to a shaggy mass.

  2. Let rest, covered, for 20-60 minutes.

  3. Add the salt (and yeast, if you are using it) and mix at Speed 2 for 5-6 minutes. Adjust flour or water to achieve a medium consistency. (Note: I did not use added instant yeast.)

  4. Ferment for 2-3 hours at 76ºF with 1 or 2 folds, as needed to strengthen the dough. (Note: The fermentation time depends on whether you use the instant yeast and on your fermentation temperature. As usual, “Watch the dough, not the clock.” The dough should end up expanded by about 20% and should be somewhat light and gassy. If you ferment in a transparent container, your should see the dough to be well-populated with tiny bubbles.)

  5. Divide the dough into two equal pieces and pre-shape as boules.

  6. Let the pieces rest, covered, for 25-30 minutes.

  7. Shape as boules or bâtards.

  8. Proof for 90-120 minutes at 80ºF.

  9. Bake at 450ºF with steam for 25 minutes.

  10. Leave in the turned-off oven with the door ajar for another 10 minutes.

  11. Cool thoroughly on a rack before slicing.


The crust softened as the bread cooled. I think this was mostly because I adjusted the dough consistency by adding a little water. This made for a more open crumb but a less crunchy crust. The aroma of the cut loaf was very nice with a noticeable acetic acid aroma. However the flavor, while more tangy than this bread is meant to be, was still only mildly sour. Otherwise, it had the delicious sweet-wheaty flavor I remember.

This bread was lovely. I am happy with the results I got, but it merits another bake following the SFBI formula and procedures without my modifications.

 David


dmsnyder's picture
dmsnyder

I almost decided not to bake this past weekend, but I activated some starter, thinking I might make some sourdough pancakes for breakfast Sunday. But, then, there was this starter, and I thought maybe I'd bake something or other. Well, I might as well have some fresh-baked bread for Sunday dinner, and it had been a while since I'd given a loaf to my next door neighbor who really appreciates my breads. I guessed I'd make some San Francisco-style sourdough to share.

I didn't want to be completely tied to the time-demands of my dough, so I relaxed the rigorous procedures with which I had been working to accommodate the other things I wanted to do. I expected the bread to be “good” but maybe not quite as good as last week's bake.

To my surprise and delight, the bread turned out to be the best San Francisco-style sourdough I had ever baked. So I am documenting what I did and hope it's reproducible. And I'm sharing it with you all. The modifications in my procedures were determined by convenience of the moment. This was sort of “a shot in the dark that hit the bullseye.”

So, here are the formula and procedures for this bake:

I started with my stock refrigerated 50% starter that had been fed last weekend. This feeding consisted of 50 g active starter, 100 g water and 200 g starter feeding mix. My starter feeding mix is 70% AP, 20% WW and 10% whole rye flour.

I activated the starter with a feeding of 40 g stock starter, 100 g water and 100 g starter feeding mix. This was fermented at room temperature for 16 hours, then refrigerated for about 20 hours. I then mixed the stiff levain.

Stiff levain

Bakers' %

Wt (g)

for 1 kg

Wt (g)

for 2 kg

Bread flour

95

78

157

Medium rye flour

5

4

8

Water

50

41

82

Stiff starter

80

66

132

Total

230

189

379

  1.  Dissolve the starter in the water. Add the flour and mix thoroughly until the flour has been completely incorporated and moistened.

  2. Ferment at room temperature for 16 hours.

Final dough

Bakers' %

Wt (g)

for 1 kg

Wt (g)

for 2 kg

AP flour

90

416

832

WW Flour

10

46

92

Water

73

337

675

Salt

2.4

11

22

Stiff levain

41

189

379

Total

216.4

953

2000

Method

  1. In a stand mixer, mix the flour and water at low speed until it forms a shaggy mass.

  2. Cover and autolyse for 120 minutes

  3. Add the salt and levain and mix at low speed for 1-2 minutes, then increase the speed to medium (Speed 2 in a KitchenAid) and mix for 5 minutes. Add flour and water as needed. The dough should be rather slack. It should clean the sides of the bowl but not the bottom.

  4. Transfer to a lightly floured board and do a stretch and fold and form a ball.

  5. Place the dough in a lightly oiled bowl and cover tightly.

  6. Ferment at 76º F for 31/2 to 4 hours with a stretch and fold at 50 and 100 minutes.

  7. Divide the dough into three equal pieces. (Note: I had made 2 kg of dough.)

  8. Pre-shape as rounds and rest, covered, for 10 minutes.

  9. Shape as boules or bâtards and place in bannetons. Place bannetons in plastic bags.

  10. Proof at room temperature (68-70º F) for 1-2 hours.

  11. Cold retard the loaves overnight.

  12. The next morning, proof the loaves at 85º F for 3 hours. (If you can't create a moist, 85 degree F environment, at least try to create one warmer than “room temperature.” For this bake, I took two loaves out of the fridge and started proofing them. I took the third loaf out about an hour later and stacked it balanced on top of the other two. I did one bake with the first two loaves and a second bake with the third loaf.)

  13. 45-60 minutes before baking, pre-heat the oven to 480º F with a baking stone and steaming apparatus in place.

  14. Transfer the loaves to a peel. Score the loaves as desired, turn down the oven to 460º F, steam the oven, and transfer the loaves to the baking stone.

  15. After 15 minutes, remove the steaming apparatus, and turn down the oven to 435º F/Convection. (If you don't have a convection oven, leave the temperature at 460º F.)

  16. Bake for another 15 minutes.

  17. Turn off the oven, and leave the loaves on the stone, with the oven door ajar, for another 15 minutes.

  18. Transfer the loaves to a cooling rack, and cool thoroughly before slicing.


Note: Because these loaves were smaller than those baked in “Take 3,” the oven temperature was hotter , and the baking time was shorter. I also wanted a slightly darker crust, which this modification accomplished.

The crust was thick and very crunchy but not “hard.” The crumb was more open than my last bake. The crust had a sweet, nutty flavor. The crumb had sweetness with a definite whole grain wheat overtone and a more pronounced acetic acid tang. It had a wonderful cool mouth feel and was a bit more tender than the last bake.

This bread was close in flavor and texture to the best tasting bread I've ever had which was a half kilo of pain de campagne cut from an absolutely huge miche in Les Eyzies, France some 15 years ago. It's a taste I've never forgotten and often wished I could reproduce.

I need to make me a miche like this!

David

Submitted to YeastSpotting 

sweetbird's picture
sweetbird

I can’t seem to resist any opportunity to watch a sourdough culture get its start. I’ve made many starters over the years but it never loses its fascination for me. I love watching the miracle of wild yeast emerge. That’s what drew me to this formula in Joe Ortiz’s book The Village Baker. It had the added charm of being an authentic formula that has been passed down through the ages. According to the author, it has been in use for hundreds of years by home bakers who gathered once a week in the French countryside to bake in communal ovens. I was drawn to it like a moth to a flame.

It takes about 6 days to complete this, but that’s because you’re building a sourdough culture from scratch. You could substitute an already thriving sourdough culture of your own, but you’d miss out on all the fun (and probably end up with a good but different-tasting loaf). This deeply wheaty and tangy levain lets you know, without any doubt, that it is there in the final loaf.

As I did with my previous Joe Ortiz formula, I’ve done metric conversions while still providing his original measurements for anyone who prefers those. I didn’t convert the tiny amounts to metrics. Also, as in my previous Joe Ortiz loaf (the Pumpkin Seed sourdough), I’ve increased the quantity of salt from 2½ tsp. to a rounded Tbs. and have used Celtic salt.

He isn’t very specific about temperatures, instead using terms like “warm” or “very warm.” I used my judgment and generally took “warm” to be in the mid- to upper-80sF and “very warm” to be anywhere from the 90sF up to 100F. Of course, it also depends on the weather, etc., so it’s best left up to the baker.

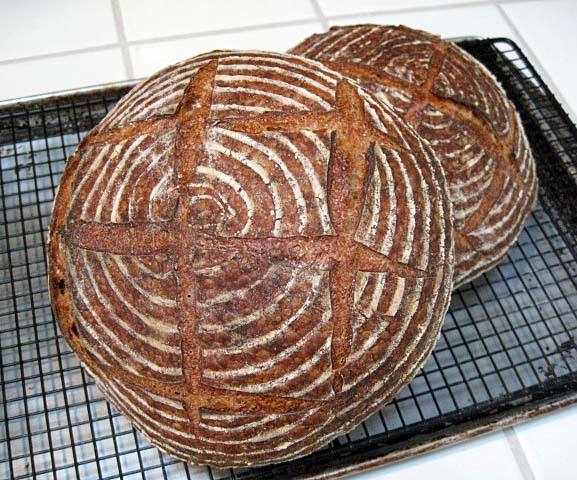
This makes one large 2-lb. or approximately 1034 gm loaf.

Chef (2-3 days):

78 gms organic whole wheat flour (½ C.)

46 gms warm water (scant ¼ C.)

1/8 tsp. cumin

½ tsp. whole organic milk


First refreshment (18-24 hrs.):

117 gms organic whole wheat flour (3/4 C.)

72 gms warm water (1/3 C.)

44 gms chef (2 Tbs.)


Second refreshment (10-12 hrs.):

115 gms levain from the first refreshment (½ C.)

117 gms organic whole wheat flour (3/4 C.)

70 gms organic unbleached AP flour (½ C.)

115 gms warm water (½ C.)


Dough:

420 gms organic unbleached AP flour (3 C.)

342 gms levain from the previous step (1½ C.)

285 gms very warm water (1¼ C.)

15 - 16 gms finely ground Celtic salt (approx. 1 slightly rounded Tbs.)


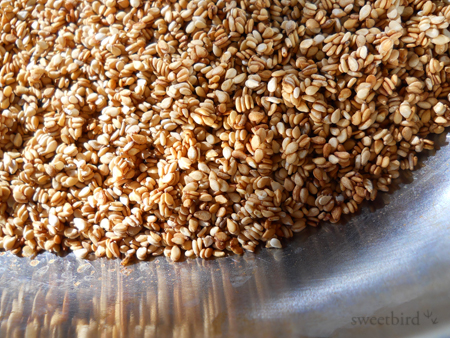
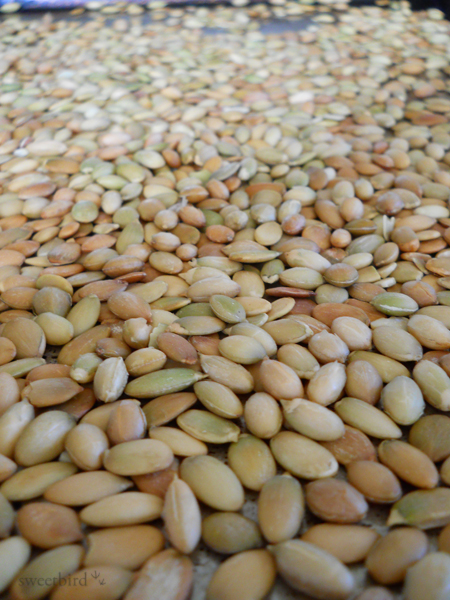
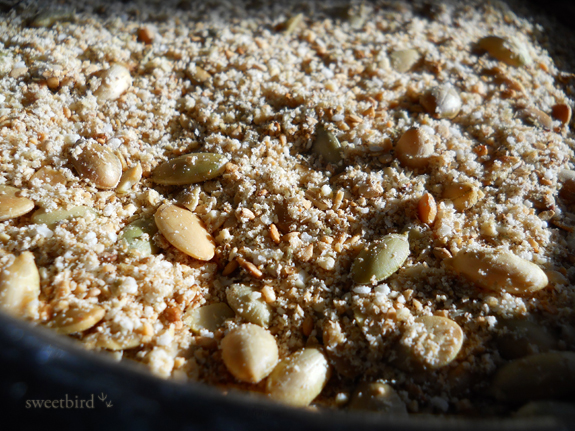
For this loaf I used organic Central Milling whole wheat flour and King Arthur unbleached AP four. And spring water, which I always use rather than tap because it gives me better and more consistent results.


To make the chef:

His method (presumably the method used for hundreds of years) is to make a mound of flour on your work table and make a well in the center. Into the well pour about two-thirds of the water, and then add the cumin and the milk. With one finger, start mixing and pulling the flour in from the outer ring. Adjust as necessary until you have a firm but somewhat sticky dough. Knead 5 - 8 minutes.

I did it a little differently: I mixed the flour and cumin in a large, wide bowl, made a well, added the liquids and incorporated the flour from the outer ring slowly with a small spatula. I kneaded it right in the bowl; more of a stretch-and-fold technique than a traditional knead.

Transfer to a ceramic or glass container. (Don’t coat with oil.) Cover and let sit in a warm place free from drafts for 2 to 3 days.

A crust will form on the top, but when you peel that back you’ll find a spongy, inflated chef. He describes the aroma as “slightly sour but fragrant and appealing,” which is exactly what I found.

I did my first refreshment after 2½ days, and that happened to be at 8 o’clock in the morning, which turned out to be perfect timing for the rest of the steps, leaving me with a baking schedule that would suit most of us I suppose, which is to bake during daylight hours. I can’t say I planned it that way but once in a while we non-planners get lucky.

First refreshment:

Remove the crust and take 2 Tbs. (about 44 gms) of the sponge. Make a well of the flour, put the chef into the well and add the warm water. After the chef dissolves, begin to draw in the flour from the sides of the well. You should end up with a very firm but still slightly moist ball of dough. You may not even be able to incorporate all the flour. Try to do so, but don’t worry if you can’t.

Transfer to a ceramic or glass container, cover, and let stand for between 18 and 24 hours. I left mine for the full 24 hours. When ready it will have risen noticeably and fallen a little. It will have a “pleasing, alcoholic aroma.” Mine did.

Second refreshment:

Discard any crust but use most of this levain (should be about 115 gms). Hold back some of the flour until you’re sure that you need it. It should be slightly moist to the touch but firm, as the first refreshment was. Let this rise, covered, for between 10 and 12 hours. Mine became active very quickly and rose like a champ throughout the day. It was raring to go by 10 hours, so I went on to the next step, mixing the final dough, which I did in the evening in preparation for a bake the following day.

Beginning of 2nd refreshment:

After 4 hours:

After 8 hours:

Dough:

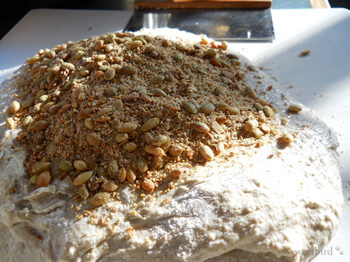
Make a well in the flour, add all the levain (broken up into pieces) and all the water and mix as before, stopping when you still have about a cup of flour left to incorporate. Add the salt and then incorporate the rest of the flour. Knead for 5 minutes until firm and elastic.

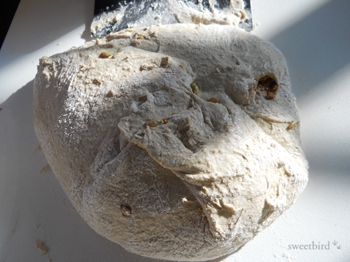
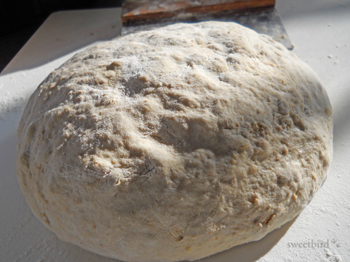
Let rise, covered, for 8 to 10 hours. It should double. I left mine overnight in a cool room (probably about 66°F, give or take a few degrees throughout the winter’s night) and it had doubled beautifully by morning. It was domed, so it hadn’t begun to fall, and it smelled nicely of fermentation.

Deflate gently on your work surface and save a walnut-sized piece of dough for your next bake. About 44 gms or 2 Tbs. is a good amount. You can refrigerate this for a day or two or begin another loaf right away if you like. To make another loaf you would let it sit at room temperature for 4 to 8 hours and treat it as the “chef,” using it in the first refreshment, then continuing on with this formula.

Pre-shape the dough and let rest for half an hour.

Cool trick: when you’re ready to shape, remove another small walnut-sized piece of dough and put it in a Mason jar (or any medium-sized glass jar) filled with room temperature water. Shape your dough and put the dough and the jar with water together in the same warm place. When the little ball of dough pops up and floats in the water, the bread is ready to bake.

Joe Ortiz calls for an 8 to 10 hour rise, but I found mine was ready to go at 3 hours, so you need to be checking your dough as you always do (even if you’re using the Mason jar trick). The important thing is to have your oven and baking stone ready when your dough is ready, so some educated anticipation is called for. The author makes the point that the final rise plus the previous step (the dough rise) should total 16 hours, but I found my levain to be too active to push it that far. That seems like it has to be left up to the baker.

By the way, for large loaves like this one, I’ve used an Easter basket lined with cloth for years and it works great. It cost about 99 cents. I searched around for one with the size and shape I wanted; this one is nicely rounded from rim to rim, and once the handle was removed it was perfect.

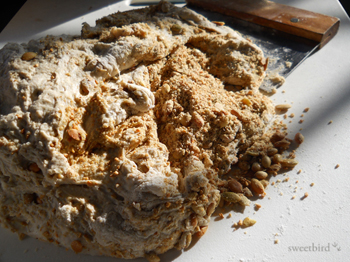
Preheat the oven and stone to 450°F about 45 minutes before you expect to bake, and prepare for steam. Score and load the loaf and adjust the temperature down to about 400°F or 425°F if your oven tends to bake hot. Mine does, so I went down to 425°F. Remove steam apparatus after 10 - 12 minutes and rotate halfway through for even browning. He recommends baking for a full hour, but mine was ready at about 40-45 minutes or so. I turned the oven off and left the door ajar for 10 minutes.

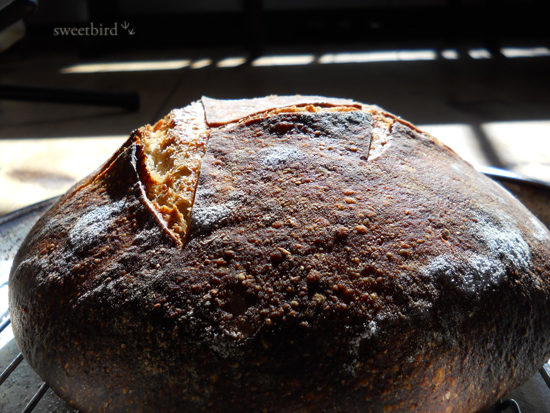
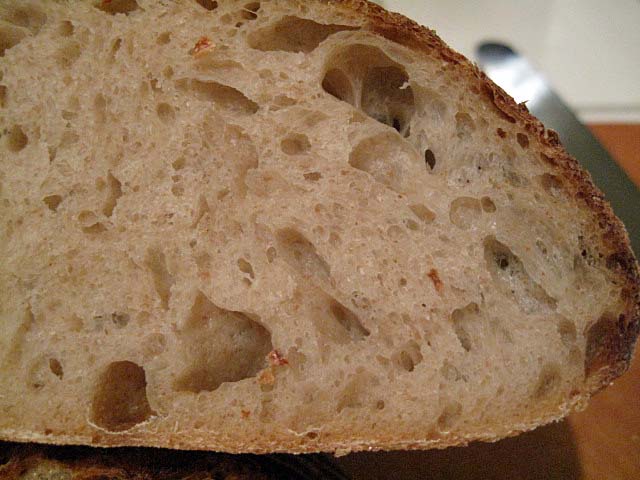
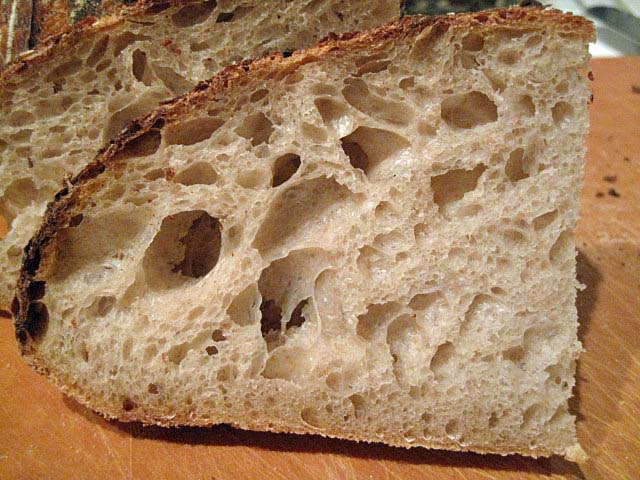
When I transferred this loaf to the peel, I had a bad feeling that I had over-proofed it. It seemed flabby. That may—or may not—account for my inelegant scoring:

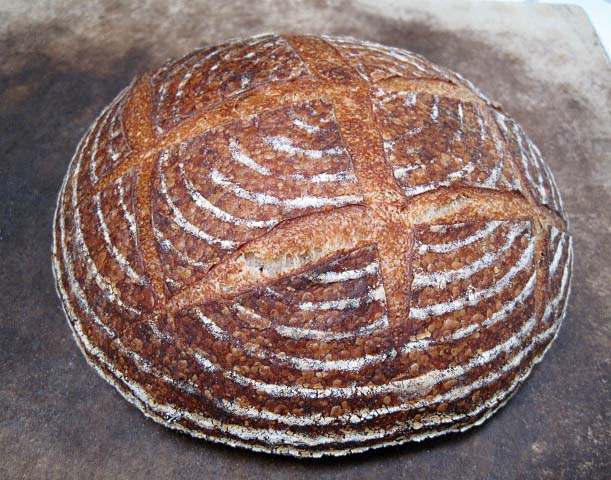
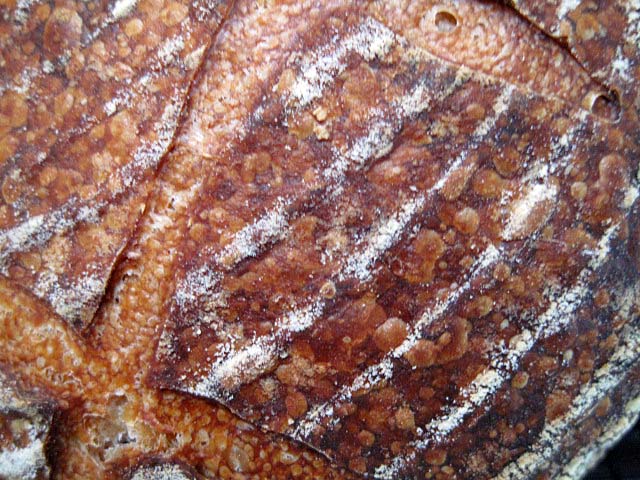
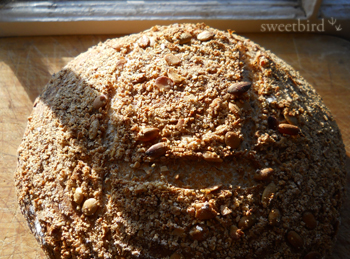
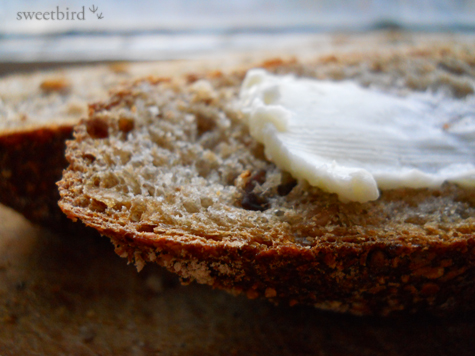
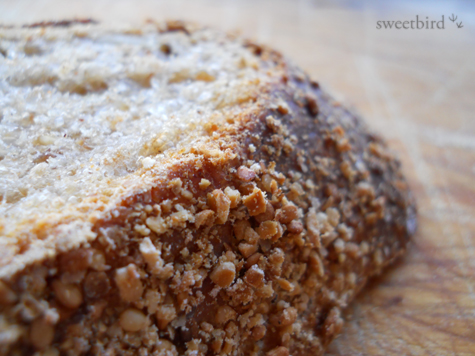
I didn’t think I was going to get any oven spring, but I ended up getting a moderate amount. Not perfect by any stretch, and a bit of a clumsy shape, but not a disaster. The color was deep (somewhere between the film noir shot at the top and the sun-drenched shot just above) and the crust was nicely blistered with signs of fermentation. The real joy came when I tried my first slice. I LOVE this bread! It has a genuine, pronounced sourdough tang and the flavor of well-developed, long-fermented wheat, which is brought about by the leisurely development of the levain, but also by the generous proportion of levain in the final dough.

My husband Angelo especially loved it too. He has a wheat sensitivity (but not an allergy, thank goodness), so he’s not supposed to eat much wheat, but he can’t resist trying some when I bake. I am thrilled with it and will make it again and again. Someday I’ll try it with one of my standard starters and report back on the results. At the moment, I’m in the process of refreshing the “old dough” from this bake in preparation for another loaf in a few days.

This little sweetie seems to like the smell of freshly baked bread, because she has a habit of showing up when I do my "photo shoots." Now I have a good shot of her face so I'll know who the culprit is if some of my bread mysteriously goes missing!

Happy baking to all,

Janie

p.s., submitted to Susan for yeastspotting http://www.wildyeastblog.com/category/yeastspotting/

sweetbird's picture
sweetbird

I’ve made this bread before and loved it, just as it’s written up in Joe Ortiz’s wonderful book, The Village Baker. His formula begins with a sponge that uses commercial yeast and it results in a delicious bread. But I was recently looking for a way to use some active sourdough starter (I hate to waste it!) and decided to try it as a sourdough loaf. For some reason it escaped my notice until after I had embarked on my experiment that he already has a sourdough version of this bread in the book(!), but it was interesting to see how mine differed from his. (For example, he uses a full cup of 100% hydration sourdough starter, making adjustments to flour and water to compensate, and mixes the sponge a bit cooler than I did mine; I will try his method the next time I make this. I also use a bit more salt than he calls for; he calls for 2¼ tsp. in the direct method and 2½ tsp.—scant—in the sourdough method. I use about a tablespoon, and I like Celtic salt in this.)

This bread’s most unusual (and, I think, brilliant) feature is the seed mixture, which Joe Ortiz says he learned from Kurt König, a baker from the Bavarian village of Miesbach, who describes himself as “your organic grain madman.” There is a fun and fascinating profile of Kurt König in the book. His bakery has existed in the same spot in Miesbach since 1650! Anyway, the seed mixture is deeply toasted and has the added magic of soy sauce, which is mixed and toasted with the sesame seeds. I want to try this mixture in a Tartine loaf one of these days.

The Village Baker came out near the beginning of the artisinal bread revival in the U.S. (copyright date is 1993), and I think that’s probably the reason that his formulas are based mostly on measures rather than weight, since weights would have seemed strange to most home bakers at that time. Now I don’t think you’d ever find a serious book without weight formulas. In any case, I’ve converted it and will also try to indicate the measurements in case that’s helpful for anyone.

By the way, for anyone not yet familiar with The Village Baker, one interesting part of the book is the final section of professional formulas (which are given in weight) and which result in serious amounts of bread!

Here’s the formula & method I used for my sourdough version of this bread:


Makes 1 large 2-lb. loaf or 2 smaller boules in 8″ brotforms

Seed mixture:

75 gms (½ C.) unhulled sesame seeds

2 tsp. soy sauce (I used San-J naturally fermented tamari)

152 gms (1 C.) pumpkin seeds


Rye sour (sponge):

25 gms sourdough starter (100% hydration)

566 gms (slightly less than 2½ C.) warm water

198 gms (1½ C.) organic dark rye flour

134 gms (slightly less than 1 C.) unbleached organic AP flour


Dough:

All of the rye sour from previous step

374 gms (2½ C.) unbleached organic AP flour

11 - 12 gms fine Celtic salt (approx. 1 Tbs.)


To make the seed mixture:

Toss the sesame seeds with the soy sauce until well coated and toast them in a 350°F oven for between 15 and 20 minutes until just browned (not too dark). Toss a few times while roasting to keep things even. Toast the pumpkin seeds dry in a separate pan at the same temperature for 10 to 15 minutes, stirring around a couple of times for even browning. Don’t worry if some are darker than others—that’s normal—but don’t let any of them get too dark or they’ll be bitter.

Let all seeds cool down completely, and then grind half the sesame seed mixture and one-third of the pumpkin seeds until you have a medium powder. Add that to the whole seeds, mix together and set aside. This can be done the night before when you set up your rye sour or can be done the morning of the bake.

To make the rye sour (sponge):

Mix all the ingredients together, cover with plastic and let sit overnight at moderate room temperature for 12 hours.

To make the dough:

Transfer the rye sour to the bowl of your stand mixer, but begin the process by hand with a wooden spoon. Slowly add the flour, a handful at a time and stir vigorously after each addition. When you still have about a cup of flour left, add the salt. At this point I switched over from hand mixing to KitchenAid mixing (with the dough hook) and continued to add the flour. I don’t really see any reason why this couldn’t or shouldn’t all be done in the KitchenAid, but Joe Ortiz recommends hand mixing the whole way. The dough will be moist and sticky. The seeds will absorb some of that stickiness in a few minutes, so don’t give in to a temptation to add too much flour. You’re aiming for a slightly stickier dough than you might otherwise want. I did find that I needed to add a few tablespoons of extra flour, though, in spite of that. I decided to add whole wheat flour for my last few tablespoons because I thought it would be delicious in this bread. I didn't add that to the formula, since that's based on how your dough performs.

Flatten the dough on your board and add all but ¼ cup of the seed mixture. Incorporate by kneading and folding into dough. This is difficult! Next time I will try adding the seeds at the end of the KitchenAid mixing and incorporating them gently on a very low speed.

Here are the seeds waiting to be incorporated:

Here is the first attempt at incorporating them:

Here they are trying my patience:

And here is the finished dough trying to pretend it was always a little angel and never once misbehaved:

Place in lightly oiled bowl or container of some sort and bulk ferment for about 3 hours at 85° or so, with two stretch-and-folds at 45 and 90 minutes.

Remove to lightly floured board and roughly pre-shape. Cover with plastic wrap and allow to rest for half and hour. Shape into desired shapes, coat the loaves with the remaining seeds* and let rise in a warm area until ready to bake. Mine took a little less than an hour and a half.

* Note about coating with seeds: I lightly sprayed the loaves with water and turned them over into a shallow bowl with the seeds, but I don’t think I’ll do it that way again. They didn’t adhere too well and didn’t look attractive. In fact they looked downright ugly. Joe Ortiz recommends glazing the top just before they go into the oven with 1 whole egg whisked with 1 Tbs. milk, then sprinkling with the seeds. I'm not a huge fan of glazed breads but this is probably a good idea! However, be careful about the baking temperature. He bakes at 350°F (seems like a low temp. to me), and that may be because of the glaze. I baked (without the glaze) at a more normal temperature for hearth bread.

Begin preheating your oven and baking stone to 500°F about 45 minutes before you expect the dough to be ready, and prepare for steam. Load the loaves and lower the temperature to 450°F. Bake for 10 - 12 minutes with steam and then remove the steam source. Turn halfway for even browning. Bake for about 30 - 35 minutes more or until internal temperature is at least 200°F. Let sit in hot oven with door ajar for about 10 minutes. Cool completely on rack.

I don’t like to badmouth any of my bread “offspring” but I have to admit this one just wasn’t a pretty sight coming out of the oven. It looked like something that had been dug up out of the earth with mud and twigs and pebbles still clinging to it. I was a little crestfallen when I first saw it. But once it cooled down and I got to taste it, my happiness returned. It wasn’t perfection, but I loved the tang of the sourdough against the texture and flavor of the seeds, which are deepened by that tiny bit of soy sauce that is roasted into them. And the best part was that it turned out to be one of those breads that improved with age. I liked it better each time I tried it. It was baked on a Monday afternoon, and my favorite slice was on Wednesday morning.


Now I want to get this post finished so I can hurry up and write my next one. I took another Joe Ortiz loaf (a Pain de Campagne) out of the oven last night and it's wonderful! I’m looking forward to telling you about it.

All the best,

Janie

dmsnyder's picture
dmsnyder

San Francisco-style Sourdough Bread 2/12/2012

Today, I baked two more loaves of my evolving San Francisco-style Sourdough bread. (See: My San Francisco Sourdough Quest and My San Francisco Sourdough Quest, Take 2)

The only change in the formula was to double the amount of dough, so each loaf was twice the weight of those previously baked. As those who have followed this adventure may note, there were also some minor changes in the procedures. The only really important one was to bake the breads at a lower temperature for a longer time, as an accommodation to their larger mass.

Those who have asked for ingredient weights in metric measures will be happy to note that weights are now given in grams.

So, here are the formula and procedures for today's bake. I have adjusted the tables below for 1 kg and for a 2 kg batch of dough.


Stiff levain

Bakers' %

Wt (g)

for 1 kg

Wt (g)

for 2 kg

Bread flour

95

78

157

Medium rye flour

5

4

8

Water

50

41

82

Stiff starter

80

66

132

Total

230

189

379

  1. Dissolve the starter in the water. Add the flour and mix thoroughly until the flour has been completely incorporated and moistened.

  2. Ferment at room temperature for 6 hours.

  3. Cold retard overnight.

  4. The next day, take the levain out of the refrigerator and ferment at 76 degrees F for another 1-2 hours. The levain is ready when it has expanded about 3 times, and the surface is wrinkled (starting to collapse).

    Final dough

    Bakers' %

    Wt (g)

    for 1 kg

    Wt (g)

    for 2 kg

    AP flour

    90

    416

    832

    WW Flour

    10

    46

    92

    Water

    73

    337

    675

    Salt

    2.4

    11

    22

    Stiff levain

    41

    189

    379

    Total

    216.4

    953

    2000


    Method

  1. In a stand mixer, mix the flour and water at low speed until it forms a shaggy mass.

  2. Cover and autolyse for 20-60 minutes

  3. Add the salt and levain and mix at low speed for 1-2 minutes, then increase the speed to medium (Speed 2 in a KitchenAid) and mix for 5 minutes. Add flour and water as needed. The dough should be rather slack. It should clean the sides of the bowl but not the bottom.

  4. Transfer to a lightly floured board and do a stretch and fold and form a ball.

  5. Place the dough in a lightly oiled bowl and cover tightly.

  6. Ferment at 76º F for 3 hours with a stretch and fold at 1 hour.

  7. Divide the dough into two equal pieces.

  8. Pre-shape as rounds and rest, covered, for 10 minutes.

  9. Shape as boules or bâtards and place in bannetons. Place bannetons in plastic bags.

  10. Proof at room temperature (68-70º F) for 1-2 hours.

  11. Cold retard the loaves overnight.

  12. The next morning, proof the loaves at 85º F for 2-3 hours. (This is ideal, in my opinion. If you can't create a moist, 85 degree F environment, at least try to create one warmer than “room temperature.” For this bake, one loaf proofed at about 76 degrees and the other at 85 degrees F.)

  13. 45-60 minutes before baking, pre-heat the oven to 480º F with a baking stone and steaming apparatus in place.

  14. Transfer the loaves to a peel. Score the loaves as desired, turn down the oven to 440º F, and transfer them to the baking stone.

  15. Steam the oven.

  16. After 15 minutes, remove the steaming apparatus, and turn down the oven to 415º F/Convection. (If you don't have a convection oven, leave the temperature at 440º F.)

  17. Bake for another 30-35 minutes.

  18. Turn off the oven, and leave the loaves on the stone, with the oven door ajar, for another 15 minutes.

  19. Transfer the loaves to a cooling rack, and cool thoroughly before slicing.

Note: Because I was baking larger loaves, the oven temperature was set lower and the bake time was lengthened. Also note that, if you make two loaves of this size, it may be prudent to bake one at a time, unless your oven stone is larger than my 16 X 14 inch one.

Those who enjoy soft crust and cannot abide a sour-tasting sourdough would be well-advised to skip making this bread. On the other hand, it is as close to my ideal San Francisco-style sourdough as I expect to get.

San Francisco-style Sourdough Crumb

The crust was thick and very crunchy but not “hard.” The crumb was denser than my first attempt but somewhat open and fully aerated with varying sized alveolae. The crust had a sweet, nutty flavor. The crumb had sweetness but a moderately present acetic acid tang.

I can't promise I won't tweak this further or conduct experiments on, for example, the difference between proofing at room temperature, 76 degrees F and 85 degrees F. However, I expect to be making this bread regularly pretty much as I did this week.

I also baked the Tartine “Basic Country Bread” and Hamelman's “Pain au Levain” this weekend.

Tartine Basic Country Bread 

Tartine Basic Country Bread crumb

Pain au Levain, from Hamelman's Bread

Pain au Levain, from Hamelman's Bread, crumb

David

Submitted to YeastSpotting


theuneditedfoodie's picture
theuneditedfoodie

A couple of weeks back, I met a group of bread bakers in the Kansas City area through thefreshloaf.com. The meeting place was decided to be Barley’s Brewhaus in Shawnee, Kansas. At the meeting, one gentleman by the name of Paul had brought some sourdough starter to share. Paul told us that he had actually started that starter in 2010 in South Africa.  My knowledge in sourdough bread baking was limited then, but I was definitely curious to get started with some sourdough culture. Unfortunately, with winter still lingering and my home temperatures still hovering around 50 to 55 degrees Fahrenheit, I knew that my options of starting a seed culture were limited. At best, I would have to wait till the summer for warm weather to arrive and thus get started on the process of seed culture. Thanks to Paul and his generous contributions with the sourdough culture, I knew that I did not have to wait till summer and could get started immediately. 


Unfortunately, baking with sourdough and keeping your sourdough culture alive is quite a process. It is almost like having a baby or even a pet. Unlike the industrial instant yeast that sits in your fridge, without crying for your attention this sourdough sucker demands regular feeding.  What is even more complicated is the math of feeding, aligned with the prediction of feeding and discarding. Unfortunately, I have never been good with numbers, whether understanding trigonometry or bakers percentage formula, and hence, I decided to write to Paul for advice on getting the sourdough thingy started. Paul was generous in replying back immediately to me on thefreshloaf.com, and his advice definitely came in handy. I mean I did bake my first sourdough bread, thanks to his number crunching. It may not be anything like the Boudin sourdough of San Francisco, but I am sure glad to have produced a loaf with just the wild yeast. So how did I get started? Here is my story.


As I told you guys before, Paul lent us some sourdough starter during our Kansas City bread bakers’ gathering. So basically, I had the sourdough starter in my fridge for about a week, before I got started on the process. Firstly, I took about 10g starter out from that chunk, right from its belly area- for the sides often tend to get a little dry. Then I fed about 10g water+20g flour to it, left it for 2 hours at room temperature, before sticking it back in the fridge.  So this was basically the feeding process, as I understood from Paul’s message.


After that I started with my baking process. This being my first time for sourdough baking, I decided to do Peter Reinhart’s basic sourdough recipe from BBA. Now the recipe called for 4oz of barm in the firm starter. Unfortunately, for some reason I thought it to be 4.5oz which basically equals to 125g. Now, I decided to do a 100% hydration levain for 150g, this way I could use 125g for my recipe and the rest 25g for my sourdough culture, which I would eventually feed and use for future endeavors. So as per the previous paragraph, I already had the starter with 10g water and 20g flour, hence for a 100% hydration for 150g- I added another 65g of water and 55g of flour. Left this at room temperature for about 4 to 5 hours.


Following that I started with Reinhart’s basic sourdough recipe—for that he needed about 110g of barm, which for some reason I calculated to 125g and stored the rest 25g out of the total 150g for future baking.  The rest of the process is pretty much how the basic sourdough recipe calls in BBA, except that in step 7 which is the fermentation for 3 to 4 hours where the dough doubles in size, and then one has to divide it in two batches of about 22oz, mine only came down to 20.5oz and 21oz respectively for some reason.  Also, since for the final proofing, I used a parchment-lined sheet, my boules almost spread flat and got attached to each other like Siamese twins. What also did not help was my scoring, which is pretty poor, and I would love some advice on improving that. Eventually, the loafs did get baked and I separated them after the process; obviously I wasn’t happy with the aesthetics of the bread- but otherwise it had some lovely holes/webs, and the best thing was the smell—you could really tell that it was a sourdough with one whiff! 

dmsnyder's picture
dmsnyder

After the disappointment of the San Francisco Sourdough according to Kline, et al, it was even more of a pleasure than usual to pull this San Francisco Baking Institute Miche out of my oven.


The formula was the same as that I originally posted. (Miche from SFBI Artisan II - 2 kg) I've settled on a 50/50 mix of AP and Central Milling's “Type 85” organic, unmalted flour, as first suggested by brother Glenn. This has always provided a wonderful crust and crumb and a delicious flavor. I did alter the procedure in a few ways for this bake. I mixed the dough in my Bosch (for 5 minutes) rather than by hand, and I proofed the formed loaf at room temperature for a couple hours before retarding the loaf for about 12 hours. It then finished proofing in my Brod & Taylor Folding Proofer for about 3 hours at 85 degrees F before baking. At the end of proofing, the loaf was expanded by about 75%. The “poke test” indicated it was “fully proofed, yet there was great oven spring and bloom.


The crust was very crunchy after 18 hours' rest in bakers' linen. The crumb was chewy-tender, moist and cool in the mouth. The flavor was deliciously wheaty and complex with moderate sourness. What a delicious bread!

David

dmsnyder's picture
dmsnyder

Back in May, 2010, bnom posted a reminiscence of the San Francisco Sourdough bread baked by Larraburu Brothers Bakery, which went out of business about 30 years ago after a fire in their plant. (See Divine inspiration--for me it way Larraburu Brother's SF SD. What was it for you?) For many who grew up eating it, the Larraburu bread was the quintessential San Francisco Sourdough. Although the bakery is long-gone (and much lamented), Doc.Dough found a journal article from 1978 describing their formula and process, so we might attempt to reproduce this famous bread.

Doc.Dough's citation is quoted below, as follows:

Title: Lactic and volatile (C2-C5) organic acids of San Francisco sourdough French bread

Cereal Chemistry 55(4): 461-468; Copyright 1978 The American Association of Cereal Chemists

Authors: A. M. Galal, J. A. Johnson, and E. Varriano-Marston

The Larraburu Company produces San Francisco sourdough French bread by the sponge and dough process.  Each day a piece of straight dough or starter sponge known as the "Mother" is saved and refrigerated to be used as a starter sponge the following day.  This starter sponge is used to make more starter sponge as well as sponges for bread production.  The starter sponge consists of 100 parts of clear flour (14% protein), approximately 50 parts of water, and 50 parts of the starter sponge.  The ingredients are mixed and fermented for 9-10 hr at 80°F.  The bread dough is made by mixing 100 parts flour 12% protein, 60 parts of water, 15 parts of sponge, and 1.5-2% salt.  The dough rests 1 hr and then is divided, molded, and deposited on canvas dusted with corn meal or rice flour.  The dough is proofed for 4 hr at 105°F (41°C) and 96% relative humidity and baked at 420°F (216°C) for 40-50 min in a Perkins oven with direct injection of low pressure steam (5 psi).  Oven shelves were covered with Carborundum.

Specific instructions for mixing are not provided, but I would surmise that, because of the very short bulk fermentation and long proofing times, Larraburu Brothers used an intensive mix. This would result in a bread with high volume but a relatively dense, even crumb. I altered the procedure to use an autolyse, a less intensive mix, a longer bulk fermentation with a stretch and fold and a shorter proof. My intention was to bake a bread with a more open crumb structure and better flavor.

The autolyse allows the flour to absorb the water and for gluten to start developing. This head start on gluten development allows for a shorter mixing time to get to the desired stage of gluten development. Less mixing has two principal effects: 1) The gluten strands are less organized, resulting in a more open crumb with a random distribution of holes of varying size. 2) Less oxidation of the carotenoid pigments in the flour, resulting in a more yellow crumb color and better bread flavor.

Note that the fermentation and proofing temperature control was made possible by using a Brod & Taylor Proofing Box.

To make one 1 kg loaf:

Sponge (Stiff Levain)

Baker's %

Wt (g)

High-gluten flour

100

45

Water

50

22

Stiff starter

50

22

Total

200

89

Mix thoroughly and ferment for 9-10 hours at 80º F in a lightly oiled bowl, covered tightly.

Final dough

Baker's %

Wt (g)

AP flour

100

565

Water

60

339

Salt

2

11

Sponge (stiff levain)

15

85

Total

177

1000


Procedure

  1. Mix the flour and water in a stand mixer with the paddle for 1-2 minutes at Speed 1.

  2. Cover the mixer bowl tightly and autolyse for 20-60 minutes. (I autolysed for 60 minutes.)

  3. Sprinkle the salt on the dough and add the sponge in chunks.

  4. Mix for 1-2 minutes with the paddle at Speed 1, then switch to the dough hook and mix for 5 minutes at Speed 2. Adjust the dough consistency by adding small amounts of water or flour, if needed. (I did not add either.) The dough should be tacky but not sticky. It should clean both the sides and bottom of the mixing bowl.

  5. Transfer the dough to a clean, lightly oiled bowl. Cover tightly.

  6. Ferment at 105º F for 2 1/2 to 3 hours in a humid environment. Stretch and fold once at 1 1/4 hours.

  7. Pre-shape the dough round and cover with a towel or plasti-crap.

  8. Let the dough relax for 15-20 minutes.

  9. Shape as a boule or bâtard.

  10. Proof at 105º F in a floured banneton or en couche, covered, until the dough slowly fills a hole poked in it with a finger. (This was in 30 minutes, for me!)

  11. About 45 minutes before baking, pre-heat the oven to 480º F with a baking stone and steaming apparatus in place.

  12. Transfer the loaf to a peel and score it as desired.

  13. Transfer the loaf to the baking stone. Turn down the oven to 450º F.

  14. Bake with steam for 15 minutes. Remove your steaming apparatus, and bake for another 25 to 35 minutes until the crust is nicely colored and the internal temperature is at least 205º F.

  15. Turn off the oven, but leave the loaf on the baking stone with the oven door ajar for another 10-15 minutes.

  16. Transfer the loaf to a cooling rack, and cool completely (at least 2 hours) before slicing. 

Proofed, slashed and ready to bake

The bread had exuberant oven spring and bloom. In hindsight, it could have proofed for another 15 minutes or so without harm. I baked it for a total of 40 minutes. The crust was very firm, and the loaf sang nicely while cooling. The aroma was that of fresh-baked bread without any yeasty overtones. 

Crackley Crust

Classic SF SD crumb

I sliced and tasted the bread about 3 hours after it came out of the oven. The aroma of the bread was sweet and wheaty. The crust was very crunchy with a wonderful flavor I have had from the crusts of excellent bakery loaves but not before from my oven. The crumb was quite tender and cool-feeling. The flavor was sweet with only a hint of lactic acid, creamy-type sourness. I could discern no acetic acid presence at all, much to my surprise.

Now, that's not "bad!" I'd say this may be the best flavored French-style pain au levain I've ever made. But it does certainly not have the assertive, vinegary tang usually associated with San Francisco Sourdough. In fact, my wife, who is not at all fond of super-sour sourdoughs, said, "This is better than San Francisco Sourdough!" I try not to argue with her, but it's clearly a matter of taste. 

I'm going to give this recipe some thought and may tweak it to get more sourness, but, you know, I may make it just like this again too. It's really outstanding!

David

Submitted to YeastSpotting 

dmsnyder's picture
dmsnyder

After my recent less than satisfactory experience with gummy rye bread, I returned to an old, reliable favorite of mine - Hansjoakim's 70% Rye Bread.


Total formula

Amount

Baker's %

Medium rye flour

436 g

70

First clear flour

187 g

30

Water

467 g

75

Salt

11 g

1.8


Rye sour final build

Amount

Baker's %

Medium rye flour

218 g

100

Water

218 g

100

Ripe rye sour

11 g

5


Final dough

Amount

Baker's %

Medium rye flour

218 g

54

First clear flour

187 g

46

Water

249 g

61.5

Salt

11 g

2.7

Rye sour (all of the above)

447 g

110

Note: 35% of the total flour is from the rye sour.

Procedures:

  1. The day before baking, mix the final rye sour build. This should ferment at room temperature for 14-16 hours.

  2. I used a KitchenAid stand mixer, but these procedures could be done by “hand.” Mix all the ingredients in the final dough in a large bowl. If using a stand mixer, mix for 3 minutes with the paddle at Speed 1. Switch to the dough hook and mix for 5-6 minutes more at Speed 2. The dough at this point is a thick paste with little strength (gluten development providing extensibility and elasticity). Optionally, after mixing, you can knead briefly on a floured board with well-floured or wet hands.

  3. Transfer the dough to an oiled bowl, cover it tightly, and ferment for 1 hour.

  4. Transfer the dough to a floured board and pre-shape it into a single round. Cover with plasti-crap or a damp kitchen towel and rest for 5 minutes.

  5. Shape the dough into a boule and transfer to a well-floured brotform or banneton, seam-side down.

  6. Cover the boule with plasti-crap or a damp towel and proof for two hours. (My loaf was fully proofed in 1 hr and 30 min.)

  7. One hour before baking, pre-heat the oven to 250C/480F with a baking stone and your steaming method of choice in place.

  8. When ready to bake the bread, transfer the boule to a peel. Transfer the boule to the baking stone. Steam the oven. Turn the temperature down to 460ºF.

  9. After 10 minutes, remove your source of steam from the oven.

  10. After 15 minutes, turn the oven down to 225C/440F.

  11. Bake another 40-45 minutes. Monitor the loaf color, and, if it is darkening too quickly, turn the oven temperature down further. It would be well within the rye baking tradition to do this planfully in steps, ending up as low as 205C/400F for the last 10-15 minutes.

  12. The loaf is done when the crust feels firm, it gives a “hollow sound” when the bottom is thumped and the internal temperature is 205F or greater.

  13. When the loaf is done, turn off the oven, but leave the loaf in it with the door ajar for an additional 10 minutes.

  14. Transfer the loaf to a cooling rack and cool thoroughly before slicing. It will be best to leave it 24 hours, loosely wrapped in linen, before slicing.


    This is a delicious bread with a mild to moderate sourdough tang and earthy rye flavor. The crumb is tender and moist, but not at all gummy. It's my idea of a delicious high-percentage rye bread. It will be perfect for tomorrow's breakfast with cold-smoked salmon and for dinner with split pea soup.

    I also baked a couple loaves of the Tartine Basic Country Bread, another of my favorites.


    This time, I did not retard the loaves overnight. I don't recall if I've done this before, but I really enjoyed the result. Tasted two hours out of the oven, still a little warm, the flavor was spectacular. It was very mildly sour with a sweet, complex wheaty flavor. Either with or without retardation, this is a delicious bread.

    David

    Submitted to YeastSpotting


Pages

Subscribe to RSS - sourdough bread