The Fresh Loaf

A Community of Amateur Bakers and Artisan Bread Enthusiasts.

sourdough bread

dmsnyder's picture
dmsnyder


This bread is based on the Italian Bread formula in Peter Reinhart's “Bread Baker's Apprentice.” I substituted a biga naturale (sourdough starter) for the biga made with instant yeast in Reinhart's formula. I still added the instant yeast to the final dough to provide more predictable fermentation and proofing times.

Reinhart recommends this formula for hoagie rolls. I divided the dough to make 4 rolls scaled to 4 ounces each and shaped the remainder of the dough into one large bâtard.

I also employed the “stretch and knead in the bowl” technique during bulk fermentation, even though I used a KitchenAid mixer for mixing beforehand.


Intermediate starter (Biga naturale)

Active starter

3 oz.

Water

9 oz.

KAF Bread flour

12 oz.


Final Dough

Biga naturale (Note: save the remaining 6 oz. for another bread.)

18 oz.

KAF Bread flour

11.25 oz.

Salt

0.41 oz. (1-2/3 tsp)

Sugar

0.5 oz. (1 T)

Instant yeast

0.11 oz (1 tsp)

Diastatic barley malt powder

0.17 oz. (1 tsp)

Olive oil

0.5 oz (1 T)

Water at 80F

7 oz (¾ cup)

Sesame seeds for coating.

Semolina to dust the parchment paper.


Mix and ferment the biga.

Mix the biga naturale the evening before baking. Dissolve the starter in the water in a medium sized bowl, then add the flour and mix thoroughly to hydrate the flour and distribute the starter. Cover the bowl tightly and allow to ferment for 3-6 hours, until it doubles in volume. Refrigerate overnight.

The next day, remove the biga from the refrigerator and allow it to warm up for an hour or so. Alternately, mix the biga late at night and ferment at room temperature overnight.


Mix the dough

Mix the flour, salt, sugar, yeast and malt powder in a large bowl or the bowl of your mixer. Add the biga in pieces, olive oil and ¾ cups of tepid water and mix thoroughly. Adjust the dough consistency by adding small amounts of water or flour as necessary. The dough should be very slack at this point.

I mixed the dough with the dough hook in the KA mixer for 10 minutes then transferred it to an 8 cup/2 liter glass pitcher that had been lightly oiled.


Fermentation

I stretched and folded the dough in the pitcher with a rubber spatula then covered it tightly. I repeated the stretch and fold again 20 and 40 minutes later. I then left the dough to ferment until it was double the original volume (45-60 minutes more).


Divide and form

Divide into 2 pieces and pre-form as logs. Allow the dough to rest 5 minutes or more, then form into bâtards. To make rolls, divide into 4 ounce pieces and pre-shape into rounds, then shape into torpedos. If desired, spray or brush the loaves with water and sprinkle with sesame seeds.

Prepare a couche – either a floured piece of baker's linen or parchment paper sprinkled with semolina.

Pre-heat the oven to 500F with a baking stone on the middle shelf. Make preparations for steaming the oven.

Place the loaves in the couche, cover with plastic or a towel and allow to proof until 1-1/2 times their original size (about 40 minutes).


Baking

Score the loaves and transfer them to the baking stone. Bake with steam, using your favorite method. After loading the loaves and steaming, turn the over down to 450F and bake until done (about 20 minutes for a bâtard, 15 mnutes for rolls.). If you want a thicker crust, use a lower temperature and bake for longer.


Cooling

Allow to cool before slicing, if you can.

Sourdough Italian Roll

Sourdough Italian Roll crumb

We had a couple of the rolls for lunch. They were very nice. The crust is chewy, not crunchy, and the crumb is also chewy. This is not your fluffy, cottony roll that seems standard in most sub shops and, unfortunately, most Italian delis.

I am pretty sure this is the roll I would choose for a meatball sandwich, oozing mozzarella and dripping marinara sauce. I don't think this roll would be the usual soggy mess after the first 20 seconds. However, in the interest of Science, I will volunteer to test this hypothesis. Of course, if additional volunteers were to pool their data with mine, we can be more confident of our conclusions.

David

Submitted to Yeast Spotting on Susan FNP's marvelous Wild Yeast blog


dmsnyder's picture
dmsnyder

Last bread for the day - Polish Cottage Rye from Leader's "Local Breads." This is another of my personal favorites. Today, I made it with a rye sour fed with whole rye rather than the white rye Leader calls for. I like it both ways.

David

dmsnyder's picture
dmsnyder

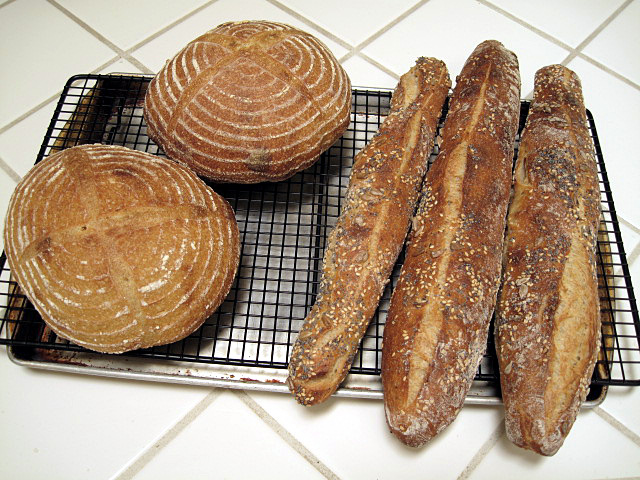
The "San Joaquin Sourdough" is my own recipe. It evolved through multiple iterations from Anis Bouabsa's formula for baguettes. Most of my deviations developed in discussion here on TFL with Janedo, who first suggested adding sourdough starter and rye, and, then, leaving out the baker's yeast and making it as a "pure" pain au levain.

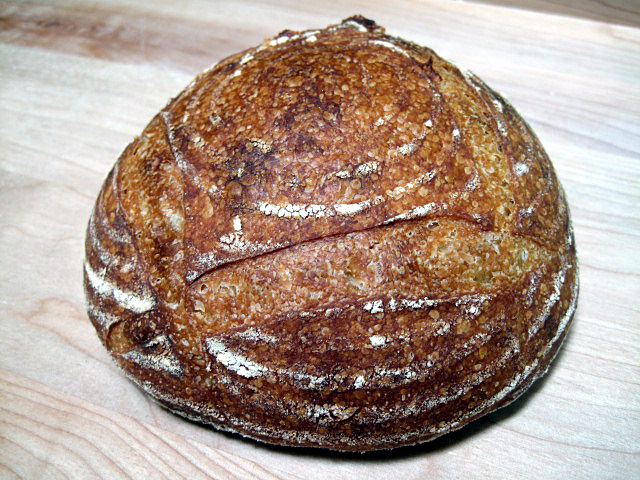
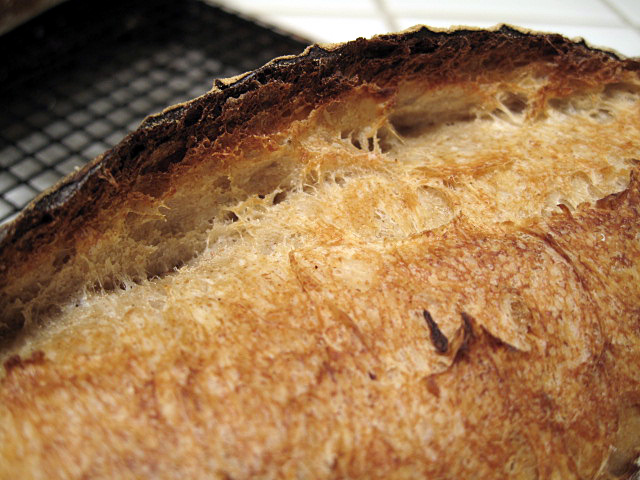
I got a pretty nice ear and grigne on this one.


Ingredients


Active starter (67% hydration)

100 gms

KAF European Artisan-style flour

450 gms

Giusto's whole rye flour

50 gms

Water

370 gms

Salt

10 gms

Note: Whole Wheat flour or White Whole Wheat flour may be substituted for the Whole Rye. Each results in a noticeable difference in flavor. All are good, but you may find you prefer one over the others.


Procedures


Mixing

In a large bowl, mix the active starter with the water to dissolve it. Add the flours and stir to form a shaggy mass. Cover tightly and let rest (autolyse) for 30 minutes.

Sprinkle the salt over the dough. Using the plastic scraper, stretch and fold the dough 30 times, rotating the bowl 1/5 turn between each stroke. Cover tightly. Repeat this stretch and fold procedure 3 times more at 30 minute intervals. 


Fermentation

After the last series of stretches and folds, scape the dough into a lightly oiled 2 quart/2 liter container and cover tightly. (I use a 2 quart glass measuring pitcher with a tightly fitting plastic lid manufactured by Anchor Glass.) Ferment at room temperature for an hour, then place in the refrigerator and leave it there for 21 hours. (In this time, my dough doubles in volume and is full of bubbles. YMMV.)


Dividing and Shaping

Take the dough out of the refrigerator and scrape it gently onto a lightly floured work surface. Gently pat it into a rectangle. Divide as desired or leave in one piece to make a 980 gm loaf. To pre-shape for a bâtard, fold the near edge up just past the center of the dough and seal the edge by gently pressing the two layers together with the ulnar (little finger) edge of your hand or the heel of your hand, whichever works best for you. Then, bring the far edge of the dough gently just over the sealed edge and seal the new seam as described.

Cover the dough with plastic wrap and/or a kitchen towel and let it rest for 30-60 minutes, with the seams facing up. (The time will depend on ambient temperature and how active your starter is. The dough should have risen slightly, but not much.)

To shape a bâtard, fold the near edge of the dough and seal the edge, as before. Now, take the far edge of the dough and bring it towards you all the way to the work surface and seal the seam with the heel of your hand. Rotate the loaf gently toward you 1/4 turn so the last seam you formed is against the work surface and roll the loaf back and forth, with minimal downward pressure, to further seal the seam. Then, with the palms of both hands resting softly on the loaf, roll it back and forth to shape a bâtard. Start with both hands in the middle of the loaf and move them outward as you roll the loaf, slightly increasing the pressure as you move outward, so the bâtard ends up with the middle highest and the ends pointed .


Preheating the oven

One hour before baking, place a baking stone on the middle rack and both a cast iron skillet (Mine is filled with lava rocks.) and a metal loaf pan (or equivalent receptacles of your choosing) on the bottom shelf. Heat the oven to 500F. Put a kettle of water to boil 10 minutes before baking.


Proofing

After shaping the loaf, transfer it to parchment paper liberally dusted with semolina or a linen couche, liberally dusted with flour. Cover the loaf with plastic wrap and a kitchen towel or a fold of the linen. Proof until the loaf has expanded to about 1-1/2 times it's original size. (30-45 minutes) Do not over-proof, if you want good oven-spring and bloom!


Baking

Put about a cup full of ice cubes in the loaf pan on the bottom shelf of the oven and close the door.

Slip a peel or cookie sheet under the parchment paper holding the loaf or transfer to a peel, if you used a couche. Score the loaf. (For a bâtard, hold the blade at about a 30 degree angle to the surface of the loaf. Make one swift end-to-end cut, about 1/2 inch deep.)

Transfer the loaf and parchment paper to the baking stone, pour one cup of boiling water into the skillet, and close the oven door. Turn the oven down to 460F.

After 12-15 minutes, remove the loaf pan and the skillet from the oven. Rotate the loaf 180 degrees, if it is browning unevenly. Close the oven door.

Bake for another 12-15 minutes, then remove the loaf and place on a cooling rack. Check for doneness. (Nice crust color. Internal temperature of at least 205F. Hollow sound when you thump the bottom of the loaf.) If necessary, return to loaf to the oven to bake longer.

When the loaf is done, leave it on the baking stone with the oven turned off and the door ajar for 5-10 minutes to dry and crisp up the crust.


Cooling

Cool on a rack for two hours before slicing.

Enjoy!

David


Submitted to Wild Yeast Spotting on Wildyeastblog

dmsnyder's picture
dmsnyder

SusanFNP's "Norwich Sourdough" is her adaptation of Hamelman's Vermont Sourdough from his book, "Bread." The recipe can be found on Wildyeastblog.com, Susan's wonderful baking blog, under "My New Favorite Sourdough."

I followed Susan's recipe with the following differences: 1) I used Guisto's Baker's Choice and Guisto's whole rye flours, 2) I baked three 500 gms loaves and froze the remaining dough in two pieces for future pizzas, 3) I cold retarded the loaves overnight, and 4) I baked the boule at 440F, 20 degrees cooler than the bâtards, to see how I liked this bread with a lighter-colored crust.

We had a few slices of the just-cooled bread with a salad for lunch. It was delicious - moderately sour with a crunchy crust and chewy crumb.

Something for blister lovers: The crust of the boule


And for the crumb-obsessed:


David

dmsnyder's picture
dmsnyder


I baked Hamelman's Roasted Potato Bread a few months ago (http://www.thefreshloaf.com/node/10934/roasted-potato-bread-hamelman039s-quotbreadquot). Floyd commented that he had used leftover mashed potatoes to make bread. That sounded interesting. And I had admired the sourdough roasted potato bread about which SusanFNP had written in February of this year. See: http://www.wildyeastblog.com/2009/02/23/roasted-potato-bread-two-ways/.

So, today I made Sourdough Potato Bread with mashed potatoes left over from last night's dinner. (No seconds on potatoes for dmsnyder! <whine>)

Sourdough Potato Bread, shaped in the "Fendu" style.


Mashed potatoes

Boil 750 gms of yukon gold potatoes in their skins until a knife goes into them without resistance. Peel the potatoes and put them through a potato ricer. Mix with 1/3 cup of chopped shallots sautéed in 4 T good olive oil. Add salt (just a few dashes from a shaker) and fresh-ground pepper (12 twists of a mill) and mix thoroughly. Add more olive oil to taste. Reheat in a sauce pan over a low fire, turning frequently to minimize sticking. (I have also heated them in a covered enameled cast iron casserole in the oven.) Serve and enjoy, but set some aside to make bread the next day!


Ingredients


Bread flour

400 gms

Whole wheat flour

166 gms

Water

215 gms

Salt

12 gms

Mashed potatoes with shallots

157 gms

Active levain (100% hydration)

200 gms

Procedures

  1. In a large bowl, dissolve the levain in the water.

  2. Add the mashed potatoes and mix. The potatoes can have some clumps, but they should be cherry-sized or smaller.

  3. Add the two flours and mix to a shaggy mass.

  4. Cover the bowl tightly and let the dough rest for 20-60 minutes to hydrate the flour and allow gluten to start developing.

  5. After the autolyse, sprinkle the salt over the dough and mix it into the dough using the method of your choice. I used the “stretch and fold in the bowl” technique. See http://www.thefreshloaf.com/node/10682/mystery-page-249-solved&rdquo;

  6. Let the dough rest, covered, for 20 minutes, then repeat the “stretch and fold in the bowl.” Repeat the rest and stretch and fold twice more at 20 minute intervals.

  7. Transfer the dough to a clean, lightly oiled glass container. (I use an 8 cup glass measuring pitcher.) Cover tightly.

  8. Bulk ferment until double in volume. Stretch and fold on the counter at 50 and 100 minutes. Then allow fermentation to continue until the dough has doubled. (About another 50 minutes.)

  9. Divide the dough into two equal pieces. Gently pre-shape into rounds. Cover with plasti-crap and allow to rest for 10-20 minutes to relax the gluten.

  10. Shape the pieces into boules, batârds or, if you want to be traditional with the potato bread, into fendu shapes.

  11. Proof the loaves in bannetons or en couche, covered with plastic to prevent drying of the surface. If you shaped fendus, proof with what will be the top of the loaf down. Allow the loaves to expand to 1.5 to 1.75 times their original volume.

  12. About 45-60 minutes before baking, preheat the oven to 500F with a baking stone in place and prepared for your oven steaming method of choice. (I currently place a metal loaf pan and a cast iron skillet, heaping full of lava rocks, on the bottom rack of the oven. About 3 minutes before loading the loaves, I dump a handful of ice cubes into the loaf pan and shut the oven door. Just after loading the loaves in the oven, I pour ¾ to 1 cup of boiling water over the lava rocks and shut the oven door fast. I remove the containers 10-12 minutes into the bake. This process also “vents” the steam, so the loaves finish baking in a dry oven.)

  13. Score the loaves as desired. (You don't score fendus, of course.) Load into the oven. Steam the oven immediately. Turn the oven down to 460F, and set a timer for 10 minutes.

  14. After 10 minutes, remove your steaming hardware.

  15. Turn down the oven to 440F. Continue baking until the loaves are done – internal temperature of 205F and the loaves give a hollow sound when thumped on the bottom. This should be about 20 minutes more. Monitor the loaves frequently for the last 20 minutes. The oil in the potatoes and, maybe, the sugar in the potatoes will cause the bread to brown more than a lean bread.

  16. Cool the loaves completely before slicing.

Enjoy!

David

Submitted to YeastSpotting

dmsnyder's picture
dmsnyder

My "San Joaquin Soudough" formula grew out of explorations of the technique used by Anis Bouabsa for his prize-winning baguettes. I have discussed this in detail in earlier blog entries on TFL. This remains one of my favorite breads, but I'm always looking for ways to improve on it.

Last week, I made some straight dough baguettes that had a wonderful flavor. I used 90% Guisto's Baker's Choice and 10% KAF White Whole Wheat in that batch. I wondered how this flour mix would work in the SJ SD. I made this as before, but slightly drier than I usually do when adding whole wheat - 70% hydration.

This was a very nice bread, as usual. The flavor of the flour mix used was not a noticeable improvement over the AP/Rye or AP/Rye/WW mixes I've used before.

I plan to make another batch of baguettes with this flour mix tomorrow, with a few minor tweaks to the procedure. I'm eager to see if last week's flavor is reproducible.

David


dmsnyder's picture
dmsnyder

Today, I baked a couple boules of Susan's "Ultimate Sourdough," a batch of Anis Bouabsa baguettes with sesame, sunflower and poppy seeds and a Polish Cottage Rye.

I've blogged about Susan's sourdoughs before. What else is there to say? I love both her "Original" and "Ultimate" sourdoughs. I can't say I prefer one over the other. The one I baked today was from Susan's recipe, but I left out the olive oil ... I think. At the moment, I can't recall whether I forgot it or not. Hmmmm ....

The seeded Bouabsa Baguettes were made at my wife's request. I've been making different breads with mixed-seed soakers recently. My wife has enjoyed them, but has told me she likes the seeds on the outside more than on the inside. Being it's Mother's Day, it seemed a good time to make something special for her.

I followed the Bouabsa formula about which I've blogged several times before. This uses Bouabsa's technique but adds 100 gms of active sourdough starter. I also substituted 10% white whole wheat flour and 5% whole rye flour. The remaining 85% was Giusto's Baker's Choice. I mixed the seeds (30 gms sunflower, 30 gms sesame and 15 gms poppy) and rolled the shaped baguettes in the mix, spread on a sheet pan, before proofing on a linen couche.

They turned out well, with a nice crunchy crust, open crumb and very tasty flavor. 

The Polish Cottage Rye is one of my favorite breads from Leader's "Local Breads." I have made it using First Clear flour with results like the photo in Leader's book. The last couple of times, I have followed the recipe and used bread flour for the wheat flour. The crumb has been very open and nothing like that pictured in "Local Breads." Using bread flour, it makes a very slack dough that requires extensive, intense mixing to develop the gluten sufficiently to allow one to form a boule that holds its shape. Leader's mixing instructions should be followed and yield good results. Both versions have been delicious. 

I made this bread today with bread flour. It just came out of the oven and "sang" at the top of its lungs. 


David

dmsnyder's picture
dmsnyder

Hamelman's Sourdough Seed Bread is basically a pain au levain made with rye and bread flour to which is added toasted sesame and sunflower seeds and a soaker of flax seeds. It has a crunchy, rather thick crust and a pretty dense crumb. Its flavor is delicious - mildly sour, even when cold retarded overnight, with well-balanced overtones from the seeds. Its flavor is not as complex as Hamelman's Five-Grain Levain, which is simply amazing, but it is a wonderful bread.

This bread has enough substance and flavor to be eaten plain. It would be wonderful with a flavorful soup or stew or with cheese or a salad. And it makes delicious toast.

It's another bread, like Tom Cat's Semolina Filone, that I like a lot but have not baked for quite a while, having been otherwise occupied by a baking agenda with way too many breads.

I baked these boules on a stone, pre-heated to 500F. A cast iron skillet with lava rocks was used for steaming. The oven was turned down to 460F after loading the loaves, and I baked them for 40 minutes.

Sourdough Seed Bread

Sourdough Seed Bread crumb

David

dmsnyder's picture
dmsnyder

I have continued to play with my formula for what I call "San Joaquin Soudough." This continuing series of experiments started with my curiosity as to whether the baguette formula of Anis Bouabsa could be applied to other types of bread than baguettes. The short answer is, of course, "yes."

The basic approach I have been using is described in detail in the following blog entry:

http://www.thefreshloaf.com/node/8454/pain-de-campagne 

The present variation used 10% KAF White Whole Wheat flour, 90% KAF Bread flour and a slightly higher hydration - 76%. The techniques for mixing, fermentation, etc. were as I have described before. So, the ingredients were:

Ripe 65% hydration sourdough starter....100 gms

Water........................................................380 gms

KAF Bread Flour.........................................450 gms

KAF White Whole Wheat Flour...................50 gms

Sea Salt.........................................................10 gms

Instant Yeast................................................1/4 tsp

The combined effect of the different flours and the higher hydration was to yield a dramatically different bread with a much more open crumb structure - really ciabatta-like.

Now, I did bake these loaves under an aluminum foil roasting pan for the first 12 minutes and then for another 18 minutes uncovered. The oven spring was massive. My scoring was obliterated. Examination of the crust coloration of the bloom revealed that the bloom occurred very early in the bake and very rapidly. (The coloration was even and not different from the rest of the crust. See my Scoring Tutorial in the TFL Handbook for further explanation.)

With the higher hydration and covered baking, the crust softened quickly during cooling. The crumb was like a good ciabatta - very tender yet still chewy. The taste is very mildly sour, even on the day after baking. It made a delicious sandwich with Toscano salami, Beaver Brand Sweet Hot mustard and lettuce. (Sorry, Mini. It definitely would drip mayonnaise in your lap.)

This bread presented me with a number of surprises, but I'm far from disappointed. I'm happy to have a "new" bread in my repertoire. 

David

dmsnyder's picture
dmsnyder


Last week, I baked Susan from San Diego's “Original Sourdough.” My description can be found at:

http://tfl.thefreshloaf.com/node/11321/susan-san-diego039s-quotoriginal-sourdoughquot

Susan also shared her formula for her “Ultimate Sourdough,” which has replaced the “Original Sourdough” as her personal favorite, I gather. The “Original Sourdough” was so good, it was hard to imagine a bread that would outdo it, and I was tempted to just make it again. But I thought the other deserved a try. So, this week, I baked Susan's “Ultimate Sourdough” - again, with some variations I will describe.

Susan's formula for her “Ultimate Sourdough” is described in her blog, here:

http://www.thefreshloaf.com/node/6927/well-i-finally-did-it

Susan's formula makes “one small boule.” I doubled the recipe. I wanted to make two boules, one to bake after overnight cold retardation, as I did with the “Original Sourdough.” I also added a bit more WW flour than Susan called for and used a different mixing and fermentation approach.


Ingredients


Active 65% hydration starter

24 gms

Water

350 gms

KAF White Whole Wheat Flour

75 gms

KAF Bread Flour

425 gms

Sea Salt

10 gms


Procedures

  1. I dissolved the starter in the water in a large bowl.

  2. Both flours were added to the water and mixed thoroughly.

  3. The bowl was covered tightly and the dough was allowed to rest (autolyse) for 60 minutes.

  4. The salt was then added and folded into the dough using a flexible dough scraper.

  5. After a 20 minutes rest, the dough was stretched and folded in the bowl for 20 strokes. This was repeated twice more at 20 minute intervals.

  6. The dough was then transferred to a lightly oiled 2 liter glass measuring “cup” with a tightly fitting plastic cover and allowed to ferment, undisturbed, until doubled. (10 hours, overnight).

  7. The next morning, the dough was very soft, puffy and full of bubbles. I divided it into two equal pieces, gently rounded them, and allowed them to rest for 10 minutes.

  8. The pieces were then formed into boules and placed in well-floured coiled reed brotforms, each of which was then placed in a food-grade plastic bag.

  9. At this point, one loaf was allowed to proof on the bench, and the other was placed in the refrigerator to retard until the next day.

  10. The first loaf was allowed to expand by about 75% (3 hours).

  11. The oven was preheated to 500F, with a baking stone in place for1 hour.

  12. The loaf was transferred to a peel dusted with semolina, transferred to the baking stone and covered with a stainless steel bowl preheated with hot tap water. The oven was turned down to 460F.

  13. After 15 minutes, the bowl was removed. The loaf was baked for another 10 minutes, then left in the turned-off oven with the door ajar for another 5 minutes to dry the crust.

The retarded loaf was baked the next day. It was allowed to proof in a warm (75F) place for 4 hours. It was baked covered for 12 minutes, then another 15 minutes uncovered. It rested in the turned off oven for 10 minutes.

Susan's Ultimate Sourdough (Not retarded)

Susan's Ultimate Sourdough (Not retarded) - Crumb

Susan's Ultimate Sourdough (Retarded)

Susan's Ultimate Sourdough (Retarded) -Crumb

The boule that was baked without retardation was very similar in taste to the one I had made using Susan's “Original Soudough” formula. It had a nice flavor and was mildly sour. The sourness increased the next day, as expected. The crust was relatively thin but crunchy the first day and chewy the second day.

The boule that was retarded had a lot less oven spring. I think it was proofed more fully than the other had been. It was a bit more sour than the un-retarded loaf, as expected, but less sour than the “Original Sourdough” retarded loaf was. Tasted 5 hours after baking, the whole wheat flavor was coming through. I expect this to mellow out by tomorrow.

Bottom line: Both of Susan's sourdoughs are wonderful. I can't say I prefer one over the other after making each once. I expect I'll be making both regularly.

Thanks again, Susan!

David


Pages

Subscribe to RSS - sourdough bread