The Fresh Loaf

A Community of Amateur Bakers and Artisan Bread Enthusiasts.

sourdough bread

dmsnyder's picture
dmsnyder

A couple days ago, I baked some baguettes with a new (to me) flour – Bob's Red Mill Organic Unbleached White Flour. The dough was much more elastic than I expected, and the baguettes had a thicker, crunchier crust and chewier crumb than expected from a flour that is supposedly 11.7% protein, the same as KAF AP flour. (The Nutritional Information on the BRM bag specifies 4 gms of protein in each 34 gm serving.)

The BRM flour acted more like a higher gluten flour than it's protein content would suggest. Now, the packaging does say it's made from hard red spring wheat. As Dan has been telling us, that's what bakers look for when they want the strongest flour. We've also heard that “protein content” is not the same as “gluten content,” and also there are differences in the “quality” of gluten in different wheats. Is that what I encountered?

I decided my next step had to be to make another bread with this flour, to be sure my baguette experience wasn't the result of something other than the flour. I wanted a recipe that I had made before and knew how the dough should be, and I wanted one that was meant to be chewy, unlike baguettes.

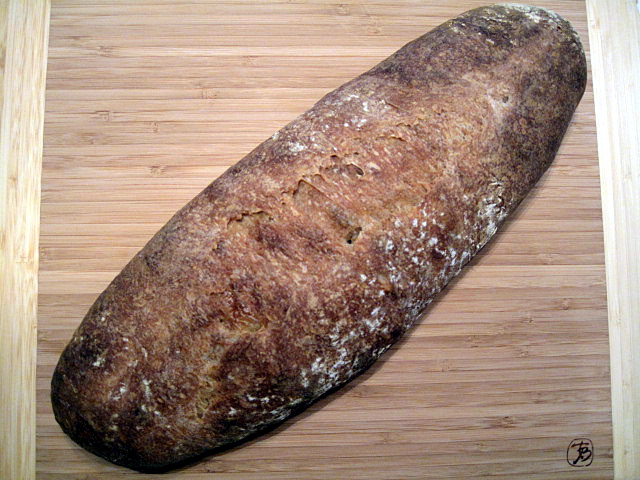
Today, I baked a couple loaves of Susan from San Diego's “Ultimate Sourdough.” Susan likes chewy bread, and her recipe calls for “High Gluten” flour. I used the BRM Organic Unbleached Flour, rather than the KAF Bread Flour or Sir Lancelot I had used for this bread before.

Again, the flour acted like a high-gluten flour. It absorbed more water than KAF Bread Flour. It made a very elastic dough that was dryer than usual – just barely tacky. I fermented the dough until doubled (7 hours) and formed two boules which were cold retarded overnight after proofing 45 minutes at room temperature.

This morning, I allowed the boules to warm up and proof for 3.5 hours to about 1.5X their original size before baking. I baked them on a pre-heated stone with steaming by pouring boiling water over lava rocks in a cast iron skillet. (Forgive me, Susan! No magic bowl.)


The result was indistinguishable in chewiness and flavor from the other loaves I've baked with this recipe. (And that is very good!) The crumb was okay but noticeably less open than usual.

My conclusion is that this flour, which has a protein content of 11.7% (by my calculation), acts like other flours I've used with 14+% protein. 

If anyone else has more information about this flour or personal experience using it, I'd love to hear about it.

I also wonder if anyone knows if "hard red spring wheat" usually has higher protein content than winter wheat, or is it's gluten content a greater percentage of the total protein, or is it of higher quality.

David

SallyBR's picture

Vermont Sourdough with Whole Wheat

July 27, 2009 - 5:15am -- SallyBR

It's been quite some time since I posted, but I wanted to share with you my new blog (about 6 weeks old only!) - I hope it is ok to post a link to it? If it is not, please let me know and I will remove this thread.


I started blogging because of he Bread Baker's Challenge that I joined in a moment of lunacy  :-)

dmsnyder's picture
dmsnyder


Even before the recent crop of beautiful breads made with James McGuire's “Pain de Tradition” formula, I had been planning to bake the “Miche, Point-à-Callière” from Hamelman's “Bread” this weekend. Hamelman attributes this bread to McGuire, whose intention was to replicate the type of bread baked by the first French settlers of what ultimately became Montreal. The name of the bread, “Pointe-à-Callière,” was the name of their first settlement.

Miche, Pointe-à-Callière

The other, more well-known, bread meant to approximate French bread of that era is Pain Poilâne. Hamelman's formula is for a 82% hydration Miche (very large boule) made with high-extraction flour. It is a pain au levain with no added yeast. The principal difference between McGuire's and Poilâne's miches is the higher hydration of McGuire's. Actually, I make this bread with 2 oz less water than Hamelman calls for, which makes it a 76% hydration dough.

I have made this bread with first clear flour, Golden Buffalo Flour (a high-extraction flour from Heartland Mills) and with a mix of bread flour and whole wheat. Personally, I prefer the results with first clear flour over the others.


Overall Formula


High-extraction whole-wheat flour

2 lbs

100.00%

Water

1 lb, 8.2 oz

76.00%

Salt

0.6 oz

1.80%

Total

3 lb, 8.8 oz

177.80%


Levain Build


High-extraction whole-wheat flour

6.4 oz

100.00%

Water

3.8 oz

60.00%

Mature culture (stiff)

1.3 oz (3 T)

20.00%

Total

11.5 oz


Final Dough


High-extraction whole-wheat flour

1 lb, 9.6 oz


Water

1 lb, 4.4 oz


Salt

0.6 oz


Levain

10.2 oz (all less 3 T)

Total

3 lb, 8.8 oz


Procedure

  1. Make the levain about 12 hours before you want to mix the dough. Dissolve the mature culture in the water, then mix in the flour. Cover tightly and ferment at room temperature. (I let the levain ripen at room temperature for about 10 hours overnight. I then refrigerated it for another 6 hours. This was a matter of my convenience. It probably did increase the sourness of the final dough, which happens to be fine with me.)

  2. To make the dough, mix the flour and water in a large bowl or the bowl of a stand mixer, if you have one that can handle this much dough. Cover and let stand for an autolyse of 20-60 minutes. At the end of the autolyse, sprinkle the salt over the dough, add the levain in chunks and mix thoroughly. Hamelman says to mix the dough at second speed for 2 to 2 ½ minutes to get a loose dough with only moderate gluten development. This time would be for a professional spiral mixer, of course. DDT is 76F. (I mixed the dough in a Bosch Universal Plus. It took about 4 ½ minutes to get what I regarded as “moderate gluten development.” I think one could easily use the “stretch and fold in the bowl” technique with this bread and achieve equally good results, if not better.)

  3. Transfer the dough to a lightly oiled, large bowl, cover tightly and allow to ferment for 2 ½ hours. Fold the dough twice at 50 minute intervals. If the gluten development was less than “moderate” after mixing, a third fold may be needed. If so, do the three folds at 40 minute intervals.

  4. After fermentation, transfer the dough to a floured board and lightly pre-shape into a round. Allow the dough to rest for a few minutes, then gently round up the dough and transfer it to a well-floured banneton. Cover with a slightly damp towel or with plasti-crap. (The miche could be proofed on a well-floured linen couche, in principle. I have never attempted to transfer a slack dough loaf of this size from a couche to a peel. I imagine the results would be … amusing.)

  5. While the bread is proofing, pre-heat the oven to 500F and set up your steaming method of choice. (Hamelman calls for heating the oven to 440F.)

  6. After steaming the oven and loading the bread, turn the oven down to 440F. After 15 minutes, remove the steam source and turn down the oven to 420F. Hamelman says the total bake time is “about 60 minutes.” You can leave the miche in the turned off oven with the door ajar for 10 minutes after the bread is done. This will dry out the crust somewhat, but this is a very wet bread, and the crust will soften.

  7. Cool thoroughly on a rack. Hamelman prescribes covering the cooled miche with baker's linen and delaying slicing for at least 12 hours. (I think I actually did forgo slicing it for 12 hours once. It is an excellent idea, but I am weak.)

Miche Crumb

Miche crumb close-up

The flavor of this bread, like Poilâne's Miche, definitely improves over 1 to 3 days. I personally like the flavor best the day after it was baked. Of course, the next day is also pretty terrific, and the next … Hamelman says that the bread gets more sour and the “wheat flavor intensifies” over several days. My experience has been that the sourness does increase. I would describe the change in flavor as “mellowing” rather than intensifying. I think that is the same as what Hamelman describes as “the flavors melding.”

This bread has excellent keeping quality. Kept in a bread bag or bread box, it is very enjoyable for a week. It also freezes well. I usually cut it in quarters to freeze, wrap each quarter in 2 layers of freezer wrap and place them in food-safe plastic freezer bags.

Enjoy!

David

Submitted to YeastSpotting


dmsnyder's picture
dmsnyder


When Shiao-Ping showed us the “Pain de Tradition” of James McGuire, I knew I was going to make it. The bread she made was gorgeous and good to eat. The techniques used were very congenial to me, since I have really had good results from “stretch and fold in the bowl” mixing with other breads. Besides, the one bread attributed to McGuire I've made (repeatedly) – the “Miche, Pointe-à-Callière” in Hamelman's “Bread” - is a wonderful bread.

I immediately thought of making this bread as a sourdough. Shiao-Ping and then Eric beat me to the draw. Here is mine.

I followed Shiao-Ping's formula. My starter has some rye and some whole wheat flour, but I used KAF Bread Flour exclusively to make the dough. I did add 2 gms of Instant Yeast, although my feeling was, like Eric's, that less would be better, particularly since my kitchen temperature was around 80F.

As I did the repeated stretch and folds, I felt the dough was not developing as well as I was accustomed to using this technique. So, for the last two sets of stretch and folds, I folded 15-20 times, rather than 8-10 times. At the end, the dough was still very loose. My inclination would have been to do a tight pre-shaping, but I stuck with the directions and just transferred the dough to a floured board to rest for 15 minutes under the bowl. I shaped a boule by gathering the edges of the dough to the center and sealing the seams. I then transferred the loaf to a well-floured, linen-lined banneton to proof.

I proofed for about 40 minutes, at which time the loaf had expanded no more than 50%. I transferred it to parchment on a peel and loaded onto my pre-heated baking stone. The rest of the baking procedure was as Shiao-Ping described.


This is the lightest-colored loaf I've baked in years. I might like this bread baked darker (by baking at a higher temperature), but the light-colored crust sure shows up the yellow pigments in the flour. Others have remarked on how yellow or “cream”-colored the crumb is on this bread. Well, my crust was too!

I baked the loaf to 210F internal temperature, then baked it 5 minutes more, then left it in the oven for 10 minutes more with the oven off and the door ajar. The crust still softened as the bread cooled.

The crumb is classic sourdough - randomly scattered holes of varying size. The mouth feel is cool and tender yet chewy. When first tasted, completely cooled, it has a lovely aroma and flavor. It is actually more assertively sour than expected.

This is a lovely bread. I'll make it again. I'd like to try it with a darker crust and a thicker one. 

David


dmsnyder's picture
dmsnyder


The San Joaquin Sourdough has been my wife's favorite bread for quite a while now. It's not that she doesn't like other breads. She thought Salome's Potato-Nut bread that I baked yesterday was “amazing.” But, if I had an “everyday bread,” I guess this would be it. The recipe and background on this bread are described in my blog entry for Pain de Campagne.

While this loaf used the method I have described a number of times, the ingredients were a bit different. I had about 20 gms of 100% hydration starter left over from another bread, so I used it and made up the rest of the 100 gms of starter from my stock 1:3:4 mixed flour starter. I'd exhausted my stock of Giusto's whole rye flour, so I used KAF Pumpernickel, which is more coarsely milled. I figured the 100% hydration starter provided a little more water, but the pumpernickel probably absorbed a little more, so I used 10 gms less water to mix the dough. In other words, I kind of faked it.

The dough tripled during cold retardation in bulk! That's probably why I didn't get much of a rise during proofing or much oven spring. The poor yeastie beasties must have been starved. <sniff>

I baked under an aluminum foil roasting pan for 10 minutes at 480F/Convection, then another 20 minutes at 460F. There wasn't a lot of oven spring, and, while there was respectable bloom, no real ear formed.


It turned out that the bread had a nice crumb structure, and the taste was as good as I've ever made, if not better. It was assertively sour, which we like. Interestingly enough, while I'd been having mild problems with the retarded dough being slacker than I wished, this dough was a bit more elastic. I can't explain it, unless it was due to the slightly lower hydration (73% vs. 75%).

I think I'll bake this bread again with 10% pumpernickel flour.

David


dmsnyder's picture
dmsnyder


This recipe was contributed by Salome, who recently joined TFL. She is Swiss, and the breads she bakes represent a bread tradition which is new to me. The Southern Tyrolean Potato-Nut Bread (Südtiroler Kartoffel- Nussbrot) particularly appealed to me, since I have made potato breads a couple of times and really enjoyed them, and I like sourdough bread with nuts. It seemed to me that the combination of the potato and nut flavors would be delicious.


Ingredients

Potatoes (steamed, roasted or boiled)

400 gms

Active 100% hydration sourdough starter

200 gms

Bread flour

500 gms

Water

250 gms

Salt

10 gms

Ground coriander

1-2 tsp

Walnuts (Lightly toasted)

100 gms

Hazelnuts

150 gms


Notes: Salome's recipe calls for a mix of hazelnuts and walnuts. My usual source of hazelnuts has very poor quality stock at present, but their walnuts are very good. So I just used walnuts.


Procedure

  1. Prepare the sourdough starter by mixing 50 gms of starter with 100 gms AP or Bread Flour and 100 gms of water. Cover and let ripen until it has expanded somewhat and is actively bubbling. (8-12 hours)

  2. Cook and peel the potatoes. Mash them or put them through a potato ricer. (Salome says she usually steams the potatoes for this bread, but I decided to roast mine, thinking I would get a more intense flavor. I used Yukon Gold potatoes and roasted them in a covered pot at 375F for about 35-40 minutes. I peeled them and put them through a ricer, directly into the mixer bowl on top of the flour.)

  3. Place 200 gms of the sourdough starter in a large bowl or the bowl of your mixer. Add the water and dissolve the starter in the water.

  4. Add the bread flour and potatoes to the dissolved starter and mix to a shaggy mass with all the flour moistened. Cover this tightly and allow it to rest for 30 minutes. (This “autolyse” allows the flour to get fully and evenly hydrated and the gluten to start to develop.)

  5. Add the coriander and salt and mix them into the dough. I then mixed in a KitchenAid Accolade using the dough hook for 13 minutes at Speed 2. There was some gluten development, but the dough was very loose. It never cleaned the side of the bowl

  6. Transfer the dough to a floured board and, with well-floured hands, stretch it into a 14 inch square. Distribute the nuts over the dough, roll it up and knead for a couple minutes to get the nuts evenly distributed in the dough.

  7. Gather the dough into a ball and place it in a large, lightly oiled bowl. Cover the bowl.

  8. Ferment the dough until it has doubled, with stretch and folds at 40 and 80 minutes. (I think a third stretch and fold wouldn't have hurt.)

  9. Transfer the dough to a well-floured bench. Divide it into 2 equal pieces. Pre-shape into logs. Dust with flour and cover with plasti-crap. Let the dough rest for 10-20 minutes.

  10. Form the pieces into bâtards and place them on lightly floured parchment paper. Dust again with flour and cover with plasti-crap.

  11. Proof the loaves until they are about 1.5 times their original size. (1.5-2 hours)

  12. 45-60 minutes before baking, place a baking stone in the oven and make pr

    eparations for

    your oven steaming method of choice. Pre-heat the oven to 450F.


  13. Bake with steam for 10 minutes, then in a dry oven for another 20 minutes. If the loaves seem to be getting dark too fast (and they  probably will), turn the oven down 10-20 degrees.


  14. Bake until the internal temperature is 205F. Remove the loaves to a cooling rack.


  15. Cool completely before slicing.


Potato-Nut Bread from the South Tyrol


Potato-Nut Bread crumb


This is a very enjoyable bread eaten without any spread or addition. It has a mildly chewy crust, once cool. The crumb is tender, as expected, and has a cool mouth feel, like many high-hydration breads. There is a mildly sour under-tone, but the predominant flavor is from the toasted walnuts. The walnuts also gave up some of their oil into the crumb, so the crumb feels like it is oiled.


I thought this bread might be good with a blue cheese, so I tried it with some Point Reyes Blue. This is a rather strong-tasting cheese, and it overpowered the bread. Maybe a fresh Chevre? A nutty Compté?


David


Submitted to Yeast Spotting on Susan FNP's  Wild Yeast blog (This week, hosted by Nick at imafoodblog)

dmsnyder's picture

Advice regarding sourdough baking in hot weather

June 29, 2009 - 4:24pm -- dmsnyder

Janedo currently has a nice entry on her blog about sourdough starter feeding and sourdough baking during the heat of Summer. (It's in French, and I haven't checked the English version.)

Anyway, Jane offers some good things to think about as the weather heats up. (It's 106F where I am today.)

Here is a link:

http://aulevain.canalblog.com/archives/2009/06/22/14168757.html

Enjoy!

David

dmsnyder's picture
dmsnyder

Hamelman's 5-grain Soudough made with rye sour is currently one of my favorite bread. The formula calls for high-gluten flour, but I have not had any for a while. I now have some KAF Sir Lancelot flour, and this is the first bread in which I used it. 

I followed the formula for ingredients exactly, as I had before. Using Sir Lancelot flour, the gluten developed a little more slowly. I think I could have given the dough another couple minutes mixing in the Bosch. I did a stretch and fold before bulk fermenting, but it could have used either more initial mixing or another stretch and fold.

The crumb was quite chewy. I'll be interested in seeing if this bread seems too "tough" when toasted.

BTW, you might notice in the first photo that the boule on the right has a duller (less reflective) crust. This was the first loaf loaded onto my baking stone, and I steamed the oven after the third loaf was loaded - maybe 45 - 60 seconds later. Even a few seconds baking without steam at the start has a pretty dramatic effect.

David

dmsnyder's picture
dmsnyder

The rolls I made with the Sourdough Italian Bread  dough were so good, I made a bigger batch today. I thought about making them larger than last time, but my wife said she wanted hers smaller. So, I made half of them 4 oz and half 3 oz. I guess you could call them "His and Hers Sourdough Italian Rolls."


One of our favorite breads is the Cinnamon-Raisin-Walnut Bread from Reinhart's "The Bread Baker's Apprentice." I don't know why I don't bake it more often. Just "so many breads, so little time," I guess. Anyway, my wife has been lobbying for me to make it for a few weeks. So ...


David

dmsnyder's picture
dmsnyder

Today, I baked a couple of boules of San Joaquin Sourdough. The dough was 75% hydration. I used Guisto's Baker's Choice flour and 10% KAF White Whole Wheat. 

I baked the boules on a stone with my usual steaming setup. However, I poured more boiling water than usual over the hot lava rocks, because I wanted to see the effect of heavier steaming. As I had suspected from previous bakes, the effect was good oven spring and bloom but reduced grigne and a shinier crust.

The flavor is good, but I do think I prefer the rye over white whole wheat in this bread.


By the way, this dough makes very satisfactory pizza too.

Pizza made from a previous batch of dough, frozen for about a month.

David

Pages

Subscribe to RSS - sourdough bread