The Fresh Loaf

A Community of Amateur Bakers and Artisan Bread Enthusiasts.

sourdough bread

swiggin's picture

Hello From Canada (1st Bread Too)

October 24, 2009 - 3:32pm -- swiggin

I just wanted to say hello, and mention what a great site this is (as everyone else knows). Also, the quality of content on here is superb, with more hints and recipes, etc, than I can use for a loaf of bread.

After recently travelling in France on my bicycle and eating a baguette a day, sometimes two a day, I was inspired to learn to make bread a more 'traditional' way, rather than with a bread machine. So now that I'm back in Canada, and in between jobs, I thought it would be the perfect time to start.

dmsnyder's picture
dmsnyder


My San Francisco Sourdough starter from sourdo.com is now two weeks old. I made another pair of my San Joaquin Sourdough breads with it yesterday. I modified my formula somewhat. I used a 60% hydration starter fed with AP flour only. I increased the amount of starter by 50%. I used KAF AP flour for the dough. I used no added instant yeast.


Ingredients

Weight

Baker's Percentage

Firm starter

150 gms

30.00%

KAF AP flour

450 gms

90.00%

BRM Dark Rye flour

50 gms

10.00%

Water

360 gms

72.00%

Salt

10 gms

2.00%


Procedure

  1. Mix the firm starter (1:3:5 – Starter:Water:Flour). Let it ferment at room temperature for 12 hours.

  2. Pour the water into a large mixing bowl. Add the starter and dissolve it in the water.

  3. Add the flours and mix to a shaggy mass. Cover tightly and let it sit for 20-60 minutes.

  4. Sprinkle the salt over the dough and mix thoroughly using the “stretch and fold in the bowl” technique. Let it rest for 30 minutes.

  5. Repeat the “stretch and fold in the bowl” for 30 strokes 2 more times at 30 minute intervals.

  6. Transfer the dough to a lightly floured board, and do one stretch and fold.

  7. Form the dough into a ball and place in a lightly oiled bowl. Note the volume of the dough. Cover the bowl tightly. Let it rest for 30 minutes.

  8. Repeat the stretch and fold on the board. Reform the dough into a ball and replace it in the bowl.

  9. Allow the dough to continue fermenting until the volume has increased 50%.

  10. Cold retard the dough for about 20 hours. (The dough had more than doubled and was full of large and small bubbles.)

  11. Take the dough out of the refrigerator and immediately transfer it to a lightly floured board.

  12. Divide the dough into two equal pieces and pre-shape them into logs or rounds, depending on whether you want to make boules or bâtards. Cover the pieces with plasti-crap and let them rest for 60 minutes. (Give them a shorter rest if the kitchen is very warm. You don't want them to expand very much, if any.)

  13. Pre-heat the oven to 500ºF with a baking stone and your steaming method of choice in place.

  14. Shape the pieces and place them in bannetons or on a couche. Cover the loaves and proof them until they have expanded by 50-70%. (30-45 minutes)

  15. Pre-steam the oven. Then transfer the loaves to a peel (or equivalent). Score them, and load them onto your baking stone.

  16. Turn the oven down to 460ºF.

  17. After 12 minutes, remove your steaming apparatus. Turn the loaves 180º, if necessary for even browning.

  18. Continue to bake the loaves for another 15-18 minutes or until their internal temperature is 205ºF.

  19. Turn off the oven, but leave the loaves on the stone with the oven door ajar for another 7-10 minutes to dry the crust.

  20. Transfer the loaves to a cooling rack.

  21. Cool the loaves completely before slicing.


The loaves were already singing when I took them out of the oven. The crust developed crackles, which can be credited to the use of AP rather than higher gluten flour and the drying in the oven (Step 19., above).


The crumb was nice and open.


The crust was crisp when first cooled and crunchy/chewy the next morning. The flavor was sweet and wheaty, like a good baguette, with the barest hint of sourness. This was po

ssibly the best tasting San Joaquin Sourdough I've made. I think I'm going to stick with this version. Next time, I may use this dough to make baguettes.

David


Submitted to YeastSpotting


dmsnyder's picture
dmsnyder

These breads were made with my recently activated San Francisco Sourdough starter from sourdo.com. I used 100 gms of starter fed with a mix of AP, WW and Rye flours, 500 gms KAF Sir Lancelot flour, 360 gms water, 10 gms salt. The formed loaves were cold retarded for about 14 hours.

The flavor is very nice. It is a little more sour than yesterday's San Joaquin Sourdough, as expected, but still only mildly sour. I'm hoping the distinctive SF SD flavor will develop over a few weeks. Stay tuned.

David

dmsnyder's picture
dmsnyder

I am again trying Ed Wood's "San Francisco Sourdough" starter. I began activating the dry starter just a week ago. It took about 5 days to get it up to speed. This is the first bread I've baked with this new starter. It's my "San Joaquin Sourdough" made without any added instant yeast and with KAF Bread Flour.

My San Joaquin Sourdough is based on Anis Bouabsa's method for baguettes, which utilizes a long cold retardation at the bulk fermentation stage. The flavor of the bread was what i usually get with this formula. It is very mildly sour. There was no distinctive "San Francisco Sourdough" flavor, but the starter is still very new, and the flavor should develop over the next month or so. We'll see.

I have another couple loaves shaped and cold retarding to bake tomorrow. Those were also made with this starter but with a more conventional method. I expect them to be more sour in flavor.

David

dmsnyder's picture
dmsnyder


I made this bread from Salome's formula a couple months ago. At that time, I couldn't get good quality hazelnuts, so I made it with walnuts only. It was very good tasting, had amazing keeping quality and was excellent after having been frozen.

A new crop of very good tasting hazelnuts finally appeared in my local Whole Foods Market, so it was time to make this bread again. Salome has posted this bread on her own TFL blog since I first made it. She made her bread using a rye sour rather than a wheat flour levain. This sounded like a great idea, so I did it.


Ingredients

Amounts (grams)

Baker's percentage

Bread flour

600

100

Roasted potato

400

67

Toasted hazelnuts & walnuts

200 (100 gms each)

33

Water

250

42

Active rye sour

200

33

Salt

10

1.7

Ground coriander

2 tsp


Notes on Ingredients

You may note that I have increased the flour for this bake. Maybe my potatoes had more water content or my flour had less. (Or my water was wetter?) In any case, the dough was even gloppier than previously as I mixed it, so, after giving it a good chance to develop but still having medium-consistency batter in my mixer bowl, I added 100 gms more flour. The ingredient list reflects this.

At this point, I'm not sure what to recommend to others except to not add “too much” flour. This is supposed to be a very slack dough. Alternative methods I would consider would be to hold back some of the water and add water as needed (rather than flour) during mixing. This has the advantage of not throwing off the percentages of other ingredients relative to the flour. Another related solution would be to plan on using the “double hydration” technique often recommended for very slack doughs. This entails initially mixing with only 2/3 to ¾ of the total water until the dough has developed some (gluten) strength, then adding the remainder of the water and mixing until it is incorporated.

Procedures

  1. The night before baking, activate the rye sour by mixing 20 gms starter with 100 gms of water and 80 gms of whole rye flour. Cover and ferment for 8-12 hours.

  2. The next day, roast, steam or boil the potatoes. Peel them.

  3. In a large bowl (or the bowl of your mixer), dissolve the rye sour in the water. Add the flour and potatoes, mashed or put through a ricer and mix to a shaggy mass. Cover and let rest (autolyse) for 30 minutes.

  4. Add the salt and coriander and mix to moderate gluten development. (10-13 minutes at Speed 2 with a KitchenAid)

  5. Transfer the dough to a floured board and, with well-floured hands, stretch it to a 14” square. Distribute the nuts over the dough, roll it up and knead for a few minutes to evenly distribute the nuts throughout the dough.

  6. Form the dough into a ball and place it in a lightly oiled large bowl. Cover the bowl tightly.

  7. Ferment the dough until doubled in volume with stretch and folds at 30, 60 and 90 minutes.

  8. Transfer the dough to a lightly floured board. Divide it in two equal pieces and pre-shape each into a log. Dust with flour and cover. Let the dough rest for 10-20 minutes.

  9. Shape each piece as a bâtard and place them, seam side down, on a linen or parchment paper couche.

  10. Cover the loaves and proof them until they have expanded to 1.5 times their original volume.

  11. 45-60 minutes before baking, pre-heat the oven to 430F with a baking stone and your steaming method of choice in place.

  12. Transfer the loaves to the baking stone and bake with steam for 10 minutes, then another 20 minutes without steam. If the loaves are browning too fast, turn the oven down 10-20 degrees.

  13. Bake until the internal temperature of the loaves is 205F.

  14. When the loaves are done, leave them on the baking stone with the oven off and the door ajar for an additional 5-10 minutes to dry the crust.

  15. Remove the loaves to a cooling rack and cool completely before slicing

I sliced the bread and tasting it after it was completely cooled. The crust had softened somewhat but was still crisp. The crumb is moist but pleasantly chewy. The nuts are soft but provide little pops of nuttiness. This is particularly true of the hazelnuts, which I roasted longer than I usually do. The overall flavor is outstanding. There is more of a sour flavor than my previous bake of this bread, presumably due to the rye sour. There is no discernible rye flavor, but it does add to the overall complexity of the flavor as well as to the sourness.

I do prefer this version with the walnuts and hazelnuts and with the rye sour. 

I'm taking one of the loaves up to San Francisco tomorrow to nourish 3 of my siblings who otherwise would be suffering with only bread from Acme, Boudin, Semifreddi, Arizmendi, Tartine, Noe Valley, etc. to eat. <sniff>


David


dmsnyder's picture
dmsnyder


Today's sourdough bread is a continuation of the experiment from last week with my modified steaming method of pouring hot water over pre-heated lava rocks in a cast iron skillet both before and after loading the loaves in the oven.

I had two new goals: In addition to trying to replicate last weeks good results, I wanted to increase the sourness of the bread and I wanted to see if I could get a “crackly” crust.

In the interest of increased sourness, I elaborated a firmer levain than what I customarily use. I fed the levain two days before mixing the dough, fermented it overnight and then refrigerated it for 18 hours. I also doubled the percentage of the levain in the formula.

I have read that lower protein flour will produce a more crackly crust, while higher protein flour produces a more crunchy, harder crust. Therefore, I used AP flour (11.7% protein) rather than the high-gluten flour (14.2% protein) I had used last week.

Since I was using a lower protein flour, I reduced the hydration of the dough to 70%. Note that the effective hydration is even a bit lower, since the levain was less hydrated also. I used the same procedures as last week except I baked the loaves slightly longer, since they were slightly larger (because of the additional levain).


Ingredients

Amount

Baker's percentage

Giusto's Baker's Choice flour

450 gms

90

Whole rye flour

50 gms

10

Water

350 gms

70

Salt

10 gms

2

Levain (50% hydration)

200 gms

40

Total

972 gms

212

Procedures

  1. Mix the flours and water to a shaggy mass. Cover and let rest for 20-60 minutes.

  2. Add the salt and levain and mix to moderate gluten development.

  3. Transfer to the bench and do a couple of folds, then transfer the dough to an oiled bowl and cover it. Note the volume the dough will achieve when doubled.

  4. After 45 minutes, do another stretch and fold, then allow the dough to double in volume.

  5. Divide the dough into two equal pieces and pre-shape into rounds. Let the pieces rest, covered, for 10-20 minutes.

  6. Shape each piece into a boule and transfer to well-floured bannetons, seam side up. Place each in a food-grade plastic bag, seal the openings.

  7. Allow to proof for 30-60 minutes (less in a warmer environment), then refrigerate for 8-14 hours.

  8. Remove the loaves from the refrigerator 2-4 hours before baking (depending on how risen they are and how warm the room is). Allow to warm up and expand to 1.5 times the loaves original volume.

  9. 45-60 minutes before baking, pre-heat the oven to 500F with a baking stone on the middle shelf and a cast iron skillet filled with lava rocks on the bottom shelf. (I suggest moving the stone ove to within one inch of the oven wall on your non-dominant side. Place the skillet next to the wall on your dominant side.)

  10. When the loaves are ready to bake, pour 1/3 cup of boiling water over the lava rocks and close the oven door fast. (Strongly suggest holding the kettle wearing an oven mitt!)

  11. Transfer the loaves to a peel or to parchment paper on a peel, and load them onto your baking stone.

  12. Immediately pour ½ cup of boiling water over the lava stones and quickly close the oven door.

  13. Turn the oven temperature down to 460F and set a timer for 12 minutes.

  14. After 12 minutes, remove the skillet. Reset the timer for 20 minutes.

  15. The loaves are done when nicely colored, thumping their bottoms gives a “hollow” sound and their internal temperature is at least 205F.

  16. When the loaves are done, turn off the oven but leave the loaves in the oven with the door ajar for 7-10 minutes to dry the crust.

  17. Cool thoroughly (2 hours) before slicing and serving.

Comments:

I autolysed the flours and water for about 30 minutes. I then added the levain and salt and mixed with the paddle in my KitchenAid for about 2 minutes. As I was switching to the dough hook, I was surprised how much gluten development had already occurred. I mixed with dough with the dough hook at Speed 2 for just a couple minutes more and already had moderate gluten development.

To what could I attribute this? The only possibilities were the increased percentage of levain and the different flour. My hypothesis is it was mostly the flour. We hear that higher-gluten flours require more mixing to develop the gluten. I was using a lower gluten flour than usual for this type of bread.

The dough consistency (Thank you, MC for this useful distinction from the SFBI!) was almost identical to that of last week's dough, so my guesstimated hydration adjustment seemed spot on.

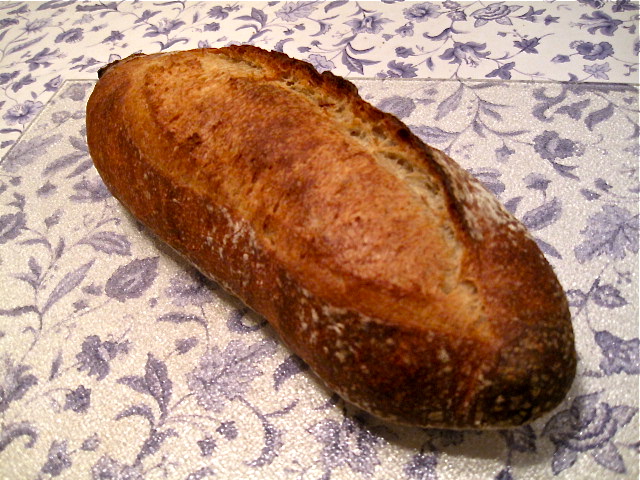
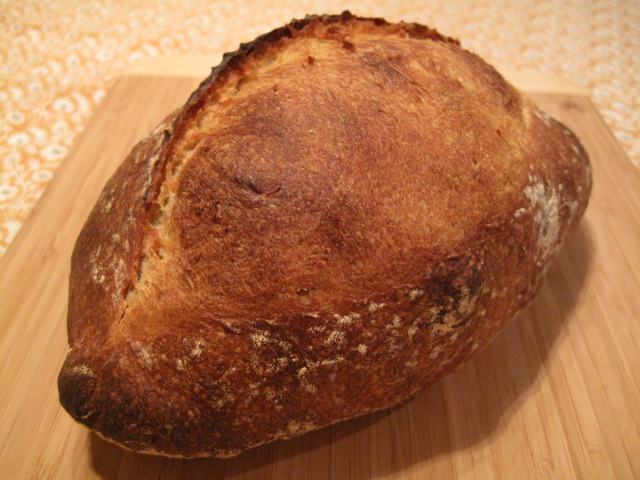
These boules were proofed for a bit over an hour before they were refrigerated. The next morning, they sat at room temperature for about 2 hours before baking. When I transferred them to the peel, they spread some. This could be because of the lower gluten flour effects, slight over-proofing or a combination of factors.

The loaves had reasonable but not great oven spring, and they had less bloom than the previous bake. This suggests they were probably over-proofed a bit. I baked them for 22 minutes at 460F. They then sat in the turned off oven for 7 minutes to dry the crust.

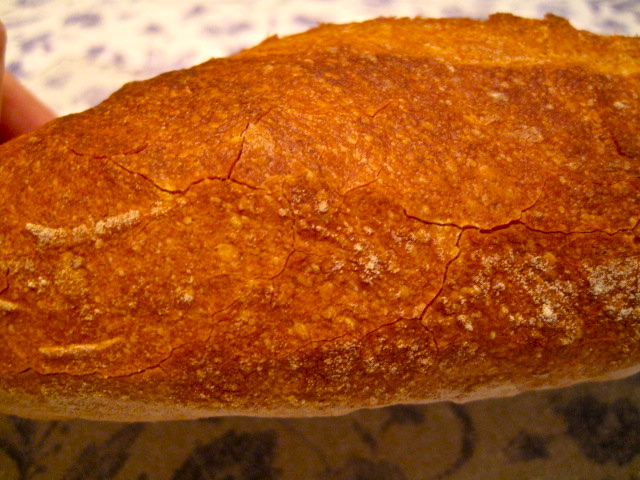
The crust was not as shiny as the last ones, but by no means “dull.” They were singing already when I took them out of the oven. It seemed to me, that the “tune” was higher pitched than the song my boules generally sing. Could this be because of the lower gluten flour? Thinner crust? And … Woohoo! Cracks began to appear in the crust as the bread cooled!

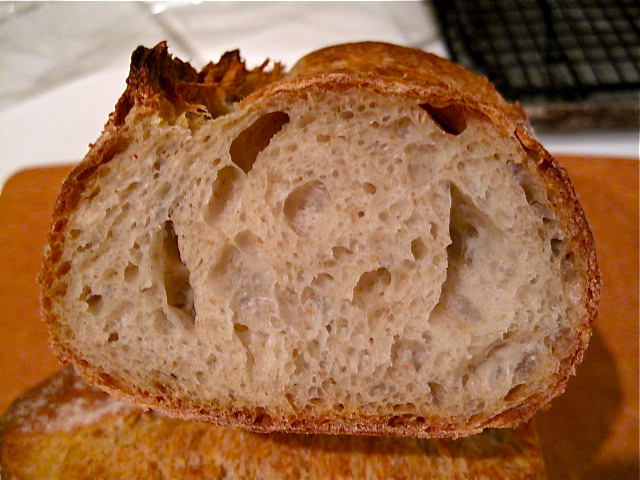
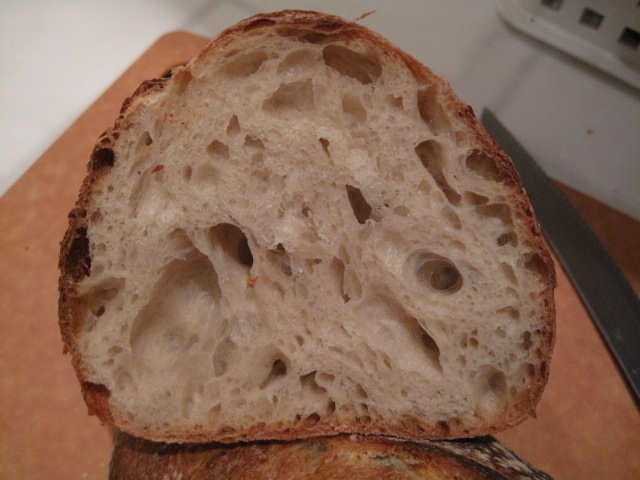
The crust has a crunchy bite. As can be seen from the crumb shot, below, it is relatively thick. I think that, to get a thin  crackly crust like a classic baguette, one must have a shorter bake at a lower temperature.

The crumb appearance was typical for my sourdoughs of this type. However, it was chewier than I expected. Very nice. The flavor was indeed more sour than last week's sourdough, as expected. I would still categorize it as mild to moderate sourness. It is not as sour as the "San Francisco Sourdough" in Reinhart's "Crust and Crumb," which uses an extremely firm levain in even higher proportions.


Conclusions:

  • Increased sour flavor with firmer levain and increased levain percentage: As expected, this loaf was more sour but not dramatically so. To get a super-sour flavor, the techniques used must be pushed further.
  • Crackled crust with lower protein flour: Today's bake seems to support this hypothesis. Is this effect desirable? That's a matter of taste, but, for me, it's at least nice to know how to get the effect when I want it.
  • The benefits of the double steaming technique: Today's results were certainly satisfactory, but they also demonstrate that steaming is just one among several variables that contribute to oven spring and bloom.


David

Submitted to Yeast Spotting


dmsnyder's picture
dmsnyder


I made a couple of sourdough boules today. I'm quite happy with them. I used a slightly different formula, but the exciting thing to me was the effect of a modification of my oven steaming method I've been meaning to try for some time.


Ingredients

Amount

Baker's percentage

High-gluten flour

450 gms

90

Whole rye flour

50 gms

10

Water

362 gms

72

Salt

10 gms

2

Levain (1:3:4 - S:W:F)

100 gms

20

Total

972 gms


194


I used KAF Sir Lancelot flour and Bob's Red Mill “Dark Rye” flour.

Procedures

  1. Mix the flours and water to a shaggy mass. Cover and let rest for 20-60 minutes.

  2. Add the salt and levain and mix to moderate gluten development.

  3. Transfer to the bench and do a couple of folds, then transfer the dough to an oiled bowl and cover it. Note the volume the dough will achieve when doubled.

  4. After 45 minutes, do another stretch and fold, then allow the dough to double in volume.

  5. Divide the dough into two equal pieces and pre-shape into rounds. Let the pieces rest, covered, for 10-20 minutes.

  6. Shape each piece into a boule and transfer to well-floured bannetons, seam side up. Place each in a food-grade plastic bag, seal the openings.

  7. Allow to proof for 30-60 minutes (less in a warmer environment), then refrigerate for 8-14 hours.

  8. Remove the loaves from the refrigerator 2-4 hours before baking (depending on how risen they are and how warm the room is). Allow to warm up and expand to 1.5 times the loaves original volume.

  9. 45-60 minutes before baking, pre-heat the oven to 500F with a baking stone on the middle shelf and a cast iron skillet filled with lava rocks on the bottom shelf. (I suggest moving the stone ove to within one inch of the oven wall on your non-dominant side. Place the skillet next to the wall on your dominant side.)

  10. When the loaves are ready to bake, pour 1/3 cup of boiling water over the lava rocks and close the oven door fast. (Strongly suggest holding the kettle wearing an oven mitt!)

  11. Transfer the loaves to a peel or to parchment paper on a peel, and load them onto your baking stone.

  12. Immediately pour ½ cup of boiling water over the lava stones and quickly close the oven door.

  13. Turn the oven temperature down to 460F and set a timer for 10 minutes.

  14. After 10 minutes, remove the skillet. Reset the timer for 20 minutes.

  15. The loaves are done when nicely colored, thumping their bottoms gives a “hollow” sound and their internal temperature is at least 205F.

  16. When the loaves are done, turn off the oven but leave the loaves in the oven with the door ajar for 7-10 minutes to dry the crust.

  17. Cool thoroughly (2 hours) before slicing and serving.

The crust was remarkably shiny when it came out of the oven. This effect, due to starch that is gelatinized early in the bake, I have only achieved before with breads baked under a stainless steel bowl for the first half of the bake. I also got quite satisfactory oven spring and bloom in these loaves which I had feared were a bit over-proofed.

It is evident that using the skillet with lava rocks for both pre- and post-loading steaming is superior to either a) pre-steaming by throwing ice cubes in a hot metal loaf pan or b) compensating for insufficient pre-loading steam by over-steaming post-loading. Some methods of steaming, when used to excess, actually interfere with the cuts opening and produce pale-colored loaves.

The bread I tasted has a delightfully crunchy crust and a chewy crumb with what I would regard as medium-strong sourness – just how I like it best.

As far as I'm concerned, this experiment was a success.

David

Submitted to Yeast Spotting


dmsnyder's picture
dmsnyder


The “Miche, Pointe-à-Callière” from Jeffrey Hamelman's “Bread” is one of my favorite breads. I've made it a great many times. But I have a confession to make: I've never made it with the proper hydration level.

It started out by my finding one of the very rare errors in this marvelous book. Hamelman's ingredient list in the “Home” version of the Final Dough calls for “1 lb., 6.4 oz (2 ¼ cups)” of water. Now, 2 ¼ cups of water weighs less than this. I initially assumed the volume measurement was correct, and I used 1 lb., 2 oz. of water. You know, this made an outstanding bread. It did have more oven spring and a higher profile than expected, but the crumb was nice and open with large holes, and it tasted great, so I kept using my “corrected” formula.

Now, “Bread” has been such a reliable book, I always doubted my solution. Finally, I compared the ingredient quantities in the 3 listings Hamelman gives with the baker's percentages he gives. It turns out that the error was really in the volume measurement, not the weight. The home recipe should call for 2 ¾ cups of water, which is 1 lb., 6.4 oz.

So, today, for the first time, I made the Miche at the 82% hydration called for in Hamelman's formula.

At the higher hydration level, this dough is not just slack. It is truly gloppy. Hamelman says to mix it 2 to 2 ½ minutes (in a professional spiral mixer) to get “moderate gluten development.” I mixed it in a Bosch Universal Plus for 17 minutes to get something less than “moderate” gluten development. Hamelman then calls for 2 or 3 folds during a 2 ½ hour bulk fermentation. I implemented the “stretch and fold in the bowl” approach and did 30 folds at 30 minute intervals over 2 hours, then I let the dough proof for another 45 minutes. (This is much like the method McGuire uses in his “Pain de Tradition,” as Shiao-Ping has shared with us. Since the Miche, Pointe-à-Callière is also a McGuire bread, according to Hamelman, using this method seemed entirely reasonable.)

I “shaped” the miche by dumping the dough onto a heavily floured board and folding the edges to the center. I made 6-8 folds. The loaf was then transferred to a linen-lined, floured banneton and proofed for 2 hours and baked with steam.


I am cooling the miche overnight before slicing. 

Miche profile

This miche still has a higher profile than those pictured in Hamelman.

Miche crumb

The crumb is about right, but, interestingly, I've gotten more open crumbs on previous bakes using somewhat lower hydration. My hunch is that the difference is related to how I did the bulk fermentation.

David


dmsnyder's picture
dmsnyder

A bowl of cherries

Hi, loafers!

I just returned from a week on the Oregon coast vacationing with our sons and their families. <sigh> It always seems too short.

I took along some previously baked breads - a Miche, Pointe-à-Callière, a Susan from San Diego's Ultimate Sourdough and Salome's Sourdough Potato-Walnut Bread. I also baked a couple loaves of San Joaquin Sourdough while there, again hazarding an unfamiliar oven and no baking stone. The breads I baked there suffered most from the scoring not opening up well. One I baked under a stainless steel bowl to steam. The other loaf was steamed by pouring boiling water into a heated skillet. The magic bowl technique worked better, I think.

I believe my older (3 years old) granddaughter ate the lioness' share of this loaf as PB&J sandwiches!

I also made AnnieT's Sourdough Pancakes with local blueberries twice. One time, I made some with roasted pecans. Yum! Highly recommended.

I took along starter in two forms: I dried some starter, and I made a very firm ball of starter about the size of a golf ball. I only ended up using the latter. It traveled for two days at room temperature without appreciable expansion. (No problems with Homeland Security.) I cut it up into very small pieces and soaked them in water for a while, then mixed the slurry well and added enough water to make an intermediate starter of about the consistency of my usual 1:3:4 (S:W:F) starter. This fermented overnight and was reasonably happy the next morning.

The other essential equipment I took along included a large Silpat mat for stretching and folding and forming loaves, an instant read thermometer, a plastic scraper and some instant yeast. I purchased a couple of large stainless steel bowls and a large cookie sheet in Oregon before heading to the beach. 

There was nothing I didn't take along that I wished I had. I think this is a good, minimal equipment list for bread baking on vacation.

My only regret is that my vacation coincided with Shiao-Ping's SFBI adventure. It would have been so neat to have met her face-to-face while she was in California! And tomorrow, I start Jury Duty. Not my choice for how to ease back into the real world after a wonderful vacation.

David

dmsnyder's picture
dmsnyder


There has been quite a bit of discussion on TFL regarding cold retardation of late. This is a recurring issue, as a site search on “retardation” will reveal. My overall conclusion has to be that, particularly for sourdough breads, there is no hard and fast rule. This is not surprising, since review of several highly-regarding bread books reveals considerable variation in how this subject is approached.

Most home bakers are fundamentally pragmatic. Some groove on the science and want to understand each process in detail, but most just want to make really good bread. Retardation is mostly a matter of convenience – to fit bread baking into a busy schedule – for both the home baker and the professional. For some, retardation during bulk fermentation works better. For others, retardation of the formed loaves is more convenient. But does the choice effect the quality of the bread?

I have generally made my own choice according to the procedures specified in the formula I was using. I've made breads that call for retardation in bulk, like Nury's Light Rye and Anis Bouabsa's baguettes, and I've made breads that are retarded after the loaves are formed, like most San Francisco-style sourdoughs. But I've never switched a recipe from one to the other, until today.

The bread I chose to make was Susan from San Diego's “Ultimate Sourdough.” I have made it several times before. I have made it without any cold retardation and with cold retardation of the formed loaves. I decided to see how it would turn out with overnight cold retardation in bulk.

Susan's formula makes one smallish boule. I generally double the recipe to make 2 small boules. This time, I tripled it to make two somewhat larger (22.5 oz) loaves. For your interest, I have included a table of ingredient quantities for one, two and three small loaves.


Ingredients


1 loaf

2 loaves

3 loaves

Active starter

12 gms

24 gms

36 gms

Water

175 gms

350 gms

525 gms

Whole Wheat Flour

25 gms

50 gms

75 gms

Hi-Gluten Flour

225 gms

450 gms

675 gms

Salt

5 gms

10 gms

15 gms

For this bake, I used KAF White Whole Wheat and Bob's Red Mill Organic Unbleached flours.

Procedures


  1. I dissolved the starter in the water in a large bowl
  2. Both flours were added to the water and mixed thoroughly.
  3. The bowl was covered tightly and the dough was allowed to rest (autolyse) for 20 minutes.
  4. The salt was then added and folded into the dough using a flexible dough scraper.
  5. After a 20 minutes rest, the dough was stretched and folded in the bowl for 20 strokes. This was repeated twice more at 20 minute intervals.
  6. The dough was then transferred to a lightly oiled 2 liter glass measuring “cup” with a tightly fitting plastic cover and refrigerated (10 hours, overnight).
  7. The next morning, the dough had expanded very little. I took it out of the refrigerator and left it at room temperature. After 3 hours, it had expanded only slightly, and I was concerned how little gas formation was occurring. I transferred the dough to a lightly floured bench and did a single stretch and fold. The dough was then returned to the bowl. From that point, it became more active and doubled in another 2.5 to 3 hours.
  8. I then divided the dough into 2 equal parts. One was preshaped into a round and the other into a rectangle. After a 10 minute rest, I shaped one boule and one bâtard, each of which was placed in a floured banneton and then in a plastic bag to proof.
  9. I proofed the loaves until they were expanded by 75% or so. They were then transferred to a peel, slashed and transferred to a pre-heated baking stone. The oven was then steamed.
  10. The loaves were baked at 480F with steam for 10 minutes, then another 17 minutes at 460F without steam. They were left to dry for another 10 minutes in the turned off oven with the door ajar.


The dough did not become too extensible during cold retardation. This may have been due to the very strong flour I used. However, I did find the crumb less chewy than expected. The crumb structure, on the other hand, was not appreciably different from what I got when I retarded formed loaves of this bread. There was no significant difference in the flavor. You might note, however, the absence of the "birds eyes" - the little bubbles of CO2 under the crust surface. 

I would not hesitate to cold retard this bread in bulk again. When I do the cold retardation would be governed by my scheduling needs. The end result is about the same: Really good sourdough bread.

David

David


Pages

Subscribe to RSS - sourdough bread