The Fresh Loaf

A Community of Amateur Bakers and Artisan Bread Enthusiasts.

sourdough bread

dmsnyder's picture
dmsnyder

I finally got around to making Hamelman's "Pain au Levain with Whole Wheat Flour." For comparison, I also baked his Pain au Levain. The former was cold retarded overnight. The latter was not. However, I did retard the firm sourdough starter used for both breads overnight, and I believe this resulted in a tangier pain au levain than my previous bakes. 

On to some photos:

Pain au Levain boules

Pain au Levain crumb

Pain au Levain crust

If I were nit picky, I'd say this dough was slightly over-fermented, and I think the loaves were slightly over-proofed. However, it had a thin, crisp crackly crust that I wish I could reproduce at will, and the flavor was delicious, with more of a tang than usual, as mentioned.

Pain au Levain with Whole Wheat Flour

Pain au Levain with Whole Wheat Flour crumb

This bread had a more complex flavor that the "regular" pain au levain when tasted 2 hours out of the oven. There was a slight WW grassiness, which I do not enjoy, and a lingering sourdough flavor, which I do enjoy. This type of bread usually tastes better to me on the day after it was baked, and I trust this bread will follow the pattern.

It's hard for me to say which of the three version of pain au levain in "Bread" is my favorite. Experience suggests it's whichever one I'm eating at the moment. I really, really like all three.

David

dmsnyder's picture
dmsnyder

Last week's successful experiment making an “Italian” bread with bulk retardation has made me want to try other types of bread using that technique and other Italian-style breads.

I've been thinking about making a Pugliese bread ever since I first read about it in Peter Reinhart's The Bread Baker's Apprentice. Have you noticed that some thoughts take longer than others to get translated into action? Well, this one has taken about 4 years. In the interim, I have accumulated a sizable number of other bread books, and several have formulas for Pugliese. Consulting these, I find amazing variation, particularly in the flours used. Some use part or even entirely Durum. Some use partly whole wheat. What they have in common is 1) Use of a biga, 2) Relatively high hydration. Most recipes specify shaping as a round loaf with no scoring. The lone exception is The Il Fornaio Baking Book which shapes and scores Pugliese like a French bâtard. None of the formulas in the books I consulted use a sourdough biga.

The formula I ended up using is my own notion of a good rustic bread baked as a large round loaf, with a nod to Puglia. I suppose I could call it “Pugliese Capriccioso.”


Ingredients

Wt (g)

Baker's %

AP flour

375

75

Fine durum flour

125

25

Water

360

74

Salt

10

2

Active starter (100% hydration)

100

20

Total

970

196

Note: For greater authenticity, one would use a firm starter. If you do, the water in the final dough should be increased and the flour decreased to keep the hydration the same in the formula.

Method

  1. Refresh your sourdough starter 8-12 hours before mixing the dough.

  2. In a large mixing bowl, disperse the active starter in the water.

  3. Add the flours and mix to a shaggy mass.

  4. Cover the bowl tightly and let it rest (autolyse) for 20-60 minutes. (Note: There is no harm in autolysing for longer, but do not decrease the time to less than 20 minutes. I often go out and run errands for an hour or more during the autolyse.)

  5. Add the salt to the dough and mix it in thoroughly.

  6. Transfer the dough to a lightly oiled, clean bowl and cover tightly.

  7. After 30 minutes, do a “stretch and fold in the bowl” for 15-20 strokes. Repeat 3 more times at 30 minute intervals.

  8. When the dough has expanded by 75% or so (about 30 minutes more), transfer it to a floured bench.

  9. Pre-shape into a ball and let the dough rest for 20 minutes to relax the gluten.

  10. Shape the dough as a boule and place it seam-side down in a floured banneton.

  11. Place the banneton in a food-safe plastic bag or cover with a damp towel. Proof the boule until the dough springs back slowly when you poke a finger into it.

  12. 45 minutes before baking, preheat the oven to 490ºF with a baking stone and steaming apparatus in place.

  13. Transfer the loaf to the baking stone, seam-side up, steam the oven and turn the temperature down to 460ºF.

  14. After 15 minutes, remove the steaming apparatus. Bake for another 30 minutes or until the loaf is done. The crust should be nicely colored. The internal temperature should be at least 205ºF.

  15. Leave the loaf on the baking stone with the oven turned off and the door ajar for another 10 minutes to dry the crust.

  16. Transfer the loaf to a cooling rack. Cool completely before slicing.


Pugliese Capriccioso crumb

The crust was crunchy, and the crumb was quite chewy. The flavor was remarkably sweet, especially given that there was no sweetener in the formula. The nutty flavor of the durum flour came through and was even more present than in the breads I've baked with a higher percentage of durum. There was little sourdough tang, although that might increase by tomorrow.

This is a bread I will be making again. I think it could stand an increase in hydration, maybe even up to 78% or so.

I also made a high-extraction miche today. This followed my formula and procedures for the San Joaquin Sourdough. The only changes were 1) I used Central Milling's “Type 85 Unmalted” organic flour for the final dough, 2) I added 5 g of diastatic malt powder to the mix, 3) rather than pre-shaping and resting for 60 minutes, after cold retardation, I let the dough ferment at room temperature until almost doubled, then pre-shaped and rested for 20 minutes, and 4) I made one large boule with the entire dough.


The crust was quite crunchy with a sweet, caramelized sugar flavor. The flavor of the crumb was sweet and earthy with moderate sourness. It was quite delicious 3 hours out of the oven, and I think it will have a long shelf life and make wonderful toast.

This is another bread I expect to be making again.


I enjoyed a slice of each with our dinner of Proscuitto with melon and Fedelini with roasted San Marzano tomatoes, garlic, bread crumbs and fresh basel.

David

 Submitted to YeastSpotting


dmsnyder's picture
dmsnyder


Yesterday, I made Chicken Cacciatore for tonight, when my sisters would be at our house for dinner. It seemed to me I should be serving some sort of Italian bread with this dinner. I didn't really feel like tackling a brand new recipe, although there are a number of Italian breads on my “to bake” list. I thought about the sourdough version of Reinhart's Italian bread from BBA which I have made many times and enjoyed. However, once the idea of formulating an “Italian version” of my San Joaquin Sourdough occurred to me, I knew that's what I was going to make.

I was delighted with the result, although I don't know that anyone more knowledgable than I regarding Italian breads would recognize it as in any way “Italian.” 

Ingredients

Wt. (g)

Baker's %

AP flour

400

80

Fine durum flour

100

20

Water

350

70

Salt

10

2

Sugar

14

3

Diastatic malt powder

5

1

Active Liquid levain

100

20

Olive oil

14

3

Total

993

199


Method

  1. In a large bowl, disperse the levain in the water.

  2. Add the flours, sugar and malt to the liquid and mix to a shaggy mass.

  3. Cover the bowl and let it rest for 20-60 minutes.

  4. Add the salt and olive oil and mix thoroughly. (Note: I squish the dough with my hands until it comes back together, then do stretch and folds in the bowl until it forms a smooth ball and the oil appears completely incorporated.)

  5. Transfer the dough to a 2 quart lightly oiled bowl, and cover the bowl tightly.

  6. After 30 minutes, do 20 stretch and folds in the bowl. Repeat 3 more times at 30 minute intervals.

  7. Refrigerate for 12-36 hours.

  8. Take the dough out of the refrigerator and allow to warm up for 1-2 hour.

  9. Divide the dough into two equal pieces and pre-shape as rounds. Cover with a clean towel or plasti-crap and let rest for one hour.

  10. Shape as boules or bâtards and proof en couche or in bannetons for about 45 minutes. (Note: Optionally, if proofing en couche, roll the loaves on damp paper towels then in a tray of sesame seeds. Alternatively, you can brush the loaves with water and sprinkle with sesame seeds. If proofing in bannetons, you would use the second method but after transferring the loaves to a peel, just before baking.)

  11. One hour before baking, pre-heat the oven to 480ºF with a baking stone and steaming apparatus in place.

  12. Transfer the loves to the baking stone. Steam the oven, and turn the temperature down to 460ºF.

  13. After 12 minutes, remove the steaming apparatus. (Note: What I actually do at this point is switch to convection bake and turn the oven down to 435ºF for the remainder of the bake.) Continue baking for another 12-15 minutes or until the loaves are nicely browned and the internal temperature is at least 205ºF.

  14. Turn off the oven, but leave the loaves on the baking stone and the oven door ajar for another 5-10 minutes to dry the crust.

  15. Transfer the loaves to a cooling rack. Cool completely before slicing.


The crust was chewy except for the ear and bottom crust which were nicely crunchy. The crumb was nice and chewy-tender. The crust flavor was sweet and nutty with the sesame flavor we always enjoy. The crumb was sweet and nutty. Absent the rye flour and with the addition of the oil, sugar, malt and durum flour, the flavor was delightful but very different from that of the San Joaquin Sourdough.

The four of us consumed 2/3 of a loaf with dinner. When I was going to slice some more, sister Ruth told me she would prefer to save it for breakfast toast. Her proposal prevailed.

I'm sure this will make delicious toast, even competing with the Hamelman 5-grain Levain I also baked this afternoon.


David

Submitted to YeastSpotting

codruta's picture
codruta

Hello everybody! There are a lot of wonderful breads here lately. I was gone in vacation, and since I got back I keep reading every post that I missed. I feel so inspired everytime I open this site and I read your stories. My "breads-I-must-try" list is already too long and it keeps getting longer. If some of you want to know how my breads looked like two years ago, when I was a beginner and I did not know anything about bread and about this site, take a look at the picture from my latest post on Apa.Faina.Sare. (pictures at the end of the post). I learned a lot in the last two years, thanks to this site and its members.

Thank you.

The last bake, before I went in vacation, was a bread from Martin's blog. Martin names this bread STUREBY DELUXE. A friend of mine had trouble with the recipe and I wanted to help him, so I baked the bread to see how will turn out. I did not have white spelt flour, so I replaced it with white flour (type "0" italian bio flour- very good), and a bit of whole wheat flour. Martin keeps a stiff levain at 70% hydration. I transformed my starter in a stiff one, for this bread. I mixed by hand and I followed his instructions, (only I added more water and I retarded the dough just 8 hours, not 10-14 hours as he recommends). This bread is very very good. The crumb is moist, chewy, full of flavour. I took 3 breads with us in our holiday and they kept very well for a week. Here are some pictures:

You can see my romanian post about this bread here: paine-alba-dupa-reteta-stureby-deluxe

I ordered some bannetons from Germany and I'm impatient to get them. It's a matter of days. Till I'll get my bannetons, I decided I'll only bake baguettes, and after that I'll throw away all the improvised baskets and linens. First breads on my list for the new bannetons will be the kamut bread that andy posted a while ago, and Faux Faux Poilane from varda's blog.

It's good to be back! Happy baking, everyone!

Codruta


codruta's picture
codruta

Recently, I bought a flour with a confusing romanian name "alac". The seller told me that is spelt, or something similar with spelt.  It was a very expensive bag of flour and I decided to use it with care. After the first bake, I was surprised by the flavor: I never felt such a deep wheaty nutty strong flavor in breads made with spelt. I thought is pure luck to find such a good flour, or maybe just an impression. I made another loaf, with AYW, using same flour, in the same ratio as before (60% "alac" flour, 10% rye flour and 30% white flour). The same wonderful result: deep rich wheaty taste, with a vague hint of bitterness. All this time I was convince I'm using spelt flour. I made a third bake, with sourdough, roasted fennel seeds and anise seeds (inspired by Hanseata and her post linked here) - this loaves were the best I've ever tasted. After that, I decided it's time to find out more about "alac" and, surprisingly, I found out that "alac" is not Spelt, but Einkorn. So... I used Einkorn flour all this time without even knowing it. That made me sad, somehow. I went back at the shop, and I bought another bag. That made me happy again.

back to bread

For the last bake, I used this formula:

Overall Formula:
- Italian white flour type "0", bio (corresponding to French T65, if I'm correct): 185 g ……………………………… 28.5%
- Einkorn Flour: 400 g ………………………………… 61.5%
- Rye Flour: 65 g ………………………………. 10%
- Water*: 495 g ………………………………………………………….. 76.1%
- Fennel seeds, roasted and crushed: 5 g ……………….. 0.77%
- Anise seeds, roasted and crushed: 2 g ……………….. 0.3%
- Salt: 13 g ……………………………………………………………… 2%
dough: 1165 g ………………………………………………. 179.2%
*I used 80g water in the levain, and 415g the water in which I boilled some beet roots, that's why the red-orangish colour.The stiff levain was build in two builds:
first build:
- White flour: 35 g
- Water: 35 g
- Sourdough (100%): 10 g

second build:
- White flour: 30 g
- Rye Flour: 40 g
- Water: 40 g
- Levain from first build: 80 g
results 190 g stiff levain 72.7%For the final dough:
- Italian white flour type "0", bio: 115 g
- Einkorn Flour: 400 g
- Rye Flour: 25 g
- Water: 415 g * see the note
- Stiff levain: 190 g
- Fennel seeds, roasted and crushed: 5 g
- Anise seeds, roasted and crushed: 2 g
- Salt: 13 g

I let the dough autolyse for 40 minutes (just water and flour, without levain and salt), Than I added the levain and the salt, I knead by hand using folds in the bowl technique and in the end I added the roasted seeds, and knead again, a few folds. The dough temperature was 24-25C. I transfered the dough in a oiled container, did 2 S-F at 50 minutes interval, for a total fermenattion time of 2h:30min. I divided the dough, shaped it and let it proof 1h:40 min, then I baked it on a baking stone, with steam for the first 15 min.

When I shaped the batard I used Khalid technique, illustrated here. I like it.

Batard: While I transfered the dough from the linen to the parchement paper, and while I scored it, I was talking on the phone. I wasn't paying attention to what I'm doing, and the batard sticked a bit to the transfer board. That's why is a little asymmetrical and the scoring is not perfect.

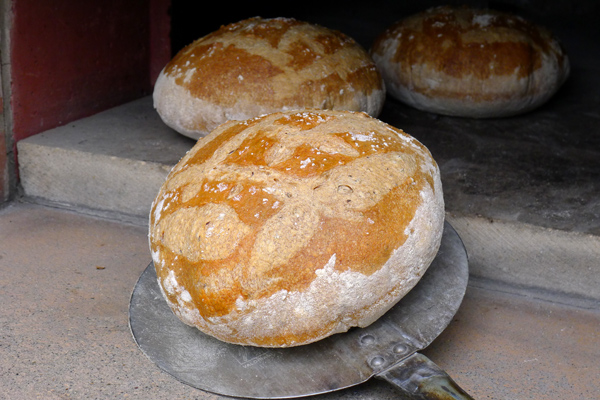
Round loaf: I proofed it with seams side down, hoping for a nice pattern to form while baking. Instead, I got a dome with no cracks. I have to practice more.

Here are the photos:


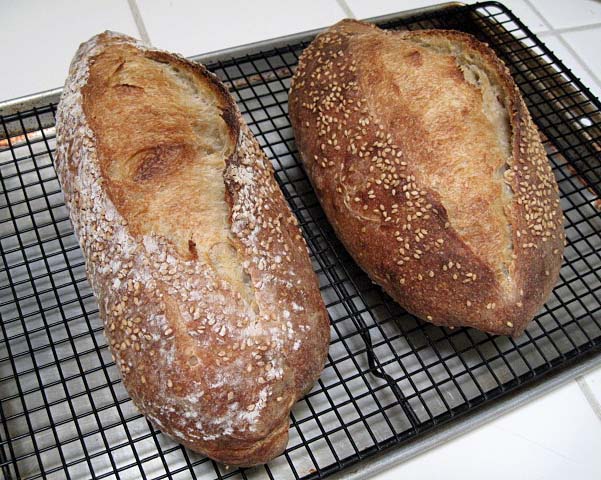
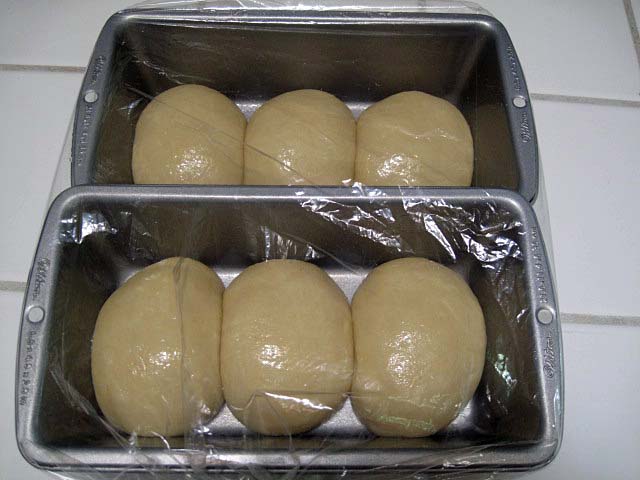
The bread I made before with AYW was 60% Einkorn Flour, 10% Rye Flour, 30% White Flour, 73% Hydration (2/3 yeast water, 1/3 water) and here are two pictures:


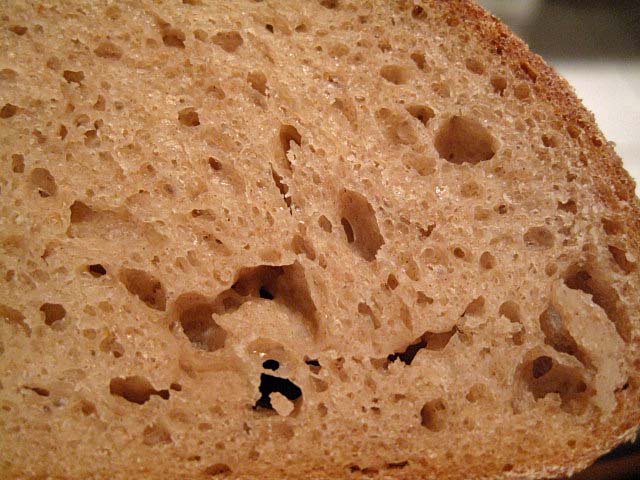
The first try with this flour was a sourdough bread. I didn't used seeds, but I used rolled germinated ryes. 60% Einkorn Flour, 10% Rye Flour, 30% White Flour, 10% rolled germinated rye, 80% Hydration, 16% prefermented flour. Photos attached below:

I never wrote a text so long in english. I hope my text is readable and comprehensible, and please correct me if some words are wrongly used.

If you'd like, you can check my romanian blog, Apa.Faina.Sare.

codruta


dmsnyder's picture
dmsnyder

The Basic Country Bread from Tartine Bread is among my favorites, but I haven't baked it in a while. After my positive experience with Central Milling's "Organic Fine Whole Wheat" flour used to make the whole wheat bread from BBA, I wanted to try it in the Tartine BCB. In summary, it was wonderful.

I shaped the loaves as bâtards and proofed them in cotton-lined brotformen. They were baked on my baking stone with my usual steaming method, rather than in cast iron dutch ovens. My starter was very frisky this weekend, and the loaves got somewhat over-proofed. The bloom suffered, but I got great oven spring and the crumb structure was nice. The crust was crunchy, and the flavor was delicious as always. 

I have made Maggie Glezer's "own" challah in the sourdough version several times. (See Sourdough Challah from "A Blessing of Bread") I really like the mild sourdough tang on top of the honey sweetness and eggy richness of this bread. Today, for the first time, I baked the challah as pan loaves. I decided to do this both to save a little time - this recipe requires a good 9 hours all together on the day the bread is baked - and because my plan was to use the bread for toast and french toast.

I divided the dough into six equal parts and shaped each as a round. Each pan got three rounds. When I was a child, the local Jewish bakery made what they called "egg bread" in this shape. I don't know if they used the same dough they shaped as braided challot, but the recipe for egg bread in Greenstein's Secrets of a Jewish Baker is less enriched than his challah.

The 470 g of dough in each pan turned out to be too little to fill the pans after the dough had tripled in volume. Consequently, the profile of the loaves is less high than what I had intended, even with very good oven spring. Otherwise, I count this a success.

Happy Baking!

David


dmsnyder's picture
dmsnyder

Besides the Whole Wheat Breads, I also baked a SFBI Miche and Hamelman's "Pain au Levain with Mixed Sourdough Starters" this weekend. 

As I have for the last few bakes, I used 50% Central Milling "Organic Type 85" and 50% Central Milling "ABC" flours for the "bread flour" in the final dough. I haven't tasted it yet, but when I sliced it 24 hours after baking it has a lovely wheaty and sour aroma with toasted nut notes from the boldly baked crumb.

When I last made Hamelman's Pain au Levain with Mixed Sourdough Starters, Andy (ananda) suggested using a more firm wheat levain and a more liquid rye sour for this bread. For this bake, I did that. I just put the amount of water called for in the rye sour into the wheat levain and the amount of water called for in the wheat levain in the rye sour. (Both call for the same weight of flour.) I can't say this accounted for any difference in the final product, although this batch was denser than usual and had a more pronounced rye flavor. This is a delicious bread, in any case. I had it for breakfast, untoasted, with just a little butter and Santa Rosa plum jam (very tart) and for lunch with Toscano salami in a sandwich.

Happy baking!

David

dmsnyder's picture
dmsnyder


It has been a while since I last made Jewish Sour Rye, but it is still a favorite of mine. Learning to make this bread, which I could no longer get locally, was a major reason I started baking bread again 4 or 5 years ago. I use a formula based on that in George Greenstein's “Secrets of a Jewish Baker.” In 2008, I worked out the ingredient weights. Greenstein gives only volume measurements. The formula for my version can be found here: Sour Rye Bread from George Greenstein's “Secrets of a Jewish Baker”

Traditional Jewish Sour Rye is made with white rye flour and first clear flour. Once I started making more German and Russian style rye breads, the flavor of white rye became less appealing to me. I started making a version of Jewish Sour Rye using dark rye instead.

Today's bake was made with a rye sour built from my stock sourdough, which is kept at 50% hydration and is fed with a 70:20:10 mix of AP:WW: Dark rye. I went through 3 builds at 12 hour intervals, doubling the volume of sour with each build. The first two were fed with BRM Dark Rye. The final build, which contained approximately half the total rye flour, was fed with a nice, finely milled medium rye flour from nybakers.com. I kept the half-ripe, final sour build refrigerated overnight and let it warm up for an hour before mixing the dough. The first clear flour I used was also from nybakers.com. I also added a half cup of altus – German-style pumpernickel (baked 5 months ago and frozen) cut in cubes and soaked overnight in cold water, then wrung out before adding to the dough. 

I needed to add an additional 1/2 cup or so of first clear flour during mixing to get the dough consistency I wanted. I suspect this was necessary because of the additional water in the altus. This dough is very slack and very sticky as it comes out of the mixer, but it shapes well with judicious flour dusting and a light touch when handling it. I divided the dough into three 528g pieces and shaped as logs. For the first time, I proofed this rye on a linen couche. This stuff is magic. Even these sticky loaves released with no dough sticking to the linen. I transferred the loaves to a sheet of parchment on my peel, because I didn't want the cornstarch glaze getting on it. The bake was as described in my previous blog entries.

I sliced and tasted the bread about 3 hours after it came out of the oven. I feared I had somewhat over-proofed the loaves. They had less oven spring than usual. However, I was very happy with the crumb structure and the texture of the crumb. It has a delicious rye with caraway flavor. It was moderately sour. The pumpernickel altus added a depth of flavor, as well as a different texture due to the cracked rye berries in in the pumpernickel dough.

This bread is still a favorite.

David

Submitted to YeastSpotting

dmsnyder's picture
dmsnyder

Franko's recent blog about his project to bake Pane tipo di Altamura (Pane di Altamura...my ongoing project) reminded me that this bread had gotten lost on my “to bake list.” I have baked a number of breads with semolina and a couple with durum (finely milled durum flour) my favorite of which has been Tom Cat's Semolina Filone from Maggie Glezer's "Artisan Breads".  However, I've never before baked an 100% durum bread. My reading about the Pane di Altamura and Franko's blog inspired me to attempt this bread, finally.

I have three books with formula's for Pane tipo di Altamura: Carol Field's “The Italian Baker,” Franko Galli's “The Il Fornaio Baking Book” and Daniel Leader's “Local Breads.” The first two use a yeasted biga and additional commercial yeast. They also use a mix of bread flour and semolina. Leader's formula uses a biga started with yoghurt and semolina flour. Leader's formula also differs from the other two in specifying a higher dough hydration. Based on my bias in favor of wild yeast and my past positive experiences with breads from Leader's book, I based my formula on his.

I deviated from Leader's formula and method in a number of ways which I will describe. I converted my stock starter to a durum biga and did not use yoghurt. The major compromise was that I only fed my starter once with durum flour. I had planned on three refreshments before the final mix, but the weather forecast is for temperatures over 105ºF for the rest of the weekend. Since it is only expected to get to a chilly 98ºF today, it seemed prudent to bump up the baking schedule and try to avoid using the oven when it's 105 or 107ºF. So, what's described is what I actually did, with notes indicating significant deviations from Leader.

Semolina biga

Wt.

Baker's %

Active sourdough starter

50 g

71

Fancy durum flour

70 g

100

Water

57 g

81

Total

177 g

252

  1. Disperse the starter in the water. Add the flour and mix thoroughly.

  2. Ferment at room temperature for 12-14 hours.

Notes

1. Ideally, one would add one or two additional builds to convert the biga to 100% durum.

2. Leader's formula for the final dough calls for 200 g of semolina biga, but his formula for the biga produces only 177 g. If you follow Leader's formula, you need to build more biga than this.

Final dough

Wt.

Baker's %

Semolina biga

170 g

34

Fancy durum flour

500 g

100

Water

350 g

70

Salt

15 g

3

Total

1035 g

207

Notes

  1. Leader's formula calls for 200 g of biga. I was only able to use 170 g. Given the very warm kitchen temperature today, using less starter is probably reasonable.

  2. Accounting for the flour and water in the biga, the final dough hydration is actually 71%.

  3. Leader specifies 3% salt in his formula without indicating why this bread has more salt than the usual 2%. Note that, if you calculate the baker's percentage of salt accounting for the flour in the biga, 15 g is actually 2.6% of the total flour

Method

  1. Mix the final refreshment of the biga 8-12 hours before the final dough mix and ferment it at room temperature.

  2. In the bowl of a stand mixer, disperse the biga in the water. Add the flour and mix with the paddle for 1 minute.

  3. Cover the bowl and autolyse for 20 minutes. (Note: Leader does not call for an autolyse, and, as far as I can tell, this is not used in Altamura.)

  4. Add the salt, and mix with the dough hook at Speed 3 for 5 minutes. The dough should be smooth and pass the window pane test. (Note: Leader says to mix at Speed 4 for 10-12 minutes. However, my dough was very smooth and passed the window pane test after 5 minutes at Speed 3. Perhaps this was a benefit of the autolyse.)

  5. Transfer the dough to a lightly oiled 2 qt container.

  6. Ferment with the bowl tightly covered for 3-4 hours or until the dough has doubled in volume. Stretch and fold in the bowl at 30 and 60 minutes. (Note: Leader does not call for the S&F's.)

  7. Transfer the dough to a lightly floured board. Shape into a boule.

  8. Dust the boule with semolina flour and place it in the center of a clean, dry kitchen towel dusted with semolina. Bring the corners of the towel to the center and tie them, “to make a snug bundle.” (Note: Leader describes this procedure being used in the Altamura bakery he visited and by the village women who brought their own dough to the bakery for baking. However, the videos I've seen of Altamura bakeries in action show the loaves being proofed en couche.)

  9. Proof the loaf at room temperature until it “balloons inside the kitchen towel” - 1-1/2 to 2 hours. The loaf is ready to bake when an indentation made by poking a finger into it springs back slowly. (Note: My loaf was proofed for 90 minutes in a 78ºF kitchen. The surface of the loaf was quite dry at the end of proofing. I imagine this contributes to the famously chaotic blooming of the folded loaf during baking.)

  10. About an hour before baking, preheat the oven to 500ºF with a baking stone and steaming apparatus in place.

  11. Transfer the loaf to a lightly floured board.

  12. Stretch the loaf into a rectangle about 6 x 16 inches, with a narrow side nearest you. Fold the near edge all the way up to meet the top edge, and seal the seam. Now, bring the folded near edge 3/4 of the way up towards the far edge, and seal the seam all the way around so the lip of the far part of the loaf is flattened. The loaf should now be shaped as a half-circle. (Note: An alternative, shape, which is also traditional, called a “priest's hat” is made by cutting a very deep cross into the boule with a bench knife and pulling the corners well apart. The opening is then dusted with semolina flour to keep it from sealing during oven spring.)

  13. Transfer the loaf to a peel dusted with semolina flour and dust the surface of the loaf with flour.

  14. Turn the oven temperature down to 400ºF. Transfer the loaf to the baking stone . Steam the oven lightly.

  15. Bake for 40 to 50 minutes until the loaf is “mahogany-colored all over and golden where it splits open.” (I removed my steaming pan after 15 minutes and switched to convection bake at 375ºF for the remainder of the bake.)

  16. Transfer the loaf to a cooling rack and cool for at least 1 hour before slicing.

    Initial mix before autolyse

    Dough mixed, ready for bulk fermentation

Pre-shaped boule, ready for proofing


Proofing 

Proofed and ready for the final shaping

Dough stretched out. First step in final shaping.

Shaped loaf, ready to bake

Pane tipo di Altamura

Pane tipo di Altamura crumb

Pane tipo di Altamura crumb close-up

The aroma and flavor of the bread are most remarkable for a prominent sourdough tang. The flavor otherwise is very nice, but I cannot identify distinctive flavors I would associate with durum, as opposed to other wheat flours. The crust is chewy over the fat part of the loaf but quite crisp over the flatter part.

David

Submitted to YeastSpotting

sortachef's picture
sortachef

If you’re anything like me, you’ve got a few sourdough starters lurking in your fridge. One I made from organic California grapes lovingly teased into fruition over 10 days some years ago. Another from rye flour that naturally ferments. And last fall’s brainchild, made from mountain berries plucked at 3600 feet. That last one yielded 6 lovely loaves and then promptly went into a funk.

But I’m going to be honest here: I don’t use any of my starters in this recipe. Every one of those starters is finicky and unpredictable at best, and when it comes to making bread, reliability is the key. So I’ve come up with a method that yields great sourdough loaves in a 3-day process. Very little attention is necessary until the third day, and the results are amazing. If you don’t have a woodfired oven, instructions on baking in a conventional oven are included as well. Go on, relax and make some sourdough!


Woodfired Sourdough Bread


Make 3 loaves, 23 ounces each


For the Starter:

2/3 cup rye flour

2/3 cup unbleached all-purpose flour

¾ cup cold water

1 teaspoon active dry yeast

Mix these together in a large bread bowl with the handle of a wooden spoon, scraping the sides clean as you go. Cover with a clean dish cloth or a loose-fitting lid and let rise in a cool place (55-60° environment) for 12-14 hours until frothy. I do this step in the early evening and let it go overnight.


First replenishment:

½ cup rye flour

½ cup unbleached all-purpose flour

3/8 cup cold water

Add these to your starter to ‘feed’ it in the morning. Scrape the sides again, put on a loose-fitting lid or a piece of plastic wrap and let it sit in a cool place for another 10-12 hours.


Second replenishment:

1 cup unbleached all-purpose flour

½ cup cold water

Feed the starter again, this time with wheat flour only. Let sit covered in a cool place for 10 hours or overnight.


Make the dough:  By morning, the starter should be bubbly and somewhat risen. It will also smell sour, which is the smell of active lactobacillus fermenting in the mix. This is good. Now add to the starter

2 cups of water at 105°

½ teaspoon of active dry yeast

4 cups of unbleached white bread flour (I use Pendleton Mills ‘Morbread’ with 12% gluten)

3 teaspoons of salt

2 Tablespoons of flaxseed meal (optional)

Mix the dough well, scraping the sides of the bowl to incorporate all the ingredients, and then knead for 10 minutes on a lightly floured surface. Return the dough to a clean bread bowl, cover and let rise for 5 hours at room temperature (68-70°).

Deflate the dough, turning it over as best you can and leave to rest for a further 1 to 1½ hours before shaping into loaves.

For Baking in a Woodfired Oven: For best results, bake this bread in an oven that has been heated for 2½ hours by a medium-sized active fire. In the last hour, move the fire from side to side to allow even heating of the floor tiles. After this time, move the active but non-flaming coals to the back, throw on a fistful of hardwood twigs and sweep the floor clean of ashes. Once the twigs have finished burning, you’re ready to bake the bread.

For Baking in a conventional oven: Line the center rack with quarry tiles or a pizza stone and preheat at 450° for at least half an hour. When the loaves are ready for baking, drop the heat to 400°.

Form the loaves / final rise: Turn the dough out onto a lightly floured counter and divide the dough into 3 equal pieces. (note: if using a conventional oven, you can only bake 2 at a time; put one of the pieces back into the bread bowl for another hour.) Form a ball with each piece by stretching the longest skin of dough across the surface and tucking it underneath.

Line 3 baskets with cloth napkins or dish cloths, and sprinkle generously with flour. Plop the dough balls into these, toss on a bit more flour, cover with the corners of the cloth and let rise for 1¼ hours in a warm place.

Once risen, turn the unbaked loaves onto either a wooden peel or the back of a cookie sheet sprinkled with cornmeal. Brush loaves lightly with an eggwhite mixed with 1 Tablespoon of water and slash as desired.

For Baking in a Woodfired Oven: Slip the unbaked loaves into the oven in a semi-circle about 12” away from the coals. Close the door all the way and bake for 1 hour, turning several times to bake evenly. Loaves are ready when the crust is medium brown.

For Baking in a conventional oven: Slip loaves 2 at a time directly onto the tiles or pizza stone. Bake for 20 minutes at 400°, lower the heat to 350°, and bake for another 40 minutes, turning the loaves as necessary to ensure even baking. Loaves are ready when the crust is medium brown.

See original publication and more photos at http://www.woodfiredkitchen.com/?p=2289

Copyright 2011 by Don Hogeland 

Pages

Subscribe to RSS - sourdough bread