The Fresh Loaf

A Community of Amateur Bakers and Artisan Bread Enthusiasts.

semolina

Isand66's picture
Isand66

I was in a creative mood the other day and decided to try something different.  I have made semolina bread before but this time I decided to convert the starter over to a semolina based concoction along with a little whole wheat flour as well.  My wife had bought a nice ball of fresh mozzarella so I figured why not incorporate some cheese and throw in some roasted peppers and roasted potatoes as well.

The dough ended up very wet due to the roasted red peppers I used from a jar had a very high water content, so you may choose to add some additional flour as you are preparing the final dough.

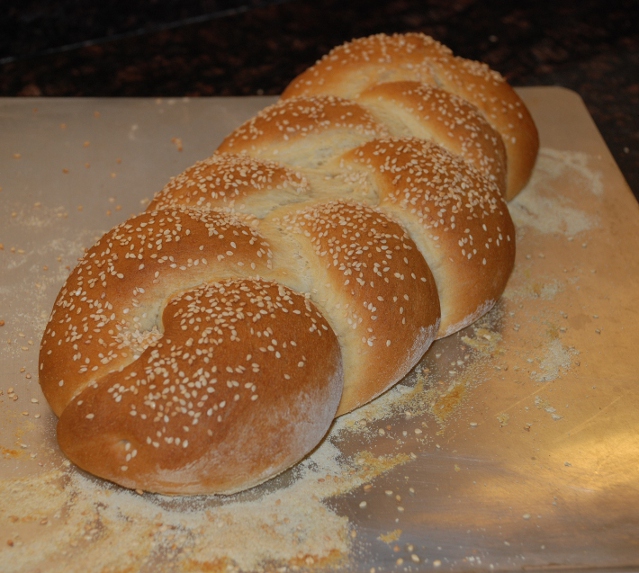
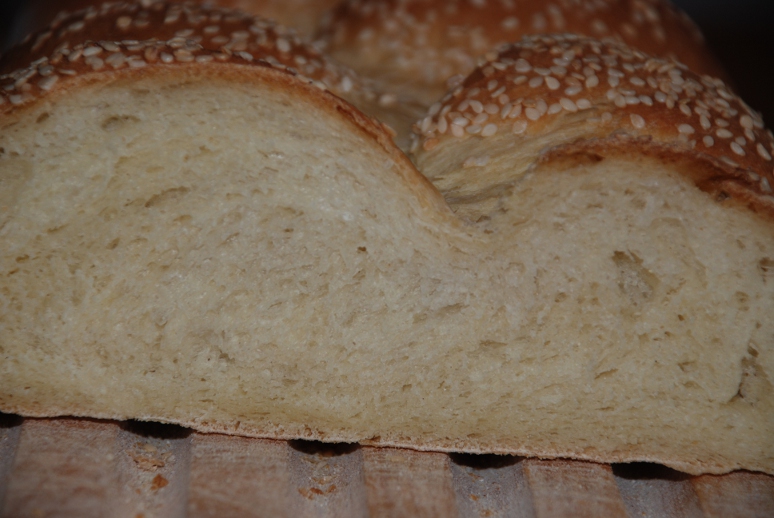
The final bread came out excellent with a nice reddish tint and a great open and crispy crumb.  You could really taste the roasted peppers and the dough had an excellent sour tang.   The only thing I would change would be to fold the cheese in before shaping the final dough rather than before putting it in the fridge for its overnight rest.

Starter

3.7 ounces White Starter, 68% hydration

8 ounces Extra Fancy Durum Semolina  Flour (do not use the course grade)

2.5 ounces Whole Wheat Flour

8 ounces Water (room temperature)

Final Dough

16 oz. Starter from above (you will have extra starter so you need to weigh this)

11 oz. Water (90 degrees F)

13 ounces French Style Flour (from King Arthur Flour-this has a 11.5% Protein level but if you don't have you can substitute with All Purpose Flour)

5 ounces  Extra Fancy Durum Semolina  Flour

2 1/2 Tsp. Salt (sea salt or table salt)

1.6 oz. Roasted Red Peppers

6.2 oz. Fresh Mozzarella

5 oz. Potatoes (I had some left-over roasted potatoes, but you can use left over mashed potatoes or make some fresh or use the equivalent instant potato flakes)

Directions

Make the Starter by adding the water to your existing starter amount and mix for a minute to break it up.  Add the flours and mix for 1 to 2 minutes until thoroughly mixed.  Put in a lightly oiled bowl and loosely cover.  Keep at room temperature for 5-6 hours until the starter becomes bubbly and doubles in size (I usually do this the night before and let it sit overnight).  You can either use the starter right away, or cover tightly and refrigerate until ready to use.  If you don't plan on using it that day, you will have to refresh the new starter before using in the final dough.

For the final dough, using your stand mixer or by hand, mix the water with the new starter to break it up.

Add the flour, potatoes, salt, red peppers (chop them up into small pieces) and mix on the lowest speed for 2 minutes.  Let rest for 5 minutes.

Mix for 4 minutes more on medium speed, adding more flour if necessary to produce a slightly sticky ball of dough.

Remove dough to your lightly floured work surface and need for 1 minute and form into a ball.  Flatten into a rectangle and add the cheese and form dough into a ball.  (You can also skip this part and add the cheese when you are ready to form the final loaves.)

Leave uncovered for 15 minutes.

Do a stretch and fold and form into a ball again and cover with a clean moist cloth or oiled plastic wrap.

After another 10 minutes do another stretch and fold and let it rest again for another 10 - 15 minutes.  Do one last stretch and fold and then put it  into a lightly oiled bowl that has enough room so the dough can double overnight.

Let the dough sit in your bowl for 2 hours at room temperature.  It should only rise slightly at this point.  After the 2 hours are up put in your refrigerator for at least 12 hours or up to 3 days.

When ready to bake the bread take your bowl out of the refrigerator and let it sit at room temperature for around 2 hours.  After 2 hours shape the dough as desired being careful not to handle the dough too roughly so you don't de-gas it.

Place it in your bowl, banneton or shape into baguettes.

Let it sit at room temperature for 2 hours covered with oiled plastic wrap or a moist cloth.

Pre-heat oven with baking stone (I use one on bottom and one on top shelf of my oven), to 500 degrees F.

Slash loaves as desired and place empty pan in bottom shelf of oven.

Pour 1 cup of very hot water into pan and place loaves into oven.

Lower oven to 450 Degrees and bake for 25 - 35 minutes until bread is golden brown and internal temperature reaches 200 degrees.

Shut the oven off and leave the bread inside with the door slightly open for 10 minutes.  This will help dry the loaves out and keep the crust crunchy.

Let cool on cooling rack and enjoy!

This post has been submitted to the Yeast Spotting Site here: http://www.wildyeastblog.com/category/yeastspotting

Please visit my other blog at www.mookielovesbread.wordpress.com for some of my older recipes.

Isand66's picture
Isand66

I have about 100 recipes and counting I want to try from old cookbooks as well as new cookbooks, not to mention all the recipes I have saved from various blog posts and websites.  Having said that I decided to experiment on my own instead and came up with a variation of Peter Reinhart's San Francisco sourdough using durum flour, stone ground barley flour and some roasted wheat germ as well.  I was very happy with the results with the exception that I didn't do a great job of shaping the loaves and they became slightly misshapen.  I do have to say though that the malformed shapes fortunately did not affect the taste.  The crumb was a little tighter than I would have preferred, but overall the bread had a nice nutty sweet flavor and went well with my wife's bow-tie pasta and chicken in a cream sauce she made tonight for dinner.

If anybody decides to try this for themselves, I would love to hear about your results.

Ingredients

15 ounces 65% Hydration Starter Refreshed

2.5 ounces Stone Ground Barley Flour (I use King Arthur Flour)

10 ounces European Style Flour from KAF (or Bread Flour)

5 ounces Extra Fancy Durum Semolina Flour (King Arthur Flour)

2.5 ounces Roasted Wheat Germ

14 ounces Luke warm water, 90 - 95 degrees Fahrenheit

2 1/2 Teaspoons Sea Salt

2 1/4 Teaspoons Instant Yeast  (you can omit the yeast if desired and let the dough sit for 1 1/2 hours to 2 hours before refrigerating)

Directions

Using your stand mixer or by hand, mix the water with the starter to break up the starter.

Add the flours, salt, yeast (if using), and mix on the lowest speed for 2 minutes.  Let rest for 5 minutes.

Mix for 4 minutes more on medium speed, adding more flour if necessary to produce a slightly sticky ball of dough.

Remove dough to your lightly floured work surface and need for 1 minute and form into a ball.

Leave uncovered for 10 minutes.

Do a stretch and fold and form into a ball again and cover with a clean moist cloth or oiled plastic wrap.

After another 10 minutes do another stretch and fold and put into a lightly oiled bowl that has enough room so the dough can double overnight.

Put in your refrigerator immediately for at least 12 hours or up to 3 days.

When ready to bake the bread, shape the dough as desired being careful not to handle the dough too roughly so you don't de-gas it. (If you did not use yeast, let it sit in your bowl for 2 hours before shaping).

Place it in your bowl, banneton or shape into baguettes.

Let it sit at room temperature for 2 hours covered with oiled plastic wrap or a wet cloth.

Pre-heat oven with baking stone (I use one on bottom and one on top shelf of my oven), to 500 degrees F.

Slash loaves as desired and place empty pan in bottom shelf of oven.

Pour 1 cup of very hot water into pan and place loaves into oven.

Lower oven to 450 Degrees and bake for 25 - 35 minutes until bread is golden brown and internal temperature reaches 200 degrees.

Let cool on cooling rack and enjoy!

This post has been submitted to the Yeast Spotting Site here: http://www.wildyeastblog.com/category/yeastspotting

Please feel free to visit my other Blog for older posts at: http://www.mookielovesbread.wordpress.com

Salilah's picture
Salilah

Well, what a cute loaf!

Using the recipe from Franko
http://www.thefreshloaf.com/node/24172/first-success-altamura-project
which builds on others - I thought I'dgive it a go.   I'd tried a version with some white flour added - but not this time...

Building the Preferment:

I used the white wheat starter I have, and couldn't measure out a small enough quantity, so ended up with
30g starter (wheat, 100%)
50g durum flour
50g water

This was in the kitchen for around 6 hours I reckon?  Bubbly and light at the end

Main Dough:

135g preferment (yes, high, I wanted to use all I had)
135g water
252g durum flour
(after autolyse, 5.6g salt)

Autolyse for around 30mins - I find the durum flour really soaks up the water!  A few S&F over the next 3 hours - fairly thorough after adding the salt, and less later.  Into the fridge overnight in a plastic container

Today - out of the fridge but still in the container for around 90 mins (driving from Cambridge to London!).  Shaped here (roughly) and covered - it didn't rise much, but I was concerned as it had had a long bulk fermentation.  About 90mins from shaping into oven

Baking: 250C for first 10 mins under a metal cloche (equals steam) then 10m at 220C, 10m at 200C, 10m at around 140C, then 10m with oven switched off (it is a small loaf!)

Results:

A very cute little loaf - I could improve my shaping, as although I did follow instructions, it is not quite right. 

However - after about 20m out of the oven (singing for at least 10m) I had to eat - really yummy!  One of the few I have felt are really successful - I could easily eat the rest of the loaf now!  Sweet taste, lovely golden crust, I'd prefer more of an open crumb but definitely worth repeating...

Very pleased - I will make this again (need to buy more flour) - a cute little lunchtime loaf!


Juergen Krauss's picture
Juergen Krauss

Inspired by the recent blogs about Pane di Altamura by Franko

http://www.thefreshloaf.com/node/24102/pane-di-altamuramy-ongoing-project

http://www.thefreshloaf.com/node/24172/first-success-altamura-project

and David Snyder

http://www.thefreshloaf.com/node/24139/pane-tipo-di-altamura-quotlocal-breadsquot,

and by the then hot weather I decided to try out this intersting bread.

In Britain I found three suppliers of Italian flours, so I ordered some.

I got semola di grano duro rimaccinata (the semolina used for bread) by Divella, from near Bari. The grains seem to be a blend from European countries.

I also got tipo 00 soft wheat flour "La Farina di Don Arcangelo", and durun semolina by the same make, both from Altamura. The semolina is coarser and makes wonderful pasta.


Here a picture of the flours:

No 1: TRS fine semolina (durum), which is availlable in Asian shops. Origin: EU countries (to compare)

No 2: La Semola di Don Arcangelo, from Altamura

No 3: Semola di grano duro rimaccinata by Divella, milled near Bari

No 4: La Farina di Don Arcangelo, from Altamura (tipo 00)

No 5: Shipton Mill No 4 organic strong white flour (my current standard flour, to compare)

To try out the Italian flours I wanted to make a bread I knew well: I used the Pugliese formula I learned at the Lighthouse Bakery with two changes:

1. I used 20% semola rimaccinata and 80% tipo 00 (for biga and dough)

2. I found an interesting baking profile in Italian bread blog: Preheat at maximum temperature, bake for 60min with no steam and turn to 200C immediately.

The result is quite amazing, my best Pugliese yet. The taste is not as sweet as the one made with English flour, but it has more depth, and an amazingly elastic yellow crumb. A good contrast to the thick crunchy crust.

Next I tried an Altamura style bread, but I got rushed, and the temparature in our kitchen dropped.

Not quite understanding the durum leaven I mixed too early. The resulting bread took a long time to raise, the crumb is uneven and it tastes very sour. But I am satisfied with my first attempt, I really like the consistency and feel of the semolina dough.

Here a picture of the loaf:

All in all it is great fun to work with these flours,

and it is really wonderful to find so much inspiration here on TFL.

Special thanks to Franko and David,

Juergen

 /* UPDATE */

The inside of the Altamura bread:

I think the main problem here was fermentation control: The temperature in the kitchen dropped by about 5C during the last elaboration of the starter, and the effect was more drastic than on wheat or rye starters. I used the starter far too early. Lesson learned

The sources for the flours:

http://www.mattas.co.uk for the Divella semolina

http://www.mediterraneandirect.co.uk/ for the altamura flours - they seem to be out of stock now (as of 8 July 2011)

DeCecco has an online shop (for European countries) where they sell Semola di grano duro rimacinata. They are based in Puglia,but like Divella they seem to use grains from all over the place. I didn't try that (yet).

http://www.dececco.it/eshop/en/


Winnish's picture
Winnish

CHALLAH made of white flour mixed with semolina flour.


Soft, rich and lightly sweetened CHALLAH


Recipe and more photos - please check my blog at this link

Google translator is available on top left side-bar


Syd's picture
Syd

Thanks to JoeVa for this detailed recipeI have made it three times now.  The first time my hydration was 60% as per JoeVa's recipe.  I didn't stick closely to the mixing instructions and worked the dough more than JoeVa recommended.  The crumb wasn't as open as I had hoped.  On the second time I upped the hydration to 63% and followed JoeVa's recipe to the letter. The crumb was nice and open.  On my third attempt, I once again increased the hydration: this time to 65%.  There wasn't much difference between the second and third attempts.

I retarded for 12 hours. It had a mild tang and it was delicious fresh on the first day.  It was similar in texture to a baguette with a razor sharp crust and soft interior.  I really like that contrast. 

On day two it made a good BLT, although that crust was dangerously hard and sharp after being lightly fried in the bacon renderings (and, yes, I know it isn't healthy, but it is delicious :).  I am wondering if that diamond crust has anything to do with the hard nature of semolina. 

Best,

Syd


Librarian's picture
Librarian


I came across this recipe in paper and thought it was worth a try, all the ingredients make this one a pocket full of flavour, which I am sure you will enjoy.

I try my best to explain where and why I deviated from the original recipe with bold and italic letters...

-----------------------------------------------------------------

Time to bake: ~ 1h15

Fermentation time: 18 hours sponge ( original )  // 13-14h my way

20 min , another 40 min ( original )   // 30 min autolyse / 1h / 1h

for the final dough.

Makes 2 loaves


-----------------------------------------------------------------


Ingredients:

-----------------------------------------------------------------


500g bread flour

250g semolina

150ml(g) milk lukewarm

150ml(g) water lukewarm x2 = 300 ml

60g butter

50g Wheat germs  

20g Malt               // I used 30g barley malt syrup

10g live yeast = 3.3g dry yeast = 1.1 instant active dry yeast ( If I am correct, please recheck to be sure , i only use live yeast )

some olive oil


-----------------------------------------------------------------

The sponge:

Combine 250g bread flour, 5g of the yeast an 150ml of water to a smooth, pliable dough The recipe didnt specify, I mixed 10 min with my Kitchen Aid on setting 3. I knew in advance that 18h  just would not work for me, so I added a teaspoon of sugar to accelerate the process a tiny bit and got away with around 14h. This is a rather small ammount of yeast, the time letting the sponge rest so long is well invested. It should double. I left it in a sealed plastic dough container at room temperature.


-----------------------------------------------------------------

The dough:
Mix the sponge with the rest of the bread flour, the semolina the wheat germ, the malt, the rest of the yeast with the milk and melted butter and salt. I melted the butter and added cold milk from the fridge which made the whole thing lukewarm. The recipe states to mix all the ingredients stated above and THEN add another 150ml of water after that, I thought that was rather silly, it is always harder to incorporate liquid into a dough later on than the other way around so I added the warm water with the milk and butter right away.


Knead the dough 10-12 minutes forceful with your hands on a counter well dusted with flour. This is a VERY sticky dough.


The original recipe states to oil up the dough and then let rest for only 20 min at a higher temperature in the oven. Being I worked with semolina before I knew it would take more time to absorb the water so I decided to let the dough autolyse for 30 min. Furthermore it makes it easier to shape the bread and gives more structure.


Much better after 30 min and still slightly sticky, but thats ok. knead again for 2,3 minutes. Instead of 20 min at higher temperature I decided to put oil on the surface as stated, but let the dough rest at room temperature for an hour

Divide the dough in 2 and roll it up on the counter, I am sure you can do better than I did.

Roll over the short edge into loafs:

Let the end be on top like in the picture this way you have the flour on the upside later on. The original states 20 min proofing time. I gave it another hour, covered with a moist towel

The bread will rise a decent ammount, at this point I thought I should maybe have rolled it up much flatter...maybe next time.

Baking:

Bake for 10 minutes at 250Celsius/485 Fahrenheit thend turn down to 190/375. Depending on your oven you might want to keep it open for a few seconds,

250 is rather hot and the bread turned dark very quickly.

I cheated with the flour afterwards abit. I didnt have enough down on the counter when rolling up, I always find it hard to make make rolled up bread like that stick together if you use to much flour, I forgot to add on top before putting it into the oven :(

Here the crust/crumb shot while still cooling off:


Resume:

I will definilty be making this again, the long fermentation adds suprising taste for "just" a yeast bread. The wheat germ adds a slightly nutty taste along with the texture of the semolina this is a very good bread. When I had a taste while it still was a bit warm it almost tasted a bit like a panini. I have seen much more ammount of enrichments in other breads, with quite less taste. I do hope, that if you try this you will enjoy every bite of it.

Submitted to YeastSpotting


varda's picture
varda


Sometimes it's all about the flour.   I have two bags of flour in my cupboard that I've been dying to use.   One is a 00 flour that I unexpectedly found carried by an store in the center of town.   Lexington, Massachusetts isn't exactly a food town.   The only bread bakery in town carries vast yeasty undercooked loaves that make me gag.   And an Italian grocery / sandwich shop has been there for 2 years without me ever setting food in it.   I simply didn't believe it would be worth my while.   It was.   Ergo 00 flour - surprise, surprise.  The second flour was a bag of semolina that I picked up on my food excursion to Watertown in an Armenian grocery.   I didn't need it - I already had two bags of semolina at home.   Ah well, I buy flour like some people buy shoes.   I know that 00 flour is for pizza.   At this point I really know it since I made pizza dough the other day and handed it off to the resident pizza chef and it was really remarkable - crisp and light.  But I wanted to make bread.    And came upon a recipe on King Arthur - http://www.kingarthurflour.com/recipes/sesame-semolina-braid-recipe - that uses both KA Italian Style flour and semolina.   I had to try it.   I converted to weight and metric and made a few more changes - I am reducing salt by around half nowadays for health reasons in all my breads; added more water than called for just to get the dough to adhere; and used 00 instead of the Italian style.   Here is the formula:


00 flour

239

60%


Semolina

161

40%


yeast

7


salt

4

1%


non-diastatic malt powder

20


Olive oil

25


water

241

67%


sesame to sprinkle


Mix all ingredients but sesame and knead for 5 minutes


(used Kitchen Aid for kneading)


Bulk ferment in bowl until puffy


Cut in three sections, roll out, and braid


Cover and proof until double


Spritz with water and sprinkle with sesame seeds


Bake for 27 minutes at 400 with some steam at the beginning


I forgot the step in the original where the dough rests for 30 minutes between mixing and kneading.  

This results in a soft tender bread which has the subtle flavor of its flours.   Not flashy, but really good.   Also quite a large loaf - fifteen inches long.

And the flour:


ph_kosel's picture
ph_kosel

Last night, sometime past midnight, I got a craving for sourdough rye bread.  I had dark rye flour and some starter I made from the same flour a couple weeks back, the first time I made my own starter instead of using commercial stuff from sourdo.com.

Also, I was looking for something to do with the bag of semolina I got at the bulk foods section of the local Winco Foods market, the same place I got the rye flour.  Found a post on TFL about a sandwich loaf made with semolina that got huge oven spring and decided to throw some in the mix.

Anyway, sometime past midnight and suffering from caffien-induced sleeplessness I whipped up a batch of dough as follows:

Ingredients:

50g Semolina (yellowish stuff, coarser than bread flour)

200g unbleached bread flour

250g dark rye flour

333g water (I suppose I could just use ml but I don't have a graduate like I used to use in chemistry class once upon a time)

1.5 teaspoon salt

~1 tablespoon of my homebrew rye starter from the fridge - sorta neglected, sour and hungry stuff

Procedure:

Mixed the dry ingredients in one bowl, the water and starter in another bowl, added the liquid to the dry stuff, and tried to make dough with my recently purchased Danish dough whisk that was actually made in Poland.  Found the dough was too thick to mix with the whisk so turned it out on the counter and kneaded it into submission - sticky stuff, but not as sticky as I recall similar dough with no semolina being. Made a log of the dough and plopped it in a breadpan lightly greased with olive oil, spritzed the top with oil, and covered it with plastic wrap.

Results (so far):

Got up around noon, found the stuff hadn't begun to rise noticeably.  At this hour (9PM my time) it has risen some but not enough to fill the bread pan.  More later, time to watch Hawaii 5 OH.

johannesenbergur's picture
johannesenbergur

So... time to try something new and the pictures of the pita breads on the right side of TFL has always appealed to me.

Being European, I had to use some other measurements and didn't bother getting the exactly like the recipe, so here's what I did, inspired by http://www.thefreshloaf.com/recipes/pitabread.

Ingredients: (Made 8 pita breads á 50g)


  • 1 dl tepid water
  • 15g fresh yeast
  • ½ dl plain natural yogurt (I can't seem to stop using this in my creations)
  • 5g sea salt
  • 5g honey
  • 10g olive oil
  • 50g durum/semolina flour
  • 150g regular wheat baking flour + some for dusting and adding as nessecary.
  • Optional: Spices (I used a tiny bit of ground chilli, smoked paprika and ground cilantro)


Mix the yeast with the water, add the yogurt, oil, salt and honey, mix well with a fork, till it's a greyish, oilish mixture.
Add the flour, a little at a time (100g) and stir with the fork as long as it makes sense.

Knead for around 10 mins or so. Let it rise under a luke warm tea towel in a warm place for 30 mins.

Carefully fold and strech the dough, and make a sausage. Cut the dough-sausage into appropriate size lumps, I weighed them and made them 50g. Let the pieces rest and rise for 5 mins.

Use a rolling pin to flatten the dough and hopefully you'll succeed in making them circular as well. Just make it really thin, not paper thin, but 3-5mm thick.

By this time your oven should be really hot (max. heat) and if you have a baking stone (which helps), it should be hot as well. Place the pancake lookalike dough onto the stone and bake them for 3 mins in 200°C or to taste. The breads should blow up like balloons.

Cut them up sidewise and enjoy your pitas.

Filling suggestion:
Garlic and herb roasted shoulder of lamb, sweet corn, tomato, cucumber, salad leaves and hot salsa.

...I'm going to quit blogging now and eat some more...

Pages

Subscribe to RSS - semolina