The Fresh Loaf

A Community of Amateur Bakers and Artisan Bread Enthusiasts.

semolina

Marc Brik's picture
Marc Brik

I was curious (again) .... I was wondering if pepper, if baked, would hold its flavour and heat... well it holds it heat a little there is a nice tinge on the tip of the tong after a few bites. But I was supprised what a nice flavour black pepper actually has. 

The bread is light,soft with a nice crumb. So; all with all, it worked really well.

Black pepper bread

You can make this dough without the sourdough starter, remove the sourdough and increase the dried active yeast to 20gr. The sourdough just gives that nice extra flavour.

Almond ground raw                             20 gr

Black pepper corn toasted                    10 gr

Anise seed toasted                                 5 gr

12% white flour                                     850 gr

Rye meal stoneground                         50 gr

Semolina                                              100 gr

Gluten flour                                           25 gr

Water luckwarm                                  650 ml

Yeast active dried                                  10 gr

Sourdough starter 60% hydration      107 gr

Salt                                                         20 gr

a)      For a starter: mix rye, semolina, water, starter, yeast, 300 gr flour. Activate to double volume

b)      Meanwhile: dry toast pepper &  anise seed, cool and ground in spice grinder

c)       Once the starter has reached the volume, quickly mix ALL ingredients together

d)      Auto lease for 20 minutes

e)      Kneed to fine window pane test, this takes a while

f)       And yes the dough is sloppy

g)      Let it rise to double to triple the volume.

h)      Divide in 450gr portions

i)        Round up, roll out, roll up, quarter turn, roll out and roll up

j)        Place on baking tray, I use baking paper

k)      Preheat the oven to 200°C, top and bottom heat no fan

l)        Make incisions  any pattern you like, dust with rye flour

m)    Cover with a light cloth, and rest until double in volume

n)      Pre-steam the oven with a spray bottle and a little container of water in the oven for 2 minuteso)     

o)      Bake the loafs for 20 minutes

p)      Check by tapping the baked bread on the bottom, it needs to sound hollow

q)      Cool on a cooling rack

r)       Very nice with some old cheese, like mature Gouda.

s)       “Eet smakelijk” 

dabrownman's picture
dabrownman

With David Snyder recent post of his new take on SFSD with higher amounts of Semolina and Ian’s new bread with semolina, it was only natural that another semolina bread would fit in this week. This one had a small amount of Desert Semolina - 150g.  We wanted to see if the high gluten, not just protein, claims were true.


The bread has 35% whole grains that included millet, another yellow grain and Kamut a durum variety that has a yellow cast too.  We didn’t want the whole grains to take away from the yellow crumb color we were shooting for the Desert Durum.  The small amount of honey was there to sweeten the non yellow AP flour since the yellow ones are pretty sweet all by theselves.


This bread was leavened with combination yeast water and mainly whole grain SD starters.   For the liquid in the dough we used the left over soaker water from our last 100% whole grain pumpernickel bread.  We added some ricotta cheese in keeping with this Altamura shape and Italian leanings of this bread – plus we are growing to like cheese in bread and the moisture it imparts to the crumb.


Since the color of the dough was yellow we thought green add ins would be appropriate and included pumpkin seeds and pistachios along with some millet seeds.  This bread isn’t as complex as some of the others we bake but it wasn’t meant to be since this is about as white a bread as we usually get around to making and we were getting low on white …..eeerrrr….yellow bread.


The levains were built separately over two builds and 8 hours.  The SD portion has spent a few days in the fridge before the final build to get it nice and sour.  The method is similar to or recent bakes but only this time only a 1hour autolyse, with the salt, was used.  We did 10 minutes of slap and folds until the dough was silky smooth and the gluten well developed. 


We incorporated the add ins on the first of 3 S&F’s which were done 15 minutes apart.  After 1 hour of ferment on the counter, the dough was bulk retarded for 14 hours.  In the morning it was allowed to warm up o the heating pad for 2 hours.  It was then shaped Altamura style but once again, it came out too long for the 12” mini oven so we folded each end under to shorten the shaped dough without having to redo it all.


After a 2 hour final proof on the heating pad, we started up the mini oven for preheat with the bottom of the broiler pan 1/4 full of water.   The bread was baked at 450 F with (2) of Sylvia’s steaming cups on the top of the broiler pan with the dough.   After 12 minutes we removed all of the steam and turned the oven down to 425 F, convection this time.


After 5 minutes 3we flipped the bread over on its top  to brownnthe bottom since the bread had sprung well and the top was getting done before the bottom,  5 minutes later we turned the oven down to 400 F convection androtated the bread 180 degrees.  5 minutes later we flipped the bread over and continued to bake for another 5 minutes until the bread reached 205 F on the inside.  All total the bread baked 32 minutes 12 with steam.


The bread crust came out that usual durum color.  It was nicely brown, blistered  and crispy that went soft as it cooled.  The crumb was fairly open but not as much as we expected with the nice rise during proof and the spring in the oven under steam.  Still, it was very soft, moist and airy with the green and brown splotches of the pistachio and pumpkin and the yellow millet bits that stayed crunchy.

Can’t really makeout the ricotta cheese but the soft moistness of it was left behind.  This bread reminds me of bread with cream cheese in it.   We like the taste of this bread and it made a fine sandwich for a late lunch today.  We will be making a version of the bread again.

Formula 

Starter Build

Build 1

Build 2

Total

%

Whole Grain SD Starter

10


10

1.63%

Spelt

15

15

30

4.88%

Dark Rye

15

15

30

4.88%

AP

50


100

16.26%

Yeast Water

50


50

8.13%

Water

30


80

13.01%

Total

170

30

300

48.78%


SD Starter Totals


%


Flour

165

26.83%


Water

135

21.95%


Starter Hydration

81.82%


Levain % of Total

21.52%


Dough Flour


%


Kamut

78

12.68%


Semolina

125

20.33%


Millet

47

7.64%


AP

200

32.52%


Total Dough Flour

450

73.17%


Salt

9

1.46%


Dough Soaker Water

350

56.91%


Dough Hydration w/ Starter

77.78%


Add - Ins


%


Pumpkin Seeds

50

8.13%


Ricotta Cheese

130

21.14%


Pistachio

50

8.13%


Honey

5

0.81%


Millet

50

8.13%


Total

285

46.34%


Total Flour w/ Starter

615


Total Water w/ Starter

485


Hydration w/ Starter & Adds

79.27%


Total Weight

1,394


% Whole Grain

34.96%


Ricotta Cheese not included inhydration calculations.


Our Crumb's picture
Our Crumb

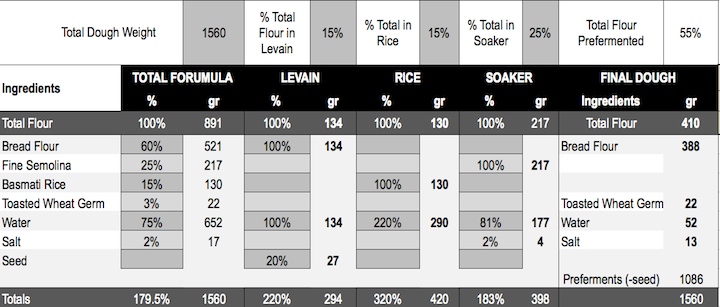
I'd been thinking that the sweet fragrance of basmati rice surely earns it some upward mobility out of its lowly caste, buried under the curry, and up into the brahmin bread basket.  A golden crumb seemed appropriate to its elevated status, so semolina was recruited.  I kept the durum to bog-standard Bob's Red Mill Fine Semolina, so as not to put the formula as out of reach as proper fine durum is (i.e., mailorder only).  Golden Temple Atta Durum would probably have been more appropriate (see below) and somewhat more accessible than the pukka mailorder product, but a soaker of BRM fine worked well.  I'm getting in the habit of adding 3% toasted wheat germ to mostly-whiteflour breads, following David Snyder's report on the SFBI miche.  So in that went.  Finally, developing the formula coincided with the recent spike in RYW chatter @TFL and the concomitant successional climax of my little mason jar crabapple/PinkLady/raisin/honey ecosystem, so RYW was fated to be the levain.  The results were surprisingly satisfying.

Formula

Process

1. Day before baking,

  • In morning, feed RYW with equal weight of Rubaud flour mix (100% hydration: 30 g RYW + 30 g flour).  Incubate at 77˚F until evening, then make up levain and incubate that overnight (9h) at 77˚F.
  • Bring 3 c unsalted water to boil.  Stir in 2 c white basmati rice (I used Lundberg Organic).  Return to boil and reduce flame to lowest setting.  Cover and cook for 20'.  White basmati rice weighs 142 g/c.  2 c dry came to 909 g cooked = 284 g rice + 625 g water; therefore each g of dry rice contributes ~2.2 g water when cooked.  This is more rice than needed.  Adjust accordingly if you don't want to have leftover rice.
  • In evening: Mix semolina soaker and leave at 77˚F (or whatever room temp is) overnight.                                         

2. Baking day, reduce cooked rice to a grainless mush via food processor and/or Foley food mill (I used the latter -- worked well).  Weigh out 420 g of mush.

3. Combine levain and all final dough ingredients (bread flour was KA Organic) except salt into shaggy mass. Adjust hydration if necessary.  Autolyse 30 min.

4. Add salt and french fold 5' / rest 5'/ french fold 5'.  Transfer to fermentation vessel (I use plastic boxes).

5. Bulk ferment 2.25 h with stretch and folds (in box) at 30', 60' and 100'.

6. Bench rest 25'.

7. Shape into a miche or 2 boules/batards.  Proof in rice+wheat floured banneton(s) for 2 h at 77˚F.

8. Bake on preheated stone in 500˚F oven turned down to 450˚F at start, for 20' with steam.  Remove steam apparatus, reduce oven temperature to 440˚F, and bake for an additional 20' with convection.    

9. Turn off oven, open door slightly, leave loaf on stone for 10'.

10. Remove and cool on rack.  Internal loaf temperature 210˚F.  Wait until fully cooled (preferably 24h) to slice.

Baking definitely diminishes the basmati flavor and fragrance.  Whereas the air was intoxicatingly perfumed with every slap of the french folding, in the finished loaf its presence is more evenly balanced with the wheat flavors.  Perhaps those more learned in the arts of gluten-free baking have tricks that would allow increasing the rice percentage in the formula.  The crust is sweet and chewy.  The crumb is angelfood-cakey soft and creamy yellow-white, slightly sticky on the bread knife but far less so 24h out of the oven than when just cooled.  RYW left no SD tang whatsoever, as advertised.  Toasts up exquisitely, best with butter.  The better the butter the better.  Fairly irresistible, truth be told.  I'll definitely be baking this again.  Maybe next week :-)

One feature of RYW that I'd failed to grok from posts by akiko, dabrownman et al. is the explosive leavening power of these potions.  From pilot builds beforehand, I knew my little homebrew could double a 100% hydration Rubaud flour mix in 6 hrs at 77˚F.  But that didn't prepare me for its Usain Boltian performance in a dough.  This juice could raise the dead.  What's up with that?  Just different bugs?  High titers?  Epigenetic adaptation to anaerobic conditions?  My baking routine this summer has been to start a SD batch and, while its fermentation proceeds at its normal stately pace, I can mix, ferment and bake a CY'd preparation (lately Reinhart's 100% WW sandwich loaf).  But bloody hell.  The CY loaf could hardly play through this time with the RYW dough hollering Fore! from the banneton.  It was nip and tuck, with the WW getting a bit overproofed (bogie?) while the RYW loaf holed out.

Finally, this bake and its score honors the victims of the tragedy in Oak Creek, WI.

Voila.  Blogo ergo sum.

Happy baking y'all,

Tom

dabrownman's picture
dabrownman

With the 110 F days of summer upon us, all baking and most cooking is done out doors on the grill or in the mini oven moved outside.  It has been a while since we did pizza on the grill so out went the stone to preheat at 650 F.

The Semolina and Durum Atta really made this dough stand out.  My wife said it was the best pizza dough we have ever made at home.  The starter was a Yeast Water and SD combination starter that was added to the autolysed dough with the salt, rosemary. grated pecorino cheese and garlic.  The hydration was 72%.

After mixing with the KA on speed 2 for 8 minutes the dough was rested for 15 minutes and then 5 S & F's were done on an oiled surface and rested for 10 minutes in a plastic covered bowl in between.  The last S&F was done on a floured surface and then the dough was rested for 1 1/2 hours on the counter before being refrigerated for 4 hours.

2 1/2 hours before bake and pizza time, the dough was removed from the fridge and divided into one piece 400 grams (for 2 pizzas) and one 800 gram piece for the bread.  The bread was pre-shaped into a batard and then final shaped 10 minutes later an places into a rice floured cloth lined basket to proof. 

When ready to bake the bread was up ended onto parchment and the top of the broiler pan that came with it  It was then baked in the mini oven at 500 F with Sylvia's steaming method for it for 4 minutes and then the oven was turned down to 450 F for another 8 minutes.  At the 12 minute mark the steam was removed the bread rotated 180 degrees and then baked at 400 F convection this time.  Every 5 minutes the bread was rotated until done and the internal temperature was 205 F  - about 32 minutes total. 

It thought the pizza was terrific and I ate a whole one by myself - no problem and I never do that.  The crust was the difference. We had grilled some; eggplant and Mexican grey squash, some poblano / red peppers and yellow onions.  Other toppings included; sliced green martini olives, reconstituted shitake mushrooms, green onions,  pepperoni, basil  and home made hot Italian sausage.   Cheeses included mozzarella, Pecorino Romano and pepper jack.  The sauce was homemade and spicy just the way we like it.

The pizza dough was par baked for 3 minutes and then removed from the grill for a coating of Mojo de Ajo and the toppings befopre being placed back on the stone for 3 more minutes.  The crust came out thin and very, very crisp. 

The pizza was so good it overshadowed the bread which oddly tasted just like the pizza dough -  which was fantastic :-)  I see some nice sandwiches in the future and some fine tasting garlic bread that, when toasted, will be perfect for bruschetta.   Some lunch with this Italian bread salami, guacamole, chips, pico, carrot, celery, cherries, cantaloupe, corn, radish, pickle and tomato.  The formula follows the cheesecake photo that jumped in there again.

Semolina Bread & Pizza Dough    
     
SD & YW C ombo StarterBuild 1Build 2Total%
SD Starter150153.00%
AP904513527.00%
Yeast Water 50, Water9009018.00%
Total Starter1954524048.00%
     
Starter    
Hydration66.67%   
Levain % of Total27.00%   
     
Dough Flour %  
Dark Rye102.00%  
Whole Wheat153.00%  
Semolina10020.00%  
Durum Atta7515.00%  
Soft White Wheat10020.00%  
AP20040.00%  
Dough Flour500100.00%  
     
Salt102.00%  
Water37074.00%  
Dough Hydration74.00%   
     
Total Flour642.5   
Water467.5   
T. Dough Hydration72.76%   
Whole Grain %48.25%   
     
Hydration w/ Adds71.53%   
Total Weight1,185   
     
Add - Ins %  
VW Gluten51.00%  
Total51.00%  
     
1 Clove of Garlic, 1 tsp Dried Rosemary,    

1 T Mojo de Ajo, 1 T Sundried Tomato

1/2 C grated Pecorin Cheese


dabrownman's picture
dabrownman

Found some Canadian durum attta in the Indian aisle at the Lee Lee’s Chinese grocery- real globalization at work.  The brand was Golden Temple.  The ‘atta’ makes this flour different than regular durum or semolina since it still has the bran in it.


We love the way the yellow durum flour softly colors the inside of white breads and gives the outside a rich brown hue.   This was more of a basic white bread with just a hint of rye and WW in the starter, levain build and dough at a total of 10%.  The durum makes up 47% of this bread with AP flour comes in at 43%.  The hydration was 73%.

 For some reason, probably because I froze it the week before,  the 33% each AP, rye and WW starter that we keep 80 grams of in the fridge, was weaker than normal so it was slow to build strength over the normal 12 hour, 3 stage, levain build.   Usually it is ready to go in 8 hours in the summer heat but it took a full 12 hours to double this time.  Maybe it didn’t like the white flour diet it hardly ever sees too.

Preheating and Sylvia’s steaming method went well but the dough stuck to the wooden articulating form and deflated as it released but it sprang back very nicely in the oven like a ciabatta.   I’m guessing poor forming and slashing caused the batard to split along the length of both of the long sides of the bottom - so the bloom at the slashes was pretty weak.


The crust browned nicely and came out of the oven slightly blistered and cracked.  The crust was very crispy when it came out of the heat and then softened as it cooled like a ciabatta. 

The crumb was a pale yellow shade due to the durum and it had some nice holes, was airy, soft and moist.

This is tangy SD bread that tastes good.  It will make some kind of fine sandwich for lunch.  Method and formula follow the pictures. 

Method

This was a 2 day build where the levain was built and the flours autolysed with the salt  in the fridge for 10 hours waiting for the 12 hour levain build to finish .  At the 10 hour mark the autolyse was removed from the fridge so it could come to room temperature over the next 2 hours.

When the levain was ready it was mixed with the autolyse by hand with a spoon, kneaded on a floured surface for 1 minute.  The dough was then placed in a covered oiled bowl to rest for 15 minutes.  

5 S&F’s  were done on an oiled work surface every 15 minutes and the dough allowed to rest in the covered oiled bowl between each one.  The dough was then allowed to ferment and develop for 1 ½ hours on the counter before being refrigerated overnight.

The dough was removed from the fridge in the morning and allowed to come to room temperature for 1 ½ hours.    It was then pre-shaped into a batard and allowed to rest for 10 minutes before final shaping.  The batard was placed into a rice floured wooden contraption and allowed to double in a plastic trash sack until it passed the poke test – about 3 hours – about an hour longer than normal due to the levain not being as active as normal.

The batard was removed from the wooden contraption by folding it flat and upturning the batard on to parchment and a peel.  We liked the Egyptian stepped mastaba shape (it almost nearly left) on the bread so much, we will call this forming articulating appliance  the ‘Pharaoh’s Mastaba.’

Sylvia’s steaming method was used in the 500 F mini oven using a 1 cup Pyrex measure, half full of water, with a face towel.  This apparatus was micro waved for 1 ½ minutes to get the water boiling before putting it onto the cold broiler top as batard was load on it and placed with the steaming cup into the oven.

4 minutes into the bake the temperature was turned down to 450 F and steaming continued to the 12 minute mark when the steam and parchment was removed and the temperature tuned down to 400 F convection this time.  The batard was rotated 180 degrees ever 5 minutes until the batard was done, 205 F inside temperature  – about 20 more minutes – 32 minutes total.

 The batard was left in the mini oven for 10 minutes with the oven turned off and door ajar to further crisp the skin before removing it to a cooling rack.

Sourdough Durum Atta Bread      
      
SD LevainBuild 1Build 2 Build 3Total%
SD Starter1000102.00%
Rye50051.30%
AP1020104010.39%
Durum Atta030306015.58%
WW50051.30%
Water20504011028.57%
Total Starter501008023059.74%
      
Levain     
Hydration100.00%    
Levain % of Total26.38%    
      
Dough Flour %   
Durum Atta17545.45%   
AP17545.45%   
Oats153.90%   
Rye51.30%   
WW51.30%   
Potato Flakes102.60%   
Dough Flour385100.00%   
Salt71.82%   
water25064.94%   
Dough Hydration64.94%    
      
Total Flour500    
Total Water365    
T. Dough Hydration73.00%    
Whole Grain %4.00%    
      
Hydration w/ Adds73.00%    
Total Unbaked Weight872    
Baked Weight 77388.65%   
Isand66's picture
Isand66

I was inspired to try adding some balsamic vinegar into one of my breads after reading about Karen Hanseata's Wild Rice bread on the Fresh Loaf this past week.  I have some cherry balsamic  that I love using so I was curious to see if it would have any affect on the taste of my bread.

While looking for some different components to add to my next bake I discovered that my wife had stashed some Toasted Almond Flour in the refrigerator so I figured why not give it a try.

I also used some Potato flour and Durum flour along with some hickory smoked sea salt and assorted all natural grains for this bake.

I cut back on the hydration slightly from my previous multi-grain breads and not counting the 359 grams of water used in the soaker it comes in at only 56%.  There is no doubt that the water from the soaker makes the final dough much moister than 56%.  I also did not count the soaker grains as part of the flour.  According to the BBGA (Bakers Guild of America) soakers including the water and other ingredients should be considered "hydration neutral".  This is obviously a difficult concept to control but none the less that is the prevailing rule in the industry.

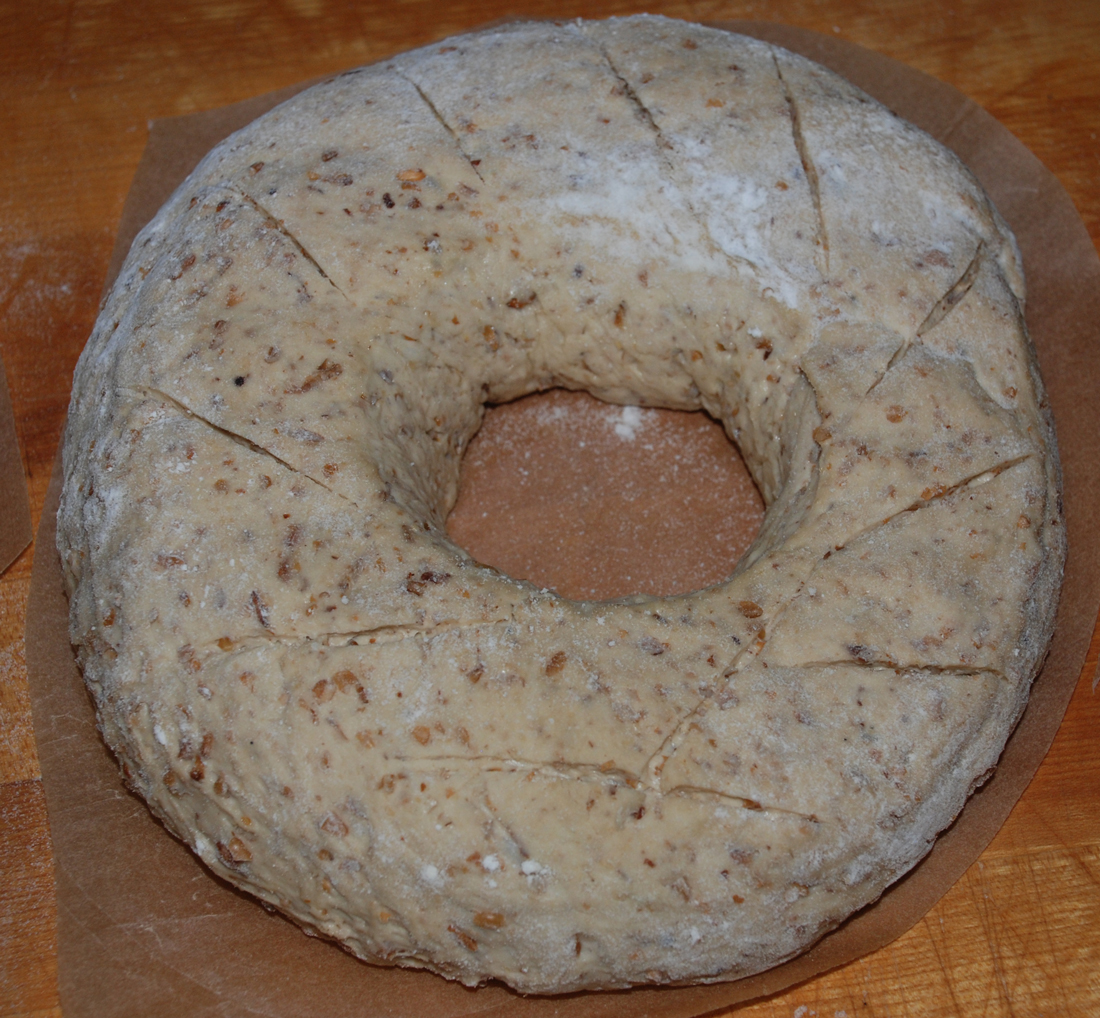
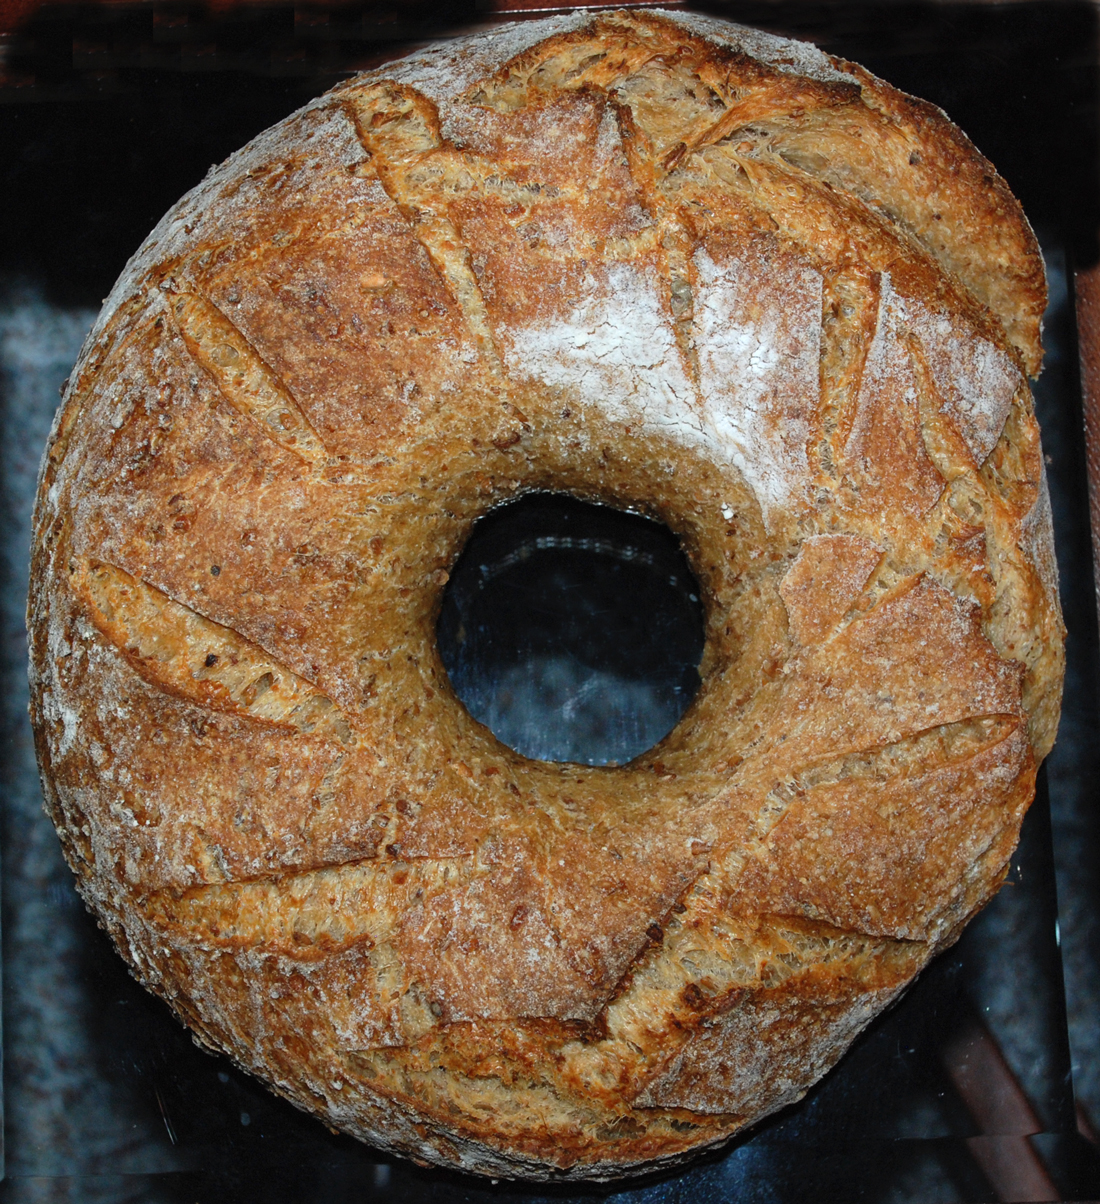
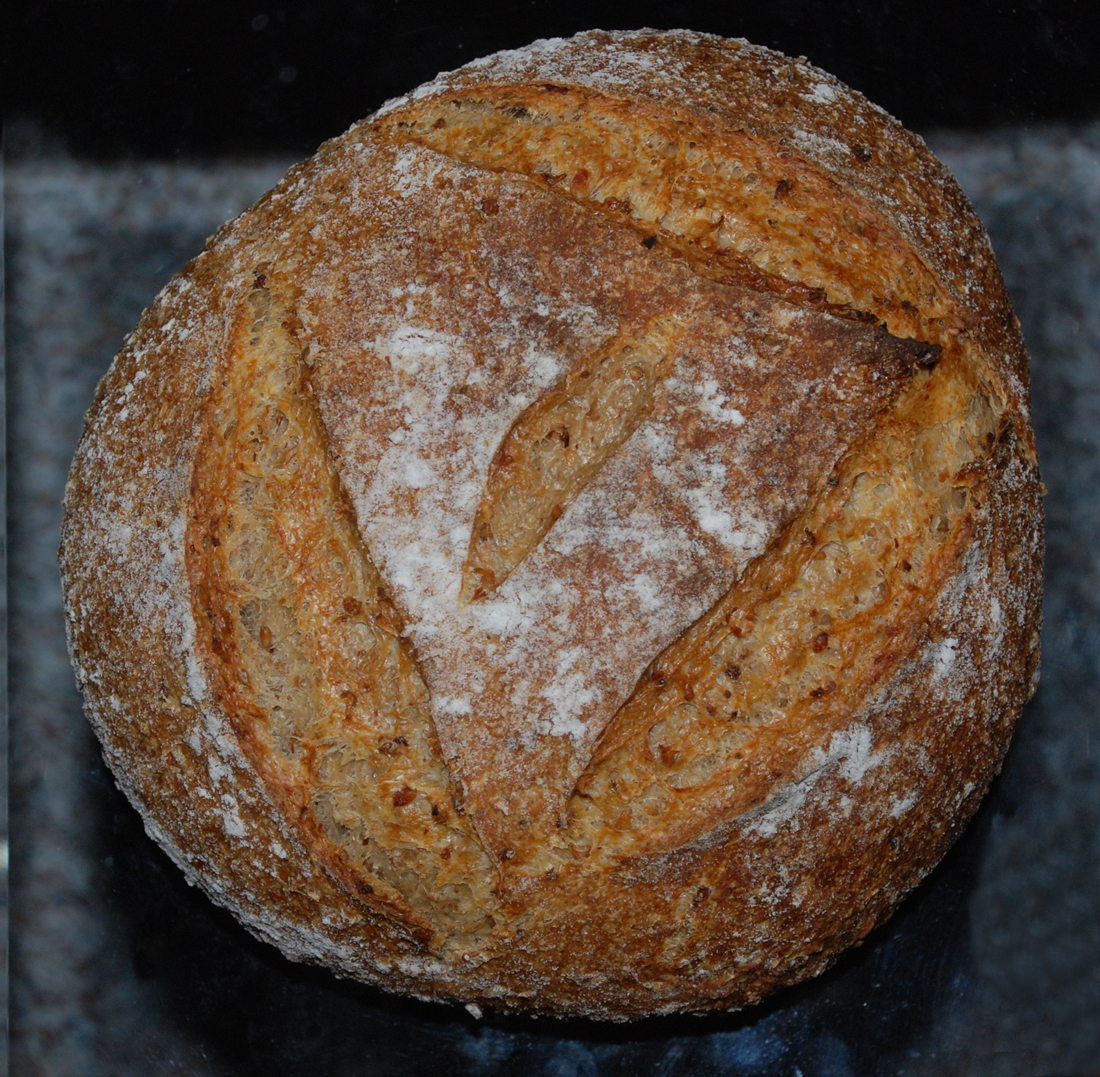
For this bake I made a boule as well as a circular shape similar to a large donut.

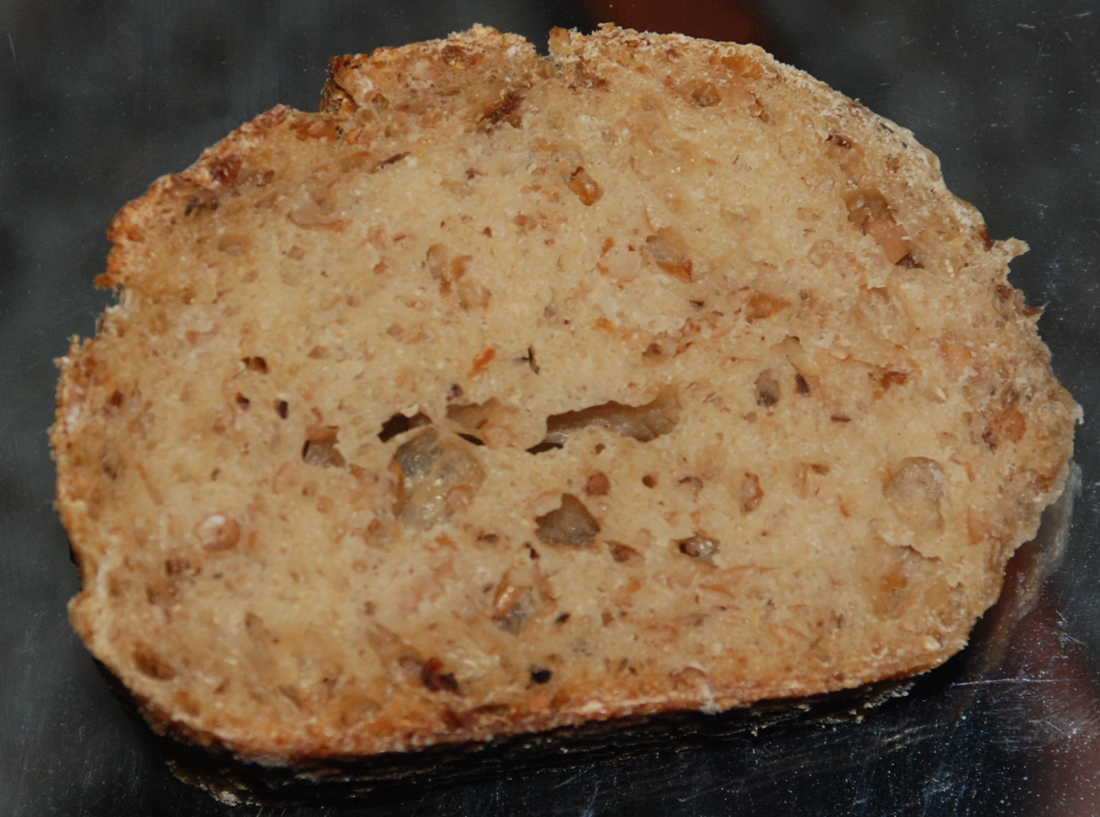
The final dough came out very tasty. You can see the toasted almond flour imparted a slightly orange tinted color in the crumb and it gives it a very nutty flavor.  I can't say that I tasted the cherry balsamic vinegar but I'm sure it added to the overall flavor profile somehow.  The crumb is nice an open and moist and you can see some of the soaker grains melded together.

If you venture to try this, please let me know how your attempt comes out.

Ingredients

Soaker

28 Grams English Malted Flakes

60 Grams Bulgar Wheat

55 Grams Organic Oat Bran

55 Grams Cracked Wheat

285 Grams Boiling Water

Final Dough

425 Grams White Starter recently refreshed (65% Hydration Seed Starter)

200 Grams Durum Semolina Flour (KAF Brand-make sure  you don't use the Fancy Semolina flour which is too gritty)

250 Grams Bread Flour (KAF)

58 Grams Toasted Almond Flour (KAF)

35 Grams Potato Flour

14 Grams  Hickory Smoked Seas Salt or Table Salt

264 Grams Water, 90 degrees F.

12 Grams Cherry Balsamic Vinegar (Feel free to substitute any Balsamic you have or just add more water)

Directions

Mix all ingredients for soaker in a bowl and add boiling water.  Let it sit for 2-3 hours covered until the grains are soft.  (I actually only let it sit for 1 hour which was long enough).

Add the water and flours into your mixing bowl and mix for 2 minutes on low.  The dough should come together in a shaggy mess and should be relatively moist at this point.  Let it rest (autolyse) for 25 minutes and then add the salt, balsamic vinegar and the soaker and mix for 4 minutes more on medium low-speed.  If necessary you can add some additional water or flour but be careful not to make the dough too dry.  It should be relatively sticky but not soupy.

Remove dough from mixing bowl to work surface and do a stretch and fold.  You may need to wet or oil your hands and the work surface since the dough will still be very sticky at this point. Form the dough into a ball and let it rest uncovered for 10 minutes.  Let the dough rest uncovered for 10 minutes.  After 10 minutes do another stretch and fold and cover the dough with a moist lint free towel or plastic wrap sprayed with non-stick cooking spray.  Do another stretch and fold two more times letting the dough rest 10 minutes each time.

 After the last stretch and fold put the dough into an oiled bowl and cover it tightly.

Let the dough sit in your bowl for 2 hours at room temperature.  It should only rise slightly at this point.  After the 2 hours are up put in your refrigerator for at least 12 hours or up to 3 days.

When ready to bake the bread take your bowl out of the refrigerator and let it sit at room temperature for around 2 hours.  After 2 hours shape the dough as desired being careful not to handle the dough too roughly so you don't de-gas it.

To make the circle bread I formed half the dough into a cylinder and formed it into a circle.  I placed a small glass bowl in the middle wrapped in plastic wrap that I sprayed with cooking spray to prevent it from sticking to the dough.  I placed the dough into a large banneton and let it rest per below.

Let it sit at room temperature for 2 hours covered with oiled plastic wrap or a moist cloth.

Pre-heat oven with baking stone (I use one on bottom and one on top shelf of my oven), to 500 degrees F.

Slash loaves as desired and place empty pan in bottom shelf of oven.

Pour 1 cup of very hot water into pan and place loaves into oven.

Lower oven to 450 Degrees and bake for 25 - 35 minutes until bread is golden brown and internal temperature reaches 200 degrees.

Shut the oven off and leave the bread inside with the door slightly open for 10 minutes.  This will help dry the loaves out and keep the crust crunchy.

Let cool on cooling rack and enjoy!
dabrownman's picture
dabrownman

We haven’t made SD ciabatta in a long time and wanted to make one that included some YW in the levain, had some semolina, rye and WWW for flavor while using mostly AP and a little bread flour for the rest of the dry.  We added some VWG to up the gluten of this dough and improve its crumb.  We also took some of our standard pizza dough ingredients; the mix of herbs, garlic and sun dried tomato and added them with some chia seeds.

 The crust came out nicely browned and crunchy and softened as it cooled.  The crumb was open, soft,glossy and moist.  The herbs, garlic and sun dried tomatoes came though but were not over powering.  The SD tang was there in the background but it was subdued due to the YW and no retarding of the dough or starters to bring out the SD flavor.  We didn’t do two separate levains this time but mixed the YW right into the SD starter from the beginning.

 This might well be the best tasting ciabatta we have ever made – just delicious!


 It looks to be some fine sandwich bread for paninis by putting the crust of the bread on the inside and grilling the inside of the bread on the outside of the sandwich. Formula and Method follow.  Here is a nice beer can chicken sandwich with lettuce and Amish Swiss, chips, berries and some salad and a chocolate sandwich cookie. 

Method

Make the YW and SD levain in 3 stages each 4 hours apart for a total of 12 hours.  The levain will triple in volume

The next morning autolayse the flour with the water for 1 hour in the mixer bowl.  Add the levain and knead with dough hook on KA 8 for 8 minutes or until the dough releases from the bowl.  Add the salt and chia seeds and knead on KA 8 for 1 more minute.  Place in a well oiled plastic covered bowl for 15 minutes.  Do 4 S & F’s every 15 minutes in the bowl.  Add the herbs garlic and sun dried tomato and do 2 more S & F’s.  Let ferment and develop in a well oiled bowl until the dough at least doubles.  This will take about 3 hours

Turn out onto a well flowered counter, shape into (2) 8”x14” rectangles with an oiled dough scraper, dimple top with fingers, spray top with oil and cover with a dusting of flour and plastic.  Let rest 60 minutes.

After 60 minutes, preheat oven for 45 minutes at 500 F regular bake with steam and stone in place.  With 2 dough scrapers, transfer ciabatta to a floured parchment paper on a peel by flipping in over at the same time.  Reshape as necessary.  Slide onto stone and steam for 6 minutes.  Remove stream, turn loaves 180 degrees and bake another 6 minutes at 450 F convection this time.  When the internal temperature reaches 205 F it is done but not finished.

Turn off oven, leave door ajar and bread on the stone for another 8 minutes to crisp the ciabatta crust.  Move to a cooling rack to cool to room temperature.

Semolina, Rye and WWW Ciabatta w/ Chia Seeds, Herbs and Sundried Tomato      
       
Mixed Starter    Build 1    Build 2    Build 3     Total      % 
SD Starter2500253.69% 
Yeast Water30100408.00% 
AP55506016516.00% 
Water25354010016.00% 
Total Starter1359510033066.00% 
       
Starter      
Hydration74.65%     
Levain % of Total24.54%     
       
Dough Flour        %    
Rye255.00%    
Semolina20040.00%    
White WW255.00%    
Bread Flour8016.00%    
AP17034.00%    
Dough Flour500100.00%    
Salt102.00%    
Water500100.00%    
Dough Hydration100.00%     
       
       
Total Flour677.5     
Total Water632.5     
T. Dough Hydrat.93.36%     
       
Hydration w/ Adds92.67%     
Total Weight1,345     
       
Add - Ins        %    
VW Gluten51.00%    
Chia Seeds204.00%    
Total255.00%    
       
 Herbs and Veggies     
1 Clove Garlic      
1/2 T Garlic Chive      
1/2 T Rosemary      
1/2 T Sage      
1 T Sundried Tomato    


Isand66's picture
Isand66

I am going to my Mother's house for lunch tomorrow to visit with some of my relatives and wanted to bring some nice rolls for lunch.  I decided to start off with a basic Challah recipe and made some modifications to make it interesting.  I used durum semolina flour along with bread flour, spelt flour and barley flakes.  I also used some agave nectar instead of white sugar to add some sweetness.

I also used several different toppings including toasted onions, poppy seeds and a toasted garlic and herbs mix I had in the pantry.

The end results were a tasty soft roll with a more complex flavor profile than the standard Challah.  I do have to admit I didn't do the best job shaping the rolls and next time I would use the egg yolk for the egg wash instead of the egg white.

Ingredients

Dough

6 oz. Egg yolks

18 oz. Water, 90 degrees F.

1 1/2 Tbs Instant yeast

4 1/2 Tbs Agave nector (you can substitute sugar or honey)

4 1/2 Tbs Vegetable Oil

12 oz. Durum Flour (King Arthur Flour or similar)

15 oz. Bread Flour (King Arthur Flour or similar)

4 oz. Spelt Flour

3 oz. Barley flakes

2.5 Tsp. Salt, .63 oz. (Sea salt or table salt)

1-2 Egg whites for glaze

Toppings of your choice

Directions

Combine the water with the yeast in your mixing bowl.  Next add the egg yolks, oil, and sugar and whisk to break up the egg yolks.  Now add the flours and mix using your stand mixer on low-speed for 2 minutes.  Let the dough rest for 5 minutes and then mix on medium speed for 4 minutes.  If necessary add some additional liquid or flour until the dough comes together in a nice silky and smooth ball.

Take the dough out of the bowl and place on your work surface.  Knead it by hand for 1-2  minutes and form it into a ball. Immediately place the dough in a lightly greased covered bowl and place in the refrigerator overnight up to 4 days.

When you are ready to make your rolls take the dough out of the refrigerator and cut the dough into pieces and form into balls or other shapes as desired.  Place the rolls on either parchment paper or baking sheets and brush each roll with an egg wash mix containing 1 egg white or whole egg and 2 tablespoons of water.   Let the rolls rise for around 1 hour uncovered.  After an hour brush the egg wash on the  rolls again and add your toppings.  Let the rolls rest for 30-60 minutes longer until they are 1 1/2 times the size.  In the meantime warm your oven to 350 degrees F.   When the rolls are properly risen, bake them in the oven for 20-25 minutes until nice and brown on the top and bottom.

When done, let them cool on a wire rack and enjoy.This post has been submitted to Yeast Spotting at http://www.wildyeastblog.com/category/yeastspotting.

breadforfun's picture
breadforfun

I was traveling last week and when I returned home I needed a fix of bread baking.  Since my starter needed to be refreshed and built up, I went for a poolish preferment, and Tom Cat's filone was high on my to-bake list.  I read Franko's write up from last year, and he referred back to David's description from 2008, so I was prepared for a "pretty gloppy" dough.  I closely followed the recipe from Glezer's "Artisan Baking" that David wrote up.

The dough was autolysed for 1 hour.  Mixing the final dough, similar to what others described, I had to add quite a bit more flour.  In fact, I increased the amount of flour by 25% (additional 75 gm per recipe) in order to get the dough to resemble anything like workable.  However, after the third stretch & fold the gluten was very nicely developed and easy to work with.  I made a double batch (because one loaf is never enough!) using Central Milling Extra Fancy Durum flour and a mixture of their Beehive AP and Hi Gluten flours.  The dough gets very puffy and has to be handled very gently to retain the gas bubbles that develop.  The results are worth it, with a beautiful golden crust, tremendous oven spring and fairly open crumb with holes of varying sizes throughout (including some large ones resulting from gentle shaping). And it is a flavorful loaf.

Here are a couple of observations: There may be an error in Glezer's recipe that resulted in the gloppy dough.  The poolish calls for dissolving 1/4 tsp IDY in 1 cup of water, then using 1/4 c of this mixture plus 135 gm water and 150 gm flour.  Here's the discrepancy: the listed baker's %-age for the water in the poolish is 110%, which would be 165 gm total.  My measurement for the 1/4 c of yeast-water is 60-65 gm, and when added to the 135 gm of water, using the more conservative 60 gm, this comes to 130%.  The leap of faith here is that the bakers %-age is more accurate than the ingredient measure.  Given the consistency of the overly wet dough described by other TFL-ers, this 30 gm more water could account for it.  I plan to make the bread again and will try this modified formula.

The second observation is that the amount of water used to autolyse the final dough was (in my case) not quite enough to hydrate all the flour.  As pointed out in the book, it could be due to the freshness or the fineness of the durum flour, but because of the wet dough I didn't want to add more water.  In retrospect, I should have.  Next time I may steal a bit of water from the poolish and increase the amount in the final dough, keeping the overall hydration the same.

The crumb came out a bit too chewy for this type of bread.  My wife loves this, but it needs to be toned down just a notch.  I used the high gluten flour because I was concerned that there wouldn't be enough gluten if only AP was used, but that doesn't seem to be the case.

Lastly, the final proofing is really short.  I proofed it about 45 minutes after shaping, and it seems a bit overproofed.

Happy Baking!

-Brad

Pages

Subscribe to RSS - semolina