The Fresh Loaf

A Community of Amateur Bakers and Artisan Bread Enthusiasts.

secrets of a jewish baker

dmsnyder's picture
dmsnyder

When I started baking bread again about four years ago, one of my principal reasons was to bake a good Jewish Sour Rye, a favorite bread I could not get locally. Greenstein's Secrets of a Jewish Baker was one of the first bread books I acquired, and I found his Jewish Sour Rye Bread at least as good as any I could remember eating.

His book was criticized by a number of TFL members for providing only volume measurements for ingredients. So, in October, 2008, I made the Sour Rye, carefully weighing the ingredients. I've used that formula since with consistently good results. I still love this bread.


Ingredients

Wt (g)

First Clear flour

500

Water (80-199ºF)

240

Sea salt

12

Ripe rye sour (100% hydration)

750

Instant yeast

7

Altus (optional)

1/2 cup

Caraway seeds

1 T

Cornmeal for dusting parchment


Cornstarch glaze


Notes on Ingredients

  • Rye Sour A sourdough starter or levain fed with rye flour is called a “rye sour.” Note that all the rye flour in the formula is pre-fermented. Traditionally, Jewish Sour Rye or New York-style Deli Rye is made with white rye flour. This is the equivalent of white flour milled from wheat. The bran and germ is removed, and the flavor is much milder than whole grain rye flour. I happen to like the flavor of whole grain rye and for years have used either dark rye or medium rye rather than white rye flour in this bread. If you use white rye, you may want to reduce the water, since this is less absorbent flour.

  • Building the rye sour If you make rye bread frequently, it is worthwhile keeping a rye sour. Otherwise, you can build one starting with a wheat or mixed flour starter. When I am going to be making this bread, I generally build up my rye sour in three feeding, at least doubling the volume with each feeding. I wrote a tutorial on “the care and feeding of a rye sour” which illustrates some of the special techniques involved. (See: Greenstein's Sourdough Rye (Rye Sour) care and feeding, illustrated.)

  • Altus This is “old bread.” It's origin is said to have been a way for the baker to recycle the rye bread he hadn't sold the day before, but, besides being a thrifty practice, the incorporation of some old bread in the dough is felt to enhance both the flavor and texture of rye bread. Its use is optional but recommended. To prepare altus, take a few thick slices of previously baked rye bread. Cut them into cubes and put them in a small bowl, covered with water. After a few hours, squeeze the water out of the bread and add it to your dough before mixing it.

  • Instant yeast As with many sourdough breads, the addition of commercial yeast makes the fermentation and proofing times more predictable. However, it is not necessary to make good bread. Since so much of this bread's flavor comes from the rye sour, I don't think the addition of yeast has any adverse impact on the quality of the bread. I generally use it.

  • Cornstarch glaze Dissolve 1 1/2 – 2 T cornstarch in 1/4 cup cold water. Heat 1 cup of water to a boil in a small sauce pan. Slowly pour the dissolved cornstarch into the boiling water, whisking constantly. Continue to stir until it is somewhat thickened. Remove from heat and reserve.

    Note on the formula: This formula was derived from the recipe provided by Greenstein, with ingredient volume measurements only. If you are interested in the formula including baker's percentages of ingredients, I have written a tutorial on baker's math, using this formula as a model. The baker's percentages can be found there. (See: Baker's Math: A tutorial )

Method

  1. If you have a white rye sour, build it up to a volume of 4 cups or so the day before mixing the dough. If you do not have a rye sour but do have a wheat-based sourdough starter, you can easily convert it to a white rye starter by feeding it 2-3 times with white rye flour over 2-3 days.

  2. In a large bowl or the bowl of an electric mixer, dissolve the yeast in the water, then add the rye sour and mix thoroughly with your hands, a spoon or, if using a mixer, with the paddle.

  3. Stir the salt into the flour and add this to the bowl and mix well.

  4. Dump the dough onto the lightly floured board and knead until smooth. If using a mixer, switch to the dough hook and knead at Speed 2 until the dough begins to clear the sides of the bowl (about 20 minutes). You may need to add a few tablespoons additional First Clear flour to get the right dough consistency. Add the flour, if needed, as early as possible in the mix. Add the Caraway Seeds about 1 minute before finished kneading. Even if using a mixer, I transfer the dough to the board and continue kneading for a couple minutes. The dough should be smooth but a bit sticky.

  5. Form the dough into a ball and transfer it to a lightly oiled bowl. Cover the bowl and let it rest for 15-20 minutes. Even after this short period, the dough is significantly less sticky.

  6. Transfer the dough back to the board and divide it into two equal pieces.

  7. Form each piece into a pan loaf, free-standing long loaf or boule.

  8. Dust a piece of parchment paper or a baking pan liberally with cornmeal, and transfer the loaves to the parchment, seam side down, keeping them at least 3 inches apart so they do not join when risen.

  9. Cover the loaves with plasti-crap or a tea towel and let them rise until almost double in size. (About 60 minutes.)

  10. Pre-heat the oven to 375F with a baking stone in place optionally. Prepare your oven steaming method of choice.

  11. Prepare the cornstarch glaze. Whisk 1-1/2 to 2 Tablespoons of cornstarch in ¼ cup of water. Pour this slowly into a sauce pan containing 1 cup of gently boiling water, whisking constantly. Continue cooking and stirring until slightly thickened (a few seconds, only!) and remove the pan from heat. Set it aside.

  12. When the loaves are fully proofed, uncover them. Pull the sides of the parchment apart to separate the loaves from each other. Brush them with the cornstarch glaze. Score them. (3 cuts across the long axis of the loaves would be typical.) Transfer the loaves, still on the parchment, to the oven, and steam the oven.

  13. After 5 minutes, remove any container with water from the oven and continue baking for 30-40 minutes more.

  14. The loaves are done when the crust is very firm, the internal temperature is at least 205 degrees and the loaves give a “hollow” sound when thumped on the bottom. When they are done, leave them in the oven with the heat turned off and the door cracked open a couple of inches for another 5-10 minutes.

  15. Move the loaves to a cooling rack and brush again with the cornstarch glaze.

  16. Cool completely before slicing.

Parchment paper on peel, folded down the middle and dusted with coarse corn meal

Loaves on parchment. Note the fold separating the loaves and the rolled up towels supporting the sides of the loaves.

Loaves covered for proofing.

Crumb

Crumb close-up

I let the final build of the rye sour get really ripe. In fact, it was starting to collapse when I mixed the final dough. The resulting bread was extremely sour and very delicious. If you don't like very sour rye bread, either use the sour when it is younger, or, if your timing demands, you can refrigerate it over-night, until you are ready to mix your dough.

 David

Submitted to YeastSpotting


dmsnyder's picture
dmsnyder


It has been a while since I last made Jewish Sour Rye, but it is still a favorite of mine. Learning to make this bread, which I could no longer get locally, was a major reason I started baking bread again 4 or 5 years ago. I use a formula based on that in George Greenstein's “Secrets of a Jewish Baker.” In 2008, I worked out the ingredient weights. Greenstein gives only volume measurements. The formula for my version can be found here: Sour Rye Bread from George Greenstein's “Secrets of a Jewish Baker”

Traditional Jewish Sour Rye is made with white rye flour and first clear flour. Once I started making more German and Russian style rye breads, the flavor of white rye became less appealing to me. I started making a version of Jewish Sour Rye using dark rye instead.

Today's bake was made with a rye sour built from my stock sourdough, which is kept at 50% hydration and is fed with a 70:20:10 mix of AP:WW: Dark rye. I went through 3 builds at 12 hour intervals, doubling the volume of sour with each build. The first two were fed with BRM Dark Rye. The final build, which contained approximately half the total rye flour, was fed with a nice, finely milled medium rye flour from nybakers.com. I kept the half-ripe, final sour build refrigerated overnight and let it warm up for an hour before mixing the dough. The first clear flour I used was also from nybakers.com. I also added a half cup of altus – German-style pumpernickel (baked 5 months ago and frozen) cut in cubes and soaked overnight in cold water, then wrung out before adding to the dough. 

I needed to add an additional 1/2 cup or so of first clear flour during mixing to get the dough consistency I wanted. I suspect this was necessary because of the additional water in the altus. This dough is very slack and very sticky as it comes out of the mixer, but it shapes well with judicious flour dusting and a light touch when handling it. I divided the dough into three 528g pieces and shaped as logs. For the first time, I proofed this rye on a linen couche. This stuff is magic. Even these sticky loaves released with no dough sticking to the linen. I transferred the loaves to a sheet of parchment on my peel, because I didn't want the cornstarch glaze getting on it. The bake was as described in my previous blog entries.

I sliced and tasted the bread about 3 hours after it came out of the oven. I feared I had somewhat over-proofed the loaves. They had less oven spring than usual. However, I was very happy with the crumb structure and the texture of the crumb. It has a delicious rye with caraway flavor. It was moderately sour. The pumpernickel altus added a depth of flavor, as well as a different texture due to the cracked rye berries in in the pumpernickel dough.

This bread is still a favorite.

David

Submitted to YeastSpotting

dmsnyder's picture
dmsnyder

SD Psomi after Greenstein's "Psomi Bread"

On page 151-153 of Greenstein's “Secrets of a Jewish Baker,” there is a recipe for what he calls “Psomi Bread.” He says he had this from a bakery in New Hampshire and made his own version. His formula is as follows (The weights are my estimates. Greenstein only provides volume measurements.):

Sponge (150% hydration)

½ cup warm water (120 gms)

2 packages active dry yeast

1 ½ cups buttermilk or sour milk at room temperature (357 gms)

3 cups whole wheat flour, preferably stone ground (384 gms)


Dough (67% to 82% hydration, depending on am't of AP flour added)

4 tablespoons honey (84 gms)

2 tablespoons butter or shortening (24.5 gms)

2 to 3 cups unbleached all-purpose flour (266-399 gms)

2 teaspoons salt (9.24 gms)

½ cup toasted sesame seeds

Flour, for dusting work top

Oil, for greasing bowl

Additional sesame seeds, for topping (optional)

Shortening, for greasing pans

Procedures

  1. Dissolve yeast in water. Add other sponge ingredients and mix. Cover and ferment for 45 minutes.

  2. Mix dough ingredients into sponge using 2 cups AP flour. Mix and add more flour as necessary. In stand mixer, dough should clean bowl sides. Mix 8-10 minutes. Dough should be smooth and elastic.

  3. Transfer dough to oiled bowl. Cover and ferment until double.

  4. Divide dough into two equal pieces and preshape. Rest 10 minutes.

  5. Shape into pan loaves or free form.

  6. Proof until doubled. Score with 3 diagonal cuts and brush with water.

  7. Bake in pre-heated 375ºF oven 35-45 minutes.

  8. Brush again with water and cool on a rack.


Now, over the past year, I've been trying to find recipes that would produce the kind of Greek bread that my daughter-in-law has described having in Greece. About the first thing I learned is that the Greek word for bread is … Psomi. So, Greenstein's formula surely was for a bread of Greek origin. I gather he had no clue that he was making “Bread Bread.”

I also learned that the typical Greek village bread was always made with a sourdough and that it used whole-grain flour. Inclusion of fat – either lard or olive oil – was common, as was the addition of honey. Sesame seeds and at least some, if not all, durum flour were also commonly used.

So, looking at Greenstein's formula, I see he uses a yeasted sponge made with buttermilk or sour milk. I think it's safe to assume this was to acidify the dough to taste somewhat like sourdough would. I see Greenstein uses both AP and WW flour, but all the WW is pre-fermented. I decided to take Greenstein's recipe a step back towards it's presumed origin. More steps may follow in the future.

I also decided to apply some of what I'd learned about whole-grain bread baking from Peter Reinhart's books and used both a soaker and a levain and pre-fermented 25% of the total flour. Following Reinhart's formulas in “Whole Grain Breads,” I divided the whole wheat flour equally between a soaker at 87.5% hydration from milk and a levain at 75% hydration, with the seed culture 20% of the flour. I used my stock sourdough starter which, as it happens, is kept at 75% hydration. I also followed Reinhart's guidance and used 1.8% salt for the total dough, with some of the salt in the soaker (to inhibit enzymatic activity).

So, this is the formula I developed:


Levain

Wt. (gms)

Baker's %

Whole wheat flour

192

100

Water

144

75

Active starter (75% hydration)

38.5

20

Total

374.5

195


Soaker

Wt. (gms)

Baker's %

Whole wheat flour

192

100

Milk

168

87.5

Salt

3.35

1.7

Total

363.35

189.2


Final dough

Wt. (gms)

All of the levain

374.5

All of the soaker

363.35

Bread flour

384

Water

241

Honey (4 T)

84

Olive oil (2T)

24.5

Salt

10.45

Toasted sesame seeds

½ cup

Total

1481.8


Procedure

  1. The night before baking, mix the soaker. Cover the bowl and leave at room temperature for 12 to 24 hours. (If not then ready to mix the final dough, the soaker can be refrigerated for up to 3 days.)

  2. Mix the levain and allow to ferment until ripe (at least doubled and volume, with a domed top) – 4 to 6 hours. (This can be refrigerated for up to 3 days.)

  3. If either (or both) the levain and soaker were refrigerated, take them out to warm to room temperature (about 1 hour) before mixing the dough.

  4. Cut the levain and the soaker into about 12 pieces and put them in the bowl of a stand mixer together with the other ingredients. Mix with the paddle until they form a shaggy mass (1-2 minutes at Speed 1).

  5. Switch to the dough hook, and mix to achieve moderate gluten development. (7 minutes at Speed 2)

  6. Transfer the dough to a lightly oiled bowl, cover the bowl, and ferment until increased 50% in bulk with folds at 50 minute intervals. (About 2 ½ hours)

  7. Divide the dough into two equal pieces and pre-shape into balls. Let the dough rest, covered for 10-15 minutes.

  8. Shape the pieces into boules, batards or pan loaves and place them in bannetons or pans or on a couche.

  9. Proof until increased 50% in bulk. (2 hours, 15 minutes in my kitchen at 72ºF)

  10. While the loaves are proofing, pre-heat the oven to 425ºF with a baking stone in place and your steaming method of choice. (If baking pan loaves, the stone and steaming are not necessary.)

  11. When the loaves have proofed, transfer them to a peel. Pre-steam the oven. Optionally, brush or spritz the loaves' surface with water and sprinkle with sesame seeds. Score the loaves. Traditional scoring for a boule is 3 transverse cuts. Transfer to the oven.

  12. Steam the oven, turn the temperature down to 350ºF and bake for 40-50 minutes.

  13. Transfer the loaves to a cooling rack and cool completely before slicing.


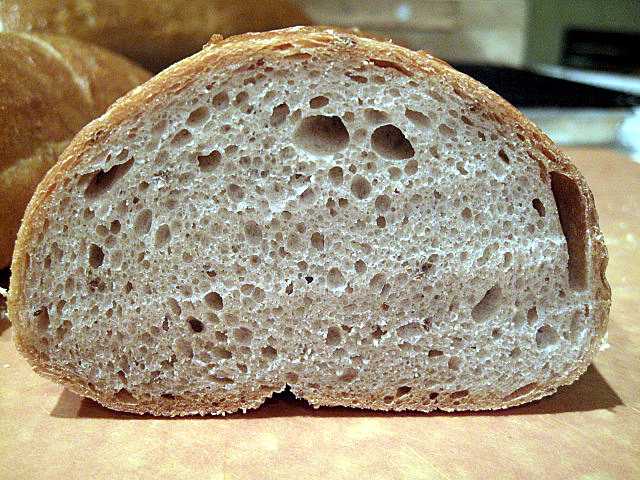
The crust was chewy and the crumb chewy but tender. The flavor was "sweet and sour whole wheat." It was actually pretty sour - more than my wife liked. I have made sourdough whole wheat breads before and did not enjoy the combination of whole wheat and sour flavors, but I did like this bread. This tasting was when the bread was just ... well ... almost cool. It will no doubt mellow by morning. I'm eager to taste it again after a good night's sleep.

Enjoy!

David

Submitted to YeastSpotting


dmsnyder's picture
dmsnyder

After last week's 70% rye bread, which I thoroughly enjoyed, I wanted to return to the first rye I had made – Jewish Sour Rye – to see if my tastes had shifted. I made the Jewish Sour Rye from “Secrets of a Jewish Baker,” by George Greenstein.

This is a classic “deli rye,” or “light rye.” It is made with a white rye sour. Rye snobs (who will remain nameless) turn up their noses at white rye because it has so little rye flavor. In fact, most of the time, I make this bread with whole rye. But, this time I made it “by the book.”

Well, not exactly by the book. Greenstein's book provides volume measurements for all ingredients. It has been criticized for this. Last year, I worked out the ingredient weights for the Sour Rye recipe, and these are provided below.


Ingredients


Rye Sour

750 gms

First Clear Flour

480 gms

Warm Water (80-100F)

240 gms

Sea Salt

12 gms

Instant Yeast

7 gms

Altus (optional but recommended)

½ cup

Caraway Seeds

1 Tablespoon

Cornmeal for dusting the parchment or peel.

Cornstarch glaze for brushing the breads before and after baking.


Method

  1. If you have a white rye sour, build it up to a volume of 4 cups or so the day before mixing the dough. If you do not have a rye sour but do have a wheat-based sourdough starter, you can easily convert it to a white rye starter by feeding it 2-3 times with white rye flour over 2-3 days.

  2. In a large bowl or the bowl of an electric mixer, dissolve the yeast in the water, then add the rye sour and mix thoroughly with your hands, a spoon or, if using a mixer, with the paddle.

  3. Stir the salt into the flour and add this to the bowl and mix well.

  4. Dump the dough onto the lightly floured board and knead until smooth. If using a mixer, switch to the dough hook and knead at Speed 2 until the dough begins to clear the sides of the bowl (8-12 minutes). Add the Caraway Seeds about 1 minute before finished kneading. Even if using a mixer, I transfer the dough to the board and continue kneading for a couple minutes. The dough should be smooth but a bit sticky.

  5. Form the dough into a ball and transfer it to a lightly oiled bowl. Cover the bowl and let it rest for 15-20 minutes.

  6. Transfer the dough back to the board and divide it into two equal pieces.

  7. Form each piece into a pan loaf, free-standing long loaf or boule.

  8. Dust a piece of parchment paper or a baking pan liberally with cornmeal, and transfer the loaves to the parchment, keeping them at least 3 inches apart so they do not join when risen.

  9. Cover the loaves and let them rise until double in size. (About 60 minutes.)

  10. Pre-heat the oven to 375F with a baking stone in place optionally. Prepare your oven steaming method of choice.

  11. Prepare the cornstarch glaze. Whisk 1-1/2 to 2 Tablespoons of cornstarch in ¼ cup of water. Pour this slowly into a sauce pan containing 1 cup of gently boiling water, whisking constantly. Continue cooking and stirring until slightly thickened (a few seconds, only!) and remove the pan from heat. Set it aside.

  12. When the loaves are fully proofed, uncover them. Brush them with the cornstarch glaze. Score them. (3 cuts across the long axis of the loaves would be typical.) Transfer the loaves to the oven, and steam the oven.

  13. After 5 minutes, remove any container with water from the oven and continue baking for 30-40 minutes more.

  14. The loaves are done when the crust is very firm, the internal temperature is at least 205 d

    egrees and the loaves give a “hollow” sound when thumped on the bottom. When they are done, leave them in the oven with the heat turned off and the door cracked open a couple of inches for another 5-10 minutes.


  15. After the loaves are out of the oven, brush them again with the cornstarch solution.


  16. Cool completely before slicing.


Jewish Sour Rye


Jewish Sour Rye crumb


Well, the verdict is: I like rye bread – white rye, dark rye, whatever. Each has it's place. The Jewish Sour Rye I had toasted for breakfast with Salami and Eggs was just right. The 70% Sourdough Rye I had for lunch with slices of Smoked Gouda and Cotswold cheese was perfect.


It's not such a hardship, having to make these choices.


David


Submitted to Yeast Spotting on Susan FNP's  Wild Yeast blog (This week, hosted by Nick at imafoodblog)


Subscribe to RSS - secrets of a jewish baker