This is my version of something I ate growing up. I’m pretty sure it’s forbidden by Atkins, South Beach, and every other well-known diet, but sometimes you need food to feed the soul.
Recipe: (makes 5 thin pancakes about 9 inches in diameter)
Dough: 58% hydration
300 g bread flour (12.7% protein)
174 g room temperature water
1 Tbsp sesame oil
10 g salt
Filling:
vegetable oil
scallions (about 1.5 to 2 cups chopped)
variations:
~AP flour will work if you don't have bread flour, though bread flour provides some additional strength and chew. High gluten flour is not ideal, because the finished dough won't be extensible enough to be rolled out thin in one of the later steps.
~You can decrease the amount of salt according to your own tastes and/or dietary needs. Salt is not necessary.
~If you don't like the flavor of sesame oil, you can replace it with vegetable oil. It's in the formula to make the finished product a little more tender.
~This is already a rich recipe, but if you're feeling extra indulgent, you can use room temperature pork fat or duck fat instead of oil in the filling
1. Combine all the ingredients at once and mix/knead for a minute or two until you have a uniform but still shaggy ball of dough. All of the flour should be hydrated. In Peter Reinhart parlance, the dough should be "tacky but not sticky"

2. Allow the dough to rest for 15 minutes, and then knead for a minute by hand. After kneading, give the dough another 15 minute rest, followed by another minute of kneading. You can repeat the resting and kneading procedure as many times as it will take to get a very smooth, satiny dough. It took me three kneading sessions in all, including the initial kneading in step 1. Below, you can see how the dough develops.


Just after step 1, the dough is still shaggy, and you can see a lot of tears on the surface due to lack of gluten development. After the first resting and kneading step, the dough is smoother, although not yet perfectly smooth (above, left). The tears on the surface have decreased but are still there. After the final resting and kneading step, the dough has no tears on the surface and is perfectly uniform.
During the resting periods, chop some scallion finely, like so:

Set the scallion aside for later.
3. Weigh the dough, and divide into 5 equal pieces by weight. They should be around 100 g each, probably a bit heavier.
4. Shape each piece into smooth ball, as if you're making dinner rolls, and let rest for 10 minutes.

5. Roll each ball into a flat pancake. Go as far as the dough will allow you. Let these intermediate pancakes rest for about 10 minutes. Use bench flour to prevent the dough from sticking to the board.

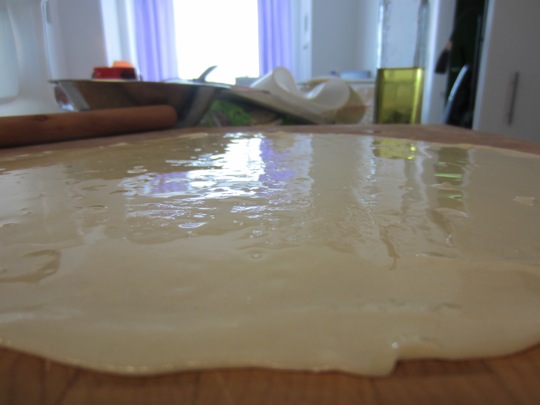
6. After resting, roll the dough out again. The goal is to get a sheet of dough that's less than 1/16 of an inch thick. You should be able to see your fingers through it, but it should not be so gossamer thin that it breaks easily. I usually finish this step by picking the dough up and draping it over my knuckles and tossing it a bit to let gravity stretch it.


7. Lay the sheet flat on a large surface. Pour as much oil onto the sheet as it will take to cover every square inch with a thin layer (as I said, this is not a low-fat recipe). Gently fold in corners of the dough to help spread the oil around.
8. Sprinkle a handful of chopped scallion on the sheet, and roll the sheet up gently but somewhat tightly into a big cigar. Try to squeeze out the air as you roll.

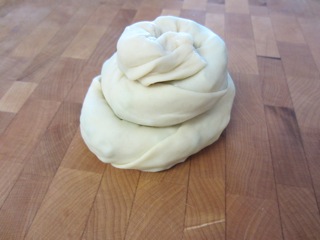
9. Pinch the ends to seal, then coil the cigar and flatten by pressing down with your palm. Coat the flattened coils generously in oil, and them rest for yet another 10 minutes. The photo below shows how the coil should look before flattening.
10. Place each flattened coil on top of a sheet of plastic wrap. Roll them out until they are very, very thin – no more than 1/8 of an inch each. If the dough is resisting, give it another 5 minutes or so to rest before continuing. Don't worry about the dough breaking and the scallions peeking out. Toasted scallion never hurt anybody. The photo below shows how they look after rolling out with a rolling pin. The thickness in the photo is not the final thickness - I had to wait five minutes after this point to get them as thin as I wanted, because the dough was bouncing back on me

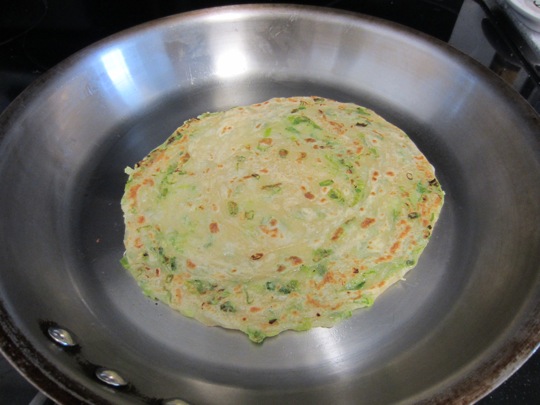
11. Now you're ready to cook them (finally). Use the sheet of plastic wrap to flip the pancakes onto your stretched palm and then onto a frying pan on medium heat. They're so flimsy that they’ll deform under their own weight if you don’t support them this way. Since the pancakes were already coated in oil in step 9, you should not have to put any oil in the pan. You can reuse the same sheet of plastic for all the pancakes. Once both sides are toasted, the insides should be done as well, since the pancake is so thin. You’ll smell sauteed scallion in the air.
Once they're cool enough to handle, cut them into wedges and enjoy. You can eat them plain, with your favorite spread (mine is japanese mayo with sriracha and lime), or filled with whatever you want (I had them with barbecued pork). For a breakfast of champions, roll up a couple of fried eggs in a whole pancake for a variation on the "Rolex," a “chapati burrito” with egg that I ate while I was in Uganda for a month.

