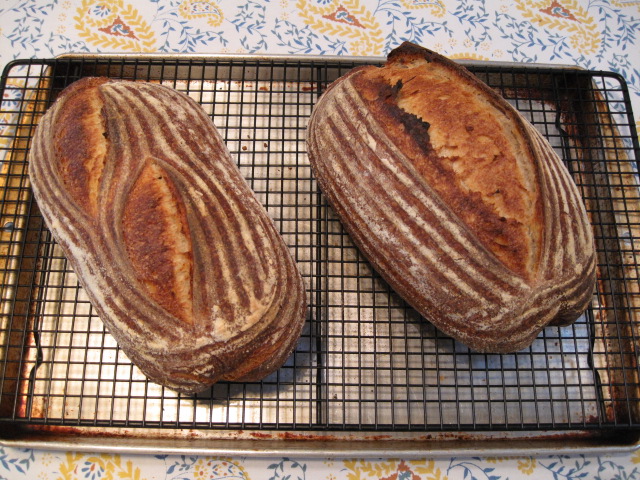
San Francisco Sourdough variation Boule

SF-SD-Variations-Boule Crumb

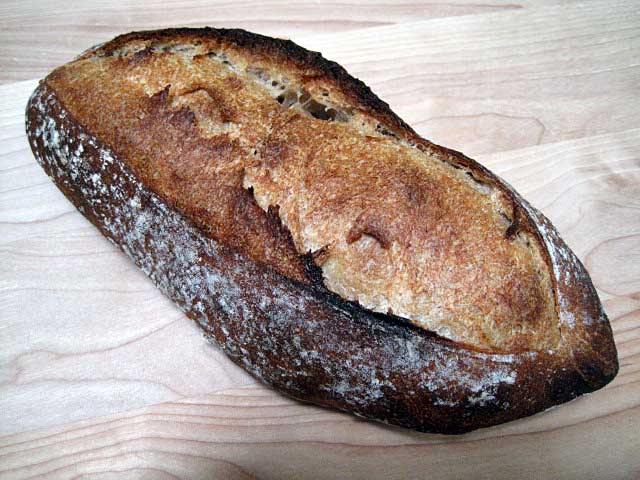
San Francisco Sourdough variation Batard

San Francisco Sourdough variation Batard Crumb
San Francisco Sourdough: Variations on a theme
The formula for San Francisco Sourdough Bread in Peter Reinhart's "Crust & Crumb" has been my favorite recipe for my favorite bread for some time. I have varied the formula, using different starters and various mixes of white wheat, whole wheat and rye.
All of the breads have been good. I can say that my favorite loaves have been made with bread flour with a small amount (10-12%) of rye flour.
I have not varied the techniques for mixing or proofing in Reinhart's instructions to date, and, with a single exception, I have always baked this bread as boules. Reinhart's instructions indicate that this bread can be formed as boules, batards or even baguettes.
This time, I decided to try some new variations in ingredients, procedures and loaf shape. The dough was mixed in a Bosch Universal Plus.
Starter Feeding
1 part mother starter
3 parts water
4 parts flour (70% AP flour, 20% whole wheat and 10% rye)
Intermediate firm starter
3 oz starter (formula above)
9 oz water
13 oz First Clear Flour
Dough
All of the intermediate firm starter
2 cups of water
23.50 oz King Arthur European Artisan Flour
3.5 oz Guisto's Organic Whole Rye
0.25 oz Diastatic Malt powder
0.75 oz salt
Procedure
Day 1 - Make the intermediate starter
Mix the Intermediate firm starter. Ferment tightly covered for 9 hours (overnight) at room temperature, then refrigerate for 10 hours.
Day 2 - Mix, Bulk Ferment, Divide and Scale, Shape and Retard
Take the starter out of the refrigerator 1 hour before use.
Mix the water, the diastatic malt and the flours until it forms a shaggy mass. Cover and autolyse (let the flours absorb the water and the gluten start to develop) for 20 minutes.
Add the firm starter cut into 10 pieces to the dough and mix at Speed 1, adding the salt while mixing. Continue to mix at Speed 2 until the gluten is well developed and a window pane can be formed. (7 minutes).
Empty the dough onto the bench and fold the dough into a ball. Place the dough in a lightly oiled bowl, at least twice its size. Roll the dough ball around to coat with oil, cover the bowl tightly, and allow the dough to ferment for at least 4 hours. (If rising too quickly, do a fold to de-gas the dough, but plan on leaving the dough alone for the last two hours, at least.)
Gently transfer the dough to the bench. Scale and divide the dough as wished, according to the type and size of the loaves you want to bake. (The total weight of the dough is around 4-1/2 pounds.)
Let the dough rest, covered with plastic wrap, for 10 minutes, then form loaves. These can be place in bannetons or on parchment or canvas "couches." In either case, cover the loaves air tight and refrigerate overnight.
Day 3 - Proof and Bake (two methods)
Take the loaves out of the refrigerator and allow to warm up and rise for 3-4 hours until expanded to 1-1/2 times their original volume.
Baking method 1
One hour before baking, pre-heat the oven with a baking stone and cast iron skillet in it to 475F.
Slash the loaves as desired, spritz with water and transfer the loaves to the baking stone.
Immediately pour 1 cup of boiling water into the skillet and close the oven door. If desired, spritz the oven walls with water 2-3 times spaced over the first 5 minutes of the bake. After 5 minutes, carefully remove the skillet from the oven, empty any remaining water and dry it. Put it somewhere to cool. After the last spritzing, turn the oven temperature down to 450F.
Baking method 2
Alternatively, set the oven to 450F.
Slash the loaves as desired, transfer them to the stone and bake the loaves covered with a bowl or a roaster for 15-20 minutes. Then remove the cover.
Continue baking until the loaves are nicely colored and their internal temperature is at least 205F. The loaves will be done in 30-40 minutes total time, depending on their size and shape. Then, turn off the oven but leave the loaves on the stone for another 5-10 minutes to dry the crust. Allow the loaves to fully cool (1-2 hours) before slicing.
Comments:
With this particular combination of flours and the procedure as described, the dough was quite sticky at the end of mixing. After a couple of foldings, it was extremely elastic, and I wondered if I had mixed it more than I should have. However, after bulk fermentation and dividing, the dough was quite relaxed and remarkably extensible. It was not at all sticky at this point. This has been characteristic of doughs made with KA European Artisan Flour, in my experience.
The batard pictured above was baked uncovered with steam from water poured into a hot skillet. The boule was baked under a stainless steel bowl without additional steam. Although the boule was baked about 45 minutes after the batard, the latter rose more quickly on parchment and acted as if over-proofed. The boule rose more slowly in a banneton. It did not seem over-proofed, and it had much better oven spring and bloom. The batard had a more open crumb. My hunch is that how I shaped the boule (too tight) was the major determinant of the differences in proofing time and crumb openness. (Other analyses would be welcome.)
Eating (Batard)
The crust is crunchy but not at all tough. The crumb is tender with a delicious complex pain de compagne-type flavor, except with more assertive sourness.
David