The Fresh Loaf

A Community of Amateur Bakers and Artisan Bread Enthusiasts.

San Francisco Sourdough Bread

dmsnyder's picture
dmsnyder

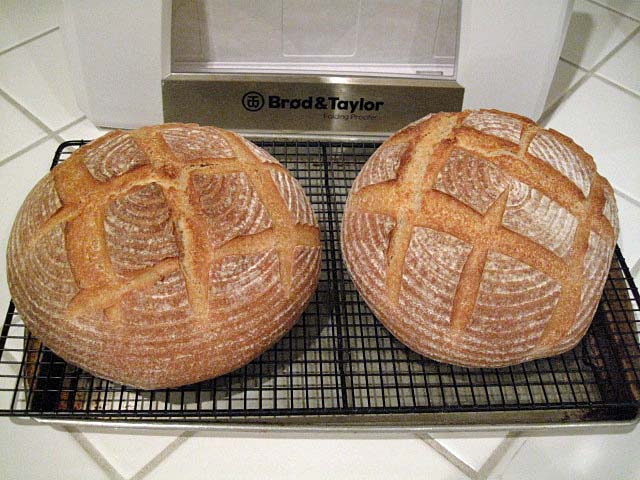
I made two 1 kg boules of my San Francisco-Style Sourdough Bread this weekend. (For the formula, see: My San Francisco Sourdough Quest, Take 3) The formula and procedures were little changed. Some of the fermentation and retardation times and temperatures were changed slightly to fit into the times I (and the oven) had free, but the dough always had the final say as to when it was ready for the next step. 

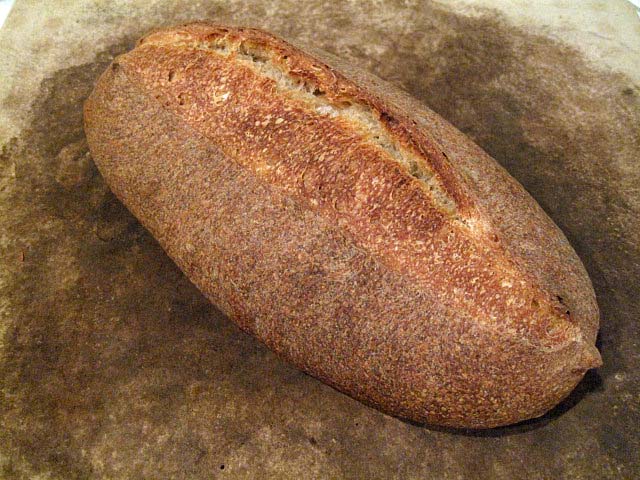
These loaves were proofed in linen-lined bannetons. Overnight cold retarding was done after dividing and shaping a well-fermented dough. Final proof was for about 3 hours at temperatures varying from 68 to 85 degrees F, mostly at the higher temperature. (I baked each loaf seperately, so I had to use variations in temperature to have the second loaf at just the right degree of proofing when the oven was free and re-heated after baking the first loaf.  If you are curious, the loaf on the right was the first one baked.

I scored with a diamond pattern this week, rather than the square pattern of previous weeks' bakes. The loaves were baked at 450 degrees F for 45 minutes, the first 15 minutes with steam.

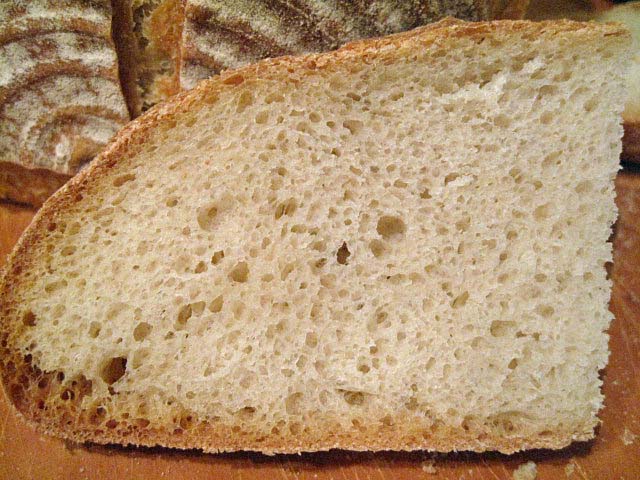
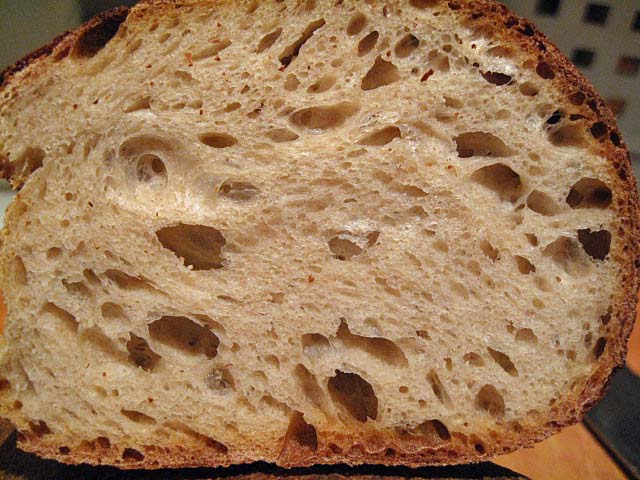
This weekend's mix had about 1% more whole wheat. I think I can see the effect of even this very small modification in the crumb, and I thought the flavor of the whole wheat came through a bit more. This bread was less like a 1960's-type San Francisco Sourdough and more like a French Pain de Campagne.

The crust was nice and crunchy. The crumb was cool and moderately chewy with a nice complex flavor and moderate sourdough tang.

David

sweetbird's picture
sweetbird

I’ve been raiding my freezer for slices of homemade bread lately and decided it was time to make some fresh loaves. There will never be a shortage of frozen homemade bread in this house but there are times when I just can’t stand it—I have to bake! I picked Glenn Snyder’s San Francisco Country Sourdough as my project and I’m so glad I did. It’s a lovely formula. Here is a link:  http://www.thefreshloaf.com/node/25402/sf-country-sourdough-%E2%80%93-my-best-ever%E2%80%A6not-sure-why.

I had made this once before with excellent results, but ended up making some minor changes both times. Not from any desire or need to improve the formula, but just because of “conditions on the ground” as the generals say in wartime.  First time around I had to refrigerate the dough after 1½ hours of the bulk ferment. I took it out in the morning, did a rough shape, bench rest and final shape and it came out beautifully.


Flours used were King Arthur AP, Central Milling organic whole wheat, Bob’s Red Mill dark rye. Also spring water and Celtic salt. My sourdough culture was at 100%, so I made a minor adjustment to the water to compensate (Glenn calls for 75% culture).

This time I decided to follow a kind of Tartine-style handling of the dough. After the autolyse I added the salt (in my case I used fine Celtic salt) along with a tiny bit of water (I had held a little back in the earlier stage) and did a rough mix by hand in the bowl, finishing up with quite a few stretch-and-folds. Since I hadn’t mixed it quite as thoroughly as the formula calls for, I changed the S & F schedule and did one every half hour for the first two hours of the bulk ferment, then I left it alone for the final hour. At the end of that time, it was lively and pillowy and it smelled of gentle wheaty fermentation.

I divided into two halves and pre-shaped, then left it to rest for about 45 minutes. Then shaped into two boules and placed into 8″ brotforms. I put one in the refrigerator and kept one out to rise and bake.

Since I was already in a Tartine frame of mind, I decided to bake the first loaf in my Dutch oven. Preheated the oven to 500°F with the Dutch oven on the lowest rack. Turned the boule out onto a rectangle of parchment paper lightly dusted with a 50/50 blend of AP flour and white rice flour, took hold of the corners and lowered it—carefully!—into the Dutch oven. Then I closed the lid and returned it to the oven, reducing the temperature to 450°F. Glenn calls for a reduction to 460°F but I though it best to go a little lower since I was using a blazing hot Dutch oven. As it turned out, I could have reduced it even a bit more; the lower crust was somewhat overdone.

That loaf was a wild thing, with explosive oven spring. It felt almost weightless when I removed it to the cooling rack. As with my Tartine loaves, this had gorgeous, deep caramelization. The flavor once it cooled was a real delight—a crust that crackled when I cut through it and released deep caramel-wheat flavor when I bit into it. The interior was sweet and somewhat moist. Not much sourdough tang. I assumed I would get more of that in the loaf that was resting in the refrigerator overnight, but that turned out to not really be the case.

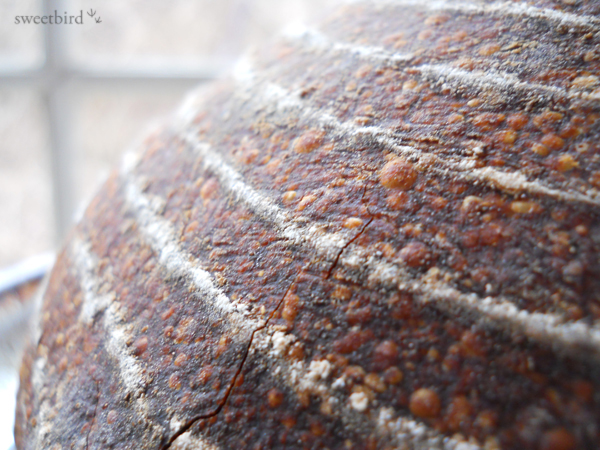
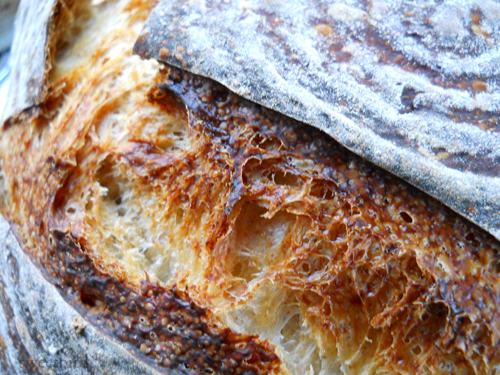
I baked the second loaf the next morning in the more traditional way on a heated baking stone on the middle shelf, with steam for the first 12 minutes. It also had exuberant oven spring, but was a little more controlled. I had taken it out of the refrigerator for about a half hour before baking, as it seemed to need it. This was my favorite of the two loaves. An incredibly deep, blistery, crackly mahogany crust, loaded with flavor and texture, with a soft but substantial interior. I really loved this crust, as you can probably tell from the overabundance of pictures! This one also felt as light as a feather after baking (+ its 10 minute rest with the oven off and the door open).

This is a great sandwich or toasting bread, and last night I made croutons by roughly cubing up several slices, crust and all, and putting them in a hot cast iron frying pan with extra virgin olive oil, garlic, parsley and basil. These got sprinkled over a homemade escarole-bean soup and made for a memorable, comforting meal on a wintry day.

Thank you for the formula, Glenn!

All the best,  Janie

p.s., sending to Susan for yeastspotting http://www.wildyeastblog.com/category/yeastspotting/


dmsnyder's picture
dmsnyder

San Francisco-style Sourdough Bread 2/12/2012

Today, I baked two more loaves of my evolving San Francisco-style Sourdough bread. (See: My San Francisco Sourdough Quest and My San Francisco Sourdough Quest, Take 2)

The only change in the formula was to double the amount of dough, so each loaf was twice the weight of those previously baked. As those who have followed this adventure may note, there were also some minor changes in the procedures. The only really important one was to bake the breads at a lower temperature for a longer time, as an accommodation to their larger mass.

Those who have asked for ingredient weights in metric measures will be happy to note that weights are now given in grams.

So, here are the formula and procedures for today's bake. I have adjusted the tables below for 1 kg and for a 2 kg batch of dough.


Stiff levain

Bakers' %

Wt (g)

for 1 kg

Wt (g)

for 2 kg

Bread flour

95

78

157

Medium rye flour

5

4

8

Water

50

41

82

Stiff starter

80

66

132

Total

230

189

379

  1. Dissolve the starter in the water. Add the flour and mix thoroughly until the flour has been completely incorporated and moistened.

  2. Ferment at room temperature for 6 hours.

  3. Cold retard overnight.

  4. The next day, take the levain out of the refrigerator and ferment at 76 degrees F for another 1-2 hours. The levain is ready when it has expanded about 3 times, and the surface is wrinkled (starting to collapse).

    Final dough

    Bakers' %

    Wt (g)

    for 1 kg

    Wt (g)

    for 2 kg

    AP flour

    90

    416

    832

    WW Flour

    10

    46

    92

    Water

    73

    337

    675

    Salt

    2.4

    11

    22

    Stiff levain

    41

    189

    379

    Total

    216.4

    953

    2000


    Method

  1. In a stand mixer, mix the flour and water at low speed until it forms a shaggy mass.

  2. Cover and autolyse for 20-60 minutes

  3. Add the salt and levain and mix at low speed for 1-2 minutes, then increase the speed to medium (Speed 2 in a KitchenAid) and mix for 5 minutes. Add flour and water as needed. The dough should be rather slack. It should clean the sides of the bowl but not the bottom.

  4. Transfer to a lightly floured board and do a stretch and fold and form a ball.

  5. Place the dough in a lightly oiled bowl and cover tightly.

  6. Ferment at 76º F for 3 hours with a stretch and fold at 1 hour.

  7. Divide the dough into two equal pieces.

  8. Pre-shape as rounds and rest, covered, for 10 minutes.

  9. Shape as boules or bâtards and place in bannetons. Place bannetons in plastic bags.

  10. Proof at room temperature (68-70º F) for 1-2 hours.

  11. Cold retard the loaves overnight.

  12. The next morning, proof the loaves at 85º F for 2-3 hours. (This is ideal, in my opinion. If you can't create a moist, 85 degree F environment, at least try to create one warmer than “room temperature.” For this bake, one loaf proofed at about 76 degrees and the other at 85 degrees F.)

  13. 45-60 minutes before baking, pre-heat the oven to 480º F with a baking stone and steaming apparatus in place.

  14. Transfer the loaves to a peel. Score the loaves as desired, turn down the oven to 440º F, and transfer them to the baking stone.

  15. Steam the oven.

  16. After 15 minutes, remove the steaming apparatus, and turn down the oven to 415º F/Convection. (If you don't have a convection oven, leave the temperature at 440º F.)

  17. Bake for another 30-35 minutes.

  18. Turn off the oven, and leave the loaves on the stone, with the oven door ajar, for another 15 minutes.

  19. Transfer the loaves to a cooling rack, and cool thoroughly before slicing.

Note: Because I was baking larger loaves, the oven temperature was set lower and the bake time was lengthened. Also note that, if you make two loaves of this size, it may be prudent to bake one at a time, unless your oven stone is larger than my 16 X 14 inch one.

Those who enjoy soft crust and cannot abide a sour-tasting sourdough would be well-advised to skip making this bread. On the other hand, it is as close to my ideal San Francisco-style sourdough as I expect to get.

San Francisco-style Sourdough Crumb

The crust was thick and very crunchy but not “hard.” The crumb was denser than my first attempt but somewhat open and fully aerated with varying sized alveolae. The crust had a sweet, nutty flavor. The crumb had sweetness but a moderately present acetic acid tang.

I can't promise I won't tweak this further or conduct experiments on, for example, the difference between proofing at room temperature, 76 degrees F and 85 degrees F. However, I expect to be making this bread regularly pretty much as I did this week.

I also baked the Tartine “Basic Country Bread” and Hamelman's “Pain au Levain” this weekend.

Tartine Basic Country Bread 

Tartine Basic Country Bread crumb

Pain au Levain, from Hamelman's Bread

Pain au Levain, from Hamelman's Bread, crumb

David

Submitted to YeastSpotting


dmsnyder's picture
dmsnyder

A couple weeks ago, I blogged on my attempt to make a San Francisco-style sourdough bread that  had a crunchy crust, moderate sourness and a nice, complex flavor. (See My San Francisco Sourdough Quest).

My quest  continued this weekend. The formula and method were amended in these ways:

1. Rather than activating my starter at 100% hydration and building my 50% hydration levain from that, I activated my stored 50% hydration starter at 50% hydration. In other words, I did two firm starter elaborations. These were fed at 12 hour intervals.

2. The levain was then fermented at room temperature for 16 hours and was not retarded.

3. The final dough was mixed substituting 10% whole wheat flour for some of the AP flour.

Otherwise, my formula and method were as described previously. I should point out that, with these changes, the only differences from the formula and method for San Francisco Sourdough found in Advanced Bread & Pastry were:

1. The substitution of some WW for AP flour,

2. The longer fermentation of the firm levain, and 

3. The higher fermentation and proofing temperatures or the final dough and formed loaves. 

The results were very similar, but the bread was substantially more sour. I'd rate it as moderately to very sour. The crumb was a little less open, presumably because the WW flour absorbed a little more water. I loved it. My wife loved it. I recommend it.

David


dmsnyder's picture
dmsnyder

Progress is being made!

After my disappointment with the Kline, et al San Francisco Sourdough method, I re-read and re-digested what I know about time, temperature, ingredients and the care and feeding of sourdough flora. I suppose the principal new concept to sink in was that the fermentation temperature matters a whole lot, and what's best for yeast growth is not best for lactobacillus growth, and what's best for lactobacillus multiplication is not what's best for acid production. In a way, I rediscovered something I found out several years ago but neglected to pursue. (Reading old blogs was interesting.) Those very smart fellows at Detmolder were on to something: You can have it all, if you do it in stages. I'm pretty sure that what I did was not the only way to achieve pretty much the same result. It may not be the best way, but it worked for me. Note that I achieved the necessary temperature control with a Brød & Taylor Folding Proofer, but you can achieve this with a home-made proofing box as well.

My goal has been to make a moderately sour, mostly white “San Francisco style” sourdough bread that has a crunchy crust, an open crumb and a nice, sweet, complex flavor, not just sourness. Today's bake achieved all of these characteristics, and I'm a very happy baker (and bread eater)!

I started with the “San Francisco Sourdough” formula in Michel Suas' Advanced Bread and Pastry, but modified the method, as described below:

My stock starter is 50% hydration. My sourdough starter is fed with a mix of 70% AP, 20% WW and 10% whole rye.

I started by refreshing my stock starter with 40 g starter, 100 g water and 100 g flour mix and fermenting it at room temperature for 12 hours. I used this to build the stiff levain. (Note: This is a liquid starter - 100% hydration.)


Stiff levain

Bakers' %

Wt (oz)

Bread flour

95

2.5

Medium rye flour

5

0.15

Water

50

1.25

Liquid starter

80

2.15

Total

230

6.05

  1. Dissolve the starter in the water. Add the flour and mix thoroughly until the flour has been completely incorporated and moistened.

  2. Ferment at room temperature for 6 hours.

  3. Cold retard overnight.

  4. The next day, take the levain out of the refrigerator and ferment at room temperature for another 2-4 hours. The levain is ready when it has expanded about 3 times, and the surface is wrinkled (starting to collapse). 

Final dough

Bakers' %

Wt (oz)

AP flour

100

14.85

Water

72.8

10.85

Salt

2.53

0.35

Stiff levain

40

6.05

Total

215.33

32.1

Method

  1. In a stand mixer, mix the flour and water at low speed until it forms a shaggy mass.

  2. Cover and autolyse for 1-2 hours. (Yup. I autolysed for 2 hours.)

  3. Add the salt and levain and mix at low speed for 1-2 minutes, then increase the speed to medium (Speed 2 in a KitchenAid) and mix for 5 minutes. Add flour and water as needed. The dough should be rather slack. It should clean the sides of the bowl but not the bottom.

  4. Transfer to a lightly floured board and do a stretch and fold and form a ball.

  5. Place the dough in a lightly oiled bowl and cover tightly.

  6. Ferment at 78º F for 3 hours with a stretch and fold at 1 hour.

  7. Divide the dough into two equal pieces.

  8. Pre-shape as rounds and rest, covered, for 10 minutes.

  9. Shape as boules or bâtards and place in bannetons. Place bannetons in plastic bags.

  10. Proof at room temperature (68-70º F) for 1-2 hours.

  11. Cold retard the loaves overnight.

  12. The next morning, proof the loaves at 85º F for 2-3 hours.

  13. 45-60 minutes before baking, pre-heat the oven to 480º F with a baking stone and steaming apparatus in place.

  14. Transfer the loaves to a peel. Score the loaves as desired, turn down the oven to 450º F, and transfer the loaves to the baking stone.

  15. Steam the oven.

  16. After 15 minutes, remove the steaming apparatus, and turn down the oven to 425º F/Convection. (If you don't have a convection oven, leave the temperature at 450º F.)

  17. Bake for another 25 minutes.

  18. Turn off the oven, and leave the loaves on the stone, with the oven door ajar, for another 10 minutes.

  19. Transfer the loaves to a cooling rack, and cool thoroughly before slicing.

San Francisco Sourdough (and New York Bagel from ITJB. This weekend's "Coast to Coast" baking.) 

San Francisco Sourdough Crumb

These loaves had a rather flat profile but did have fair oven spring and bloom. When sliced after cooling for 4 hours, the crust was crunchy. The crumb was open. The aroma was decidedly sour. The crumb was tender-chewy and cool in the mouth. The flavor of the crumb was a bit sweet and wheaty with a moderately sour after taste. The crust was nutty, but I would have personally enjoyed it more had it been darker, even though that would not have been strictly in the the “San Francisco Style” of old.

This method is spread over 3 days, so it requires some advance planning. Since it requires little time, except on the second day, it should be easy to fit into almost anyone's schedule. It this is the kind of bread you're after, it's definitely worth the effort.

Future plans

  1. Substitute 5-10% whole wheat for some of the AP flour in the final dough.

  2. Make some larger loaves.

 David

Submitted to YeastSpotting

Addendum added 2/4/2012: Please see My San Francisco Sourdough Quest, Take 2 for my next bake. The modifications resulted in improvements in the crumb and a more assertively sour bread.

dmsnyder's picture
dmsnyder

San Francisco Sour Dough French Bread

according to

Kline, Sugihara and McCready

(The Bakers Digest, April, 1970)


In their 1970 Bakers Digest articles, Kline, Sugihara and McCready first deliniated the microbiology of San Francisco Sourdough bread. Their discovery of the special relationship between the dominant yeast – S. exeguna – and a unique species of Lactobacillus provided understanding of the special flavor of San Francisco sourdough and the stability of the sourdough cultures over time.

In the first of their articles, they also described the process San Francisco bakeries used to maintain their starters and make their breads. They describe the process as if all of the bakeries used the same process without actually stating this was the case. Regardless, the process they describe is significantly different in several respects from those found in any of the currently popular baking books in my collection. Because of that, and because I'm curious about whether the process they described can be successfully replicated in my own kitchen and produce bread like that of the traditional San Francisco sourdough breads with which I'm familial, I made a couple of loaves following their procedures.

The formulas and procedures described by Kline, et al. in the articles cited are as follows:

Sponge

Bakers' %

Firm starter

100

High-gluten flour

100

Water

46-52

  1. Ferment for 7-8 hours at 80º F

  2. In the bakery, fed every 8 hours

  3. Can feed less often by fermenting for 6 hours and retarding at 50-55ºF or fermenting 3-4 hours and retarding for longer times with refreshments 3-4 times per week, rather than 3 times per day.


Dough

Bakers' %

Sponge

20

AP flour

100

Water

60

Salt

2

  1. Mix ingredients (No mix method or time is given.)

  2. Rest for 30 minutes at room temperature.

  3. Divide and pre-shape.

  4. Proof for 1 hour at 90ºF

  5. Shape.

  6. Proof for 6-8 hours at 85-90º F.

  7. Score loaves and Bake with lots of steam for the first half of the bake at 375-390ºF for 45-55 minutes.

To make 2 kg of dough, I proceeded as follows: 

Sponge

Bakers' %

Wt (g)

Firm starter

100

88

High-gluten flour

100

88

Water

50

44

Total

250

220

1. I built the firm starter for the sponge with two elaborations, starting with my firm stored starter.

2. The sponge was mixed and fermented at 80º F for 10 hours.


Dough

Bakers' %

Wt (g)

Sponge

20

220

AP flour

100

1099

Water

60

659

Salt

2

22

Total

182

2000

Note: Accounting for the flour and water in the sponge, the actual final dough hydration was 58.9%.

Procedures

  1. All the dough ingredients except the salt were mixed and allowed to rest, covered, at room temperature for one hour.

  2. The salt was sprinkled over the dough and mixed in a Bosch Universal Plus mixer at First (lowest) speed for 1-2 minutes, then at Second speed for 5 minutes.

  3. The dough was then divided into two 1 kg pieces, pre-shaped as rounds and proofed at 90º F for 1 hour. (I placed the pieces on a bakers' linen-covered 1/4 sheet pan in a Brød & Taylor Folding Proofer.)

  4. The pieces were than shaped tightly as boules, transferred to floured bannetons and placed in plastic bags.

  5. The loaves were then proofed in the Folding Proofer at 85º F for 6 hours.

  6. 45 minutes before baking, the oven was pre-heated to 450º F/convection with a baking stone on the middle shelf and a cast iron skillet filled with lava rocks on the bottom shelf.

  7. The loaves were dusted with semolina, transferred to a peel, scored and loaded on the baking stone. A perforated pie tin filled with ice cubes was placed on the lava rocks. The oven was turned town to 380º F/conventional bake.

  8. After 23 minutes, the skillet was removed from the oven. The oven setting was changed to 360º F/convection bake, and the loaves were baked for another 22 minutes.

  9. The oven was turned off, but the loaves were left on the baking stone, with the oven door ajar, for another 15 minutes.

  10. The loaves were then cooled on a rack before slicing.

This is a low-hydration dough. After mixing, it was very smooth and barely tacky in consistency. It was still very dry and firm before the final shaping. After the six hours final proofing, the dough was very soft and puffy. I was afraid it was over-proofed and would deflate when scored or, at least, have poor oven spring and bloom. However, It took the scoring well and had good oven spring and bloom.

The baking temperature was lower than I usually employ for lean dough hearth loaves, and the crust color was thus lighter than most of my bakes. The crust color was quite characteristic of the San Francisco Sourdough breads I remember from the 1960's and 1970's. The loaf profile also was typical – a rather flat loaf.

The aroma of the vented oven air was remarkably sour during the final 10-15 minutes of the bake. The bread, once baked, cooled and sliced, revealed a very even crumb. The crust was somewhat crunchy but more chewy. The flavor was minimally sour and had little complexity or sweetness to it. All in all, a handsome loaf with undistinguished eating quality.

I expect I could tweak more sourness out of this dough by retarding the loaves overnight, but I don't particularly feel inclined to experiment further when there are so many other breads that are so much better.

 Comments regarding the process described would be very welcome. I am curious regarding the disparity between the San Francisco Sourdough's I have had, supposedly produced by this method, and what I baked at home. Any thoughts?

David


dmsnyder's picture
dmsnyder

A couple days ago, I blogged on my bake of a San Francisco sourdough bread based on Larraburu Bros. recipe as described in the 1978 Cereal Chemistry article by Galal, et al., as cited by Doc.Dough. (See San Francisco Sourdough Bread using Larraburu Bros. formula.) It was a delicious bread, but it lacked the sourdough tang usually associated with San Francisco sourdough. This blob describes some modifications of the recipe. I hoped to retain the good qualities of this bread while increasing the sourness somewhat.

In summary, the modifications were:

  1. Substitute some whole rye flour for some of the high-gluten flour in the sponge.

  2. Ferment the sponge at a lower (room) temperature for a longer time.

  3. Substitute some whole wheat flour for some of the AP flour in the final dough.

  4. Compare breads baked with and without an overnight cold retardation of the shaped loaves.

For three 667 g loaves:

Sponge (Stiff Levain)

Baker's %

Wt (g)

High-gluten flour

90

81

Whole rye flour

10

9

Water

50

44

Stiff starter

50

44

Total

200

178

Mix thoroughly and ferment for 12 hours at room temperature.

Final dough

Baker's %

Wt (g)

AP flour

90

1017

WW flour

10

113

Water

60

678

Salt

2

22

Sponge (stiff levain)

15

170

Total

177

2000


Procedure (Note: I actually mixed the dough in a Bosch Universal Plus, using the dough hook. I have left the instructions as if I had used a KitchenAid mixer. This amount of stiff dough would have challenged my KitchenAid. Also, I retarded one of the 3 loaves I made overnight in the refrigerator.)

  1. Mix the flours and water in a stand mixer with the paddle for 1-2 minutes at Speed 1.

  2. Cover the mixer bowl tightly and autolyse for 20-60 minutes. (I autolysed for 60 minutes.)

  3. Sprinkle the salt on the dough and add the sponge in chunks.

  4. Mix for 1-2 minutes with the paddle at Speed 1, then switch to the dough hook and mix for 5 minutes at Speed 2. Adjust the dough consistency by adding small amounts of water or flour, if needed. (I did not add either.) The dough should be tacky but not sticky. It should clean both the sides and bottom of the mixing bowl.

  5. Transfer the dough to a clean, lightly oiled bowl. Cover tightly.

  6. Ferment at 105º F for 2 1/2 to 3 hours in a humid environment. Stretch and fold once at 1 1/4 hours.

  7. Divide the dough into 3 equal pieces.

  8. Pre-shape the pieces round and cover with a towel or plasti-crap.

  9. Let the dough relax for 15-20 minutes.

  10. Shape as a boule or bâtard.

  11. Proof at 105º F in a floured banneton or en couche, covered, until the dough slowly fills a hole poked in it with a finger. (This was in 30 minutes, for me!)

  12. About 45 minutes before baking, pre-heat the oven to 480º F with a baking stone and steaming apparatus in place.

  13. Transfer the loaf to a peel and score it as desired.

  14. Transfer the loaf to the baking stone. Turn down the oven to 450º F.

  15. Bake with steam for 15 minutes. Remove your steaming apparatus, and bake for another 25 to 35 minutes until the crust is nicely colored and the internal temperature is at least 205º F.

  16. Turn off the oven, but leave the loaf on the baking stone with the oven door ajar for another 10-15 minutes.

  17. Transfer the loaf to a cooling rack, and cool completely (at least 2 hours) before slicing.

This bread came out very dark for reasons that are not clear to me. Again, the “poke test” failed me. The loaves seemed ready to bake after 30 minutes in the proofer, but their oven spring and bloom seemed to indicate under-proofing. The crust was nice and crisp. The flavor was different from the first bake, partly because of the rye and whole wheat flours, but it was also very slightly sour – more so the day after baking. I would still categorize it as “very slightly sour.”

Larraburu SFSD, modified formula 

Larraburu SFSD, modified formula crust

Larraburu SFSD, modified formula Crumb

I cold retarded one loaf from this batch for about 24 hours en couche, inside a plastic bag. Because of the apparent under-proofing problem described above, it then was warmed up at room temperature for about 90 minutes and proofed at 105º F for another 75 minutes. The smooth surface of the loaf which had been face down on the couche was significantly dried out. The couche had absorbed a lot of its moisture.

Because of my experience with the previous bake, described above, I baked this loaf at 440º F for a total of 30 minutes, leaving it in the turned off oven with the door ajar for 20 minutes. The oven spring and bloom were moderated by these changes. The color was pretty much perfect, to my taste.

Larraburu SFSD, modified formula and procedure

Larraburu SFSD, modified formula and procedure: Crumb

The aroma of the sliced bread was whole-wheaty and ... slightly sour. The crust was crunchy and the flavor of the crumb was decidedly sour ... very sour. It was a very different bread from the ones that had 1) not been cold retarded and 2) had been proofed for a very much shorter time at a warmer temperature.

I'm a very happy sourdough baker!

The next step will be to return to the original formula but use the present modified procedure.

David

Submittted to YeastSpotting


dmsnyder's picture
dmsnyder

Back in May, 2010, bnom posted a reminiscence of the San Francisco Sourdough bread baked by Larraburu Brothers Bakery, which went out of business about 30 years ago after a fire in their plant. (See Divine inspiration--for me it way Larraburu Brother's SF SD. What was it for you?) For many who grew up eating it, the Larraburu bread was the quintessential San Francisco Sourdough. Although the bakery is long-gone (and much lamented), Doc.Dough found a journal article from 1978 describing their formula and process, so we might attempt to reproduce this famous bread.

Doc.Dough's citation is quoted below, as follows:

Title: Lactic and volatile (C2-C5) organic acids of San Francisco sourdough French bread

Cereal Chemistry 55(4): 461-468; Copyright 1978 The American Association of Cereal Chemists

Authors: A. M. Galal, J. A. Johnson, and E. Varriano-Marston

The Larraburu Company produces San Francisco sourdough French bread by the sponge and dough process.  Each day a piece of straight dough or starter sponge known as the "Mother" is saved and refrigerated to be used as a starter sponge the following day.  This starter sponge is used to make more starter sponge as well as sponges for bread production.  The starter sponge consists of 100 parts of clear flour (14% protein), approximately 50 parts of water, and 50 parts of the starter sponge.  The ingredients are mixed and fermented for 9-10 hr at 80°F.  The bread dough is made by mixing 100 parts flour 12% protein, 60 parts of water, 15 parts of sponge, and 1.5-2% salt.  The dough rests 1 hr and then is divided, molded, and deposited on canvas dusted with corn meal or rice flour.  The dough is proofed for 4 hr at 105°F (41°C) and 96% relative humidity and baked at 420°F (216°C) for 40-50 min in a Perkins oven with direct injection of low pressure steam (5 psi).  Oven shelves were covered with Carborundum.

Specific instructions for mixing are not provided, but I would surmise that, because of the very short bulk fermentation and long proofing times, Larraburu Brothers used an intensive mix. This would result in a bread with high volume but a relatively dense, even crumb. I altered the procedure to use an autolyse, a less intensive mix, a longer bulk fermentation with a stretch and fold and a shorter proof. My intention was to bake a bread with a more open crumb structure and better flavor.

The autolyse allows the flour to absorb the water and for gluten to start developing. This head start on gluten development allows for a shorter mixing time to get to the desired stage of gluten development. Less mixing has two principal effects: 1) The gluten strands are less organized, resulting in a more open crumb with a random distribution of holes of varying size. 2) Less oxidation of the carotenoid pigments in the flour, resulting in a more yellow crumb color and better bread flavor.

Note that the fermentation and proofing temperature control was made possible by using a Brod & Taylor Proofing Box.

To make one 1 kg loaf:

Sponge (Stiff Levain)

Baker's %

Wt (g)

High-gluten flour

100

45

Water

50

22

Stiff starter

50

22

Total

200

89

Mix thoroughly and ferment for 9-10 hours at 80º F in a lightly oiled bowl, covered tightly.

Final dough

Baker's %

Wt (g)

AP flour

100

565

Water

60

339

Salt

2

11

Sponge (stiff levain)

15

85

Total

177

1000


Procedure

  1. Mix the flour and water in a stand mixer with the paddle for 1-2 minutes at Speed 1.

  2. Cover the mixer bowl tightly and autolyse for 20-60 minutes. (I autolysed for 60 minutes.)

  3. Sprinkle the salt on the dough and add the sponge in chunks.

  4. Mix for 1-2 minutes with the paddle at Speed 1, then switch to the dough hook and mix for 5 minutes at Speed 2. Adjust the dough consistency by adding small amounts of water or flour, if needed. (I did not add either.) The dough should be tacky but not sticky. It should clean both the sides and bottom of the mixing bowl.

  5. Transfer the dough to a clean, lightly oiled bowl. Cover tightly.

  6. Ferment at 105º F for 2 1/2 to 3 hours in a humid environment. Stretch and fold once at 1 1/4 hours.

  7. Pre-shape the dough round and cover with a towel or plasti-crap.

  8. Let the dough relax for 15-20 minutes.

  9. Shape as a boule or bâtard.

  10. Proof at 105º F in a floured banneton or en couche, covered, until the dough slowly fills a hole poked in it with a finger. (This was in 30 minutes, for me!)

  11. About 45 minutes before baking, pre-heat the oven to 480º F with a baking stone and steaming apparatus in place.

  12. Transfer the loaf to a peel and score it as desired.

  13. Transfer the loaf to the baking stone. Turn down the oven to 450º F.

  14. Bake with steam for 15 minutes. Remove your steaming apparatus, and bake for another 25 to 35 minutes until the crust is nicely colored and the internal temperature is at least 205º F.

  15. Turn off the oven, but leave the loaf on the baking stone with the oven door ajar for another 10-15 minutes.

  16. Transfer the loaf to a cooling rack, and cool completely (at least 2 hours) before slicing. 

Proofed, slashed and ready to bake

The bread had exuberant oven spring and bloom. In hindsight, it could have proofed for another 15 minutes or so without harm. I baked it for a total of 40 minutes. The crust was very firm, and the loaf sang nicely while cooling. The aroma was that of fresh-baked bread without any yeasty overtones. 

Crackley Crust

Classic SF SD crumb

I sliced and tasted the bread about 3 hours after it came out of the oven. The aroma of the bread was sweet and wheaty. The crust was very crunchy with a wonderful flavor I have had from the crusts of excellent bakery loaves but not before from my oven. The crumb was quite tender and cool-feeling. The flavor was sweet with only a hint of lactic acid, creamy-type sourness. I could discern no acetic acid presence at all, much to my surprise.

Now, that's not "bad!" I'd say this may be the best flavored French-style pain au levain I've ever made. But it does certainly not have the assertive, vinegary tang usually associated with San Francisco Sourdough. In fact, my wife, who is not at all fond of super-sour sourdoughs, said, "This is better than San Francisco Sourdough!" I try not to argue with her, but it's clearly a matter of taste. 

I'm going to give this recipe some thought and may tweak it to get more sourness, but, you know, I may make it just like this again too. It's really outstanding!

David

Submitted to YeastSpotting 

freerk's picture
freerk

Because there are hardly any bread baking videos out there in Dutch, I decided to do it myself; this loaf is way too good to be only made in English!


freerk's picture

san francisco sourdough (now with how to video's)

November 11, 2010 - 3:26am -- freerk

Okay, there must be at least a dozen or so, pictures of this specific bread lurking around the site since it is such a famous loaf, but hey; I'm new and it is my first SFSD, so.... I need to show off my results a little, so here they are, whether you like it or not


Pages

Subscribe to RSS - San Francisco Sourdough Bread