The Fresh Loaf

A Community of Amateur Bakers and Artisan Bread Enthusiasts.

San Francisco sourdough

Song Of The Baker's picture

Oakland Sourdough 99.99999% Success

October 28, 2012 - 6:11pm -- Song Of The Baker

Here is this weekend's Oakland Sourdough bake, attempt #2.  I was much happier with this loaf and I owe thanks to Ford and Dabrownman for all their help in crunch time.  Also, I finally made an ear! - And have no idea how I did it.  As you can see, one slash made an ear and the other flattened out and pretty much disappeared.

Any comments/suggestions/critique would be much appreciated.

John

breadforfun's picture
breadforfun

If you haven't tried David Snyder's SF Sourdough bread technique yet, you really should.  It is a crusty, tasty bread that is very forgiving to make.  I have made it a number of times, and have been making some small adjustments to fit my schedule and my tastes.  In the last two weeks, I baked it twice and thought I would share some photos.

I like adding a small amount of whole spelt flour (about 10%) because of the flavor it imparts.  This loaf used David's 50% hydration starter that I made with 5% spelt in place of the rye that he lists.  I also wanted to try to shape it into a fendu, which I have never tried before.  The loaf was shaped and retarded overnight (about 18 hours) directly in a floured banneton.  In the morning it was proofed an hour at 85˚F and two additional hours at room temperature, about 68˚.  The results were quite good.

Sorry, I don't have a crumb picture because I took the bread for a dinner party and didn't have a chance to take one.  There is a very strong sour flavor to this bread, and it has a crispy-chewy crust and creamy crumb.

I baked a second set of batards the following week.  Again I used 10% whole spelt, but instead of the 50% hydration starter, I used a 75% hydration starter to try to reduce the acidity.  There have been some discussions on whether the starter hydration affects acidity recently, and I wanted to see what happens to my loaves.

The technique was mostly the same.  The main difference was that I proofed the loaf in linen lined baskets for 90 minutes after shaping and then retarded them overnight.  In the morning I finished proofing at 85˚ for an hour, then another 45 minutes at room temperature.  To my taste, the second bake (75%H starter) seemed less tart than the first (50%H starter), but of course it is highly subjective.  Both bakes gain acidity after sitting for a day or two.

Thanks again David for a great bread formula.

-Brad

dmsnyder's picture
dmsnyder

This weekend, I baked another version of my San Francisco-style Sourdough and Hamelman's Flaxseed Rye Bread. 

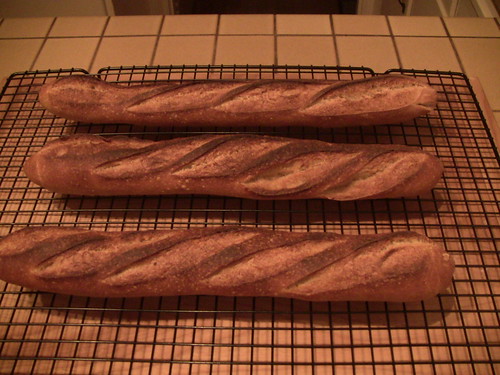
I baked two large bâtards of San Francisco-style sourdough bread. My procedures were modified to accommodate other demands on my time. My starter was fed only once before mixing the levain, and the activated starter was not retarded. The levain was retarded. The levain was then fermented at 76 rather than 85ºF. (I document these details for my own reference, to see if the differences make a difference. Others may find comparison of the procedures I used among my sequential bakes of this bread of some interest. Or not.)

Preliminaries

I started with my stock refrigerated 50% starter that had been fed two weeks ago. This feeding consisted of 50 g active starter, 100 g water and 200 g starter feeding mix. My starter feeding mix is 70% AP, 20% WW and 10% whole rye flour.

I activated the starter with a feeding of 40 g stock starter, 100 g water and 100 g starter feeding mix. This was fermented at room temperature for 16 hours, then refrigerated for about 20 hours. I then mixed the stiff levain.

Stiff levain

Bakers' %

Wt (g)

for 1 kg

Wt (g)

for 2 kg

Bread flour

95

78

157

Medium rye flour

5

4

8

Water (Warm)

50

41

82

Liquid starter

80

66

132

Total

230

189

379

  1. Dissolve the starter in the water. Add the flour and mix thoroughly until the flour has been completely incorporated and moistened.

  2. Ferment at room temperature for 6 hours. Refrigerate for 12 hours.

  3. Remove from refrigerator and ferment further for 3 hours at 76ºF.

Final dough

Bakers' %

Wt (g)

for 1 kg

Wt (g)

for 2 kg

AP flour

90

416

832

WW Flour

10

46

92

Water

73

337

675

Salt

2.4

11

22

Stiff levain

41

189

379

Total

216.4

953

2000

Method

  1. In a stand mixer, mix the flour and water at low speed until it forms a shaggy mass.

  2. Cover and autolyse for 40 minutes

  3. Add the salt and levain and mix at low speed for 1-2 minutes, then increase the speed to medium (Speed 2 in a KitchenAid) and mix for 6-8 minutes. Add flour and water as needed. The dough should be rather slack. It should clean the sides of the bowl but not the bottom. (Note: Today's dough was considerably looser than any of the previous mixes using this formula. It has been raining heavily. I assume my flours had a higher moisture content. I considered adding flour but did not.

  4. Transfer to a lightly floured board and do a stretch and fold and form a ball.

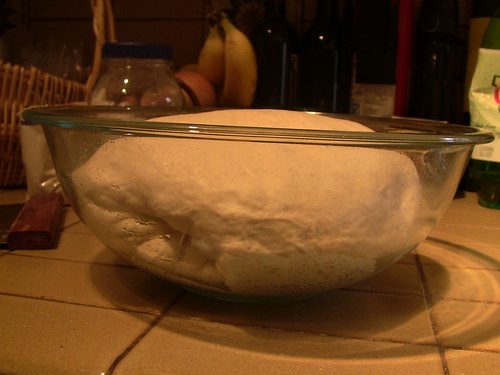
  5. Place the dough in a lightly oiled bowl and cover tightly.

  6. Ferment at 76º F for 31/2 to 4 hours with a stretch and fold at 45 and 95 minutes. (Note: Even after the first of these foldings, the dough was very smooth and had good strength. After the second folding, it was quite elastic.)

  7. Divide the dough into 2 equal pieces. (Note: I had made 2 kg of dough. I had decided to bake two large bâtards today rather than three or four smaller boules.)

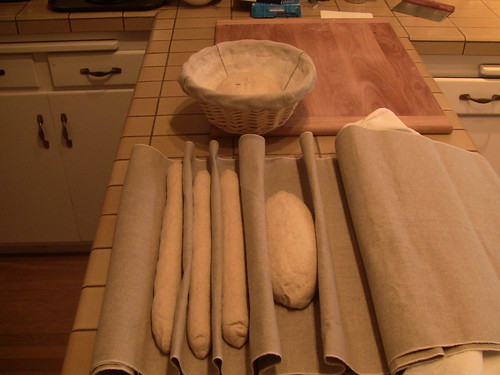
  8. Pre-shape as rounds and rest, covered, for 10 minutes.

  9. Shape as boules or bâtards and place in bannetons. Place bannetons in plastic bags.

  10. Proof at room temperature (68-70º F) for 1-2 hours.

  11. Cold retard the loaves overnight.

  12. The next morning, proof the loaves at 85º F for 3 hours. (If you can't create a moist, 85 degree F environment, at least try to create one warmer than “room temperature.” For this bake, I took two loaves out of the fridge and started proofing them. I took the third loaf out about an hour later and stacked it balanced on top of the other two. I did one bake with the first two loaves and a second bake with the third loaf.)

  13. 45-60 minutes before baking, pre-heat the oven to 480º F with a baking stone and steaming apparatus in place.

  14. Transfer the loaves to a peel. Score the loaves as desired, turn down the oven to 450º F, steam the oven, and transfer the loaves to the baking stone. (Note: These loaves were baked at a lower temperature for a longer time because of their larger mass. A boule of the same weight would require an even longer bake because the center of the loaf is further from the oven heat.)

  15. After 15 minutes, remove the steaming apparatus, and turn down the oven to 425º F/Convection. (If you don't have a convection oven, leave the temperature at 450º F.)

  16. Bake for another 20-25 minutes.

  17. Turn off the oven, and leave the loaves on the stone, with the oven door ajar, for another 15 minutes.

  18. Transfer the loaves to a cooling rack, and cool thoroughly before slicing.

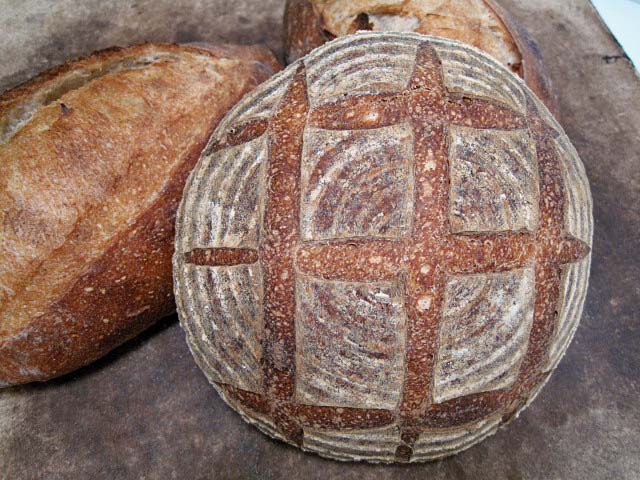
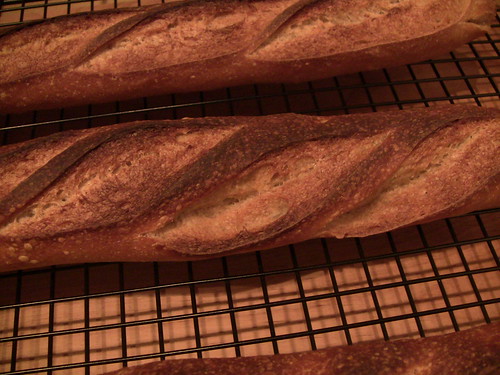
Comparing this bake to previous ones, the crust was thin and crunchy-chewy. The crumb was quite chewy. The flavor was good with a mild sourdough tang and a more prominent flavor from the whole grains. I think the differences are attributable to my having one less feeding of the firm starter and not fermenting it at the higher temperature.

Hamelman's Flaxseed Rye

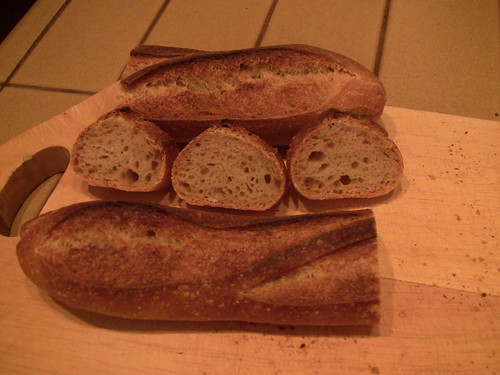
Hamelman's Flaxseed Rye crumb

This bake was inspired by hansjoakim's recent bake of this bread. Looking through my TFL blog, I found I had only baked this bread once before, back in September, 2009. (See Hamelman's Flax seed rye bread - Thanks, hansjoakim!) That time, I made one large boule. I found the dough extremely slack. This time, I substituted first clear flour for the AP, and the dough was tacky but much less goopy. This time, I made two 500 g bâtards. I need to make more rye breads, if only to practice my "chevron cut" scoring until I get it right!

Recalling how delicious this bread was and how much my wife - not a big rye bread fan - enjoyed it, I am amazed that it's been so long since I baked it again. Once more, I must thank hansjoakim for the prompt to bake this delicious bread. 

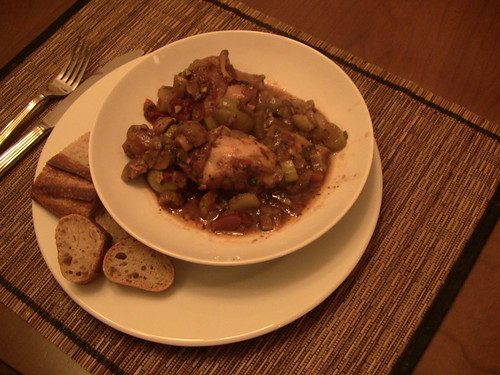
The flavor of this bake was as good as I remembered. It was delicious just cooled and the next morning, toasted - a nice accompaniment to pickled herring and scrambled eggs. And, again, my wife enjoyed it a lot. It is telling that she chose it over the San Francisco Sourdough for her own breakfast.

David


bnom's picture

Science question - localized bacteria and impact on crust formation

April 15, 2012 - 10:08am -- bnom

As you know, David Snyder and others on this site have been trying to replicate the distinctive flavor and character of San Francisco sourdough. For me, a significant part of the SF SD flavor and experience is a thick, crunchy, deeply carmelized crust (for me, the Laraburu Brothers bread I grew up on was the epitomy of SF SD).  I recently made David's fourth iteration of the SF SD bread formula he's been developing and found the flavors exceptional but it did not have the crust qualities that I think are typical of SF SD.  

Isand66's picture
Isand66

After reading about Dave's never-ending quest to create the perfect San Francisco Sourdough bread I felt it was time to give his latest recipe a whirl.  I have never been to SF so I don't know exactly what the final bread should taste like other than by his description.

I tried very hard to follow his exact recipe but alas my string of good luck continued and my refrigerator decided to mimic an oven.  I was forced to let the bulk ferment dough rest in my mini beer/assorted alcohol refrigerator instead of the shaped loaves.  I let the dough bulk ferment over night and the next afternoon while I waited for my refrigerator to be fixed I let the dough rest at room temperature for a couple of hours.  I then formed the loaves into Boules and let them rise in their bannetons inside my oven with a bowl of hot water for 3.5 hours.

The dough was nice an elastic and puffed up very nicely.  Unfortunately I didn't realize that the risen loaves would be too big to fit in my oven at the same time.  I had to adjust the loaves while the oven was nice and hot and subsequently one of the loaves was hanging off the baking stone for a few minutes causing it to sag slightly.

The final result was an excellent crust and a nice open and light crumb.  I did however discover the first loaf I cut into had a mysterious hole running through a big part of the bread, almost like someone or thing was trying to dig its way to China.

Overall the bread turned out excellent.  I would have expected it to be slightly more sour though and I'm not sure why it was so mild.  It could be due to the fairly new converted starter I used.  I turned my 65% AP starter to Dave's multi flour starter at 50% so maybe it wasn't mature enough.

You can find Dave's recipe  here: http://www.thefreshloaf.com/node/27982/san-franciscostyle-sourdough-bread-two-ways-3252012.

Thanks again Dan for an excellent recipe!

dmsnyder's picture
dmsnyder

Baguettes made with San Francisco Sourdough dough

I do like sourdough baguettes. Since I'd developed a San Francisco-style Sourdough bread I was happy with, I decided to make some baguettes with this dough. I made one kg of dough and shaped half of it as a boule which was retarded overnight before baking. I divided the other half into two 250 g pieces and shaped them as baguettes, proofed them and baked them without retarding at 460 degrees F for 22 minutes. See my recent blog entries for the formula and procedures. (My San Francisco Sourdough Quest, Take 3

Baguettes on the peel, ready to score and load

Scored baguette, ready to load and bake

Baked baguette, cooling

Baguette crumb

The crust was slightly crunchy and chewy. The crumb was chewy with a nice flavor and a mild sourdough tang. These are definitely worth making again. Next time, I think I'll retard the shaped baguettes and also try baking at a slightly higher temperature to get a darker, crunchier crust.

The boule also turned out nicely, shown here with "a supporting cast" of San Joaquin Sourdough bâtards.

David


dabrownman's picture
dabrownman

My next attempt at learning something new about bread, I decided to bake off David Snyder's SFSD that he is trying to perfect like the rest of his fine breads, with Pierre Nury's light SD Rye that I ran across in zolablu's fine blog.  Thought I would make them both as directed and bake them off in the same oven at the same time now that is is clean after my San Joaquin adventure even if it was a fiasco.  I used a compromised temp, steam and time since they didn't quite line up perfectly.  I did shape the Nury loaf and lightlu slashed it before in went into the final rise to try to get it to swell and split naturally somewhere on the top.  I used my new parchment containment system to control a very wet dough from spreading and ....It worked just fine.

David's small SFSD boule went into a heavily flowered basket that should have been floured more sanely.  I used 50% rice flour for this heavy handed dusting.  I have never done this before so, was flying a little blind and had read that they will stick when the basket is new.  Plus this basket was never meant for bread in the first place.  When I went to slash David's boule, it was pretty hard and my razor just sort of bounced off.  I finally butchered it with a big serated knife.  My slashing skills are quite primitive and weak to begin with even though I have seen many folks live, and on video doing it like it was easy as pie.  I think they are showing off knowing my slash challenged bread making skill :-)  David's didn't spring because of its tougher exterior and Nury's nearly exploded.  Both browned up nicely and I did bake the boule 5 minutes longer to get that deep dark skin.

The crumb was slightly more open on the boule but both were fine with holes of all sizes.  The weird thing was that I couldn't taste any rye in Nury's and I wanted to since I love rye.  Couldn't taste it in David's either.  In fact both the breads tasted the same to me. and both had the same sour undertone probably because they both used the same rye, spelt, WW and AP starter and levain.

David's won the taste test the next day as the crumb got , the sour revealed itself and it became more complex.  I can't wait for David to get it perfected as he is sure to do.  I have my own changes to make to Nury's 'Non Existent' Light Rye so that will be more rye like and complex in taste.  Here are some Pic's.


dmsnyder's picture
dmsnyder

This 2+ kg miche is for an upcoming family gathering. Eighteen of us - most of 3 generations - will be getting together at the Central California beach town where my generation vacationed with our parents in the 1960's and '70's. There are lot's of wonderful memories of those Summers.

The formula for the miche is from the SFBI Artisan II workshop I took last December. I have described the formula and methods here: This miche is a hit! Since then, many TFL members have made this bread and seem to have enjoyed it as much as I. That includes brother Glenn, who has promised to bring along a matching miche.

The only modification of the original formula for this bake was to use half WFM Organic AP flour and half CM Organic Type 85 flour.

 The crust has lots of lovely crackles.

No crumb photos, since I'm taking it intact to the gathering.

I also baked a couple 1 pound loaves of the San Francisco Sourdough from AB&P today. The formula can be found here: Crackly Crust & Shiny Crumb: San Francisco Sourdough from AB&P

I think the "group photo" puts things in better perspective.

David

GSnyde's picture
GSnyde

IMG_2044

Last week I made San Francisco Sourdough, and learned a lot.  I decided to try it again this weekend with some variations relating to flour mix, dough handling, retardation time and loaf shape.

I again used the formula in Peter Reinhart’s Crust and Crumb, and I again used primarily Bob’s Red Mill bread flour.  But this time, instead of 100% bread flour I used about 9% dark rye flour and about 11% whole wheat flour.  I used the rye and whole wheat in each of the three mixes: the liquid starter, the firm starter and the main dough.  I did not adjust the hydration (64%).

My other departures from the C&C formula were:

  • Though the formula calls for kneading the dough, then letting it sit unmolested in a bowl for four hours, I gave it a four-way letterfold every hour.  The dough was firmer (less slack) this time, compared to last weekend when I did no folds.
  • I followed the formula’s specifications for ripening and then retarding the two starters, but I decided to test the effects of retardation after proofing and to test the attributes of different loaf shapes using this formula.  I scaled the dough for 3 mini-baguettes of 250 grams each and a boule and a batard of 615 grams each.  The baguettes I baked as soon as they were proofed; the larger loaves were put in the fridge overnight after proofing 3 hours as in the formula.

I should also mention that I proofed the baguettes and the batard on linen couche, and the boule in a linen-lined basket.  I did not spray oil on the loaves at the beginning of proofing as Reinhart specifies.  The baguettes were covered with a fold of couche fabric and a tea towel over that.

Here’s the fermented dough after a 3 ½ hour rise.

IMG_2035

Here’s the proofing loaves. 

IMG_2039 

The baguettes baked at 450 on a stone with steam for 10 minutes, then without steam at the same temperature for another 10 minutes.   Then I left them to sit on the stone with the oven off and the door ajar for another 10 minutes.  The internal temperature was 209F.  They’re really pretty to look at.

IMG_2040 

IMG_2042


The crust is darkish, and very hard.  Indeed, it is positively tough, as in hard to bite through.

The crumb is very good tasting and nicely chewy, not what I’d call tough.  Not a very open crumb, but not really dense.

It was a really good thing I had delicious Chicken Cacciatore to dip the bread in to moisten it (the bread made a fine mop).  Thanks for the recipe, David.

IMG_2045


So, you experienced bakers, what caused the rock hard crust this time?

  • ·      Increased gluten strength from the folds during ferment?
  • ·      Baguette shaping?
  • ·      Baguettes getting too much air (not sealed in plastic) during proofing?
  • ·      Too low hydration?
  • ·      Too bold a bake or too much time drying on the stone?

Any help would be appreciated.  The boule and batard just came out of the oven, and I’ll report results later.

Thanks.

Glenn


Pages

Subscribe to RSS - San Francisco sourdough