Ed Wood, who sells sourdough cultures from various parts of the world, insists that a culture will maintain its unique combination of yeast and lactobacillus species and, thus, its unique growth characteristics and flavor, forever. My experience has been otherwise. I've bought his San Francisco Sourdough culture on two previous occasions. Both times, after a couple weeks of feeding, they produced bread with the characteristic San Francisco sourdough flavor, but after six months or so the flavor changed. The eventual culture was in no way "bad," it was just different. I assume the original organisms were replaced by others, and, from what I've read, the new ones derived from the flour with which I was feeding my culture.
My understanding is that the yeast and bacteria which inhabit grains are mostly on the outer surface, that is the bran. I have fed my starters with a mixture of white flour, whole wheat and whole rye for some time. Also, I keep my starters at about 75% hydration. Dr. Wood does not address what kind of flour one should use for feeding starters, but he does recommend keeping the San Francisco culture as a liquid. I believe this favors the homofermentive (lactic acid producing) bacteria over the heterofermentive (lactic and acidic acid producing) bacteria which prefer a less liquid (and cooler) environment.
With these considerations in mind, I have purchased Dr. Wood's San Francisco Sourdough starter a third time. I am feeding it only white flour. I still use whole grains in final levain builds, but I will not feed them to my "stock" cultures.
It is now a month since I activated the SF SD culture. I've baked a few breads with it, but I made no special effort to bring out the distinctive SF SD flavor to date. The breads I baked were very tasty – among the best tasting I've made. The dough rose very well, indicating good yeast activity. The sourness has been mild.
I figure it's time to start following the procedures I understand to optimize the culture for making breads with the authentic, distinctive San Francisco Sourdough flavor.
The first goal is to generate a mature starter with good numbers of active yeast and lactobacilli. Second, to have this starter ferment at the hydration levels and temperatures that enhance the production of the “right” balance of lactic and acetic acid. Third, to mix and ferment a dough with the desired flavor balance.
Incidentally, for this bake, I also incorporated Eric's (ehanner) recently endorsed addition of a small amount of Durum flour to a white flour mix to enhance flavor.

|
Penultimate levain build
Ingredients
|
Ingredient weights (gms)
|
Baker's percentages
|
|
Stock starter (67% hydration)
|
50
|
50
|
|
KAF AP flour
|
100
|
100
|
|
Water
|
100
|
100
|
|
Ultimate levain build
Ingredients
|
Ingredient weights (gms)
|
Baker's percentages
|
|
Activated levain
|
250
|
167
|
|
KAF AP flour
|
150
|
100
|
|
Water
|
150
|
100
|
|
Final dough
Ingredients
|
Ingredient weights (gms)
|
Baker's percentages
|
|
Ripe levain
|
200
|
37
|
|
Fine durum flour (from KAF)
|
35
|
6.5
|
|
KAF European Artisan-style flour
|
500
|
93.5
|
|
Water
|
360
|
67.3
|
|
Salt
|
10
|
1.9
|
Procedures
-
Make the penultimate levain by dissolving the firm starter in the water and mixing in the flour. Ferment at room temperature until it is actively bubbling but not foaming. (8-10 hrs) I mixed this early one morning and let it ferment while I was at work.
-
Make the ultimate levin by dissolving the penultimate levain in the water and mixing in the flour. Ferment at room temperature for 2-3 hours, then at 78-85ºF for another 10-12 hours. I mixed this after dinner and placed it in a warmed microwave oven over night. In the morning, I refrigerated it while I was at work.
-
Mix the final dough by dissolving the ripe levain (Feed the extra and save it for another bread.). Add the flours and mix to a shaggy mass. Cover tightly and let it sit for 20-60 minutes. (Autolyse)
-
Add the salt and mix thoroughly. Knead by french folding or in a stand mixer until the gluten is moderately developed. If using a KitchenAid mixer, this dough will not completely clean the sides of the mixer. With the flours I used, this was a moderately slack and somewhat sticky dough, even though the hydration was actually lower than what I most often use for sourdough breads these days. I assume this was because I have generally been using about 10% whole wheat or whole rye flour, which absorbs more water.
-
Transfer the dough to a large bowl and cover it tightly. Note the volume of the dough.
-
After 20 minutes, “stretch and fold in the bowl” for 30 strokes. Cover tightly.
-
Repeat Step 6. two more times.
-
After the third “stretch and fold in the bowl,” let the dough rest for another 20 minutes, then transfer it to a lightly floured board and do a stretch and fold (“letter fold”). Return the dough to the bowl.
-
After 45 minutes, do a second stretch and fold on the board. Return the dough to the bowl. Cover tightly. Continue fermenting until the dough has doubled in volume from the original volume that you noted in Step 5.
-
Transfer the dough to the board. Divide it into two equal pieces, and pre-form each piece into a round (if making boules) or log (if making bâtards). Cover the pieces and let them rest for 10-20 minutes to relax the gluten.
-
Form your loaves and transfer them to bannetons. Cover with plasti-crap or place each banneton in a food-grade plastic bag.
-
Cold retard the loaves until ready to bake. (12-16 hours at 40ºF)
-
Remove the loaves from the refrigerator and allow them to warm up and continue proofing until they have expanded by 50-75%
-
One hour before baking, preheat your oven to 500ºF with a baking stone and your steaming method of choice in place.
-
Pre-steam the oven.
-
Transfer the loaves to your peel. Score the loaves. Transfer the loaves to the baking stone. As anticipated, the loaves spread some when transferred to the peel and spread more when scored.
-
Steam the oven and turn the temperature down to 460ºF.
-
After 12 minutes, remove your steaming source. (If it is already dry, you can leave it in place, but do open the oven door for 10-20 seconds to vent the steam.
-
Continue baking until the loaves are done – about 18-20 minutes more. (Their internal temperature is 205ºF, and thumping their bottom gives a hollow sound.)
-
Leave the loaves in the turned off oven with the door ajar for 7-10 minutes to dry the crust.
-
Transfer the loaves to a cooling rack.
-
Cool thoroughly before slicing. (At least 2 hours)

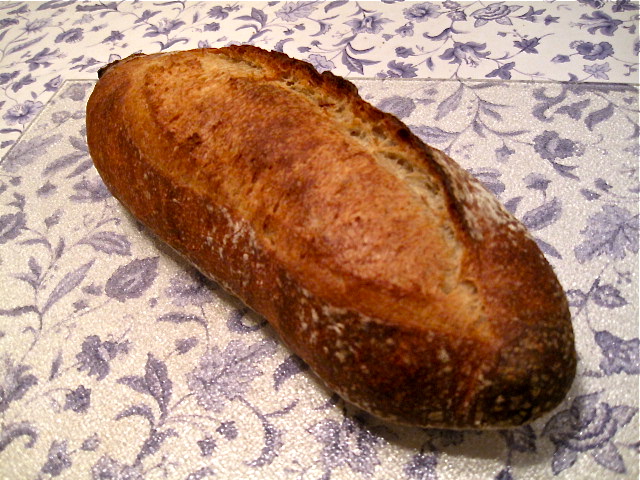
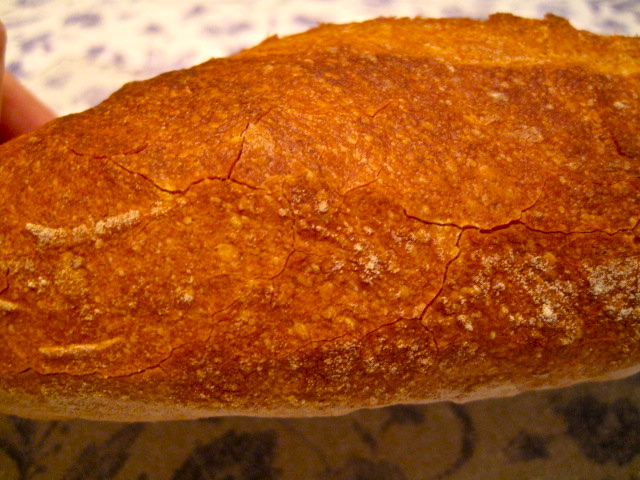
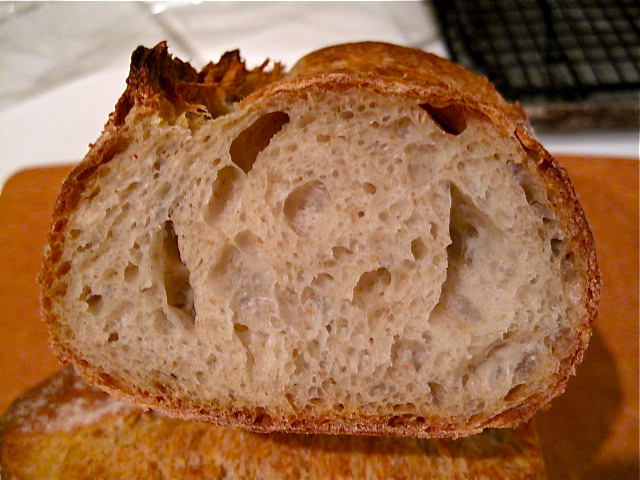
The crust is very crisp and crackly. The crumb is moist, tender and quite full of lovely holes. The flavor is sweet and "clean" with no perceptible sourness. This is a wonderfully tasting bread, but the absence of any sour flavor is a mystery.
My next experiment needs to be to bake the "San Francisco Sourdough" from Reinhart's "Crust&Crumb." If that is not sour, the lactobacilli must have missed the plane from Idaho!
David
Submitted to Yeast Spotting.