A birthday present and long time no baking: had to use the present and bake some!

Suas' Cinnamon Rolls
Ever since I started baking, now about 2 years ago, I hated our tile counter tops which are not suitable for working dough etc. I had worked on a marble slab since, but it was small and got me into trouble with larger batches, or longer breads (like large challah). Yesterday my solution arrived (two day early father's day/birthday present) in the form of a maple countertop, standard depth (25"), 48" wide and 1.5" thick. You can see it in the background of the photo above. While meant to be an actual counter top, I put some rubber feet under it to prevent sliding, and put it on top of the counter. Heavy lifting, but solid and immobile (might leave it on permanently). Wonderful! Now I needed to make/bake something.
I got Suas's book (Advanced Bread and Pastry) a while ago and read almost the whole thing (the technical stuff, not all formulas) in just a few days. I really like this book. This weekend I finally had time to make something from it (work has been incredibly busy, so little baking happened in the last few months, except the routine sandwich bread). The choice was actually from the Viennoisserie section, page 360/361: Cinnamon Rolls made with "Sweet Roll Dough", and "Sticky Bun Glaze" (p. 394) on the bottom and "Flat Icing" (p. 646) on top. Although not in the recipe, but apparently present in the photographed version, and consistent with that, I added golden raisins.

Suas' Cinnamon Rolls Inside
Of course, and as fairly typical for me diving into formulas in books, I found an error in the "Sweet Roll Dough" formula right away. I found this because I use my Dough Calculator spreadsheet and it comes up with different answers. In this case the conversion from metric to US decimal was wrong in the formula on the line for Cake Flour, and as a result, the fractional representation of the decimal was wrong as well. In the formula, as presented, cake flour is 0.748 pounds, or 0.424 kg. That is incorrect. The correct number: 0.935 pounds (which is indeed 424 g). Also, the lbs & oz number, given as 12 should be 15 oz. Here is the formula I used (with different numbers because it was scaled down to produce 2 lbs of dough):

Suas' Cinnamon Rolls (12 rolls)
I did not have milk powder, so I used the Dough Calculator to convert to "real" milk (and presented above). Although the formula does not describe it here (but does in the book), I used SAF Osmotolerant Instant Dry yeast  (available from King Arthur's Catalog). The high sugar content of the dough can make life a little difficult for regular IDY but OT IDY can handle this better. Fear not if you do not have it. You can use just a little more regular IDY and allocate a little more time for the proof and you should be fine. A similar comment applies to the use of cake flour. The texture will be better with it, but if you don't have it, try AP flour instead.
The instructions for making the dough are pretty standard. This dough should come out of the mixer fairly cold (72F) so you may need to use cold(er) milk. You can see the calculation for my case in the formula above, where I had to use 42F milk. My fridge happens to be set at 40F, so I used it straight from the fridge. Put all dry ingredients in a bowl, and mix well. Add wet ingredients, except butter and mix at second speed (even 3rd on KA mixers) until full gluten development, adding the butter in small batches starting about 2/3 of the way through mixing. Dough should clear the bowl and be fairly stuff, although supple because of the butter. If you desire raisins, knead them in by hand at this point (I used about 100 g). Let proof on the counter for about 1 hr and then refrigerate overnight.
One of the problems with this book (in particular for the home baker) is that it provides formulas (of course using baker's percent) for both large amounts (typically a 10lbs dough) and "test" amounts, but does not specify the yield for either. My prior baking experience told me to make a 2lbs dough to get about 12 rolls (I actually got 13). Likewise it talks about using the "Sticky Bun Glaze", but does not tell you how much you need, nor does it say how much cinnamon sugar and icing you need. I guessed the cinnamon sugar wrong, but here is how to make the right amount (prepare whenever, and store in moisture tight container):
| Ingredient | % | Decimal lbs | Fractional lbs | Volume | Metric |
|---|
| Sugar | 100% | 0.1103 | 1 3/4 oz | 4 T | 50 g |
| Sugar, Brown | 100% | 0.1103 | 1 3/4 oz | 4 3/4 T | 50 g |
| Cinnamon | 8% | 0.0088 | 0.14 oz | 1 3/4 t | 4 g |
Next morning, take the dough out of the refrigerator about 1-2 hours and let it warm up. While it warms up, prepare the "Stickly Bun Glaze" (optional) from the formula below. Cream the butter and sugar together until smooth, then add the remaining ingredients and set aside. Alternatively you can heat everything up in a pan until the sugar is dissolved and then let things cool down.
| Ingredient | % | Decimal lbs | Fractional lbs | Volume | Metric |
|---|
| Sugar, Brown | 100.00% | 0.3314 | 5 1/4 oz | 7/8 C | 150.0 g |
| Butter | 56.67% | 0.1878 | 3 oz | 5 3/4 T | 85.2 g |
| Salt | 0.83% | 0.0028 | 0.04 oz | 1/4 t | 1.2 g |
| Honey | 38.33% | 0.1270 | 2 oz | 2 1/2 T | 57.6 g |
| Vanilla Extract | 2.50% | 0.0083 | 0.13 oz | 3/4 t | 3.8 g |
| Cinnamon | 0.83% | 0.0028 | 0.04 oz | 1/2 t | 1.2 g |
Degas the dough and roll out into a rectangle about twice as wide as it is long, about 1/8" thick. Brush the whole rectangle with water and sprinkle on the cinnamon sugar mixture, making sure to leave a 1" strip at the far (wide) end uncovered so the dough can stick. If you didn't do the raisins already, you could add them here (I prefer to do them earlier so the dough absorbs the raisin flavor). Roll up the dough somewhat tight, starting at the wide, sprinkled end, and ending at the other wide end, where a little pressure will "glue" things shut.
Prepare a baking sheet by covering it with parchment paper and spreading the "Sticky Bun Glaze" evenly on top of the paper. The glaze will melt and be absorbed in the bottom of the rolls and cover the bottom. Take a wet and sharp knife and cut 1" pieces of the rolled up dough and place sideways on the sheet. Leave room between the rolls for expansion. Twelve rolls, evenly spread out, will be about the right spacing on a standard home oven baking sheet. Let proof until about 1.5 to 2 times size. Pre heat the oven to 350F and bake on middle rack. You may want to consider putting another baking sheet immediately under it, to prevent the bottoms from burning. The rolls will be ready in about 15-18 minutes.
Now comes a tricky move. Take the sheet pan out of the oven, place a cooling rack on top, and then, without pressing, flip the whole deal over and place on a surface where you can deal with the dripping glaze. Remove sheet pan and parchment paper. If you used the paper this will be extremely easy! Now, to prevent too much glaze from covering the sides and top of the rolls, use a second cooling rack and invert again. Now let cool. This seems convoluted, but you do not want to handle the hot rolls with your hands: they're really hot, very sticky, and very fragile! Meanwhile prepare the "Flat Icing":
| Ingredient | % | Decimal lbs | Fractional lbs | Volume | Metric |
|---|
| Sugar, Powdered | 100% | 0.2197 | 3 1.2 oz | 7/8 C | 100.0 g |
| Lemon Juice | 3% | 0.0066 | 0.11 oz | 1/2 t | 3.0 g |
| Water (hot) | 14% | 0.0308 | 1/2 oz | 2 3/4 t | 13.9 g |
Mix this together with spatula and try to not incorporate any air in the mixture. If you desire it thinner, add more water. This was just about right though, I think. Now, when the rolls are still somewhat warm, but not hot, put the icing in a piping bag with fine tip, or if you don't have fancy equipment, use a plastic baggy (sandwich size or so), and cut just the tiniest piece of a corner. Drizzle the icing over the rolls in the desired amount and let the icing set (a few minutes). Then, get set and eat!

Cinnamon Roll Sample
--dolf
See my My Bread Adventures in pictures


 Half-baked Onion Rolls
 Norm's Onion Rolls


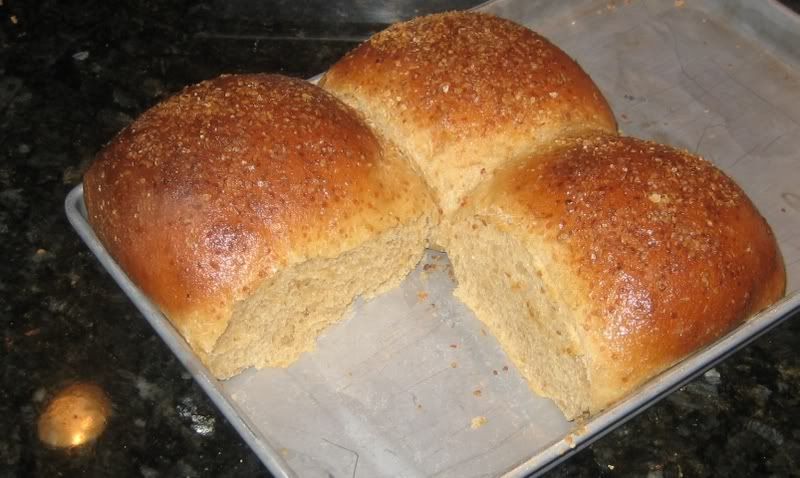
 Crumb
Crumb Whole Wheat Rolls
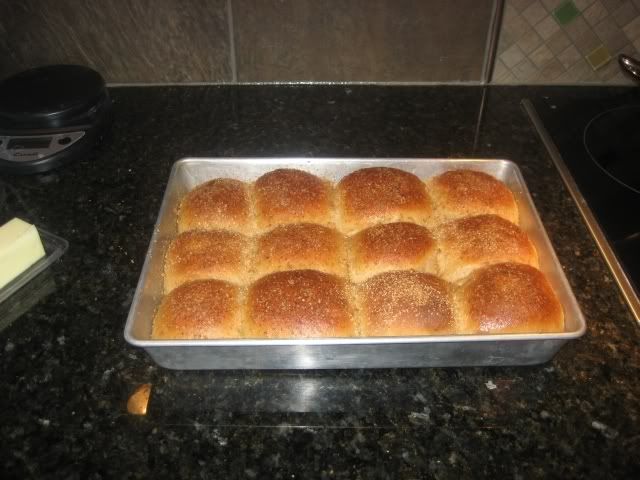
 Whole Wheat Rolls