The Fresh Loaf

A Community of Amateur Bakers and Artisan Bread Enthusiasts.

ricotta

dabrownman's picture
dabrownman

After our recent experiments with 100% whole grain bread, and DaPumperizing some of them, we found out that our limited supply of what we call white breads was exhausted.  These ‘white breads’ still have 20%-30% whole grains in them so they have some decent flavor and healthfulness.


We thought we would go Italian for this bake because of the sneaky ricotta, goat cheese and citrus cheese cake my apprentice baked while no one was looking.   It had also been awhile since we had done a chacon shape too.  We could have done an Italian shape like an Altamura but these shapes usually need some durum flour in hem and we are saving the last of Desert Durum for something else.


Instead of out usual pesto, parmesan and sun dried tomato Italian bread that we like so much we decided to go in a different Italian direction by using figs, hazelnuts and ricotta cheese to go along with the 22% whole grain Rye, spelt and WW that was mainly used in the levains.


Yes, we had 2 levains for this bake but they were both of the SD variety instead of YW we usually use for 1 of them.  We used out Rye Sour and our Not Mini’s Ancient WW starters for this bake.  We love what both of them do for bread so why not combine them and see what happens.


So not to have enough to do for this bake we also decided to use whey water for some of the liquid and do a Tang Zhong with 25 g of the dough flour with an additional 125 g of water not included in the liquid amounts in the formula.


We thought about throw in some of our aromatic seed mix but the apprentice nixed that at the last minute wanting to know what was German about this bake anyway?  For being mainly nutzoid when it comes to breaking the bread mold, she can be traditional when you least expect it – usually right before doing a nose rip on you – which is also not expected.


These levains built themselves up to doubling in 4 hours so only one build was needed to get them full strength.  We did not retard the levains when built as is our usual practice of late but we did do a 4 hour autolyse of the dough flours with the malts, VWG and Toadies.  We kept the nuts, figs, cheese and salt out.  Usually we put the salt in the autolyse so we don’t forget it but thought we try to have Lucy remember to put it in later.

After the 2 levains, the Tang Zhong, ricotta cheese and autolyse came together, we mixed it withy a spoon for 1 minute and then did 4 minutes of slap and folds before adding the salt.  This dough feels much wetter that the just short of the 69% total hydration with the add ins.  This is due to the Thang Zhong and the cheese. 

After the salt went in, we did another 8 minutes of slap and folds before the dough finally came together fore a 20 minute rest.  We then did (3) sets of S&F’s on 15 minute intervals and incorporated the nuts and re-hydrated figs in the 2nd one and by the 3rd one they were well distributed.   The wet figs also added some more unaccounted liquid to the mix. 


After a hours worth of ferment on the counter the dough was bulk retarded for 12 hours, ala Ian’s typical retard mastering.  In the cold it had risen to the rime of the bowl and after 1 ¾ hours on the counter the next morning it has risen above the rim of the bowl .

We then divided it and shaped the knotted rolls; one each for the bottom of each basket, and shaped the twisted rope in addition of the oval basket so these Chacons wouldn’t end up looking too similar after baking.   So no braids, balls or other intricate shapes and designs in the bottom of the basket were used in keeping with this simple Italian bake.

After 2 hours of final proof on the counter in a plastic bag, they were ready for Big old Betsy that had bee preheated to 500 F with one of David Snyder’s lava rocks in a large cast Iron skillet along with a large size one of Sylvia’s steaming pans with 2 rolled up towels in it.  Both were put into the oven half full of water when the 40 minute preheat started and they supplied their usual mega steam.  We also used top and bottom stones as we always do since they never come out of the oven.

My apprentice thought that the loaves were over proofed again when the came out of the bag since the dough jiggled like jello or a croissant and the dough had risen above the rim of the baskets.   But, since Chacons do not need to be slashed, they went straight into the oven on the bottom stone after un-molding onto parchment paper and peel.  They still managed to spring nicely anyway and my apprentice’s over proofing fear was as unfounded as her legal immigration status.

After 2 minutes the temperature was turned down to 460 F and then after a total of 12 minutes the steaming apparatus came out of the oven and the temperature was turned down to 425 F , convection this time.  The loaves were rotated on the stone every 5 minutes for 15 minutes when they tested 205 F and were removed from the oven to a cooling rack.

The loaves cracked well on top as they should and they ended up being nicely browned,  crisp but un-blistered despite the long retard and mega steam.  They are awfully nice looking loaves none the less and we can’t wait to cut into one to see what the crumb looks like.

The crumb turned out fairly open, glossy and super soft.  The Tang Zhong really came through as it always does.   I like to use it on whole grain, multi-grain breads since we discovered that it does the same thing for these breads as it does for white breads.  Now we know it isn't just the YW that makes the crumb soft.  We like this bread very much and it is worth the extra effort required to pull it off. 

Formula

WW and Rye Sour Levain

Build 1

Total

%

WW SD Starter

25

25

3.79%

Rye Sour Starter

25

25

4.67%

Spelt

25

25

4.67%

Whole Wheat

50

50

9.35%

Dark Rye

25

25

4.67%

Water

100

50

9.35%

Total

250

200

37.38%


Levain Totals


%


Flour

125

23.36%


Water

125

23.36%


Hydration

100.00%


Levain % of Total

17.82%


Dough Flour


%


Whole spelt

5

0.93%


Dark Rye

5

0.93%


AP

525

98.13%


Dough Flour

535

100.00%


Salt

10

1.52%


Whey 200 Water100

300

56.07%


Dough Hydration

56.07%


Total Flour

660


Soaker Water 300 & Water

425


T. Dough Hydration

64.39%


Whole Grain %

22.27%


Hydration w/ Adds

68.92%


Total Weight

1,403


Add - Ins


%


White Rye Malt

3

0.56%


Red Rye Malt

3

0.56%


Toadies

6

1.12%


VW Gluten

10

1.87%


Ricotta Cheese

100

18.69%


Adriatic & Mission Figs

115

21.50%


Hazelnuts

71

13.27%


Total

308

57.57%


Weight of figs is pre re-hydrated weight


linder's picture
linder

I had to use up the rest of the ricotta I made so it was time to make an sweet Italian Easter pie to match the savory one, which we have almost completely devoured.  The recipe I used is from the website http://www.ciaoitalia.com  The only 'change' I made was to use wheatberries in place of the rice as indicated in the recipe.  Otherwise the pie was made per instructions.  I tasted some of the filling as I was making the pie and it is very flavorful with vanilla, orange zest, orange juice and cinnamon.  I have seen some pies that add chocolate bits as well, maybe next year.  Will be having some of this pie with a cup of tea later this evening.

dabrownman's picture
dabrownman

With David Snyder recent post of his new take on SFSD with higher amounts of Semolina and Ian’s new bread with semolina, it was only natural that another semolina bread would fit in this week. This one had a small amount of Desert Semolina - 150g.  We wanted to see if the high gluten, not just protein, claims were true.


The bread has 35% whole grains that included millet, another yellow grain and Kamut a durum variety that has a yellow cast too.  We didn’t want the whole grains to take away from the yellow crumb color we were shooting for the Desert Durum.  The small amount of honey was there to sweeten the non yellow AP flour since the yellow ones are pretty sweet all by theselves.


This bread was leavened with combination yeast water and mainly whole grain SD starters.   For the liquid in the dough we used the left over soaker water from our last 100% whole grain pumpernickel bread.  We added some ricotta cheese in keeping with this Altamura shape and Italian leanings of this bread – plus we are growing to like cheese in bread and the moisture it imparts to the crumb.


Since the color of the dough was yellow we thought green add ins would be appropriate and included pumpkin seeds and pistachios along with some millet seeds.  This bread isn’t as complex as some of the others we bake but it wasn’t meant to be since this is about as white a bread as we usually get around to making and we were getting low on white …..eeerrrr….yellow bread.


The levains were built separately over two builds and 8 hours.  The SD portion has spent a few days in the fridge before the final build to get it nice and sour.  The method is similar to or recent bakes but only this time only a 1hour autolyse, with the salt, was used.  We did 10 minutes of slap and folds until the dough was silky smooth and the gluten well developed. 


We incorporated the add ins on the first of 3 S&F’s which were done 15 minutes apart.  After 1 hour of ferment on the counter, the dough was bulk retarded for 14 hours.  In the morning it was allowed to warm up o the heating pad for 2 hours.  It was then shaped Altamura style but once again, it came out too long for the 12” mini oven so we folded each end under to shorten the shaped dough without having to redo it all.


After a 2 hour final proof on the heating pad, we started up the mini oven for preheat with the bottom of the broiler pan 1/4 full of water.   The bread was baked at 450 F with (2) of Sylvia’s steaming cups on the top of the broiler pan with the dough.   After 12 minutes we removed all of the steam and turned the oven down to 425 F, convection this time.


After 5 minutes 3we flipped the bread over on its top  to brownnthe bottom since the bread had sprung well and the top was getting done before the bottom,  5 minutes later we turned the oven down to 400 F convection androtated the bread 180 degrees.  5 minutes later we flipped the bread over and continued to bake for another 5 minutes until the bread reached 205 F on the inside.  All total the bread baked 32 minutes 12 with steam.


The bread crust came out that usual durum color.  It was nicely brown, blistered  and crispy that went soft as it cooled.  The crumb was fairly open but not as much as we expected with the nice rise during proof and the spring in the oven under steam.  Still, it was very soft, moist and airy with the green and brown splotches of the pistachio and pumpkin and the yellow millet bits that stayed crunchy.

Can’t really makeout the ricotta cheese but the soft moistness of it was left behind.  This bread reminds me of bread with cream cheese in it.   We like the taste of this bread and it made a fine sandwich for a late lunch today.  We will be making a version of the bread again.

Formula 

Starter Build

Build 1

Build 2

Total

%

Whole Grain SD Starter

10


10

1.63%

Spelt

15

15

30

4.88%

Dark Rye

15

15

30

4.88%

AP

50


100

16.26%

Yeast Water

50


50

8.13%

Water

30


80

13.01%

Total

170

30

300

48.78%


SD Starter Totals


%


Flour

165

26.83%


Water

135

21.95%


Starter Hydration

81.82%


Levain % of Total

21.52%


Dough Flour


%


Kamut

78

12.68%


Semolina

125

20.33%


Millet

47

7.64%


AP

200

32.52%


Total Dough Flour

450

73.17%


Salt

9

1.46%


Dough Soaker Water

350

56.91%


Dough Hydration w/ Starter

77.78%


Add - Ins


%


Pumpkin Seeds

50

8.13%


Ricotta Cheese

130

21.14%


Pistachio

50

8.13%


Honey

5

0.81%


Millet

50

8.13%


Total

285

46.34%


Total Flour w/ Starter

615


Total Water w/ Starter

485


Hydration w/ Starter & Adds

79.27%


Total Weight

1,394


% Whole Grain

34.96%


Ricotta Cheese not included inhydration calculations.


sweetbird's picture
sweetbird

It all started when Angelo put ricotta on the shopping list because he likes to have it on pasta sometimes and we didn't have any in the house. I was the one doing the shopping that day, a day or two prior to Easter, and I found the ricotta on sale, with the large tub marked at a lower price than the small tub. So the large tub went in my basket, and then my mind started dreaming about what I was going to do with all that lovely ricotta.

Cannolis turned out to be the answer. I married into an Italian family from the New York City area, and that automatically means that in my lifetime I've eaten a lot of the best cannolis in the world. Since we moved to the country north of the city, we haven't had easy access to all the special things that city people accept as their birthright -- the best bagels, the best pizza and the best cannolis (to name just a few). The cannolis up here are pale, lifeless, overly-sweetened imposters.

So . . . I consulted all my resources and came up with a recipe for shells and filling and made some cannolis on Easter day. I gave myself a mediocre grade that day, even though we both loved the shells and loved the idea of having homemade cannolis (and Angelo sweetly never gives my efforts anything less than flying colors...). But I knew I could do better, so the next day I did more research and picked up some mascarpone, and then I think I hit the jackpot, or at least close enough to make us very happy.

It turns out that regular ricotta is not what you are getting when you buy a cannoli from a high-end shop or restaurant. They're using a special type of ricotta called impastata. It's creamier but at the same time drier than what you find at most markets, and it's used for all sorts of Italian specialties, savory and sweet. I asked around and found out I could place a special order with a local cheese shop, but since I realized I was spinning away from the original idea of using up all the ricotta I had bought, I tried a different strategy. And I think it came out very well, so here's what I did. I drained some ricotta in a fine sieve in the refrigerator for about 8 hours, then beat it thoroughly with the whisk in my KitchenAid to approximate the creamy texture of the impastata, and once it was beaten into submission I added some mascarpone. We thought it was great.

SHELLS (recipe from Chef Anne Burrell, with slight changes):

1½ C. AP flour (I used King Arthur unbleached)
1 Tbs. sugar
½ tsp. ground cinnamon
Pinch of kosher salt
2 Tbs. cold butter, cut into pea-sized pieces
1 egg yolk
¼ C. marsala
¼ C. cold water (approx.)
Oil for deep frying

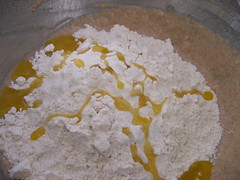
Pulse the flour, sugar, cinnamon & salt in the food processor to combine. Add butter & egg yolk and pulse until the mixture looks like grated cheese. Add the marsala and pulse to incorporate. Begin to add water in small amounts, pulsing between each addition, just until the dough forms a ball. You may not need all the water.

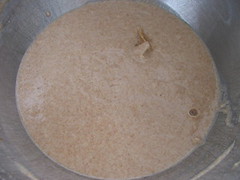
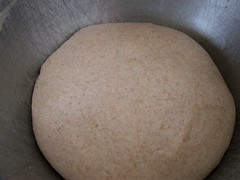
Knead for about 5 minutes, until silky and smooth. Form a flat disk and wrap in plastic wrap. Refrigerate at least 45 minutes.

Start heating your oil when you take the dough out after its resting period. It should reach 350°F - 375°F. Get your cooling rack ready for the finished shells.

Separate the dough into two pieces and put one piece back in the refrigerator, wrapped. Using a pasta roller (I used my Atlas), roll out the dough, starting at setting #1. I like to put it through a couple of times at that setting, folding it in between times, until it seems completely smooth. Use flour as needed to keep it from sticking on the rollers. When the dough comes out of the roller, handle it with your palms down (in other words, drape it over your knuckles) to avoid stretching it. Continue to roll it thinner and thinner until you have something no thicker than 1/8″. That should be about #5 on the dial (but next time I may try it one notch thinner, or roll it with a rolling pin before cutting into squares).


It can also be rolled by hand if you don’t have a pasta roller.

 Cut into 3″ squares. I used a pizza cutter for this.

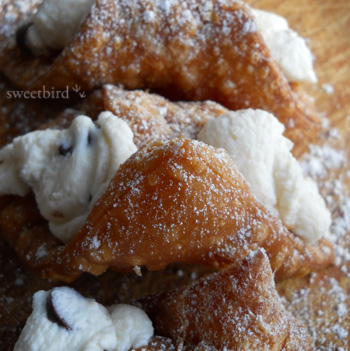
Put a metal cannoli tube across the center diagonally and moisten the tips with water or egg white before rolling together. Press slightly on the tips to ensure a good seal. Drop into hot oil and fry for several minutes until well browned. You can fry several at once, depending on the size of your fryer. Push the shells under the oil from time to time to achieve even browning. You’ll notice that the shell stops sending out moisture toward the end of frying; that's a clue that it's ready to come out. Drain on rack. Sprinkle with confectioner's sugar.

 When cool enough to handle, remove the tube and use for the next batch. Since I only have four cannoli tubes, I needed a quicker turnaround, so I removed the hot tubes with rubberized pads and put them in the freezer for a minute to cool down.

Waiting to be filled:

FILLING (enough for about 4 cannolis):

About a cup of whole milk ricotta, drained at least 8 hrs.
          (or ricotta impastata, if available; no need to drain)
1 tsp. Madagascar Bourbon vanilla
1 Tbs. confectioner’s sugar
3 Tbs. mascarpone
Chocolate chips or shaved chocolate (optional)

Whip the well-drained ricotta by itself for about 5 minutes on fairly high speed with a whisk in the KitchenAid. Add the vanilla and confectioner’s sugar and whisk briefly to blend. Add the mascarpone and whisk another 2 - 3 minutes. Stop frequently to scrape the sides down into the bottom with a spatula, and occasionally remove the whisk and shake out the filling that is stuck in the middle. Taste and adjust flavor.

Add dark chocolate bits. (I used Guittard dark chocolate chips.) Hold filling in the refrigerator until ready to serve the cannolis, then pipe into the shells from both sides with a pastry bag or plain plastic bag with a corner cut off.

Above is my second-day filling and below is a photo of my first-day filling. I think you can see the difference in texture. It is lumpy. I hadn't beaten it; just folded the ingredients together with a spatula. And it is brownish because I followed a recipe that added cinnamon to the filling. I won't do that again, because I think the flavor contrast with the shell was lost. A great cannoli has a gorgeous, creamy whiteness to it, and it's perfectly balanced against the flavor and texture of the shell. Here's what the first (much less successful) filling looked like:

The amounts for the filling are approximations. I played around with the flavor and texture until I liked what I had, then I reconstructed it into a recipe. The end result is very lightly sweetened, since that's what we like, but you may prefer to have a bit more sweetening in both the shells and the filling. It's all personal preference at that point. I like using confectioner's sugar because its fine texture disappears in the filling.

There are many ways to flavor a cannoli, including orange or lemon rind, liqueur, pistachios, etc., so it's something you can play with to suit your and your family's palate. In fact, since you shouldn't fill the shells until the last minute (so they don't get soggy), you can mix up a batch of the basic filling and then let everyone create their own filling variation and pipe it into the shells. Kids would love that.

I decided to make cannoli shells with just the first half of the dough. That gave me about 10 - 12 shells, which seemed more than enough for us. With the second half, I rolled out the dough as before but cut it into rough rectangles and dropped it in the hot oil, then sprinkled with confectioner's sugar. I think these would make great appetizers. Hardly any sweetness; just crispy, airy deliciousness. We liked having a few with wine as we were putting dinner together.


One day I'll try it with homemade ricotta, which I love more than any ricotta I've ever tasted!

Happy baking to all,
Janie

jennyloh's picture
jennyloh

I got a call that there's a discount on one kitchen item that I've been eyeing for like 3 years.  After lunch, I quickly hop over to the store,  the buy is not only a discount but also a free meat grinder,  well,  I wanted the pasta maker.  The sales girl promised that there will be a free surprise gadget in the pack,  and ok,  fine, we decided to buy it.  Well,  the surprise was not there and the sales girl decided to give us a the pasta maker for free!,  I was exhilarated.  


Lugging the big item back home, my son had to help me carry it home.   I couldn't wait to try.  But it was already evening,  too late for a quick bake.  I decided to work Daniel Leader's Local Breads,  usually turns out really really well.  And,  my son requested for Rosemary Bread.  Leader's Local Breads contains a lot of recipes that uses herbs,  simply love it,  and uses biga that somehow,  makes it easy for the bread to work with and it usually turns out excellent.Rosemary Filone (Daniel Leader's Local Breads)1.  Took the biga out from the fridge, put into the mixer bowl.  add in water,  and used the stirrer to cut up in chunks.2.  Add in all Ingredients, all dry first then, followed by wet.3.  Mix for 10 mins using no. 3 ( I initially used 4 and the whole machine was jumping like crazy, I was afraid that it'll jump off the counter.)  In the meantime,  I was able to do some cleaning up.4.  After 10 mins, the gluten was developed very well,  I was able to get my window pane dough.  And the dough was warm from the mixing.  Remove from the bowl.5.  Round the dough and leave in the container for 1st proof.6.  1 hour 15 mins.  the dough doubled.   7.  Split dough by half,  fold and leave for 15 mins.8.  Shape into loaf and leave in basket to proof for another 1 hour.9.  Meanwhile,  heat oven at 210 degree celsius.10. Score dough, bake for 40 minutes with steam.  (this bread is stated as no steam required, but I prefer the crust to be crispy and light)Rosemary Filone:  The dough doubled in the oven,  and the rosemary smell wafted through the oven as it was baking. This bread is so soft and the crumbs were so well stretched. Ricotta Bread - Pane Alla Ricotta(Daniel Leader's Local Breads)Since I had my machine and flour all out,  I decided to make another bread at the same time. I had a box of Ricotta that I bought,  but not sure how to use it other and there in front of me, just a few pages down,  Ricotta Bread.  I just have to try it.1.  Same method,  dry ingredients first then followed by cheese and butter, then water and milk.2.  Mix for 10 mins at No. 3.3.  Dough was mixed well. Window Pane achieved again.4.  Let proof for 1 hour 30 mins.5.  Cut 2/3 and 1/3.  Fold and leave for 15 mins.6.  Round the 2/3 dough and 1/3 into loaf.  Leave to proof for 1 hour 30 mins.7.  Score dough,  bake bread for 30 mins, with steam.  This time,  the loaves tripled.  The milk and ricotta seems to make the dough much lighter than other breads,  and with the steam,  the bread just bloomed.  This is the first bread that I see spread, bloomed,  just indescribable.I am totally happy with this new machine that I bought.  Totally satisfied,  as I usually don't get consistent mix.  And now,  with only 10 mins,  and the dough is so well mixed,  gluten fully developed. https://sites.google.com/a/jlohcook.com/jennycook/latest-postings/rosemaryfiloneandricottabreadwithmybrandnewkenwood
turosdolci's picture
turosdolci

It is natural to consider that Ricotta and almonds would be married together into a delicious soft biscotti flavored with almond oil. Almond ricotta biscotti are delicate cookies but with an intense aroma. We always include it on a “Torta di Biscotto di Nozze” because they are so perfect for a biscotti wedding cake.  It is the almond oil that gives these cookies that lovely warm almond flavor.

http://turosdolci.wordpress.com/2010/07/21/almond-ricotta-biscotti/


gothicgirl's picture
gothicgirl

Posted on EvilShenanigans.com on 6/12/09

I have been on something of a pizza kick lately, and not those commercially prepared pies with flavorless cheese and mushy veggies.

DSCF2897

I can directly pin-point when this all started.  It began at the Mushroom Council lunch when Chef Kent Rathburn made us a grilled mushroom pizza.  I knew in that moment that I would be making a pizza with grilled mushrooms.  This is the result.

DSCF2890

I used mushrooms that were available at the grocery store, portobello and white button, and added some red pepper for extra flavor.  I will say this, grilling mushrooms is an easy way to add a soft smoky flavor and meaty texture to a pizza, and it may be the only way I do it from now on!

DSCF2880

I decided that instead of sauce I would just put diced tomato on my pizza, and along with some lovely fresh mozzarella cheese I would add some creamy ricotta.  Of course, I added some pepperoni.  It is my favorite topping.  I'm not ashamed to admit it either.

DSCF2896 

The crust is homemade, and I decided almost at the last minute to add about 1/4 cup of my sourdough starter to it.  The starter added a nice tangy bite to the crust, which has a crisp exterior and a soft interior.  If you do not have any starter do not fear.  It is entirely optional, and the crust is still beautiful with out it.

Grilled Mushroom and Ricotta Pizza on Sourdough Wheat Crust   Serves 4-6

Sourdough Wheat Crust:
1 cup water heated to 95F
2 teaspoon active dry yeast
1/4 cup sourdough starter, optional
1 teaspoon sugar
1 tablespoon honey
1 cup whole wheat flour
1 1/2 cups white bread flour
1 tablespoon olive oil, plus more for the bowl
1 teaspoon salt

Grilled Mushrooms and Peppers:
1 pound portobello mushrooms, stemmed and sliced
1 pound white button mushrooms, sliced
1 red bell pepper, sliced into strips
2 cloves garlic
1/4 cup olive oil
1 teaspoon kosher salt
Fresh ground pepper

Other Toppings:
Ricotta cheese
Fresh Mozzarella Cheese
Diced tomatoes
Pepperoni
Fresh oregano, minced
Fresh Basil

DSCF2839

Prepare a sponge by combining the water, yeast, starter, sugar, honey, and what flour in a bowl.  Stir to combine and allow to sit covered, at room temperature, for ten minutes.  The sponge may not be terribly foamy or bubbly.

DSCF2840

To the sponge add the remaining ingredients and mix with the dough hook on low speed for 3 minutes. Adjust the hydration as needed (the dough should be tacky but not cling too much to your fingers).  Increase the speed to medium and mix for 8 minutes.   Remove the dough from the bowl and form it into a ball on a lightly floured surface.

DSCF2842

Transfer to a bowl coated with olive oil, turn once to coat, and proof for two hours, covered, at room temperature.  After the initial proof, degas the dough and store, covered well, in the refrigerator for 24 hours, or up to three days. 

 DSCF2877

Pull the dough an hour before you are ready to bake it.  While the dough warms up prepare your toppings and heat your oven to 500F with a pizza stone on the bottom rack, if you have one.  

DSCF2879

With the flat of a knife crush two large garlic cloves.  Mix them with the olive oil, salt, and pepper.  Add the sliced mushrooms and bell pepper strips and allow sit five minutes.

DSCF2882

Transfer to a perforated grill pan and cook, over a very hot grill, until starting to soften, about five to ten minutes.  Transfer to a bowl to cool slightly.

DSCF2872DSCF2875

Divide the dough into two large or four small balls and, using your hands, stretch it into a thin circle.  

DSCF2883

Transfer the dough to a pizza peel that has been dusted generously with corn meal.  Top the pizza with a thin layer of ricotta, diced tomatoes, oregano, mozzarella, pepperoni, and the grilled mushrooms and peppers.

DSCF2891 

Cook the pizza for 10 to 15 minutes, or until the crust is crisp and brown and the cheese has melted and begun to brown as well.

DSCF2899 

Allow the pizza to rest for five minutes before slicing.  Top with torn fresh basil.

DSCF2898

Enjoy!

staff of life's picture

Leader's Pane alla Ricotta

February 28, 2008 - 8:08pm -- staff of life

I've made the pane alla ricotta several times now from Leader's new book.  I find that it's unworkable as is--there is way too much yeast in there.  I cut it down to 1 1/4 t from 1 T.  I proof it in a lined banneton til it's nearly overproofed, slash it and bake it on a baking sheet--on the stone directly and it's very very likely to burst.  Does anyone else have trouble with this one?

SOL

Subscribe to RSS - ricotta