The Fresh Loaf

A Community of Amateur Bakers and Artisan Bread Enthusiasts.

quinoa

Isand66's picture
Isand66

Every time I venture to Whole Foods I manage to find something interesting to add to my bread baking and last weekend was no exception.  I was already planning on making bread with some fresh chopped cherries so when I saw some 100% Cherry Juice on the shelf I couldn't resist buying it and using it in place of most of the water.

I recently also bought some Red Quinoa so I decided  to make a soaker by using the Quinoa and also adding some Organic Oat Bran.  I used around 2 cups of boiling water (sorry but I forgot to measure) and added that to the soaker ingredients and let it sit for about 1 hour.  Beware that this combination of grains will absorb most of the liquid and it caused me to up the amount of flour in the recipe to compensate.  Even with the added flour this is a very wet dough.  If you don't count the soaker ingredients it is 69.5% hydration which doesn't take into consideration the amount of liquid absorbed by the soaker.  If you include the soaker ingredients as flour it comes in at 59% but trust me this is a wet dough.

I also used some White Whole Wheat Flour, French Style Flour (low protein flour good for baguettes) and some Spelt.

The cherries were fresh cherries with the pits removed and chopped into small pieces.  If you like bigger pieces please feel free to follow your hearts or stomach's desires.

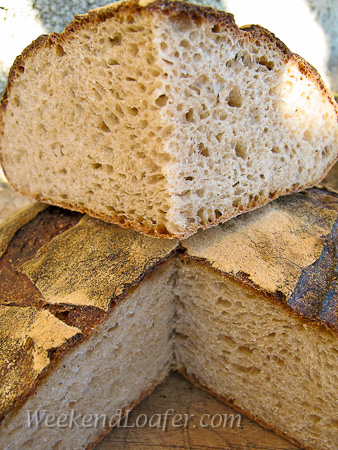
The addition of the Cherry Juice and chopped cherries I thought would give the final bread a very distinctive cherry flavor but in actuality you don't really taste the cherry juice at all.  You definitely see it in the reddish color and the Red Quinoa also adds a nice nutty flavor and red tint to the bread.

The dough may have over-risen slightly since it was warmer in my kitchen than usual and I was zonked after cooking a pork butt and brisket since 7:00AM in the morning and I didn't pay attention as closely as I usually do.  The bread flattened out a bit when putting it in the oven but had some excellent oven spring.

The crust is nice and crispy and the crumb is incredibly moist and open.  The final product tastes amazing for a multi-grain bread and is nutty and sweet and earthy tasting.  The cherries are not overpowering at all but add along with the cherry juice a nice depth to this bake.

Procedure

For the starter, I refreshed my standard AP white starter the night before and used most of it in this bake.  I have also included the ingredients to make the exact amount of starter needed from your seed starter.  Mine is kept at 65% hydration so adjust yours accordingly.

Soaker

100 grams Red Quinoa

50 grams Organic Oat Bran

335 grams Boiling Water  (It may have been less so use your judgment and adjust accordingly)

Mix boiling water in a bowl with other ingredients and let sit covered at room temperature for 1 hour or longer.

Starter

71 grams Seed (Mine is 65% AP Flour Starter)

227 grams AP Flour

151 grams Water (85 - 90 degrees F.)

Mix seed with water to break up for a few seconds and then mix in flour until the starter form a smooth dough consistency.  Put it in a lightly oiled bowl and loosely cover and leave at room temperature for at least 10 hours.  The starter should double in volume.  Put the starter in the refrigerator for up to 1-2 days or use it immediately.

Main Dough

Ingredients

425 grams Starter from above (all of the starter)

300 grams French Style Flour (KAF)

195 grams White Whole Wheat Flour (KAF)

70 grams Spelt Flour

40 grams Chopped, Pitted Fresh Cherries (frozen would work fine if not in season)

200 grams Cherry Juice at room temperature (100% Juice with no sugar added)

200 grams Water (85 - 90 degrees F.)

18 grams Sea Salt (or table salt)

Procedure

Mix the liquids with the levain and break it up with your hands or a spoon.    Next add the flours and mix on low for 2 minutes.  Let the dough rest for 25 minutes and then add the soaker and the salt and mix on low for 3 minutes.  Add the chopped cherries and mix on low for 1 additional minute.  Transfer the dough to your work surface.  Resist the urge to add too much bench flour (I didn't add any) and use a bench scraper to do about 5-6 stretch and folds.  Put the dough into a lightly oiled container/bowl and let it sit for 15 minutes.  Do another stretch and fold in the bowl.  Cover the bowl and let it sit for another 15-20 minutes.  Do this 2 additional times waiting about 15 minutes between S&F's.  By the last S&F the dough should start developing some gluten strength.  Let the dough sit out at room temperature for around 1.5 to 2 hours.  Do one last stretch and fold and put in your refrigerator overnight for 12-24 hours.

The next day take the dough out of the refrigerator and let it sit out at room temperature for 1.5 hours.  After 1.5 hours you can form it into loaves and put them in floured bannetons and let them rise covered for 2 hours (note: make sure to watch the dough and depending on the temperature of your kitchen and the refrigerator adjust your timing as needed).

Score the loaves as desired and prepare your oven for baking with steam.  I use a heavy-duty baking sheet on the bottom rung of my oven and I pour 1 cup of boiling water into the pan as soon as I load the loaves in the oven.  Pre-heat your oven to 500 degrees F. before placing the loaves in the oven.

Once the loaves are loaded onto your baking stone and you add your steam turn the oven down to 450 degrees and bake until both loaves are golden brown and reach an internal temperature of 200 - 210 degrees F.  For an extra crispy crust once done baking turn the oven off and crack the door and leave the loaves in the oven for another 10-15 minutes.  Once done place on a wire cooling rack and resist the temptation to cut the bread until they are sufficiently cooled.

I hope you give this recipe a try and be sure to let me know how it turns out if you do.

Isand66's picture
Isand66

Now that I finally made the famous Phil's 100% Whole Wheat Desem bread I figured it was time to push the envelope and put my own twist on it.  I love onions so I added some toasted onions and figured I would try to mix up the flour a bit by adding a small percentage of Quinoa and Barley flour.  Both of these flours impart a nice nutty flavor to the dough along with the toasted wheat germ I also added.  I also added some dehydrated onions since I ran out of the toasted onions and wanted to make sure I used enough in the recipe.  Just for the hell of it I added some pistachio oil to make it even more nutty tasting.

I refreshed my whole wheat starter I built for the last bake of 100% Whole Wheat Desem bread and the next day away we went with mixing the final dough.

Please see Phil's original recipe for his  formula for 100% Whole Wheat and his original procedures here http://www.thefreshloaf.com/node/27999/honest-bread-100-wholewheat-desem-bread-and-some-country-bread.

Ingredients

243 grams (refreshed) Desem Starter

650 grams Whole Wheat (KAF 100% Organic)

130 grams Quinoa Flour

119 grams Barley Flour

20 grams Roasted Wheat Germ

838 grams Water (90 degrees F.)

20 grams Sea Salt (or table salt)

11 grams Toasted Onions

4 grams Dehydrated Onions (I ran out of the toasted so used this instead)

11 grams Pistachio Oil (you can omit if desired or use any nut oil or olive oil)

Procedure

Like the last bake I decided to change his procedures by using my Bosche Mixer as follows:

I mixed  the flours and wheat germ together with all the water except for 50 grams and let them autolyes for 1 hour.  I added the dried toasted onions to the remaining 50 grams of water.  After an hour  I added the levain and the water with onions, pistachio oil and salt and mixed on speed #1 for 1 minute and #2 for 4 minutes.  I then did a stretch and fold, rested the dough uncovered for 10 minutes.  I then did another stretch and fold, covered the dough and let it rest for 10 minutes.  I did one more stretch and fold and put it in a lightly oiled bowl for 1.5 hours.  I then put it in the fridge overnight.

The next day I let the dough sit out at room temperature for 1.5 hours.  After 1.5 hours I formed it into loaves and put them in floured bannetons and let them rise covered for 2 hours.  Score the loaves as desired and prepare your oven for baking with steam.

I then baked on my oven stone with steam at 450 degrees until both loaves were golden brown and reached an internal temperature of 200 - 210 degrees F.

The bread had a great nutty flavor and you can taste the barley and quinoa flours for sure along with the onions.  The crumb was nice and moist and open with a nice dark medium hard crust.

Isand66's picture
Isand66

I was in the mood for something simple and relatively uncomplicated to bake so I decided to make some baguettes based on the Peter Reinhart method from ABED which uses a long overnight ferment of the bulk dough.  Of course I couldn't leave well enough alone and had to add something different to make it more interesting.  I just picked up some quinoa flour from the supermarket which imparts a nice nutty flavor to the dough.  I also added some low protein Italian style 00 flour from KAF along with some organic whole wheat and bread flour.

The end result was a nice crispy, light and nutty flavored baguette.  I still need some practice with my shaping and figuring out how long to make them so they fit on my oven stone.  I could have handled the dough a little lighter to preserve some bigger holes, but overall the crumb was not bad and the crust was nice and crisp.

Ingredients

300 grams KAF Bread Flour (BakersPercentage, 44%)

200 grams Italian Style Flour 00, KAF (BakersPercentage, 29%)

100 grams Organic Whole Wheat Flour, KAF (BakersPercentage, 15%)

80 grams Quinoa Flour, Bob's Red Mill (BakersPercentage, 12%)

454 grams water, 70 degrees Fahrenheit (BakersPercentage, 67%)

14 grams Sea Salt  (BakersPercentage, 2%)

7 grams Instant Yeast (BakersPercentage, .01%)

Directions

Using your stand mixer or by hand, mix the water with the flours for 2 minutes on low.

Let the dough autolyse for 30 minutes.

Add the salt and mix for 2 minutes more on medium speed, adding more flour if necessary to produce a slightly sticky ball of dough.

Remove dough to your lightly floured work surface and need for 1 minute and form into a ball.

Leave uncovered for 10 minutes.

Do a stretch and fold and form into a ball again and cover with a clean moist cloth or oiled plastic wrap.

After another 10 minutes do another stretch and fold and put into a lightly oiled bowl that has enough room so the dough can double overnight.

Put in your refrigerator immediately for at least 12 hours or up to 3 days.

When ready to bake the bread, shape the dough as desired being careful not to handle the dough too roughly so you don't de-gas it.

Place it in your bowl, banneton or shape into baguettes.

Let it sit at room temperature for 2 hours covered with oiled plastic wrap or a wet cloth.

Pre-heat oven with baking stone (I use one on bottom and one on top shelf of my oven), to 500 degrees F.

Slash loaves as desired and place empty pan in bottom shelf of oven.

Pour 1 cup of very hot water into pan and place loaves into oven.

Lower oven to 450 Degrees and bake for 25 - 35 minutes until bread is golden brown and internal temperature reaches 200 degrees.

Shut the oven off and crack the door with the bread still present.  Let it sit for 10 minutes to continue to dry out and develope the perfect crust.

Let cool on cooling rack and enjoy!

This post has been submitted to the Yeast Spotting Site here: http://www.wildyeastblog.com/category/yeastspotting/.

CaptainBatard's picture
CaptainBatard

With my bread supply almost depleted and my neighbors arriving for their monthly visit to there retreat… I charged up my stiff Levain and was ready to conquer another recipe from Local Breads for my weekly bread. I thumbed through the chapter with stiff dough levain recipes and to my complete surprise, I baked them all! I did not have time to convert the waiting stiff levain to a liquid one…so I went into the pantry to inventory my baking supplies and discovered I had lots of high extraction flour, spelt and an unopened bag of quinoa (never used it before in pain).  And with that the experiment was on.  The first thing that came to mind was a giant Poilane-inspired Miche with mixed flours …. while the other side of my brain was saying “try something sure-fire, something to share with your neighbors.” Well -- throwing caution to the wind -- I went for the Miche! I wrote out the recipe and doubled it substituting some (approx. 1/3) of the whole wheat flour for the spelt and quinoa…and then adding a smidgen of rye.  After an hour of antolyse, and another 15 minutes of slapping and smearing a very slack dough into workable dough, I took a breather and wiped the sweat for my brow.

When I returned to my experiment rejuvenated by a good cup of strong French style coffee, I uncovered the dough to find the once taut boule was now, shall we say, relaxed and spread out on the counter . . . ugggh.  As I started to panic I heard a voice in my head saying “you can never over knead a dough by hand”.  So I continued the French kneading for another ten minutes, did a window pane test, and it passed the test!  I threw the still slack dough into a bowl for one hour to ferment, crossed my fingers and hung my laundry out to dry. After two series of stretch and folds in the bowl, I covered it back up and put it into the 76° proofing chamber for two hours before shaping. Shaping the slack dough into a miche was a little more artful than I had planned for…but these loaves gently made their way into the linen lined bowl and banneton for the final two hour proofing. And that was my big mistake!

When I finally looked in after two hours, it had more than doubled and looked like a pillowy, bowl of loose Jell-O full of air bubbles. Because of the size of the boules…and the size of my oven…I put the smaller one in the fridge to slow things down, and gently turned the other out onto a piece of parchment paper, slashing it swiftly with four crossing lines. The only thing that comes to mind when trying to describe the sensation of slashing the miche,  is the feeling you have when running over a nail on your bike…first you hear the pop and then you see it slowly deflate.  Sound familiar?

Feeling a bit deflated myself…I placed the miche in the awaiting, steamy oven for its trial by fire!  As I peered through the glass of the oven door, I was a bit relieved to see the loaf making a bit of a comeback.  Although it did have a little oven spring, it wasn’t what I was hoping for.  Though it wasn’t a pancake, let’s just say it had a low profile, something more similar to a Pointe-à-Callière Miche!  After baking the other loaf and letting it cool, I cut into the small loaf to see the outcome. The tan crumb was riddled with small even bubbles, the crust was crisp and brittle….and the taste was even better than I expected. It had a very moist, creamy mouth feel with a bit of a tang, but not too much for my French neighbors' pallets …they really enjoyed it.  I will be very curious to see how the flavor transforms over the next couple of days of eating. This is one I definitely will have to revisit again!

Thing to remember next time:

  • Try pre-fermenting some of the spelt and quinoa...
  • Hold back some of the water in the initial mix (I knew that), you can always add it to get the necessary consistency.
  • May be leave out the autolyse?
  • Either lower the temperature for the final proofing or cut it back to one hour.
  • AND: DO NOT TAKE A NAP DURING THE FINAL PROOFING!

If you want to see the recipe and MORE pictures...you are just a click away... Weekendloafer.com


bread10's picture

Mixing Spelt and Quiona Flour - Bread

April 23, 2010 - 9:46pm -- bread10
Forums: 

Hi,

I am about to bake my first loaf bread in the oven. I will do sourdough soon but for now I wanted to just bake something up quickly.

I am looking at spelt flour bread recipes on the internet. I have a big bag of wholemeal spelt flour.

I am just weighing up whether to use half whole half white for lighter bread, or whether mixing quinoa and whole spelt would work??? If so how much (50/50??)


Thanks

Glacrwlf's picture

Introduction + Do Jackfruit and Quinoa go together?

March 17, 2010 - 4:46pm -- Glacrwlf

Hi, I'm Vittorio Arriola, AKA: Glacrwlf. I am a college student who is trying to major in the baking and pastry arts. I just completed my first class in baking and have 2 more classes to go, along with some other classes that are required to earn my bachelor's degree in baking. I hope to be active here and share my ideas with you.

My baking career was inspired by the anime: Yakitate!! Japan. I saw a few episodes and it caused me to become interested in baking rather than cooking. I saw a few people who were inspired by the anime as well.

DakotaRose's picture

Breads made with exotic flours

April 24, 2008 - 6:40pm -- DakotaRose
Forums: 

I went down to our local mill and purchased some exotic flours the other day.  I want to use them as additions to our favorite whole wheat recipe.  I was just wondering if anyone else has worked with these flours and has some good recipes for them.  I started out today by adding some quinoa to the recipe and it came out dense, but boy was it good.

Thank in advance.
Lydia

umbreadman's picture
umbreadman

So today i started a double batch variant of a multigrain hearth bread in the PR delayed fermentation/epoxy style. I decided to add 12ozs of cooked brown rice, quinoa, and amaranth grains for extra protein; i've also found that the quinoa sometimes gives a pleasant little *pop* if you happen to catch a grain between your teeth while eating the bread. It's "retarding" now; meaning I got lazy, and didn't want to bake it tonight so i left the bowl in the cold basement to do its thing.

I baked them in the early afternoon. By the time I actually got to them with a camera, they looked like this:


The crust was nice, but the crumb wasn't as open as i would have liked. I had a little trouble transfering it to the oven stone, and that negated a lot of the proofing : \ However, it wasn't dense in that heavy, difficult-to-chew-through way. Rather, every bite was substantial, chewy, and pleasant. I've become a great fan of naturally leavened breads, in part because of that unique texture.


I made this one the next day, somewhat on a whim, only checking Hammelman's sourdough seed bread recipe for a guide of what proportion of seeds to put in.

This one turned out amazingly, slightly burnt crust aside. The inside opened up nicely and the toasted seeds added a nutty sweetness that shut out any need for sweetener.

I also think I should get my camera out sooner, maybe I'll get a photo of a whole loaf one day... 

Sourdough Sunflower Seed Bread with Sprouted Grains

2lbs high extraction flour (e.g. Heartland Mill Golden Buffalo)

~20-22ozs water

~.6-.7 oz salt

5.5 oz sunflower seeds, toasted in pan and cooled

4oz sprouted grains (i used a combination of quinoa and amaranth. The grains should be soft from all the soaking, so no grinding was needed)

Sourdough culture (unknown amount, ~ 3 heaping tablespoons. ish.)

1) Mix Flour, water, grains, and salt into a tacky dough and let rest for 30-60 minutes for autolyse.

2) Cut dough and sourdough into small/medium chunks and mix. Knead until well blended and dough feels strong, ~7-10 minutes. (I knead by hand).

3) Let ferment for about 2.5-3hrs, folding at 1-1.5 hour intervals, depending on dough strength.

4) Unload dough, shape, and let proof for ~1hr, while heating oven + stone at 400-425.

5) Top with more sunflower seeds, slash, and bake with steam, turning down oven to 375 or so if crust darkens too quickly.

6) Eat when patience fails.

umbreadman's picture
umbreadman

I just pulled my Quinoa Struan out of the oven a little while ago, and I'm rather pleased with the results.


I used reinhart's multigrain struan formula and used 6ozs of cooked quinoa in the overnight soaker. I also used Heartland Mill Golden Buffalo flour, which I'm playing aroudn with. I've used "Gold 'n' White" flour before (a high-extraction flour, meaning the coarse bran sifted out of whole wheat flour), and I was pleased with it, so I ordered 25 lbs of this to see how it performed. So far so good i think. Since it called for a substantial amount of yeast to be added for the final proof, I think it rose rather quickly, and was probably ready before I made it back home. I had to reform it and considered letting it proof a second time, but I thought it might become a mess if the yeasts were given too much free reign.

I haven't tasted this loaf yet (it wasn't done cooling), but it smells great. It looks like it would be great for sandwiches or toast. I was intrigued when it called for milk in the soaker, and I wonder how that will impact the bread.

Subscribe to RSS - quinoa