The Fresh Loaf

A Community of Amateur Bakers and Artisan Bread Enthusiasts.

pumpernickel

dabrownman's picture
dabrownman

My apprentice says that sane German bakers don’t usually try to do a pumpernickel style bake of; slowly reducing low temperatures over a long baking time, when baking white bread of any kind.  But, I figured that if professional bakers can call a bread with only 25% to 30% of rye flour in it a rye bread, then we should be able to DaPumperize a white bread too.  

I have to admit this is about the whitest bread we would usually make, but thankfully, only my apprentice is a German baker and she doesn't count when it comes to new and exciting things, bread wise, around here most always.  Now, if the bake goes horribly wrong, then it is all her fault - I mean she is only an apprentice.  She also looks ridiculous in that full body hair net when she bakes anyway.  So who could take what she says seriously looking like that?


We had to break the recent trend of 100% whole grain bakes or risk falling into the dark abyss.  Even though the dark side breads are fantastic and tempting, being stuck there forever is a little much if you aren’t a German bread baker,


We do like breads in the 25% - 30% whole grain range and they make fine sandwich breads.  Sandwiches, as some might know, are right up there with home made amber lager beer, as far as, my apprentice’s way of thinking goes - which admittedly isn't very far or even deep for that matter.


So, mainly out of boredom with a touch of insanity and a touch of spite, I decided to try to DaPuperize a white bread and see if the tremendous boost in flavor this technique usually provides would work with white bread too.  It was worth a shot even though a long one – otherwise you would think people would be doing it all the time as a matter of course – but they don’t.  Maybe it’s the 6 hour bake time that puts them off?


To give the bread a chance at being decent, we included bread spice seeds and the other usual other seeds we have recently been using, to give this bread a chance the bread at some depth and chew like our whole grain breads we DaPumperize.

Since this bake was planned to be 80% wheat we decided to use our new Not Mini’s Ancient WW starter ( a very powerful one)  to go along with a WW Yeast Water one and make separate levains.   All 25% of the whole grains are in the levains and are made up of a mix of WW, rye and spelt.

We upped the whole grains some using 100 g of wheat berries for the scald along with the Toadies and home made red and white malts.  We dropped the molasses and barley malt syrup for this bake. For much of the dough water we used the excess scald water. Aromatic seeds were the usual coriander, fennel, anise and bi-color caraway that we buzzed up a little after roasting this time.   The meaty seeds were also roasted and they included; black and white sesame seeds, cracked flax and 50 g each f pumpkin and sunflower seeds.

We followed usual routine of late by building the levains over 3 stages with the Not Mini’s Ancient WW one doubling every 3 hours from the first build on while the YW one took 4 hours. For the last build – its best showing.  We autolysed the dough flours, salt, malts and Toadies  for 3 hours before adding in the levains. 

10 minutes of Slap and folds followed when the slack dough really came around on the gluten development side.  After a 20 minute rest we stretched out the dough to do an envelope fold and dropped all the seeds and scald onto it and folded it up with a few S&F’s.   We did 2 more S&F’s on 20 minute intervals to further develop the gluten and to distribute the add in seeds thoroughly.

After a 30 minute rest we took half the dough and shaped it into a loaf and placed it into a large loaf tin, filling it less than half full and covering it with plastic.  The other half of the dough was left in the oiled and plastic covered bowl. Both were then refrigerated for 8 hours overnight.  They didn't expand much in the fridge.

In the morning, both were placed on a heating pad, covered with a cloth and allowed to warm up for 1 1/2 hours.  The bulk retarded dough was them shaped and placed into a basket for final proof on the heating pad with the tinned loaf.

After another 2 hours the tinned loaf was 1/2” under the rim.  We covered it with aluminum foil and placed it into the preheated 375 F mini oven for its 6 hour baking schedule where the bottom of the broiler pan was full of water to provide extra steam.    We didn't put any oat bran or poppy seeds on the top of the loaf because we wanted to see how dark a white DaPumpernickel could get in 6 hours.  The baking schedule follows:

375 F - 30 minutes

350 F - 30 minutes

325 F - 1 hour

300 F - 1 hour

275 F - 1 hour

250 F - 1 hour

225 F - 1 hour

For some extra thrill for my apprentice and a comparison baseline for me, we decided to bake the other half; the boule, as one would expect a loaf like this to be baked - just in case the DaPumpernickeled half was a total failure.

We decided to bake it in a hot DO but it took another hour and a half before we thought that it was ready for the oven.  After a poor slash job and lowering into the DO with a parchment sling, this boule was baked at 450 F for 20 minutes with the lid on and another 5 minutes with the lid off at 425 F convection before removing it from the DO and placing it on the lower stone to finish baking - another 10 minutes – 35 minutes total baking time.

We then turned the oven off and left the bread on the stone with the oven door ajar for 5 minutes to help crisp the crust.  The boule baked up nice and brown, blistered and the crust was crispy before went chewy as it cooled.  It smells terrific.

The loaf is now through with its slow and low bake and hit exactly 210 F at the end of 6 hours in the mini oven.  We will slice into this loaf after it has rested for 40 hours. Luckily we have tasted the boule and it is a fantastic loaf of bread.  The crumb is so soft and shreddable, glossy and open like it had butter, eggs and and cream in it - just delicious!   This bread cannot be sliced thin and 1/2" thick, or maybe a little more is its sweet spot. This is another bread could eat every day.  Already ate a quarter of the boule!.Can't wait for the loaf to be ready to slice thin.  It will have to go a long way to be better than the boule.

We got 33 slices oiut of the 83/4" DaPumpernickel loaf.  It wasn't as dark as a black pumpernickel about a couple of shades darker than the other part of this two way bake.  The flavor wasn't as deep or rich as a 100% whole grain pumpernickel but it tastes totally different than the regular baked boule.  This tastes like half a pumpernickel and is much more powerful a taste than the boule.  We like this bread a lot too!  For those that don't like pumpernickel but want something stronger than a rye then this loaf  might be the one for you!

Formula

YW and Rye Sour Levain

Build 1

Build 2

 Build 3

Total

%

WW SD Starter

20

0

0

20

2.47%

Dark Rye

0

25

0

25

5.00%

WW

0

0

50

50

10.00%

AP

50

0

0

50

10.00%

Water

50

50

10

110

22.00%

Spelt

0

25

0

25

5.00%

Total

120

100

60

280

56.00%


Levain Totals


%


Flour

310

62.00%


Water

230

46.00%


Hydration

74.19%


Levain % of Total

31.69%


Dough Flour


%


AP

500

100.00%


Dough Flour

500

100.00%


Salt

13

1.60%


Water

400

80.00%


Dough Hydration

80.00%


Total Flour

810


Soaker Water 300 & Water

630


T. Dough Hydration

77.78%


Whole Grain %

26.67%


Hydration w/ Adds

75.99%


Total Weight

1,704


0.40669


Add - Ins


%


White Rye Malt

3

0.60%


Red Rye Malt

3

0.60%


Toadies

20

4.00%


Bicolor; Sesame, Cracked Flax

13

2.60%


Pumpkin and Sunflower Seeds

100

20.00%


W&B Caraway, Anise, Coriander, Fennel

12

2.40%


Total

151

30.20%


Scald


%


WW Berries

100

20.00%


Total Scald

100

20.00%


Weight of scald is pre scald weight


dabrownman's picture
dabrownman

For the 2nd test of our new 2 week old WW starter, we though we would continue our 100% whole grain quest to a 3rd bake, similar to the last 2, but making a few changes along the way as my apprentice usually does.  She just can’t leave well enough, or me either for that matter, alone.


We decided to add in some YW to the mix to help open the crumb of the planned pumpernickel baking temperature and schedule.  We also decided to change from a 100% whole wheat, 100% whole grain bread to one that was still 100% whole grain but had equal portions of WW, Spelt and Rye.  We omitted the VWG on this bake.


We also added some barley malt syrup and cut the molasses in half and throw in some bread spices consisting of; black and brown caraway, coriander, anise and fennel.  To keep in line with the change in whole grains we also changed the whole berry scald to match it using WW, Spelt and Rye.


The resulting overall hydration of 87.5% is fairly in the middle of the pumpernickel hydrations we do around here in AZ where it is so dry all time.  The method was pretty straight forward if a tiny bit unusual.   We built the whole wheat combo SD YW levain together over (2) 4 hour builds where it easily doubled.


After a 1 hour autolyse that had everything in it but the levain and scald, we mixed the levain and the autolyse together with a spoon and then did 10 minutes of slap and folds trying to develop as much gluten as we could = what fun.  We then folded in the scald berries with a bench knife.


 Once the berries were evenly distributed, we tossed the paste into a large bread pan filling it about 3/4th full.  The paste filled the pan fuller than we would normally like for pumpernickel but, my apprentice was lazy and refused to pull it out, divide it and put into two smaller cocktail pans.


 She did, to be fair, reminded me that the Altus loaf at 300 G lsss in size actually shrank the last time leaving the finished bread 1” below the rim of this same pan.  We dusted the loaf with oat bran and let it ferment on the counter for an hour before it went into the fridge covered in plastic, for a 16 hour retard.


It's a little more dense and moist on the bottom.

It had risen to the top of the pan when it came out of the fridge the next morning when it went into a plastic bag to warm up and do final proof on a heating pad for 3 hours.  Since the bread would eventually rise almost an inch above the pan rim, we decided to bake it low and slow; pumpernickel style, in the WagnerWare, MagnaLite turkey roaster with the trivet inside so extra water could be added to steam the loaf.

The temperature reducing (as time goes on) baking schedule follows:

400 F - 30 minutes

375 F - 30 minutes

350 F - 30 minutes

325 F - 30 minutes

300 F - 1 hour

275 F - 2 hours

250 F - 2 hours

225 F - 1 ½ hours

200 F - 1 ½ hours

We had a powerful sunset last night

When the bread tests 205 F in the center, turn off the oven and leave the bread in the DO inside the oven for 8 -12 hours.  We did 8 hours and the oven was still warm in the morning due to the two baking stones on the top and bottom rack of the oven.

The 3 P sandwich - DaPumpernickel, Pepperjack and Pate

Yes, it is a long bake but worth it in the end if you want to make a classic pumpernickel style loaf.  Not that this one is a classic, since it isn't 100% rye, have cornmeal, potatoes or bacon fat in it.  But this sure tastes like a pumpernickel even if it doesn't really use classic pumpernickel flours and uses an Irish Stout for much of the liquid. That’s the great thing about bread – there aren't any real rules, especially if you choose not to follow them like my apprentice.  This bread smell tremendous with the caramelized grains, scald and aromatic seeds.

Love the first one so much we made a variant - DaPumpernickel, Irish Swiss and Pate open face

Sadly, even after it cools you don’t want to slice it for at least 32 hours.  Just wrap it on linen or cotton and be as patient as you need to be…. We love pumpernickel and do not mind waiting, as long as, we win the Power Ball tonight for over $320 plus million.  Well we didn't win the big moola drawing but we still won a jackpot none the less.  We took a few slices off the loaf this morning for pictures and breakfast, re-wrapping the rest to let it sit another 24 hours before slicing it.

A close up open face sandwich - in your face:-)

This bread easily sliced 1/4" thick slices even for such a large loaf.  The bread was open and very moist.  It is also about the best tasting example of a non-traditional pumpernickel my German apprentice has ever tasted.  She wanted to take the rest of the loaf outside to bury it in the back yard but I managed to stop her before she got to the doggie door.  It is a powerful bread flavor wise, as much so as last night's sunset,  and we can't wait to try it with some robust red wine, pate, cheese and fruit spread especially after this morning's toasted pumpernickel with butter, egg, hot sausage and bacon delight.    Yummy. 

Formula

SD Starter

Build 1

Build 2

Total

%

Mini's WW Starter

20

0

20

3.28%

Yeast Water

30

0

30

6.00%

Whole Wheat

50

50

100

20.00%

Water

20

40

60

12.00%

Total

90

90

210

42.00%


SD Levain Totals


%


Flour

110

22.00%


Water

100

20.00%


Hydration

90.91%


Levain % of Total

16.15%


Dough Flour


%


Whole Rye

165

33.00%


Whole Spelt

165

33.00%


Whole Wheat

170

34.00%


Dough Flour

500

100.00%


Salt

9

1.80%


Guinness

423

84.60%


Dough Hydration

84.60%


Total Flour

610


Guinness, YW & SD Starter Water

523


T. Dough Hydration

85.74%


Whole Grain %

100.00%


Hydration w/ Adds

87.50%


Total Weight

1,300


Add - Ins


%


Red Rye Malt

3

0.60%


White Rye Malt

3

0.60%


Caraway, Anise, Fennel & Coriander

16

3.20%


Toadies

4

0.80%


Barley malt

16

3.20%


Molasses

16

3.20%


Total

58

11.60%


hungryscholar's picture
hungryscholar

This is so far my favorite of all the pumpernickels I have made. While I am now aware that there is another kind of pumpernickel bread that I have yet to bake, this my version of the kind of bread that I liked to have for my sandwiches growing up. I called it American pumpernickel in hopes of mollifying any pumpernickel purists. It's not quite as dark as I imagine I could get it with caramel color, but I can't quite bring myself to do that, even though I've added food coloring to plenty of deserts before. So I used two of the other often suggested options, cocoa powder and coffee. The coffee really seems to go well with the rye and fennel seeds which I also added. I used brewed coffee because I figured the rule about only cooking with wine you'd drink ought to apply to coffee. Or... there was enough coffee left over in the pot the next morning.

Ingredients350 g all-purpose flour150 g pumpernickel rye350 g coffee (brewed)1 T cocoa powder1 T fennel seeds100 g stiff levain (~50% hydration)10 g salt
As for method, I doubt I would do it the same way the next time, but this time it started out in my bread machine on the dough cycle, because lately I've been using it to knead the dough for my daughter's weekly sandwich loaf. So, I put everything into my bread machine but the salt(because I forgot about it). Once I remembered I paused the machine for about 20 min., added the salt and restarted it. I also paused it and did some S&F every 30-45 minutes through the machine's cycle, because I was afraid I was going to end up with glop instead of dough. When the dough cycle was done I let the dough proof in my oven with the light on at around 85 F for about 90 min to bring the total time from the start of mixing up to about 3 hours.
Then I took it out of the pan, preshaped as a boule and let it rest for 15 min. and then did a final shape and let it rise in a floured brotform for about 3 hours before slashing and baking on a stone with a bowl on top. I preheated the oven to 450 F or so and dropped the temperature to 400 F once the bread was in the oven. I left the bowl on for 20 min and then baked for an additional 20 after removing the bowl. This is about when I realized it was a lot harder to judge crust browning when it's already so brown at the start of the bake, so I decided to take it out after 40-45 min total.

Submitted to YeastSpotting

dabrownman's picture
dabrownman

After 4 Fresh Loafians recent trip to KA flour where they took the rye class from master baker Jeffrey Hamelman and the recent spate of posts on altus, my apprentice couldn’t help but devise a baking test to see if we could tell the difference, taste wise, when altus was added to a high percent rye and 100% whole grain bread.

Perfect bread holder for home made Pate Maison.


Our last bake was a test on ‘old dough’ that proved old dough makes a difference in taste that is noticeable and really quite profound.  Normally we would put altus in high percent rye bread, if we have it, but have never baked the same recipe at the same time under the exact same conditions with and without altus to determine first hand if there really was a noticeable taste difference.


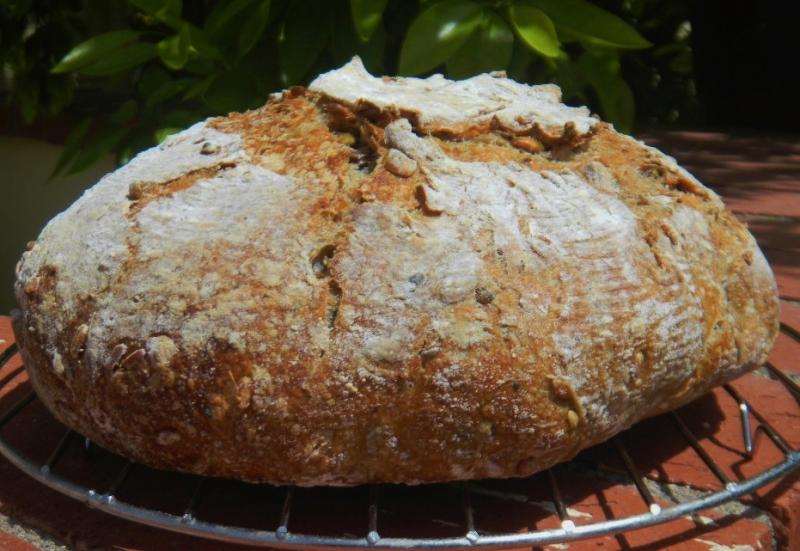
We would have made a 100% whole rye bread for this test but didn’t have enough rye berries to grind up.  We decided to use whole spelt berries for 50% of the mix and bake it like it was pumpernickel, that had real pumperdime berries cut in half - long, low and slow, to bring out the dark color.  The instant coffee, cocoa, molasses, barley malt, honey and red malt also helped to turn this loaf dark.


The altus we used came from this bread - Multigrain SD/YW Brown Bread with Aromatic Seeds and Multi-Grain Scald which was also a multi-grain and YW/SD combo levain bread sort of similar to this one.

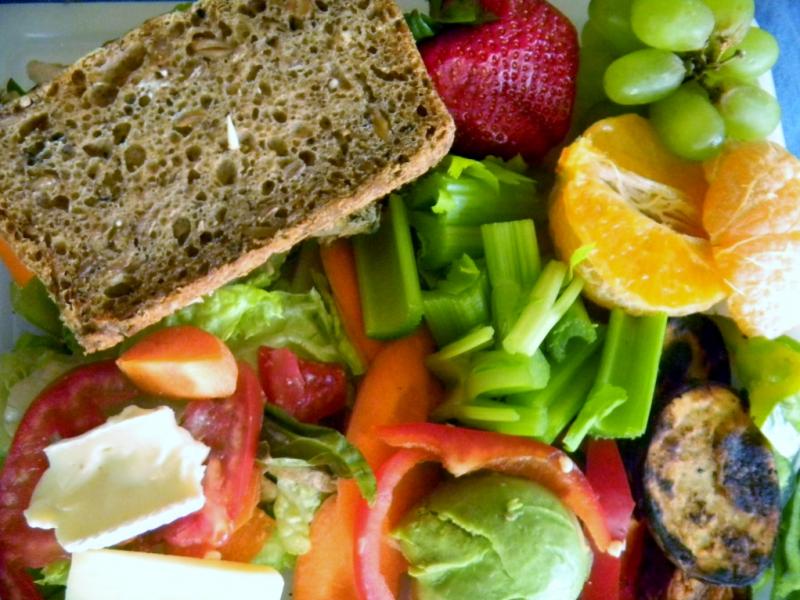
Today's lunch sandwich featuring the bread we used for the altus in todays bake that is still in the oven going on 7 hours.

You want to start the levain and scald the day before you bake.  We had a mainly rye and spelt 100% whole grain starter, that had been developed to its peak for the last bake.  It had been in the fridge for a coupe of days putting on some more sour.  It was used to make the combo levain with 30 g  of YW - a tiny amount in the scheme of things but YW really makes a huge difference to open the crumb in heavy whole grain breads.


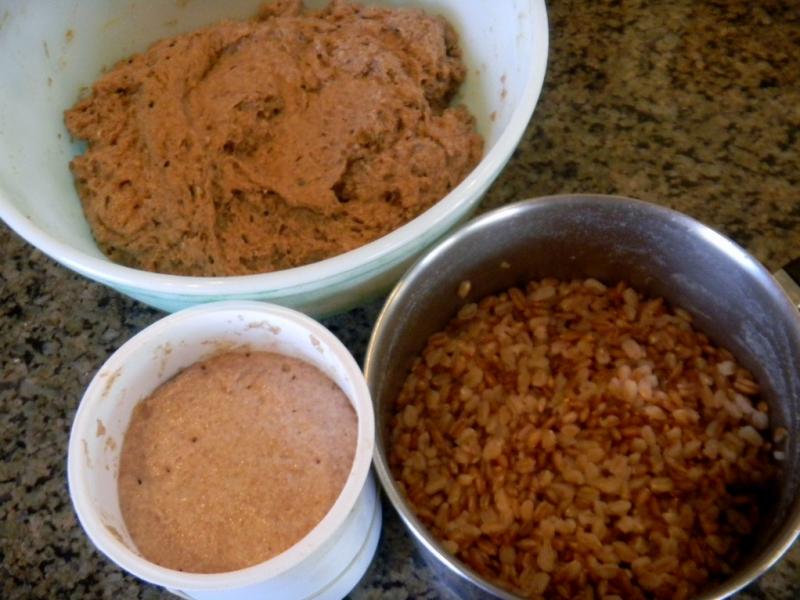
All of the cracked and meal varieties of rye and spelt, half the total flour amounts used for the levain, along with some whole rye and spelt flour was used in the 1 build.  The rye and spelt berries were soaked overnight for 12 hours and then simmered for 10 minutes and allowed to cool.  The excess soaker / scald water was used to soften the altus so none of the flavor was lost.


It took about 12 hours for the levain to double on the counter.   While that was happening, we autolysed the dough flour, salt, all the add-ns (less the altus and the scalded berries) using excess soaker water for the liquid for 4 hours.   We like longer autolyse times for whole grain breads.  We also see no difference if the salt is included to the autolyse or not… so we always put it in.


Once the autolyse and the levain came together we mixed the heavy 76 % hydration mass with a big metal spoon to try and get things acquainted before turning it out on the counter and doing 10 minutes of French slap and folds when the dough really came together nicely from a structure point of view but still very sticky.

The dough was rested for 15 minutes before the first of (2) S&F’s were completed on 15 minute intervals.  The scald was incorporated in the first one and the seeds in the 2nd one.  Then the dough as divided in two with one dough 72 g more than the other since the smaller dough would have 72 g of soaked altus added to it. 

Once the scald was added the dough felt wetter than a 76% hydration dough because of the excess scald water carried along with it – even after draining and running a paper towel through the berries.

15 minutes later, the altus went into half and a minute of slap and folds was used to distribute it properly.   A few slap and folds were also performed with the other half to get it back into better shape gluten wise.

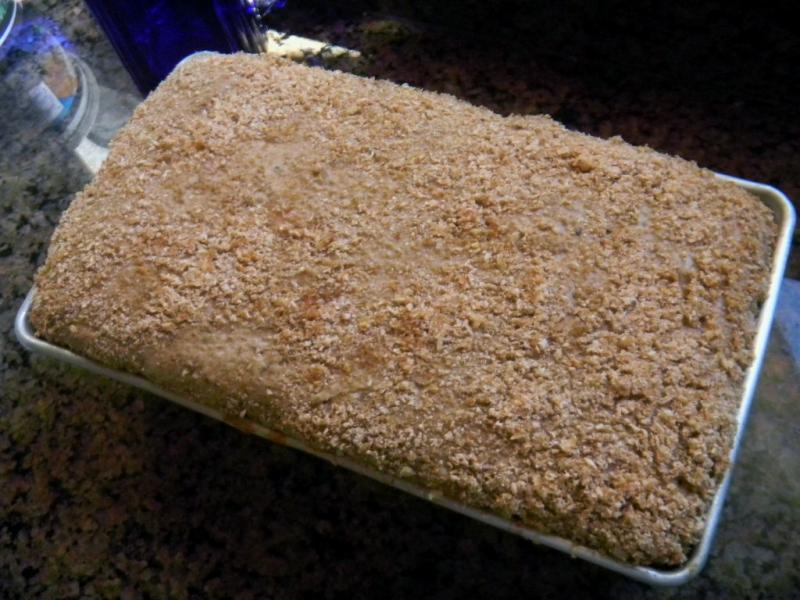
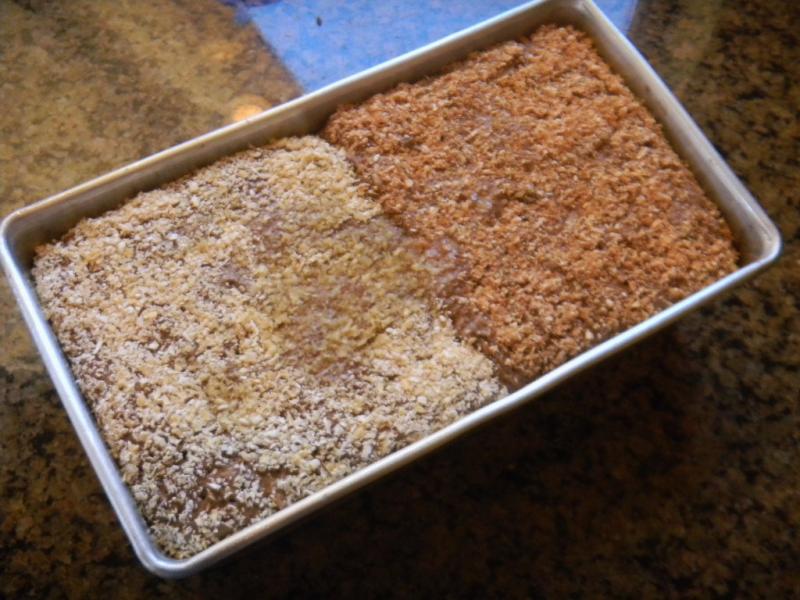
 We then panned each into half of a PAM sprayed large metal loaf pan and covered the non altus side with the lighter colored oat bran and the altus side with the darker wheat bran to mimic their actual color since the altus had made that side darker.

We then covered in oiled plastic wrap and allowed it to proof on the counter for 30 minutes before refrigerating it for a 12 hour retard at 38 F.  After removing the loaf from the fridge the next morning, we allowed it to warm up and proof on the counter for 6 ½ hours at 68 F until it nearly doubled to the rim of the pan.

We covered the top with a PAM sprayed double layer of heavy aluminum foil and placed it on the 375 F mini oven’s broiler pan that was half full of water along with (2) of Sylvia’s steaming cups that were heated to the boiling in the microwave.   Even though the loaf tin was covered we still wanted as much steam as we could generate in the mini.

After 30 minutes we turned the mini oven down to 350 F for 30 minutes.  We continued the baking in a falling oven with steam according to the baking schedule:  Many will notice that this is similar to the baking schedule for Black Pumpernickel that Hamelman uses.  This one just starts a little higher


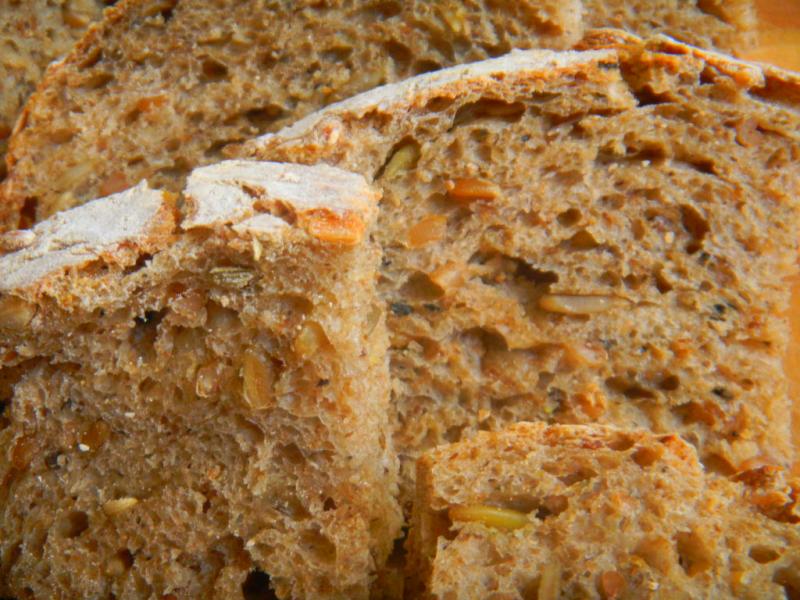
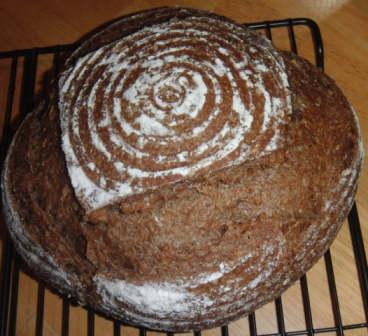
Theise were 3"pieces of pumpernickel (altus left) that we got 12 slices out of the altus side than the 11 slices we got out of the non altus side.  For lunch the altus wa more moist and produced few crumbs when slicing and the non altus side was more dry and produced more crumbs when slicing.  It will be altus pumpernickel from now on.

375 F - 30 minutes

350 F - 30 minutes

325 F - 30 minutes

300 F - 1 hour

275 F - 2 hours

250 F - 2 hours

225 F - 1 ½ hours

200 F - 1 ½ hours

Turn oven off and leave the bread in the oven until morning or 8 hours.  Uncover and de-pan the bread.  Wrap the cooled bread in cotton cloth or linen for a minimum of 24 hours - 36 hours would be better.

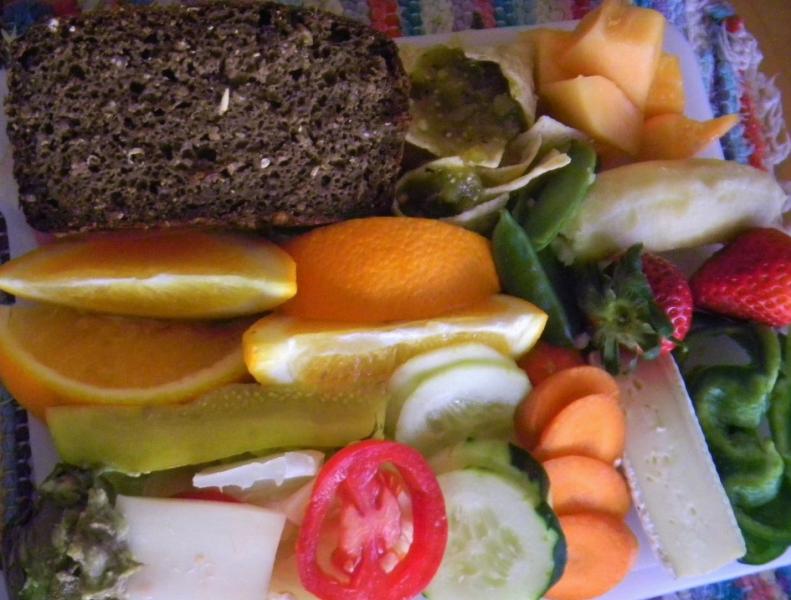
A great lunch sandwich of Pesto Infused Roasted Pork Loin with; pepper jack cheese, lettuce, tomato and homemade Dijon mustard.  The fruits and veggies, include Poblano peppers cantaloupe, carrots, a homemade kosher dill pickle and a Minneola from the back yard.  A piece of this bread with a schmear of grilled salmon and cream cheese was included because it was go fantastic at breakfast.

Beautiful sunrise this morning!

Please note that the altus actually used for half of this loaf was 72 wet grams not the 144 listed in the formula below.  The 90 g dry and 144 g wet altus would be used in a full, non test loaf of this bread.

Crumb shots will be 24 hours from now.

The great aroma of this bread didn't start permeating the house until the temperature had been reduced to 250 F.  There were some unusual things and some expected from the crust points out.  First the loaf shrank a little bit while baking instead of springing. I have never used a  long low slow baking schedule for this kind of bread before and have never had one shrink - maybe this is normal?

The altus side came out of the pan much wetter than the non altus side and it was more caramelized.  We have never had a bread come out of the pan this wet before but this too may be normal?  When the aluminum foil lid came off, the aroma was incredibly pungent and pervasive.  It sure smells like a very nice black pumpernickel and I can't wait to slice into it.  But we will wait, even though my apprentice doesn't want to her being German and this loaf dear to her heart.  The loaf is now resting in its cotton cocoon for 24 hours - making it 32 hours after it finished baking before we will slice it. 

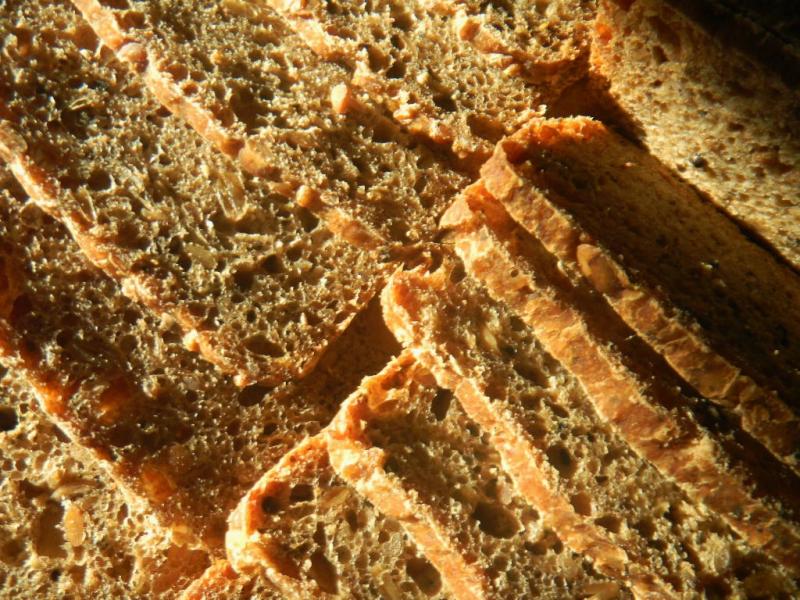
After baking and slicing the color difference went away,  the non altus inside was more open with larger holes.  the altus side was open too but the holes more even throughout.  The crumb was glossy and moist.  The YW really helped to open the crumb and make it lighter than just about any other bread of this type that I have made, seen or eaten.  Great taste - less weight :-)

The long low and slow bake at the end produced a finished temperature of exactly 205 F . Amazing!  This loaf was perfectly baked and the taste was just the best we have ever experienced.  The difference between the altus and no altus was slight though not nearly as great as we would have expected.  The altus side had a deeper and more complex flavor though and next time we have this bread for the altus. What a great loaf of pumpernickel!

Formula

100% Whole Grain Rye and Spelt  Sourdough - The Altus Test


Starter

Build 1

%


SD Rye & Spelt Starter

15

3.83%


Whole Rye, Meal & Cracked

80

20.43%


Yeast Water

30

7.66%


Whole Spelt, Meal & Cracked

80

20.43%


Water

130

33.21%


Total Starter

335

85.57%


Starter


Hydration

100.00%


Levain % of Total

34.50%


Dough Flour


%


Dark Rye

112

28.61%


Whole Spelt

112

28.61%


Dough Flour

224

57.22%


Salt

7

1.79%


Water

150

38.31%


Dough Hydration

66.96%


Total Flour

391.5


Water

317.5


T. Dough Hydration

81.10%


Whole Grain %

100.00%


Hydration w/ Adds

76.20%


Total Weight

971


Total Weight does not include added water from the scald and altus


Add - Ins


%


Barley Malt

6

1.53%


Molasses

6

1.53%


Honey

6

1.53%


Red Rye Malt

10

2.55%


Rye and Spelt Altus

90

22.99%


Coffee Cocoa

20

5.11%


Spice Seeds

20

5.11%


VW Gluten

7

1.79%


Total

165

42.15%


Altus weighed 144 g after adding soaker water to soften

Spice Seeds - corriander, black and brown caraway, anise & fennel


Scald


%


Spelt

45

11.49%


Rye

45

11.49%


Total Scald

90

22.99%


Scald weighed 188 g when incorporated


Isand66's picture
Isand66

Today's the Superbowl and I was asked to make some pretzel rolls to bring to the party we're going to.  I made a batch for Christmas Eve which everyone raved about so I used the same recipe I found on the TFL website.  I also couldn't help but try my own variation using my sourdough starter, pumpernickel flour and cheddar cheese.

I wasn't sure how they would turn out, but I do have to say they didn't dissapoint and rival the original.  Come on....who doesn't like cheese?

These are not hard to make except for the food grade Lye bath they go into.  Many people say you don't need to use Lye and can use baking soda.  I have not tried baking soda yet since I still have plenty of the Lye.  The Lye gives the pretzels a hard dark brown crust which is not easy to obtain with anything else. Feel free to use baking soda instead and increase the amount used versus the Lye.

Caution:  When using the Lye make sure you wear gloves, long sleeves and protective eye gear. Also, never add Lye to hot water or it will bubble over and probably burn you.

Main Dough Ingredients for 10 rolls at about 110 grams each

145 grams AP Sourdough Starter at 65% or adjust flour and water accordingly

437 grams Bread Flour (KAF)

200 grams Dark Rye (also known as Pumpernickel)

5 grams Seas Salt or Table Salt

5 grams Diastatic Malt Powder

384 grams Water (80-90 degrees F.)

Cheddar Cheese cut into cubes (sorry but I forgot to measure the cheese)

Pretzel Salt (for topping only)

For Lye Bath (3.5% Solution

2 Liters of Cold water

70 grams Sodium Hydroxide Crystals

Procedure

Add the diastatic malt powder to the water and stir.  Add the flours in your mixing bowl and slowly add the water mixture.  Mix for about 1 minute until combined.  Cut your starter in pieces and lay on top of the flour mixture and cover and let rest for 30 minutes to 1 hour so the flour can absorb the water.

Next add the salt and mix for 4 minutes on low.    Place the dough in a slightly oiled bowl and do a couple of stretch and folds.  Cover the bowl and let it rest for 10-15 minutes.  Do another stretch and fold in the bowl and let it rest another 10-15 minutes.  Do another stretch and fold and let the dough sit out in the covered bowl for another 1.5 hours.  Place the dough in the refrigerator until ready to bake the next day.

When ready to bake take the dough out and leave it covered in your bowl for 2 hours.  Next divide the dough into around 10 pieces that are 110 grams each.  Flatten each piece into a circle and place a piece of cheese in the middle and pinch the dough around the cheese.  Next flip over and roll against your work surface while creating a tight ball.  Place on a baking sheet and cover with either a moist towel or plastic wrap sprayed with cooking spray.  Let it rest for around 60 minutes to about 1/2 proof.

While the rolls are proofing, fill a large stock pot with 2 liters of cold water.  Measure out the Lye and slowly add it to the cold water.  (DO NOT EVER ADD LYE TO HOT WATER).  Cover the pot and bring it to a rolling boil and then shut off the heat.

Pre-heat your oven to 400 degrees.  When the rolls are proofed sufficiently, prepare to dip them for about 15 seconds in the lye bath upside down.  Let them drain on a bakers rack over a cookie tray covered with a towel or parchment paper.  After draining for a minute you can transfer them to a cookie/baking sheet that has been sprayed with cooking spray.  You want to use a stainless steel cooking sheet as aluminum may react with the lye and peel.  Note: do not ever use parchment paper as the rolls will get stuck to the bottom.  I know this from experience and I had to cut off the bottoms of half the rolls I made.

When ready to bake, score each roll with an "X" on the middle and sprinkle with pretzel salt.  Make sure you use pretzel salt if you want authentic rolls.

Bake for about 15-20 minutes until they are golden brown and register about 185 F in the middle.  Let them cool on a bakers rack until you can't wait any longer!

I actually couldn't wait long enough to try one which is why the crumb shot below is a little gummy looking.  It tasted good though!

Enjoy!

Let's go Jets!  (Did I really say that?  Must be the alcohol.....)

Isand66's picture
Isand66

After reading about how much better freshly ground flour is compared to store-bought I finally decided to wiggle a couple of toes in the water and try grinding some of my own.  I used my Krupps coffee grinder to make some Farro flour and also some Hard Red Wheat from grains I had purchased at Whole Foods previously.

To make it interesting I used a portion of my standard AP starter along with a much larger portion of a Farro starter I prepared.

I didn't have enough whole grains to grind all my own flour so I used King Arthur flour for the rest of the ingredients.

I also made a soaker using some cracked wheat.

I have to say I made a mistake by thinking the extra liquid from the soaker would increase the hydration of the dough which only comes in at 57%.  Since the freshly milled flour also sucks up more water than store-bought the final dough ended up much drier than I would have liked and the crumb was denser than my usual multi-grain bakes.  Next time I will increase the liquid amount probably another 15-20%.

I think I shall have to invest in an attachment for my wife's Kitchen Aid to mill my own flour which should be much easier to do larger batches than the Krupps.

In any case the final bread while not being one of my favorites still tasted very earthy with a nice sour flavor and nutty undertones from the Farro and Wheat Germ.

Farro Starter

184 grams Farro Flour ground from fresh kernels

71 grams AP Starter

117 grams Water at Room Temperature (80-90 degrees F.)

Mix ingredients in a bowl until thoroughly combined.  Cover the bowl and let it sit at room temperature for around 10 hours.  The starter should almost double when ready to proceed.  You can either mix in final dough or put in refrigerator for at most 1 day before using.  If your kitchen is warmer than mine which is usually about 70-72 degrees with my air-conditioning you can proceed sooner.

Soaker

90 grams Cracked Wheat

280 grams Boiling Water

Mix ingredients together in a bowl and cover.  Let rest for 30 minutes or longer until ready to use.

Drain the liquid before mixing in the final dough.

Main Dough Ingredients

75 grams Refreshed AP Starter (65% hydration)

351 grams Farro Starter from above (should be all of it)

90 grams Cracked Wheat Soaker from above

75 grams Quinoa Flour

70 grams Wheat Germ

40 grams Potato Flour

200 grams French Style Flour (You can substitute AP flour)

195 grams Freshly Ground Hard Red Wheat Flour

100 grams Pumpernickel Flour (Dark Rye or Course Rye Flour)

50 grams Molasses

16 grams Sea Salt or Table Salt

430 grams Hard Cider

Procedure

Mix the flours with the Hard Cider and molasses in your mixer or by hand for 1 minute.  Next cut the starters into small pieces and put in bowl and mix for 1 minute to incorporate all the ingredients.  Let the dough autolyse for 20 minutes to an hour in your bowl and make sure to cover it.  Next add in the salt, and the soaker and mix on speed #1 for 3 minutes or by hand and on speed #2 for 2 minutes.  The dough should have come together in a ball and be tacky but not too sticky.

Next take the dough out of the bowl and place it on your work surface.  Do a stretch and fold and rest the dough uncovered for 10 minutes.  After the rest do another stretch and fold and cover the dough and let it rest for 10 minutes.  Do one more stretch and fold and put the dough into a lightly oiled bowl and let it sit at room temperature covered for 2 hours.  After 2 hours you can put the dough into the refrigerator for 24 hours or up to 2 days before baking.  Feel free to do some additional S & F's if you feel it is necessary.  I baked the bread about 24 hours later.

The next day (or when ready to bake) let the dough sit out at room temperature for 1.5 - 2  hours.  Next, form the dough into your desired shape and put them in floured bannetons, bowls or on a baking sheet and let them rise covered for 2 hours or until they pass the poke test.  Score the loaves as desired and prepare your oven for baking with steam.

Set your oven for 500 degrees F. at least 30 minutes before ready to bake.  When ready to bake place the loaves into your on  your oven stone with steam and lower the temperature immediately to 450 degrees.  Since these loaves were a little lower in hydration and were not cooking as quickly as normal, I lowered the temperature to 430 degrees.  The total baking time was around 45 minutes.  When both loaves are golden brown and reached an internal temperature of 200 degrees F. you can remove them from the oven.

Let the loaves cool down for at least an 6 hours or so before eating as desired.

The crust the next day was very hard and the crumb like I said before was much denser than I would have hoped but this bread still makes some nice pastrami or corned beef sandwiches for sure along with a nice sour pickle.  Now I have to go get some to eat for lunch!

Isand66's picture
Isand66

Last Friday I finally returned from my latest trip to China and was eager to try my hand at a rye bread after reading about some interesting ones on The Fresh Loaf.  I wanted to make one utilizing a Yeast Water starter per my baking friend DA Brownman who recently baked a master piece using a combination of a Yeast Water starter and traditional SD starter.

Since I have been having some fairly successful bakes using coffee in place of the water in my multi-grain bakes I decided to try again and used a simple dark roast coffee for the soaker and for the final dough.  I made a soaker using rye berries and cracked wheat.  I mixed the hot coffee with the dry ingredients and let sit for 24 hours covered at room temperature.

For the Yeast Water starter I wanted to develop a Pumpernickel starter so I built up the starter in 3 stages.  The first stage was left for 4 hours at room temperature and the second stage was left overnight for about 8 hours at room temperature.  The final build was left for around 5 hours at room temperature.  I tried to make exactly 425 grams of starter, but be sure to weigh your final starter and adjust as needed.

Make sure you drain the grains from the soaker, but be aware that they will absorb a great deal of the liquid.  Even though the hydration of this dough is only 70%, it is really much higher when you take the soaker into consideration.

Soaker

485 grams Hot Coffee

100 grams Cracked Wheat

150 grams Malted Rye Berries

Mix coffee in a bowl with other ingredients and let sit covered at room temperature for 24 hours.

Yeast Water Starter Build 1

60 grams Yeast Water

60 grams Pumpernickel Flour

Mix ingredients in a bowl and cover.  Let sit at room temperature for 4 hours or until you see some activity and your starter is almost doubled.

Yeast Water Starter Build 2

100 grams Yeast Water

100 grams Pumpernickel Flour

Mix above into starter from Step 1 and let sit covered for 8-10 hours or until the starter has almost doubled.

Yeast Water Starter Build 3

15 grams Yeast Water

100 grams Pumpernickel Flour

Mix above into starter from Step 2 and let sit covered for 4-5 hours or until starter has almost doubled.  You can also put in the refrigerator and leave for up to 1 day if necessary until you are ready to bake.

Main Dough

Ingredients

425 grams Starter from above

150 grams Graham Flour (I used Bob's Red Mill)

200 grams White Rye Flour

100 grams Pumpernickel Flour or Dark Rye Flour (I used KAF)

70 grams Roasted Wheat Germ (adds a nice nutty flavor)

370 grams Dark Roast Coffee (90 degrees F.)

14 grams Sea Salt (or table salt)

10 grams Walnut Oil (substitute any oil desired)

Procedure

I mixed  the flours together with all the coffee except for 50 grams and let them autolyes for 30 minutes.   I then added the Yeast Water Pumpernickel levain, oil and the soaker and the rest of the coffee with the salt and mixed on speed #1 for 1 minute and #2 for 4 minutes.  I then did a stretch and fold, rested the dough uncovered for 10 minutes.  Note that since this dough was extremely sticky it was not very easy to do a stretch and fold.   I then did another stretch and fold, covered the dough and let it rest for 10 minutes.  I did one more stretch and fold and put it in a lightly oiled bowl for 2 hours.  I then put it in the fridge overnight.

The next day I let the dough sit out at room temperature for 2 hours.  I had planned to make 2 boules but since this dough was so moist and did not come together like a bread made with white flour I decided to form it into a large Miche.  Alternatively I could have formed it into loaves and baked in a bread or Pullman pan.

Cover the dough in your pans or basket and let it sit at room temperature for 2 hours or until you notice some lift to the dough and it can pass the poke test.

Score the loaves as desired and prepare your oven for baking with steam.

I then baked on my oven stone with steam at 450 degrees until the loaf was golden brown and reached an internal temperature of 200 - 210 degrees F.

I had to bake this bread for almost 50 minutes since it was so moist and the final dough came out with an excellent crust and moist crumb but a little denser than I would have preferred.  It is an excellent bread for some sharp cheese and/or a nice grilled cheese sandwich.

This bread has been submitted to Yeast Spotting here at http://www.wildyeastblog.com/

Anomalous's picture

Pumpernickel: should it shrink overnight?

March 17, 2012 - 5:02am -- Anomalous
Forums: 

My first attempt at Pumpernickel came out of the oven somewhat shunken, so I'm wondering whether that's what should have happened or whether I've done something wrong. I used a German-style recipe, summarised below, from  Daniel Stevens's River Cottage Bread Handbook, with the quantities proportionally reduced by half to a manageable quantity.

Boulanger's picture

Pumpernickel Flour in Montreal

October 5, 2011 - 2:27pm -- Boulanger
Forums: 

Hello fellow bakers,

I am planning to try Brother Juniper's Pumpernickel bread recipe but I am not able to find the coarse rye flour, also known as Pumpernickel  Flour, required. I live in Montreal, and I am looking for a supplier in my area or any online source in Canada.

I tried to order a  3 pounds bag from King Arthur Flour in Vermont but they where asking 25 dollars for shipping and duties, a bit expensive.

My plan A would be to find the right flour for this recipe but I also have a plan B

stephy711's picture
stephy711

Find more recipes on my blog Dessert Before Dinner


Everyone in the family loved this recipe. It was great with butter and trout roe when it was fresh out of the oven, and this morning it was perfect with cream cheese and smoked salmon. The crumb is tender and the crust was firm, creating a wonderful contrast. It's great right now, but this bread will be even better with soup or smoked fish in the winter. Like all brown breads, this is a hearty, winter weather bread. It has a very complex flavor and it is even better a day or two later.

Russian Black Bread 

Ingredients
  • 2 packs active yeast
  • 1 pinch sugar
  • ½ cup warm water
  • 2 cups water
  • 1 oz unsweetened chocolate
  • 4 tbsp unsalted butter
  • ¼ cup dark molasses
  • ¼ cup cider vinegar
  • 2 oz (1/2 cup) whole wheat flour
  • 2 ¼ oz (1 cup) wheat bran
  • 13 oz (3 cups) bread flour
  • 11.25 oz (3 cups) rye flour
  • 2 Tbsp caraway seeds
  • ½ tsp fennel seeds
  • 1 tbsp minced shallots
  • 1 tbsp ground dark roast coffee
  • ¼ cup cornmeal
  • 1 tbsp all purpose flour
  • 1 tsp caraway seeds

Directions
    1. Heat 2 cups water, butter, chocolate, molasses, coffee grounds and vinegar on stove until butter and chocolate are melted. Set in refrigerator to cool. Too hot liquids will damage the yeast.Proof yeast with ½ cup water and pinch of sugar
    2. Sift together flours and bran.
    3. In separate bowl, add fennel, shallots, caraway and 2 cups of the mixed flours. Add chocolate mixture and yeast to the flour. Continue adding flour half a cup at a time until the mixture pulls away from the mixing bowl.
    4. Knead until mixture is springy yet dense. Place in oiled bowl and let proof until doubled in size (about a hour and a half).
    5. Remove dough from bowl and divide into two pieces. Shape pieces into boules and dust tops with cornmeal, flour and caraway mixture. Let rest for 45 minutes
    6. Preheat oven to 350 degrees. Just before baking, slash tops of loaves. Bake for 45 minutes or until dark.

Pages

Subscribe to RSS - pumpernickel