SearchUser loginBread BooksFavorite Recipes
|
Submitted by jennyloh on March 22, 2011 - 6:49am Milk Loaf using Pullman Pan and Water Roux StarterThanks to Yippee for her recipe, I managed to do this soft white milk loaf. Obviously I didn't read the instructions properly and end up with 1 loaf of bread which I could have split into 2. Anyhow, I believe I will make this bread again. I can't find the link to upload the picture here, somehow it disappeared on me occasionally. But here's my link to what I was referring to. I will try again to upload the picture the next time.
Submitted by dmsnyder on December 28, 2010 - 12:06am 70 Percent Rye with a Rye Soaker and Whole Wheat Flour” from Hamelman's Bread
Almost all the breads I bake are hearth loaves, but I've been tempted for some time to make one of the German-style ryes that Hamelman says should be baked in a pullman pan (AKA pain de mie pan).
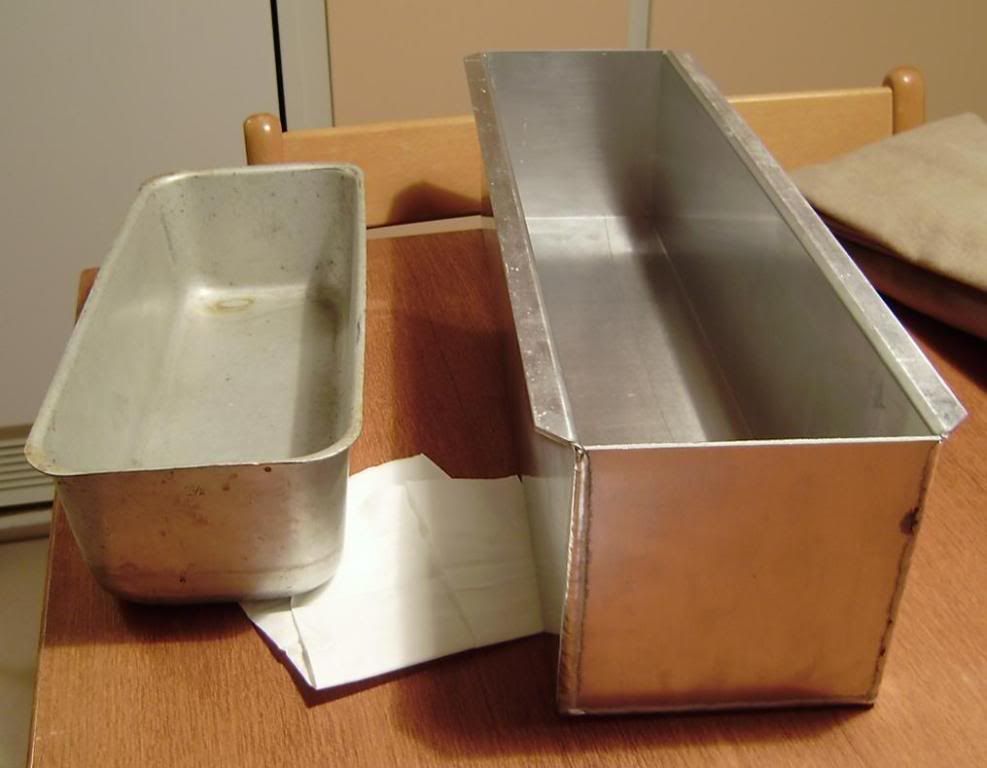
Pullman or pain de mie pan I purchased a pullman pan from KAF's Baker's Catalogue. It is from the new line of bakeware they are carrying, and it is a beautiful piece of metal. But this is not a review of baking pans, so back to bread … Today, I baked the “70 Percent Rye with a Rye Soaker and Whole Wheat Flour” from Hamelman's Bread. It is made with medium rye, all pre-fermented. The rye soaker is in the form of rye chops – an equal weight to that of the medium rye. The remaining 30% of the flour weight consists of whole wheat flour. The dough is 78% hydration and has 2% salt and ¼ tsp of instant yeast. Not having rye chops at hand, I hand-chopped the 390 g of rye berries needed for making 2 kg of dough, which is what is needed to fill my 13” pullman pan. (Did I tell you how beautiful it is?) Now, I believe that Andy (or was it MiniO?) claims the proper way to make rye chops by hand is to slice each berry into 3 equal pieces. I didn't do that. After trying to chop the berries on a cutting board with a chef's knife, which sent berries – whole and in fragments of varying sizes and shapes – flying everywhere, I turned to the chopping method I learned at my mother's knee. She never chopped rye berries, I'm sure, but she sure chopped a lot of fish for gefilte fish in the years before the coming of the Cuisinart. I still have her chopping bowl and hackmesser. (I believe that's what she called it.)
Well, I made a lot of little pieces of rye, but I figure I ended up with a mix of coarse rye flour, cracked rye, rye chops and whole (and very smug) rye berries. So, I poured boiling water over the whole mess and ordered a grain mill. This morning my rye sour was ripe and smelling wonderfully sour and fruity. My soaker was soaked. I mixed the dough. Now this is a 70% rye, since the cracked rye is included as a flour in calculating baker's percentages. But, really, if you look at the flour, it's about 50% rye and 50% whole wheat. I've made several other 70 and 80% ryes before, and this was different. There was much less gluten development with mixing. I've not yet made a 100% rye, but I imagine it's not much different from this dough. Maybe it was the whole wheat flour, whereas the other ryes I'd made used high-protein white flours. This dough was completely like sticky clay. But not insurmountable. I mixed the dough in my KitchenAid – about 2 minutes at Speed 1 and 6 minutes at Speed 2. Then, the dough was fermented for 60 minutes. (Hamelman says ferment for 30 minutes, but my kitchen was only about 67ºF today.) I formed the dough into a log and placed it in the pullman pan which had been lightly oiled and dusted with pumpernickel flour. After 60 minutes proofing with only a little expansion of the dough, the loaf was baked with steam for 15 minutes at 480ºF, then for another 60 minutes in a dry oven at 415ºF. The last 15 minutes of the bake was with the loaf out of the pan, on a baking sheet, to dry the sides of the loaf. There was really nice oven spring. The loaf crested well above the top of the pan. (Sorry, I neglected to photograph the baked loaf still in the pan.) In hindsight, I probably should have proofed more fully. There was some bursting of the loaf on one side, at the point it expanded over the top of the pan.
Rye dough in pan, sprinkled with pumpernickel flour and ready to proof
Rye bread cooling After cooling, I wrapped the loaf in baker's linen, as instructed.
Rye wrapped in linen 
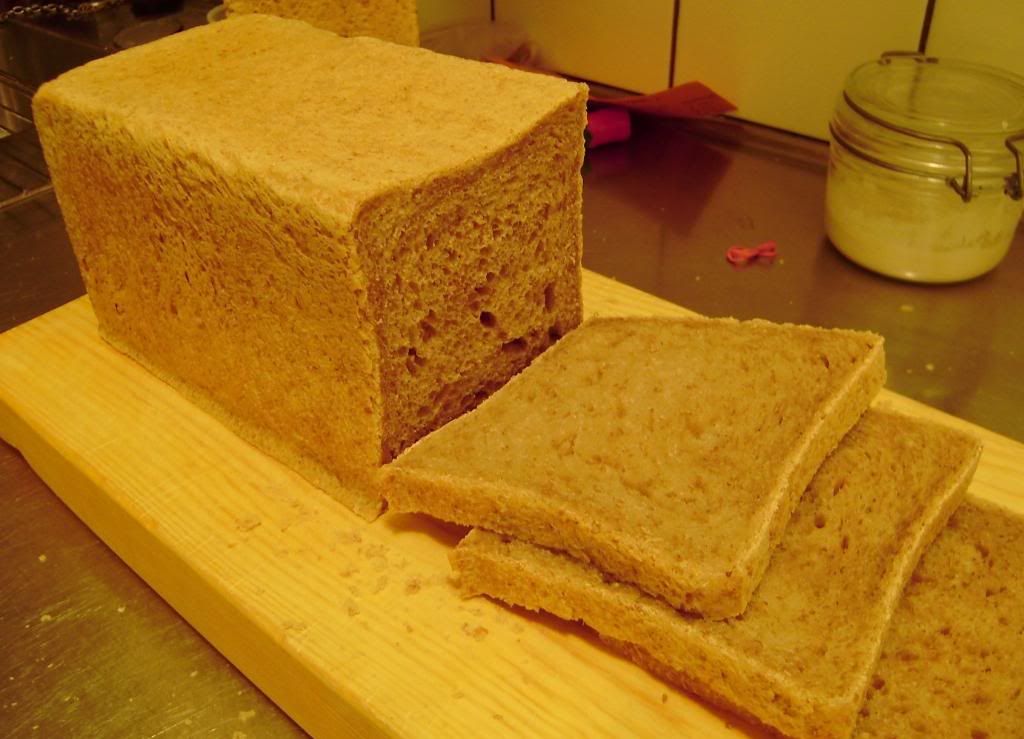
The loaf was wrapped in baker's linen for 24 hours before slicing ... and tasting.
Pre-slicing (Big bread, isn't it?)
Coronal section with crumb
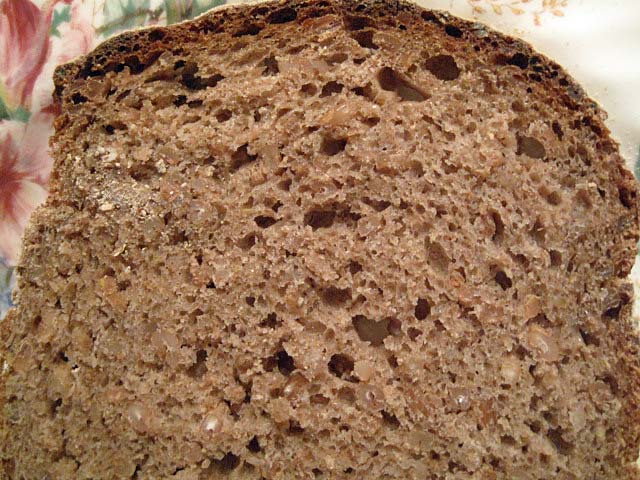
Crumb, close-up
Another close-up
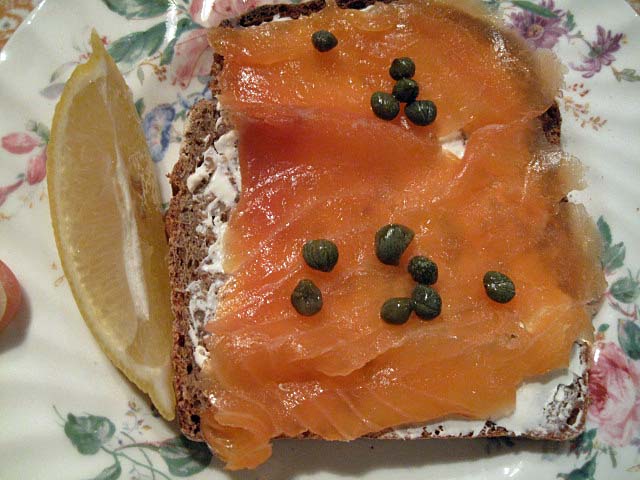
Delicious plain. More delicious with smoked salmon! The crust was firm but not hard. The crumb was soft and moist but slightly crumbly and less dense than I expected. The aroma is powerful with rye, yet the flavor is relatively mild. It is rye with no distinctive whole wheat tones, yet the whole wheat must have mellowed the rye flavor. There is a sweet note to the aftertaste. The rye "chops" are very chewy, which I like. This bread has lots of character, and I enjoyed it unadorned. I had another slice with a thin schmear of cream cheese and a thin slice of Scottish smoked salmon, with some capers and drops of lemon juice. Fantastic! David
Submitted by tlcrn on April 4, 2010 - 6:22am Pullman Pan lidHas anyone had problems with their Pullman Pan lid popping off during baking? Or having a hard time getting the lid off? Submitted by ehanner on February 24, 2010 - 1:05pm Learning Pumpernickel--Now With CrumbLast week, I posted about my Horst Bandel bread from Hamelman's Bread. At first glance the crumb images looked good and the flavor was very good. However after some reflection on the bread and the process I decided my initial declaration of victory may have been over stated. While my first attempt was acceptable for a first try, I suspect I have much to learn about this style of bread. I have been having conversations with Mini and Andy (ananda) about the process and specifically the temperature profile to arrive at a well baked loaf. Along the way I have been talking with qahtan about puddings of various types. There was a most interesting thread on puddings which made me wonder if Pumpernickel isn't really just another steamed pudding without the fruits. After all you cook it in a closed pan at low extended heat and after wards stabilize the moisture by wrapping in towels. The word Pudding has me first thinking about chocolate or lime and a box of Jello but apparently the British and many other Europeans refer to steamed bread by the same term. I looked at some videos on how to make a proper Christmas Pudding. The example was shown placing a quantity of wet looking dough in a glass pan, covering it with parchment and foil, then tying a string around the foil cover. The whole thing gets placed in a hot oven and slowly cooked in a lowering oven to arrive at a well caramelized crumb, deep in color and full of flavor with a soft crust. That's exactly what I want for my Pumpernickel. So, to sum up. I discovered that the bottom of my crust from my first try was quite a bit drier and harder than the sides. I decided to place the pan on a wire roasting rack instead of directly on the hot stone. Thinking is that I'll get a less direct and harsh heat. I took my best guess on how much dough to load in the pan and let it proof. When it was again within 1/4 inch of the top, I removed some of the dough from the top as you can see in the photo. That shot is taken after proof and after I removed an additional amount. Next I placed a piece of parchment over the bread and slid the cover on. It was then weighted down with a cast iron griddle to be sure it didn't pop off again and also to be sure it was sealed. I made additional dough so I would have enough to try a glass pan at the same time. My thinking was that the thicker walls of the glass pan would temper the direct heat and not dry out the bottom crust. Also I had the chance to try out the paper/foil cover tied on with a string. The breads were loaded into a preheated 350F oven and baked as above for 30 minutes. At this time the heat was lowered to 250F for 2 hours. The final reduction was to 220F for another 6 hours approximately. At this time (6AM) I turned the oven off and let the heat coast down for the next 4 hours. The internal temp was 204F when I checked after the 6 hours at 220F. Both loaves popped out of the pan easily and were well shaped. They are now wrapped in a towel awaiting the Pumpernickel Fairy to tap me on the head and say they are ready to eat. I will post the crumb images when available. Some of these are a little out of order, sorry but they should make sense. I thought anyone who might be thinking of making this bread might like to see the steps I used to get this far. Eric Added the Crumb Image by edit: The Pumpernickel Fairy made a low pass on the flight deck this morning and gave me a frown. It has been 24 hours since I wrapped the bread in a towel and placed it on the wire rack (thanks Mini). I unwrapped it and sliced off a few slices to see the results. First, I will now confess I made a mistake with the mix, which was in following the directions as written. On page 223 Item 4.) Mixing, Hamelman says "Add all the ingredients to the bowl, including the sour-dough and both of the soakers, but do not add any of the final dough water reserved from squeezing the liquid from the old bread soaker". I take that to mean that I should add the amount of water in the final dough segment of ingredients (page 222 bottom). The water amount is 12.8 Oz (1-5/8 cups). The first time I made this I with held that water and found I didn't need it. This time I needed an additional 16+ Oz of bread flour to get to a reasonable dough. The amount must be a misprint as I can not see where the differences in rye flours would make that much of a difference. JH goes on to say "It is entirely possible that no additional dough water will be required". So, bottom line is that this batch has way more white flour in it than was called for, percentage wise. It isn't nearly as flavorful as the last batch. The edges are hard now but they will soften up some after it has sat a day or so in a plastic bag. It has a nice flavor and my wife and are enjoying some with cream cheese. Turn the page and start over she said (Pumpernickel Fairy)
Pleated paper over glass pan
Proofed, removed some dough, ready to cover
Wrapped and tied.
In oven covered and weighted down
Pullman ready to cover
Covered with paper ready to bake
After bake, paper is wet from steaming.
Perfectly formed top.
After bake, foil removed, wet paper.
Clean slightly domed top.
Side view of glass pan shows solid loaf.
Turned over on board. Well shaped loaves
I think this is the way they should look?
Waiting for the Pumpernickel Fairy!
Submitted by Kuret on March 16, 2009 - 12:47am Suas Scones and new toys!, --Image Heavy--It is my girlfriends birthday today so I decided to make her a special breakfast! I had eyeballed the butter scones from Advanced Bread and Pastries before but seeing as how they are so rich I didn't want to make them save for a special occasion. Here in sweden a scone is more akin to Soda Bread than the sweetish style scones you get in Britain och America. I managed to make them up the day before without my girlfriend noticing and refrigerate them overnight so that I could bake them for here first thing in the morning. I think they turned out pretty good, and my girlfriend did like them so I'm set!
I have also finally taken the plunge and aquired a Pullman pan for myself, maybe a 1.5kg loaf of tasty toast bread is too much for a two person family but maybe a 2.5kg loaf of Vollkornbrot might not be enoguh? hmm.. might have to share any attempts at Vollkornbrot with friends or there will be leftovers for ever! Here the pullman pan Is shown beside my regular breadpan.
and here is how a loaf of sourdough sandwich bread turned out, tasty! This is the same bread I have blogged about earlier, with a formula developed by me. Unfortunately the picture is insanely yellow, but that is due to poor lighting when I took the picture.
This is a secret too, but I have also made two mini cheesecakes for tonights dinner wich I am making for my girlfriend, hope that they are tasty..
Submitted by leanna on February 22, 2009 - 12:30pm PullmanPans, 1 pound or 8 1/2 inchI'm looking for an outlet for a one-pound or 8 1/2 inch pullman pan. Any ideas? Would prefer as inexpensive as possible. Thanks! Leanna Submitted by Dan_Drury on February 11, 2009 - 2:08pm Pullman pan recomendationCan anyone recommend a brand of Pullman pan? I have visited all of the local cooking shps but no one has one I can touch an play with.
Thanks
Dan Submitted by ryeaskrye on December 2, 2008 - 12:12am Reinhart's Bavarian Pumpernickel QuestionI recently bought Reinhart's WGB and have been reading and re-reading the Bavarian Pumpernickel recipe and my girlfriend keeps asking why I'm drooling. Silly me, I'm going to attempt something that might be beyond my abilities. If anyone has made this, or if you can answer anyway, I have a question: I found a slightly dented Pullman Loaf pan on discount. It is a 13"x4"x4" and says it is for a 1.5lb loaf. Reinhart's recipe is for 1482 grams or roughly 3.23 lbs., yet he talks about a single 4"x8.5" loaf pan. So...Do I need to split the recipe, or does the fact that it is a rye bread mean my pan size will work? Is that 1.5lbs for a "normal" white bread loaf? Any other tips? Thanks, John Submitted by smartdog on May 24, 2007 - 2:04pm Square Challah LoafThis is my fourth challah. I decided to stray from the traditional braid "out of a pan" to braiding first, then letting it rise in the pullman pan today. I am pleased so far. It's hot out of the oven, so I will post the cut picture later this evening. ;) Luv4Country Soaps |
ALSO ON |