This is my first Blog so I figured I would start it out with something that looks good enough to eat. This morning was one of those rainy dreary days that just screamed take a nap. But instead I headed to the kitchen to fend off the rainy day blues. I'm well stocked on sourdough breads, English muffins, challah, and croissants so I decided to play with something new, Phyllo. Today was all about the dough and I had no great plan for what to do with the phyllo once it was made, so I made dough.
I went on line and searched for recipes and decided on this one http://makinglifedelicious.com/2011/06/27/make-your-own-phyllo-dough-baklava-traditional-less-so/
I followed the recipe with the exception that I used olive oil and not vegetable oil and high gluten flour not all purpose flour
PHYLLO DOUGH
Recipe from Kaffeehaus – Exquisite Desserts from the Classic Cafés of Vienna, Budapest and Prague” by Rick Rodgers
- 2 2/3 cups (270 g/13 oz) unbleached all purpose flour
- 1/4 teaspoon (1 1/2 g) table salt
- 1 cup less 2 tablespoons water (210 ml), plus more if needed
- 4 tablespoons vegetable oil (60 ml), plus additional for coating the dough
- 1 teaspoon (5 ml) cider vinegar
(Hope I used the proper credits here just a copy and paste from the website above.)
As far as the mixing goes I put it all in the KA with the dough hook mixed on low speed until it was mixed then 2ed speed for 10 minutes with the occasional scraping down the hook. The dough was quite soft and supple and reminded me of a sourdough after the final bulk fermentation. I let the dough rest for 2 hours oiled and covered with plastic wrap.

I cut off small pieces a bit larger then a golf ball. You can see the other items on the counter to give a reference as to the size.
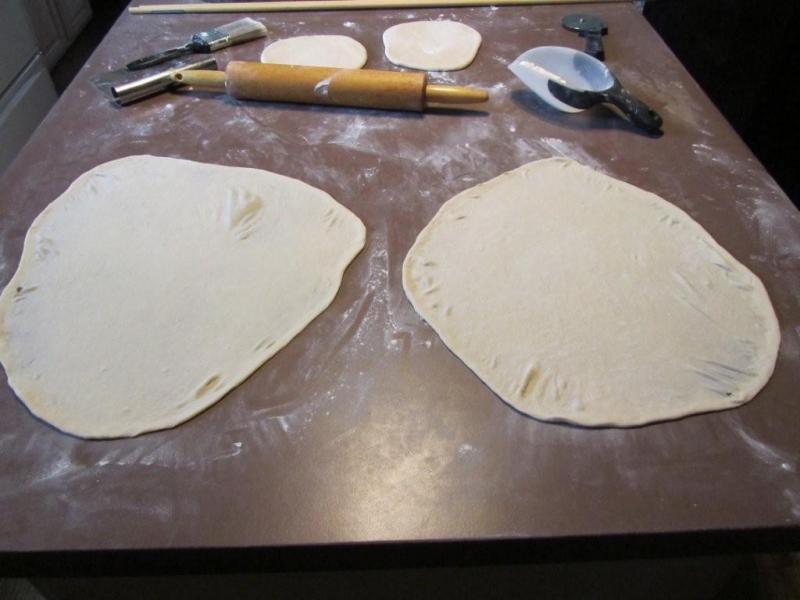
Top of the picture you can see I hit them first with the rolling pin. The lower of the picture is after hand stretching. I used the same technique as a pizza dough. I did try other ways. Just the rolling pin did not get the dough very thin. There is another way using a dowel (stick) I guess it takes practice but I kept throwing the dough across the counter slinging it around a stick.
One thing to keep in mind this required a bunch of bench flour. But the dough was so nice it did not tend to dry out as you were working it. But lots of flour keeps it from sticking to itself.
I also did them in stages giving the dough a chance to rest between stretches.

More hand stretching and using the light over the counter to see what needs more stretching. (at this point this would be one thin crust pizza.) I was really surprised by the stretch this dough has.

Then more stretching while on the counter. I used the counter edges to hook the dough so I could stretch it easier. More flour dusting to keep it from sticking to another sheet when stacked. The outside edges were a bit thicker. I could have stretch the edges more but I just cut them with the pizza wheel cutter so that the dough was quite equal in thickness.

This gives you an idea on how thin this dough can stretch. In this picture I put my recipe for pizza sauce under the stretched dough. I know you can read the recipe so the credit is http://www.fornobravo.com/pizzaquest/instructionals/59-written-recipes/102-all-purpose-pizza-sauce.html#comment-245
I cut, dusted, and stacked all the phyllo dough. I must say it was huge fun but also took some real time so I would not try this on a tight schedule. For the time involved I wondered if it was worth the effort when you can just buy it frozen in a box. NO!!! Sorry I just can't do the frozen box thing. It was totally worth it.
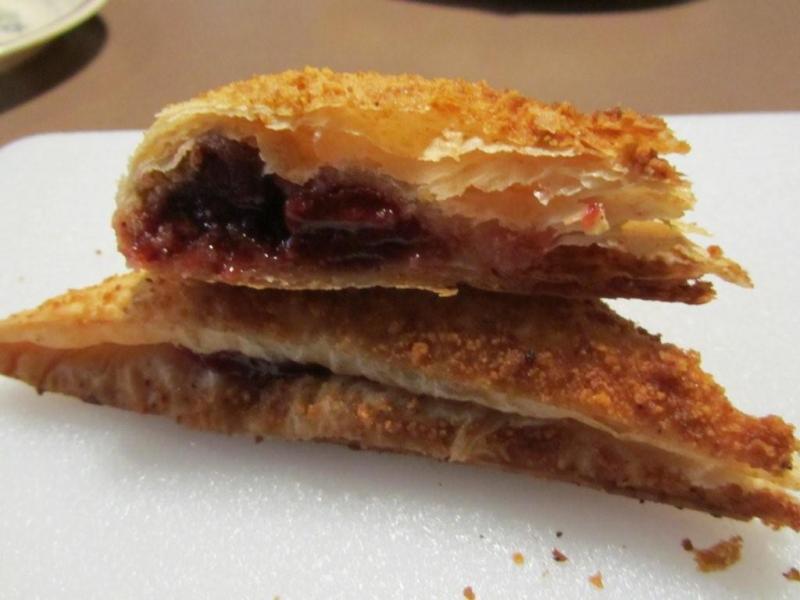
So now I have a pile of phyllo dough. After all that work I needed some kind of reward for my efforts so I decided on easy turnovers.
Nothing fancy here and standard phyllo practice. Lay down a sheet, paint with melted butter. I did take a mix of 1 cup graham cracker crumbs and 1/3 cup brown sugar and dusted in between the layers. Then lay down another sheet butter and crumb mix. I think I did about 8 layers. Trim and cut the dough into squares I put the edge scraps into the square pieces. In a pinch I used a can of pie filling that was taking up space in the cabinet for way too long. Fold them into triangles butter the top and use the rest of the crumbs on top. 375 degree for about 18 to 20 minutes.

Great cure for the rainy day blues.


