The Fresh Loaf

A Community of Amateur Bakers and Artisan Bread Enthusiasts.

no-knead bread

krusty's picture

Bulgur wheat bread

June 14, 2011 - 9:25am -- krusty
Forums: 

Lately I've been baking delcious bread by the almost no-knead method, using bulgur wheat instead of whole-wheat flour.  Bulgur adds nutrients and fibre, and the bread stays fresh longer.  I've used coarse and medium bulgur wheat - the fine grind doesn't add much character - and firik (a.k.a. frekeh, freekeh and farik), which is green wheat, parched or roasted, then dried.  Firik adds a light smoky taste, and a hint of sourness.   I buy it at a Turkish grocery store, but any middle-eastern grocery store should have it.

The basic recipe is:

bottleny's picture
bottleny

I had tried again baking these two weeks (I'm a weekend baker). My first goal is to bake a very good baguette like what I saw in the bread books and in France.

Failed sourdough baguette

Last week, I used Carl's starter and the no-knead bread recipe, but tried the baguette shaping. The later didn't go well as you can see below.

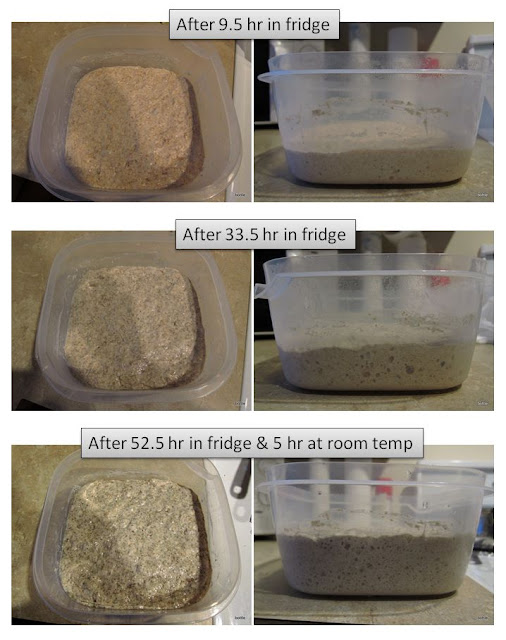
The recipe is similar to this one in breadtopia but use longer fermentation in the fridge (37 hrs), followed by 11-hr fermentation at room temperature.

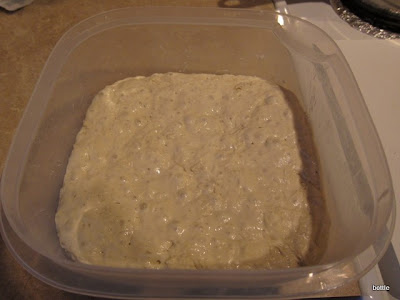
Just mixed. At that time, I measured the flour by volume, since my digital scale had not arrived yet. When compared with the one below, I think this was wetter.

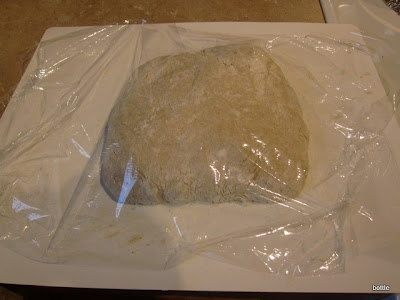
After the first rise, did the stretch & fold (very difficult because the dough tended to stick onto the chopping mat) and 2nd proof (1.5hr). Following Ciril Hitz's demonstration, I managed to have three long sticks.

Initially I proof them on the floured towel. But they were still very sticky and hard to handle, I then decided to rest them on the roaster pan .

Baked at 475F (didn't know the exact temperature in the oven then). I tried to create the steam by SylviaH's method. But most of the steam came out from the ventilation hole on the top of the oven.

When I took this photo, I realized that I forgot to score the dough! Not much oven rising either.

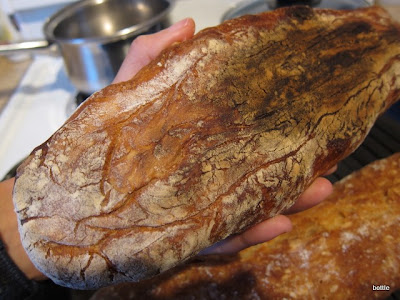
The sourdough sticks. The bottom(not evenly brown; the one in the center was darker)


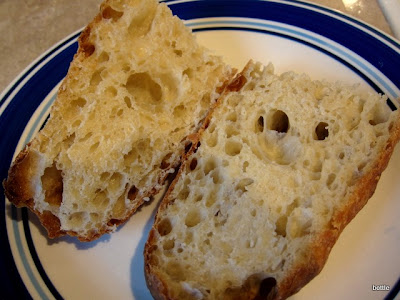
As expected, the crumbs didn't have big holes.

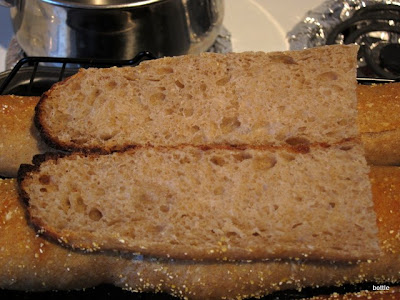
The taste was very sour, a little over what I would like. I'm not sure whether that's normal since this was my first time to have sourdough bread. These were dryer on the 2nd day.

Kind of Successful Stirato

This week I decided to try Lahey's no-knead Stirato recipe. I thought I would have better chance to succeed with his method.

Besides, my order of some baking tools finally arrived, including the digital scale and oven thermometer. This time I used weight rather volum for measuring flour.

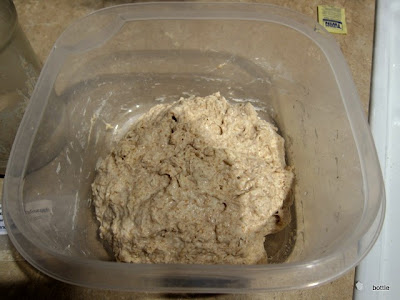
Just mixed (Lahey's recipe is 75% hydration). And fermented in the fridge for 11 hr and then at room temperature for 12 hr.

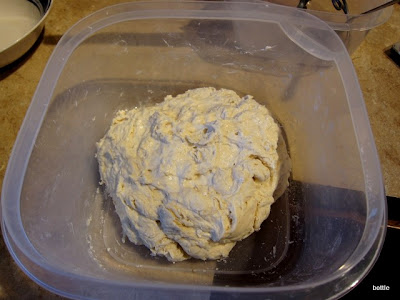
Again, it's very sticky (Question 1). I finally managed to create a rod and divided it into two.

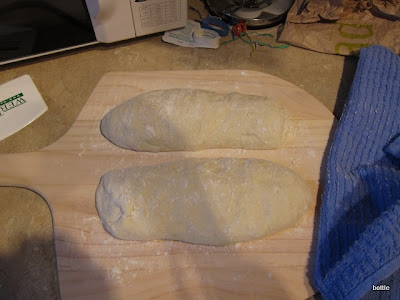
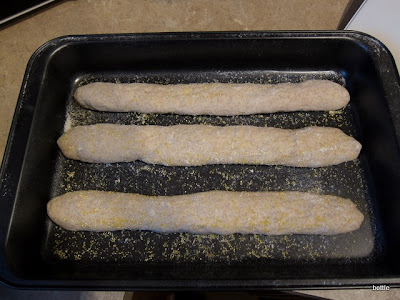
After resting for 40min (Question 2), then stretched them about 13-14in long and put them in the preheated roaster pan (at 475F). I sprayed a little water on top and inside the Al pan (as cover). By the time when I closed the oven door, the temperature already dropped below 400F. :-( Well, I still need to practice more.

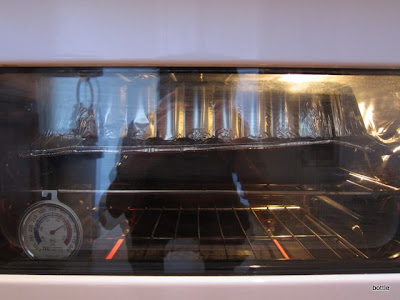
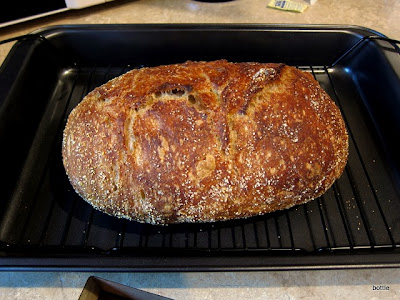
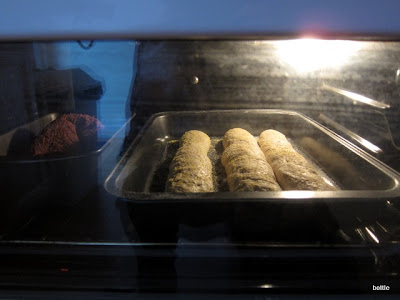
Baked with cover for 20 min and without for 10 min (at 450F).

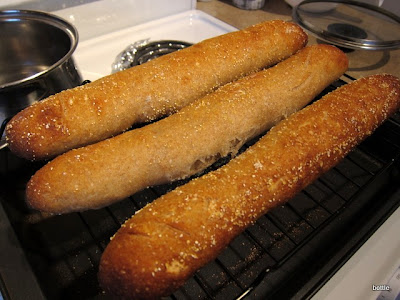
I knew it's a success when I took them out.

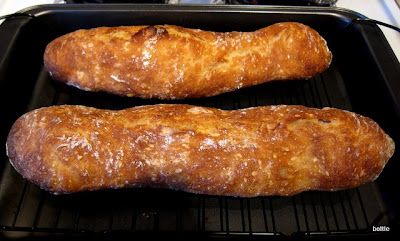
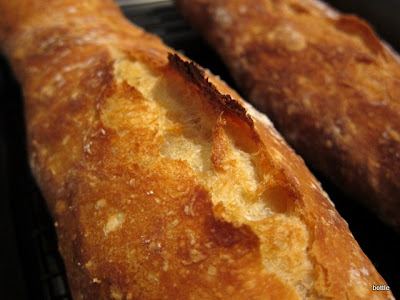
The bottom was very dark (Question 3).
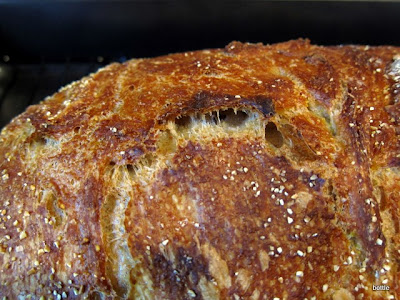
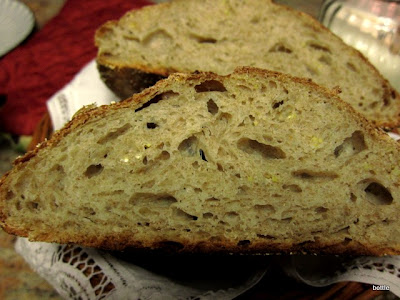
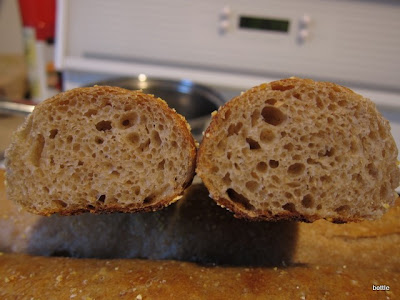
 

The crumbs

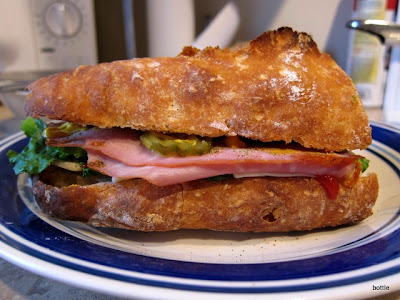
Very nice for sandwich for today's lunch

Thoughts & Questions

Lahey's "cover" method is easy to succeed even for a newbie. No matter what kind of tools you use for the cover, it works. I wish I can find a way to create enough steam in my oven. Before that, his method is the best I can get.

Question 1: How do you handle a very wet dough? Maybe I didn't put enough flour on the surface? Is it not a good idea to use chopping mat even sprayed with flour?

Question 2: This recipe (Stirato) is different from the basic no-knead bread. For 2nd rising time, Lahey calls 30 min for Stirato but 1-2 hr for the basic no-knead bread. Why is that? I didn't get the double volume for 40 min but I went ahead to bake anyway.

Question 3: The bottom of the bread came out very dark and thick. How can I make it not so dark?

bottleny's picture
bottleny

This was my first time to use oven to bake bread (before used bread machine). I had been wanting to try the no-knead bread receipe since it came out in 2006.

I followed the original receipe but tuned it to suit my case. Since my order of the digital scale hasn't arrived, I could only use volume to measure the quantities:

  • 3 Cup flour (2 AP + 1 WW)
  • 1 5/8 tsp salt
  • 3/8 tsp active dry yeast (direct into the mix)
  • 1 5/8 Cup filtered water

After mixing, it looked pretty sloppy.

Then went back to look at the video and realized that it's 1 1/2C water used in the video. This dough was way too wet. Anyway, I still continued the process. Atfer two hours at room temperature, I put the dough (inside a plastic bag) into the fridge.

Here are a series of photos of the long cold-fermentation process.

With another hour at room temperature (total 58.5 hr), I streched and folded the dough. It's so wet that even with plenty flour it's very difficult to handle the dough.

I let it sit for 15 min and then transferred it onto a kitchen towel with flour & cornmeals. Covered for 2.5 hr for the 2nd rise. The dough did rise quite a lot (but in a flat round shape).

When I tried to put it into the big stainless stew pot (preheated in the oven at 500F), I couldn't let it slide into the pot. The dough was so wet that it sticked to the towel. I tried to use the chopping mat but it still sticked to that. In the end, I had to scrabed the dough down.

I was worried that this might delate the dough quite a lot. But when I removed the cover after 30min, I noticed the bread was all right. So happy that I forgot to lower the oven temperature to 450 until 8 min later. I let it baked at 450 for another 8 min before took the bread out.

It looked not bad right? Initially I shaped it into a round "disk" (it's too soft to be shaped into a ball), but it became oval when I tried very hard to let it slide into the pot. I even slashed the dough but it's all gone during that process.

Look at this caramalized crust!

I brought this bread for the Thanksgiving dinner at my supervisor's house. I had the honor to cut my bread and took the picture.

When I saw the crumb like that, I knew it's going to be good. And indeed, it's very chewy inside! I was very proud of my bread. Well, for a newbie, this was a big success.

If I didn't have the trouble of sliding this extremely wet dough into the pot, the bread would likely rise higher than the above.

I estimate the hydration in my dough was around 90%, much higher than Mark Bittman's in his later note (80%). Next time I would definitely lower the water amount. I would like to try no-knead bageutte. :-)

inabech's picture

No-knead bread in LeCreuset Pate Terrine Pan

October 11, 2010 - 5:57am -- inabech
Forums: 

I am being gifted with a cast iron LeCreuset Pate Terrine pan.  It is approximately 4" x 12" x 3" and holds about 1.5 quarts.  I am hoping to make no-knead breads in this lidded pan.  i am relatively new to bread baking and no-knead breads.  So far I have tried the Cook's Illustrated Almost No-Knead bread, the Artisan in Five no-knead and the Leahey NYT No-Knead Breads.  I have baked them in the LeCreuset Dutch Oven and the Emile Henry Dutch oven pans.  Since there are only 2 of us, the resulting breads are too big to consume before getting stale: hence the terrine pan idea.

RobertS's picture
RobertS

I use three enamelled pots with cast iron cores (each is 3.5 qt. size, one round and two oval) frequently now in my bread baking---all three fit nicely into my oven at the same time--- and am delighted with the perfect crust and crumb this Lahey method delivers unfailingly. And for superior taste, I always employ a 24-48 hr+ initial cold refrigerator ferment,  using ice cold water (77%), instant yeast .7%, table salt 2%, and 100% unbleached Canadian white all-purpose flour. On a stack of Bread Bibles, I solemnly (if immodestly) swear my Lahey Cold Pot Bread has no equal in the land, or in heaven for that matter.

But in my opinion the method Lahey suggests for proofing and "loading" the dough into the pot is fraught with unecessary difficulties. He suggests proofing on a wheat bran-sprinkled tea towel, and then inverting this "package" and plopping it unceremoniously into the hot pot. (In the Bittman video he looks like a farmer dropping a boulder off the top of his barn). The problem is, the very wet dough looks like a wayward handful of jello, and is liable to get out of hand, literally. Furthermore, the odds are good that this very wet dough will stick to the tea towel just as you are about to upend it. The result can be a less than perfect crust and less than perfect crumb structure.

The solution I came up with does not involve using parchment paper. (I hate putting that stuff in my pots).

1. Lightly oil the bowl in which you proof the dough, and then sprinkle  wheat bran into the bottom. Cover with towel and when proofing finished, sprinkle more wheat bran on top of dough.

2. When oven is heated, take pot out and place on stovetop. Close oven door quickly. Remove lid.

3. Using gloved hand, tip pot over toward stovetop. Using other hand, roll dough from bowl into the pot using a quick, decisive wrist turn.

You will find the dough goes into the pot very, very gently, with the top of the proofed dough now on the bottom of the pot, with your carefully-nurtured gluten structure undisturbed.


breadbakingbassplayer's picture
breadbakingbass...

Hi All,

Just wanted to tease you a little with what I'm working on right now. 

100% Hydration 100% Whole Wheat No Knead Bread

Ingredients:

450g WW (Gold Medal)

50g Malted Barley Flour

100g Firm SD Starter (60% hydr)

500g Water

10g Kosher Salt

1/8 tsp ADY

1111 Total Dough Yield


Process

3:15pm - Mix all ingredients in large mixing bowl with wooden spoon, cover let rest.

4:40pm - Turn dough using French fold method in bowl with wet hands, cover let rest.

5:20pm - Turn dough, cover and let rest.

6:45pm - Turn dough, cover and let rest.

7:35pm - Turn dough, cover and let rest.

9:00pm - Shape dough as follows: flour linen lined banneton with WW flour.  Turn dough in rising bowl with wet hands using reverse letter fold so that smooth side remains on top.  Transfer dough floured side down into banneton, place banneton in large plastic bag to proof.  Arrange baking stone and steam pan in oven, preheat to 550F.

10:00pm - Try to turn the dough out onto peel but dough sticks majorly to banneton...  I manage to scrape it out onto the peel and shove it in the oven...  I get a little bit of oven spring, but it's pretty much a pancake...

10:45pm - it's out of the oven now.  I'll cut it open tomorrow morning, but I don't have high hopes for this one...

Verdict: Fail for now...  I'll try something tomorrow...

Tim

aturco's picture

Crust/Film forming on No-Knead Dough

January 18, 2010 - 10:35am -- aturco
Forums: 

Happy 2010 all...

I am back to making bread again in the colder months. I like making the no-Knead bread, its quick and easy. However lately, when I let it sit overnight the top of it forms a hard crust, I dont remember this forming when I made it last year. I am using GM all purpose flour, I put it in the over w/ the light on covered either with plastic or a dish towel.

Any suggestions would be greatly appreciated.

Thanks

Alex

Pages

Subscribe to RSS - no-knead bread