The Fresh Loaf

A Community of Amateur Bakers and Artisan Bread Enthusiasts.

maggie glezer

baybakin's picture
baybakin


Sourdough Pizza: (Based on Maggie Glezer's Pizza Napoletana crust)

I've fiddled around with this recipe quite a bit, finding the right amount of levain and durum to suit my tastes, and here's what I have settled on.  The key to the big bubbles and flavor is a minimum 24 hours in the fridge, maximum 3 days.  There's lots of instructions on how to make good pizza in a home oven, my setup is as follows: Stone on the bottom of oven (gas in my case), pre-heated at 550F for an hour.  Pizza goes in on parchment, when the crust just starts to get toasty looking I put the broiler on until the top bubbles just begin to char.

150g Levain (100% hydration)
255g Water (room temp)
100g Fancy Durum Wheat Flour
325g Unbleached Bread Flour
10g Salt

Mix all ingrediants together until a rough dough is formed, let rest for 30 mins.
Kneed until smooth, rest on bench for an hour.
Divide into two equal pieces, form into balls.
Wrap in oiled plastic.
Place in fridge for 24-72 hours.

Take dough out of fridge at least one hour before baking.

Hope it works for others as well as it has worked for me.


FlourChild's picture
FlourChild

This is my first go with Maggie Glezer's Pandoro (from Artisan Baking), and all things considered I'm quite pleased with it.  There are two amazing things about this bread.  The first is how something with that much sugar and butter can be so light and ethereal-  I'm stunned by the texture.  The second is the balance of flavors.  It doesn't come across as too eggy, it doesn't taste only of butter or vanilla, and it isn't obviously a sourdough.  But put them all together in just the right balance, and they add up to a beautiful, rounded, perfumed and complex flavor.  I was so very happy when this bread was baking, I don't think I've ever smelled something quite that good from my oven.

The dough largely followed the schedule in the book, with the exception that the first build took about 50% longer (6hrs vs 4) than it was supposed to, but I attribute that to my tendency to feed starters a little too early, so it needed a bit of time to catch up.  Once it did, the rest of the stages proceeded right on time.  I used my folding proofer set at 78F.

The only other issue I had was that my paddle attachment was just not capable of mixing this super-sticky yet strong dough.  I have a KA 600, and this dough only worked when I switched to the dough hook.  With the paddle, it just wrapped around and would not come off for anything, not with a spatula, not with high speeds.  I finally had to slice it off with a sharp knife.  

I used a large tube pan (16 cups capacity) instead of two eight cup pandoro molds, as I wanted to see how the bread was before buying more pans.  Looks like I'll be in the market for some star-shaped molds this season:)  

The final proof takes the dough up by more than quadruple, from the picture above to the one below.  Not bad for a naturally-leavened bread with just 0.2% yeast.

I don't want to post Maggie Glezer's recipe, but Artisan Baking is a lovely book to read or check out of the Library.  This bread was the reason I made a starter last year, and though it's taken me a while to collect all the ingredients (like cocoa butter, high-gluten flour and osmotolerant yeast), I'm glad I finally got around to making it.  

The top is prettier than the bottom, if I make it in the tube pan again I think I'll keep it right side up.

The ethereal crumb, so soft and light.  It even had a bit of shreddability.  Next time, I'll try a bit longer/slower mixing to see if I can get more shredding.

This would be the perfect seasonal viennoiserie for anyone who isn't crazy about the fruit in a panettone, or who appreciates light textures.  The bread has 17% of its flour pre-fermented, more  than 42% butter/cocoa butter, 0.2% osmotolerant yeast, 68% eggs/yolks, more than 41% sugar/honey, and hydration of 73% (taking into account the water content of eggs, honey, butter, etc.).  

davidg618's picture
davidg618

My wife loves focaccia. One of her favorite snacks is a naked piece of focaccia topped only with its pre-bake sprinkling of coarse sea salt.  We've been making focaccia for about a decade, using a bread machine recipe, and our Zo on dough cycle. Once fermented, I'd stretch the dough onto a half-sheet pan, and bake it in the oven. Here's a link to a focaccia bake I posted in the first month after I'd joined TFL.

http://www.thefreshloaf.com/node/11810/bread-machines-you%E2%80%99ve-come-long-way-baby

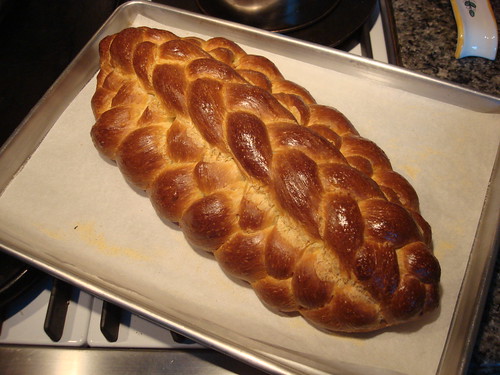
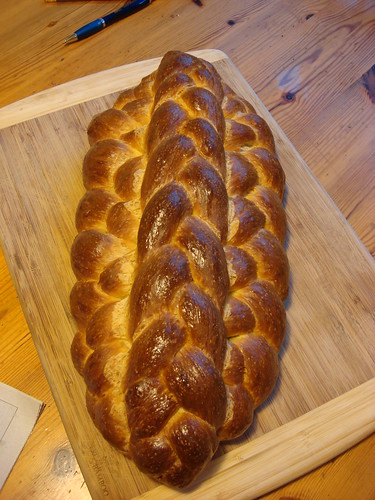
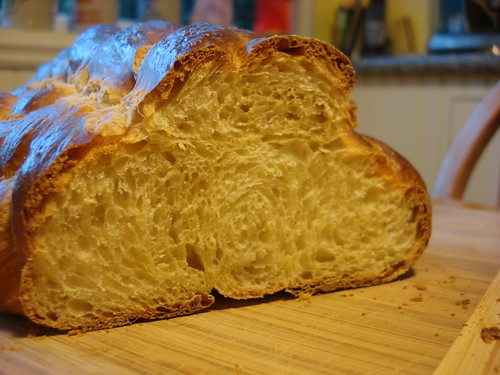
Shortly, following I became obsessed with sourdough, baguettes and, to a lesser degree, challah. That trinity has kept me busy for the past three years, and although we didn't abandon our bread machine dough making, we only use it routinely for tried-and-true sandwich bread dough, and on occasion the reliable, but uninspiring focaccia which we also like for sandwich making.

Now, reasonably certain I can produce a satisfactory loaf of any of the trinity, my curiosity has turned to reexploring other bread styles.  My thoughts had settled on either ciabatta, or focaccia when my wife settled the matter, asking for focaccia. When questioned, she allowed she wanted it mostly for sandwiches. At that momemt I decided I'd bake focaccia buns, in lieu of the usual single flat rectangle.

I first considered making the well-known, and safe, bread machine recipe and incorporating an overnight retarded bulk fermentation, striving for additional flavor. However, searching further I found Maggie Glezer's formula for Acme Bakery Herb Slabs: a styleized focaccia in her Artisan Baking book. She had adapted Acme's four-hour poolish to an overnight twelve-hour poolish, finishing with a making the dough and subjecting it to an approximately six-hour bulk fermentation, with early S&Fs, at room temperature.

I've become an advocate for overnight retarding at low temperature (54°F) so I planned an eight-hour poolish, followed by mixing the dough (DDT 54°F) and invoking a fifteen-hour retarded bulk fermentation, with early S&F.  I followed Ms. Glezer's ingredient ratios to the letter, with two very small variations: 1.) I used Instant Dry Yeast, mixed directly into the poolish flour (1/8th tsp) and the final dough flour ( 1/4 tsp), and 2.) I made the poolish hydration exactly 100%. Ms. Glezer specifies a main water ingredient amount that yields a hydration of 98%, and some manipulation of the yeast in  1 cup of water--only a quarter of a cup of the yeasted water is used--resulting in 1/16th tsp of yeast, and additional grams of water, which leads to 118% poolish hydration. This percentage is annotated parenthetically after the main water ingredient as "(eventually 118%)". Frankly, I didn't understand all this unusual baker's math at the time I was mixing the poolish. Using the K.I.S.S. principle I simply made it 100%. Only, now writing this blog, did I piece together her instructions. Oops! 3.) I also left out the herbs--intentionally.

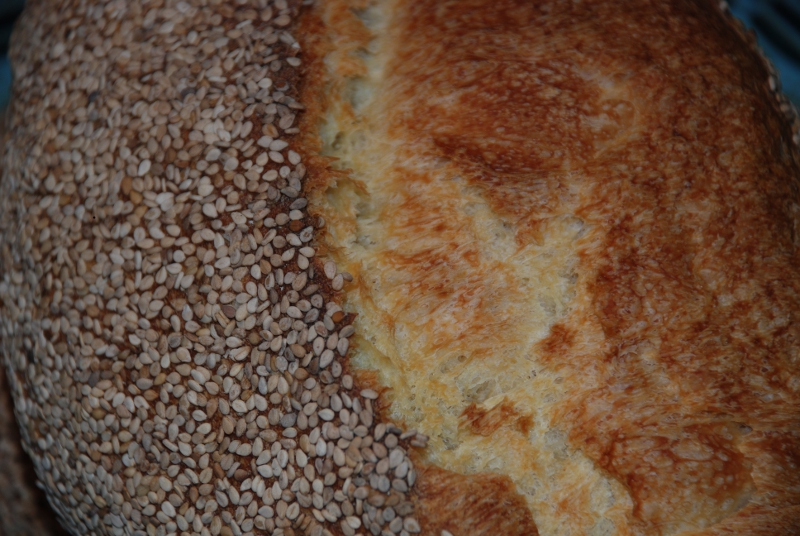
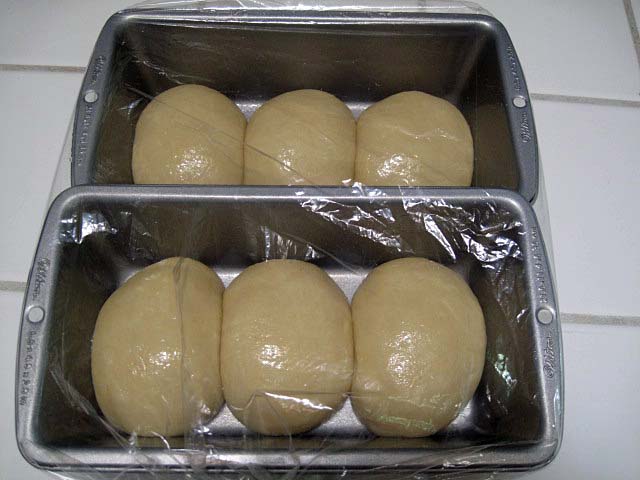
When I retrieved the dough in the morning, after 15 hour bulk fermentation, it had tripled in volume. I turned it out, degassed it, and pre-measured 4, 180g; 2, 120g; and 1, 270g dough pieces. These corresponded to 4 large oval baking dishes, 2 small oval custard dishes, and 1, 8"x 8", square baking pan. I preshaped the dough into balls, and let them warm in the proofing box (82°F) for 1 hour. After panning I brushed the tops with a generous coating of olive oil. After proofing I poked finger-holes in the top and sprinkled two large ones, the two small ones and the square with coarse sea salt, the remaining two large ones with black pepper and grated parmesan.  I baked them at 425°F for twenty-two minutes (Convection mode). I didn't use steam, thinking the loaves, coated with olive oil wouldn't benefit. I've also found salt begins to dissociate in steam.

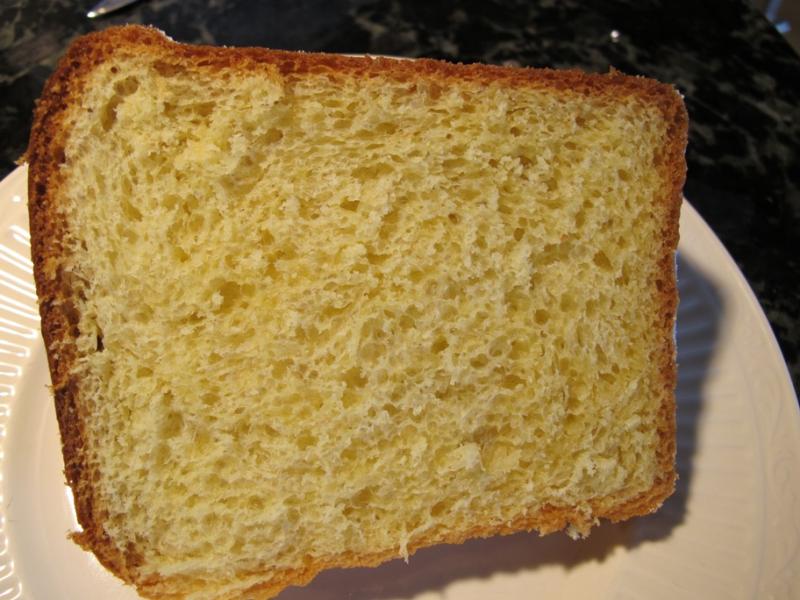
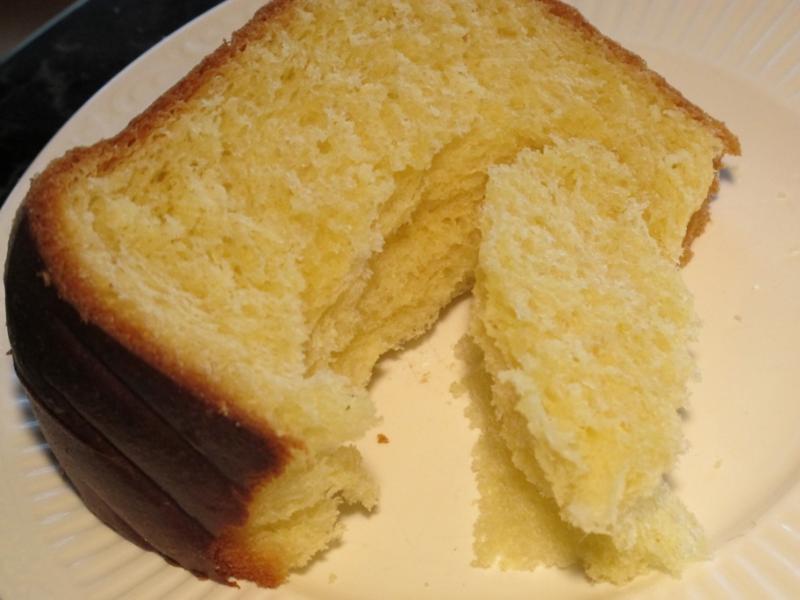
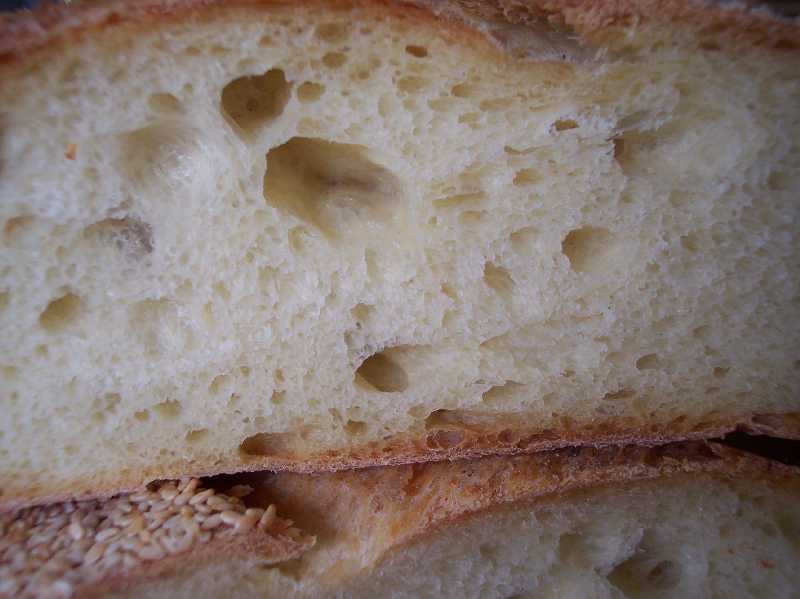
This dough was wonderful to work with (although slightly sticky), however, my not understanding the directions resulted in a dough that was 62% hydrated. Had I followed directions correctly the the dough's hydration would have been 75%, and I would have had a crumb very different than what I got (and a much sticker dough). Nevertheless, not all mistakes lead to bad results. This crumb is more than acceptable, for us, in a sandwich bun, and the flavor is excellent.

I'll make these again. I will likely increase the dough hydration, but probably only to 68%, the same hydration I now typically use for baguettes. This dough, with the exception of 6% olive oil, is essentially the same as the baguette dough I make in both ingredients and handling. I achieve a very open crumb in baguettes, not a crumb I especially like in a sandwich bun. Subsequently, I'll raise or lower the hydration as it fits our tastes. I also will experiment with using the baking dishes and custard dishes as bannetons, and bake the unpanned loafs on the baking stone. I had to use two racks for this bake, which gave me a two differing browning depths and patterns.

David G

varda's picture
varda

Some time ago Franko did a great post on Tom Cat's Semolina Filone.   I pretended to make it but in fact I didn't because I used starter instead of poolish and whole durum instead of extra fancy.   Now following Karin's excellent no-discrimination policy I decided to cook from books lying under my nose, and what book could be greater (or more underutilized by  me) than Maggie Glezer's Artisan Baking.    This time I followed directions to the letter (see page 124.)  This bread is so good that someone should post on it every few months or so.   With this post, I've done my part.   

Bonus bread lessons:

1.  Different flour,  different bread.

2.  If you bake bread from a formula without following directions you haven't yet made that formula. 


dmsnyder's picture
dmsnyder

The Basic Country Bread from Tartine Bread is among my favorites, but I haven't baked it in a while. After my positive experience with Central Milling's "Organic Fine Whole Wheat" flour used to make the whole wheat bread from BBA, I wanted to try it in the Tartine BCB. In summary, it was wonderful.

I shaped the loaves as bâtards and proofed them in cotton-lined brotformen. They were baked on my baking stone with my usual steaming method, rather than in cast iron dutch ovens. My starter was very frisky this weekend, and the loaves got somewhat over-proofed. The bloom suffered, but I got great oven spring and the crumb structure was nice. The crust was crunchy, and the flavor was delicious as always. 

I have made Maggie Glezer's "own" challah in the sourdough version several times. (See Sourdough Challah from "A Blessing of Bread") I really like the mild sourdough tang on top of the honey sweetness and eggy richness of this bread. Today, for the first time, I baked the challah as pan loaves. I decided to do this both to save a little time - this recipe requires a good 9 hours all together on the day the bread is baked - and because my plan was to use the bread for toast and french toast.

I divided the dough into six equal parts and shaped each as a round. Each pan got three rounds. When I was a child, the local Jewish bakery made what they called "egg bread" in this shape. I don't know if they used the same dough they shaped as braided challot, but the recipe for egg bread in Greenstein's Secrets of a Jewish Baker is less enriched than his challah.

The 470 g of dough in each pan turned out to be too little to fill the pans after the dough had tripled in volume. Consequently, the profile of the loaves is less high than what I had intended, even with very good oven spring. Otherwise, I count this a success.

Happy Baking!

David


dmsnyder's picture
dmsnyder

You can go nuts trying to find the perfect pizza dough formula. The cookbooks and the web are full of recipes for various types of dough and full of opinions regarding the type of flour to use, the ingredients (beyond flour, water, salt and yeast) and the mixing and fermentation methods that work best.

My goal for today was what I understand to be classic pizza napoletana. The dough should consist of the four basic ingredients only – no oil, sugar, malt or other stuff. The crust should be very thin and crisp on the bottom, not soft or soggy. The toppings should be minimal, so the crust is the main attraction.

After reading through many, many recipes, I settled on the one in Maggie Glezer's “Artisan Breads.” It uses the 4 ingredients only. It is for a Naples-style pizza. It is credited to Emanuele Leonforte of Hosteria restaurant in Port Chester, New York.

Leonforte uses a mix of Doppio Zero and high-gluten flour that Glezer calculates as resulting in about 12.5% protein. He uses a remarkably short mix. He ferments the dough for a long time but only once. Glezer gives the option of retarding the dough overnight and fermenting it the next day, and that fit best with my schedule. The method I used is described below.


Ingredients

Wt.

Baker's %

KAF Bread Flour

500 g

100

Instant yeast

1/4 tsp

0.2

Salt

10 g

2

Water, lukewarm

330

66


Method

  1. Measure the flour, yeast and salt into the bowl of a stand mixer and mix them.

  2. With the dough hook in place and the mixer at slow speed, gradually pour in the water.

  3. Mix until the dough forms a ball and cleans the side of the bowl, about 3 minutes.

  4. Cover the bowl and let the dough rest for 10-15 minutes.

  5. Mix the dough at Speed 2 for about 3 minutes. It should be fairly smooth but will not pass the window pane test.

  6. Transfer the dough to a lightly floured board and divide it into 4 equal pieces of about 200 g each (to make 10 inch pizzas).

  7. Shape each piece into a tight ball.

  8. Place each ball into a 1 qt Ziploc bag with a tablespoon of olive oil. Roll the ball in the oil and seal the bags.

  9. The dough can be refrigerated overnight, frozen for later use or allowed to ferment at room temperature for 5 to 6 hours for use the same day. (I refrigerated two balls and froze two.)

  10. For refrigerated dough, remove it to room temperature 3-5 hours before you plan on making the pizza, depending on room temperature.

  11. An hour before baking, pre-heat the oven to 500ºF (or more, if possible) with a baking stone on the middle shelf.

  12. Remove one ball at a time from its bag and shape into a 10 inch round by your method of choice.

  13. Top the pizza as desired, immediately transfer it to the baking stone, and bake for 8-10 minutes until done. Repeat for additional pizzas.

The toppings I used for each pizza were:

  1. Brush the entire surface of the shaped pizza dough with olive oil.

  2. Sprinkle with a tablespoon of finely chopped fresh rosemary.

  3. Sprinkle with a large clove of garlic, sliced very thin.

  4. Distribute on the pizza a cup of cherry tomatoes, halved, cut side up or a cup of fresh roma tomatoes peeled, seeded and cut into quarters.

  5. After baking, optionally top with fresh arugula or basel leaves.


Pizza with Cherry Tomatoes, pre-bake

Pizza with Cherry Tomatoes, baked

Pizza with Roma Tomatoes, pre-bake

Pizza with Roma Tomatoes, baked

The results were wonderful! The dough stretched easily to paper thin without tearing and baked so crisp there was no sagging when a slice was help up by the corona. Biting into it was a noisy crunch. The flavor of the crust was delicious. The whole experience sold me on minimalist toppings.

Pizza bottom crust

Thin crust

Crust

I don't think adding a few capers, or olives or mushrooms would do any harm, but I don't think making pizzas with heavy saucing, lots of cheese or lots of anything will be tempting again.

 The pizza was a nice follow-up to last night's bruschetta.

Bruschetta with fresh funghi porcini and with tomatoes and basel

David

Submitted to YeastSpotting

dmsnyder's picture
dmsnyder


Pan de Horiadaki

Maggie Glezer describes this Greek Country Bread as the “daily bread” of the Jewish community of Thessaloniki, almost all of whom were deported to Auschwitz by the Nazis during WW II. Glezer got the recipe from Riva Shabetai, who was a Holocaust survivor. Thessaloniki is currently the second largest city in Greece. It was settled by Jews expelled from Spain in 1492 and thrived for almost 500 years. Its culture had many Spanish influences in language, cuisine and customs.

The dough is 67% hydration and is enriched with sugar and olive oil. It is formed into boules, then, after bulk fermentation, it is proofed and baked in oiled cake pans, a technique I have not seen used except with Greek breads. Glezer provides both a yeasted and a sourdough version of Pan de Horiadaki. I made the sourdough version. The method is remarkable in that the bulk fermentation is short relative to the proofing time.

Levain

Wt.

Bakers %

Firm starter

30 g

22

WFM Organic AP Flour

135 g

100

Warm water

80 g

59

Total

245 g

181

  1. Disperse the starter in the water, then add the flour and mix until fully incorporated.

  2. Ferment at room temperature for 8-12 hours 

Final dough

Wt.

Bakers %

WFM Organic AP Flour

875 g

100

Warm water

595 g

68

Salt

20 g

2

Olive oil

30 g

3

Granulated sugar

30 g

3

Levain

170 g

19

Total

1720 g

195


Method

  1. The night before baking, mix and ferment the levain.

  2. Mix the flour and water and autolyse for 20-60 minutes.

  3. Add the starter in pieces and mix at Speed 2 until the dough is smooth for 10-15 minutes. The dough should clear most of the sides of the bowl after about 5 minutes. If needed, at 1-2 T of flour.

  4. Add the salt, sugar and oil and continue mixing until fully incorporated. The dough should be sticky but smooth and should yield a nice window pane.

  5. Transfer the dough to a lightly oiled bowl and ferment, covered, for 2 hours. (I did a stretch and fold in the bowl after 1 hour.)

  6. Oil two 8-inch cake pans generously with olive oil. (I did not have two 8 inch pans, so I used 9 inch pans. As a result, I'm sure my loaves were flatter than if proofed in the smaller pans.)

  7. Divide the dough into two equal pieces and form each into a tight boule.

  8. Roll each boule in the oiled pans and leave them, seam side down, in the pans.

  9. Cover the pans with plasti-crap or place in food safe plastic bags.

  10. Proof for 5 hours or until tripled in volume and risen above the pan sides. Glezer says to proof until the dough stays indented when poked with a finger. This was at 3 hours for me.

  11. An hour before baking, pre-heat the oven to 500ºF.

  12. Bake at 400ºF for 50-55 minutes until deeply browned. Rotate the pans, if needed for even browning, after 35 minutes.

  13. Remove the loaves to a cooling rack, and cool completely before slicing.


Pan de Horiadaki crumb

Note the dull (not shiny) crust. This is from baking without steam, as Glezer specifies. I personally prefer a somewhat shinier crust, so I may bake this bread with steam next time.

The crust is relatively thick from the long bake and very crunchy. The crumb is chewy. The flavor is exceptional, enhanced I'm sure by the sugar and olive oil. There is no detectible sourdough tang, just a sweet, wheaty flavor. I expect this bread to make outstanding toast and sandwiches, but it is delicious just as is.

Note to brother Glenn: If you liked the other Greek bread I made, you will love this one. I don't suppose it would be a crime to coat it with sesame seeds either, but the flavor is so nice as it is, it would be almost a shame to mask it with other strong flavors.

David

Submitted to YeastSpotting

varda's picture
varda

Ever since Franko posted his semolina filone I've been wanting to try it.   But I didn't want to follow Maggie Glezer's directions (recipe on p. 124 of Artisan Bread) completely since I wanted to adapt it to use a starter instead of a Poolish.    I also didn't have access to fine durum flour - just the big bag of Atta that I hauled home last week.   I have made a few tries at it - today's was my third.    It is the sourest bread I have made recently, with no change to my starter, so I assume it is a function of the fermentation of the durum.   The hardest part seemed to be to get proper opening of the scores.   I think I finally got it.   It wasn't any one thing - just getting a hang of the dough and making small changes to the formula.   The difference in flours meant that Franko's experience - particularly how much water required - didn't match mine.  

Perfect for an afternoon snack.

Formula - with 66% hydration starter 97% white, 3% rye.

Semolina Filone    
5/30/2011    
  Final Starter Total 
Atta Durum300 30057%
Bread flour10011921942%
Rye 551%
Water2608234265%
Starter205  24%
Salt10 101.9%
   875 


Mix all but salt.   Autolyze for 30 minutes.  Add salt.   Bulk Ferment for 3 hours with 2 stretch and folds.   (I didn't do mine evenly because of outages.)   Shape and dust with flour.   Place seam side up in couche.   Proof for 50 minutes.   Spritz with water and sprinkle sesame seeds.   Score down center flat to counter.   Bake at 400F for 20 minutes with steam, 25 minutes without.

Franko's picture
Franko


A few weeks back I went looking to find a source for Fancy or Extra Fancy Durum flour here in B.C. or Western Canada but drew a complete blank with all my usual local retailers. Durum Atta flour for chapatti and other Indian baking is readily available but the x-fancy is nowhere to be found...at least for now. Fortunately breadsong http://www.thefreshloaf.com/user/breadsong  was able to give me a hand and put me in touch with one of her contacts at Giusto's in San Francisco who was quite happy to fill my 1 bag order. The shipping cost was fairly steep, but now at least I had 25lbs of beautiful, finely milled durum flour that I could use while I try to source something a little closer to home. One of the several breads that I wanted the flour for is a recipe from Maggie Glezer's 'Artisan Baking' called Tom Cat's Semolina Filone. David Snyder as well as many others on this forum have posted on it, but it was David's post of his bake of this bread that really inspired me to give it a try. Link to David’s post below:

http://www.thefreshloaf.com/node/8114/tom-cat039s-semolina-filone-maggie-glezer039s-quotartisan-breadsquot

I won't go into a step by step of the procedure since David has already covered that thoroughly in his post, with our methods and experiences with the dough being almost identical. The one notable difference being that I didn't find I needed to add any extra flour because of the dough being “gloppy” during the initial mixing. This may be because I was using a blend of Canadian AP and Bread flour, likely with a higher gluten content than the KA-AP that David used.

This is a really nice dough to work with and an easy mix by hand for the quantities given in Glezer's formula. After a 3 hour bulk ferment the dough is soft, supple, and very extensible with it's 33% prefermented flour from the poolish allowing for easy molding. Very similar to a baguette dough I thought, and something I'll try molding this dough as in future mixes. There will certainly be future mixes since this is a great tasting bread in all respects. I love toasted sesame seeds, so any bread covered in them is going to taste wonderful to me, but the crumb and crust just on their own work perfectly together, creating a good crunch from the crust with, to borrow one of David's terms, a nutty flavour. I didn't notice the nut flavour so much in the crumb as he did, rather I found a very slight acidity highlighting the mixed grain flavours. I know that several folks on this forum have noted the lack of flavour that durum flour has but whatever contribution it makes overall to this formula surely must be positive. The texture of the crumb is almost feathery soft but has good chew somehow as well, which surprised me. Again, possibly a factor of the flour combination used in this mix, and not something I'd want to change in future mixes. This bread being a natural for open faced sandwiches with fresh tomato and cheese or dry salami and pepperoncini with a little EVOO drizzled over, that's exactly what I had for a very enjoyable lunch this afternoon.

Franko


Brot Backer's picture
Brot Backer


Hello to all you Loafers!

This is my first blog entry and I thought I'd start out with my second most recent endeavor (I made sourdough bagels but didn't take any pictures!). I'd like to give a little preempt by saying that I am only slightly Jewish by blood and an Atheist at heart. That being said, if you have any Jewish blood or get Anthropological hard-ons, purchase Maggie Glezer's A Blessing of Bread NOW! This book is filled to the brim with traditional but well tested/formulated recipes and all the stories, traditions and techniques that go with them.

As soon as I opened this book I would be baking a lot from it and the real challenge was to decide which recipe to try first, as you can see I choose one the the numerous Challah recipes and being a sourdough sucker I landed her My Sourdough Challah recipe.


This recipe is a winner! The one thing that a wild culture really adds to this recipe is the extra oven spring achieved that allows for this nice tears along the braids, it's one of the few loaves that have made my jaw drop. For the sake of full disclosure, I've been professionally trained as a baker and have made Challah before but those recipes were either too high hydration or fermented to quickly with too little oven spring in order to achieve those distinct braids.


I did make 1.5 adjustments to the recipe and they were to replace some of the whole eggs called for with yolks and half of the oil with olive oil. I did this for color, added richness and to avoid that eggy flavor that comes with the whites (just not my cup o' joe). The results were wonderfully yellow tinted crumb that was soft and just begged for a little of that naughty butter as well as making incredible toast.


The flavor was a perfect blend of rich and savory, using a natural levain really didn't add a tang so much as it amped up the flavor profile of the wheat to balance the eggs, sugar and oil. From beginning to end this dough was a pleasure to work with and I encourage you all to buy this book if you haven't!


I am submitting this to Yeastspotting

http://www.wildyeastblog.com/category/yeastspotting/ 


Pages

Subscribe to RSS - maggie glezer