The Fresh Loaf

A Community of Amateur Bakers and Artisan Bread Enthusiasts.

Lactobacillus

Lumpynose's picture
Lumpynose

I've been thinking about leavening and fermenting with bread making. The books I've been reading are Jeffrey Hamelman's Bread, Peter Reinhart's Whole grain breads and Artisan breads every day, and Chad Robertson's Tartine bread.

Both Peter Reinhart and Chad Robertson state that the sour flavor for a sourdough comes from the Lactobacillus sanfranciscensis bacteria, not from the yeast. The Lactobacillus produce lactic acid which makes the bread taste sour. This is what I call fermenting.

In a sourdough starter the wild yeast produces gas, and this is what I call leavening. Likewise, commercial yeasts provide leavening, except that they're faster than wild yeast and predictable.

When reading about bread making and pizza making, people use the word fermenting to describe part of the bread making process when I think what they really mean is a combination of both leavening and fermenting. It seems to me that fermenting is a catch-all word for a long rest period for the dough; for example, "bulk fermentation." Coming from the fermented vegetables background (for example, sour kraut, kimchi, and fermented pickles, where the vegetables are put in a brine solution for several weeks) I think of fermenting as the souring process from the Lactobacillus bacteria.

As an example of the terminology problem, in Hammelman's Bread, starting on page 13 he describes bulk fermentation but he mixes together the actions of leavening from the yeast producing gas, and fermentation saying that fermentation produces the superior flavors. He talks about the "production of organic acids during fermentation" without explaining how they're produced. He goes on to say that organic acids develop slowly and take hours before there are enough to benefit the bread's flavor. Nothing incorrect there, but things could be more carefully delineated and explained.

The same is also true for The Yeast Treatise at theartisan.net; fermentation and leavening are being conflated.

When describing bulk fermentation and the role of the temperature of the dough, one of the interesting things Hammelman says is that "the flavor components in the dough prefer temperatures lower than that required for maximum gas production." By "flavor components" I'm assuming he's talking about the Lactobacillus bacteria's activity. This no doubt explains how these no knead recipes work where you put the dough in the refrigerator for several days; the yeast activity is greatly slowed down while the Lactobacillus activity is slowed down to a lesser degree.

Back to the leavening side, if you're using a no-knead recipe where the bread sits for several hours and you do a stretch and fold periodically, you should do the stretch and fold gently, so that you don't squeeze out the gas that's in the dough from the yeast. This shows that leavening is occurring during the inaptly named bulk fermentation step.

For some people this may be hair splitting terminology. Before I retired I was a computer programmer and systems administrator and in that field it is crucial to always use the correct words (and not mash things together) when describing things. So I think this hair splitting is helpful for understanding the different things that are going on in the bread dough.

One new thing that I learned from Robertson's book is that for him a starter isn't just a starter; there are desirable starters and undesirable starters. An undesirable starter is one that's excessively sour. A desirable starter is one where the wild yeast is very active and the Lactobacillus is just getting up to speed, although he doesn't explain it that way and instead uses visual and olfactory clues (very bubbly and doesn't smell a lot).

Because the Lactobacillus are doing the fermenting and improving the bread's flavor and not the wild yeast, I think this is why bakers (for example, Peter Reinhart) get good results by using commercial yeast in addition to a sourdough starter. The starter is mainly seeding the dough with Lactobacillus bacteria for the fermentation and the commercial yeast provides the leavening. The starter may or may not have a good population of wild yeast, but in any event the commercial yeast produces a quicker and more predictable rise.

After thinking about this, one idea that I've had is that it should be possible to redesign the starter so that its recipe favors the Lactobacillus bacteria; the only yeast it needs is whatever is necessary to keep the Lactobacillus happy. Then, in the bread recipe, use commercial yeast for the leavening and use the starter for seeding the dough with Lactobacillus. I'm speculating that with the correct amounts of starter, yeast, and fermentation time that a good bread can be made. And probably without the long three day period that's currently necessary.

Rising times with commercial yeasts are undoubtedly well known and documented; for example, a percentage of yeast (using baker's percentages), a hydration range, and a temperature range will yield an appropriate rise in so many hours and minutes. Then, all that's needed is knowing how long of a fermentation period is needed for the Lactobacillus, how much Lactobacillus, at what temperature, etc. Matching the correct amount of yeast with the correct amount of Lactobacillus for a particular temperature, hydration, and period should yield a good loaf of bread.

All that's needed is for some enterprising food scientist to culture and dry Lactobacillus so that in addition to buying instant dry yeast we can also buy instant dry fermentation.

sortachef's picture
sortachef

If you’re anything like me, you’ve got a few sourdough starters lurking in your fridge. One I made from organic California grapes lovingly teased into fruition over 10 days some years ago. Another from rye flour that naturally ferments. And last fall’s brainchild, made from mountain berries plucked at 3600 feet. That last one yielded 6 lovely loaves and then promptly went into a funk.

But I’m going to be honest here: I don’t use any of my starters in this recipe. Every one of those starters is finicky and unpredictable at best, and when it comes to making bread, reliability is the key. So I’ve come up with a method that yields great sourdough loaves in a 3-day process. Very little attention is necessary until the third day, and the results are amazing. If you don’t have a woodfired oven, instructions on baking in a conventional oven are included as well. Go on, relax and make some sourdough!


Woodfired Sourdough Bread


Make 3 loaves, 23 ounces each


For the Starter:

2/3 cup rye flour

2/3 cup unbleached all-purpose flour

¾ cup cold water

1 teaspoon active dry yeast

Mix these together in a large bread bowl with the handle of a wooden spoon, scraping the sides clean as you go. Cover with a clean dish cloth or a loose-fitting lid and let rise in a cool place (55-60° environment) for 12-14 hours until frothy. I do this step in the early evening and let it go overnight.


First replenishment:

½ cup rye flour

½ cup unbleached all-purpose flour

3/8 cup cold water

Add these to your starter to ‘feed’ it in the morning. Scrape the sides again, put on a loose-fitting lid or a piece of plastic wrap and let it sit in a cool place for another 10-12 hours.


Second replenishment:

1 cup unbleached all-purpose flour

½ cup cold water

Feed the starter again, this time with wheat flour only. Let sit covered in a cool place for 10 hours or overnight.


Make the dough:  By morning, the starter should be bubbly and somewhat risen. It will also smell sour, which is the smell of active lactobacillus fermenting in the mix. This is good. Now add to the starter

2 cups of water at 105°

½ teaspoon of active dry yeast

4 cups of unbleached white bread flour (I use Pendleton Mills ‘Morbread’ with 12% gluten)

3 teaspoons of salt

2 Tablespoons of flaxseed meal (optional)

Mix the dough well, scraping the sides of the bowl to incorporate all the ingredients, and then knead for 10 minutes on a lightly floured surface. Return the dough to a clean bread bowl, cover and let rise for 5 hours at room temperature (68-70°).

Deflate the dough, turning it over as best you can and leave to rest for a further 1 to 1½ hours before shaping into loaves.

For Baking in a Woodfired Oven: For best results, bake this bread in an oven that has been heated for 2½ hours by a medium-sized active fire. In the last hour, move the fire from side to side to allow even heating of the floor tiles. After this time, move the active but non-flaming coals to the back, throw on a fistful of hardwood twigs and sweep the floor clean of ashes. Once the twigs have finished burning, you’re ready to bake the bread.

For Baking in a conventional oven: Line the center rack with quarry tiles or a pizza stone and preheat at 450° for at least half an hour. When the loaves are ready for baking, drop the heat to 400°.

Form the loaves / final rise: Turn the dough out onto a lightly floured counter and divide the dough into 3 equal pieces. (note: if using a conventional oven, you can only bake 2 at a time; put one of the pieces back into the bread bowl for another hour.) Form a ball with each piece by stretching the longest skin of dough across the surface and tucking it underneath.

Line 3 baskets with cloth napkins or dish cloths, and sprinkle generously with flour. Plop the dough balls into these, toss on a bit more flour, cover with the corners of the cloth and let rise for 1¼ hours in a warm place.

Once risen, turn the unbaked loaves onto either a wooden peel or the back of a cookie sheet sprinkled with cornmeal. Brush loaves lightly with an eggwhite mixed with 1 Tablespoon of water and slash as desired.

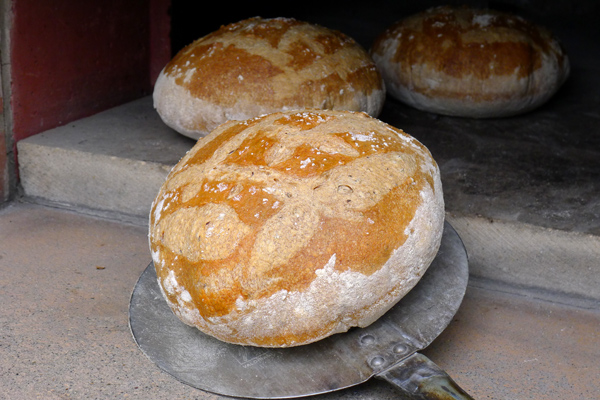
For Baking in a Woodfired Oven: Slip the unbaked loaves into the oven in a semi-circle about 12” away from the coals. Close the door all the way and bake for 1 hour, turning several times to bake evenly. Loaves are ready when the crust is medium brown.

For Baking in a conventional oven: Slip loaves 2 at a time directly onto the tiles or pizza stone. Bake for 20 minutes at 400°, lower the heat to 350°, and bake for another 40 minutes, turning the loaves as necessary to ensure even baking. Loaves are ready when the crust is medium brown.

See original publication and more photos at http://www.woodfiredkitchen.com/?p=2289

Copyright 2011 by Don Hogeland 

sharonk's picture
sharonk

I see a lot of sourdough starter recipes that call for commercial or dried yeast. For those of us who chose not to use yeast it is possible to create a starter without it. Before the invention of commercial yeast all sourdough starters and breads relied on the natural yeast in the air for leavening. I’ve made many successful wheat and rye starters with just flour and water. They fermented easily and made wonderful breads. After I learned I was gluten (and dairy) intolerant I tried to make gluten free starters using the same technique I had grown accustomed to for the wheat and rye breads: a 7 day sourdough starter. With gluten free flours 7 days did not work well. The starter turned a moldy shade of bluish green. I experimented, searched the webs and learned that gluten free sourdough needs to be fed 2-3 times a day unlike wheat/rye starter which can be fed as little as once a day.

I was able to create a brown rice starter in about 4-5 days using only brown rice flour and water but it smelled almost spoiled and the bread was unpleasantly sour. (one wonders why I would go forward and bake something that smelled almost spoiled, but I was determined to follow through so I could learn all the ins and outs of this) Someone suggested that I try a small amount of Water Kefir, a non-dairy fermented drink, to give the starter a boost. This made all the difference for me because it cut the fermenting time down to 3-4 days and never moldered. I have come to greatly depend on this success-every-time starter.

Fermented drinks are an important part of my diet. They have helped me repopulate my digestive system with probiotics and enzymes enabling me to fully recover from health challenges. Water Kefir culture is a colony of bacteria and yeast that, when fed sugar, creates lactobacillus into the liquid which then becomes available to us in the form of a drink. It can also be used to soak grains and beans before cooking. It then boosts the predigestion process that happens when grains and beans are soaked. It does the same for the flour in the starter making the finished bread more digestible. It also speeds the fermentation process.

Kombucha Tea is another fermented drink I make at home, that can be used to boost a starter, although I find the fermentation time to be slower than with the water kefir. For people able to eat dairy products, Milk Kefir or active Yoghurt could be used to boost a gluten free starter. Just add 2 tablespoons of any of these fermented products to your starter when first mixing it up. I save a bit of this starter to start the next batch and store it in the refrigerator. If I haven’t used it after 2 weeks I take it out, let it come to room temperature, feed it with rice flour and water, let it sit (and ferment) for 4 hours and store it back in the fridge. Creating a new starter with this bit of previously fermented starter cuts the fermentation time from 4 days to about 2 days!

I make a quart of water kefir at a time and use it to soak grains and beans before cooking. I also drink it in small amounts as a digestive aid before meals. It becomes effervescent and is very refreshing. I bought my first batch of water kefir culture for under $30 including shipping. With care these can last indefinitely and as they add probiotics into my diet I save money as I no longer need to buy bottles of probiotics.

Here are very succinct directions for making Water Kefir:

Nearly fill a wide mouth quart jar with water.

Add 2 tablespoons sugar, stirring to dissolve, 20 raisins and a slice of lemon or lime.

Add the contents of your bottle of water kefir grains into the quart jar.

Cover with a paper towel or cloth and secure with a rubber band. 

When raisins float to the top, scoop them and the lemon slice out and discard.

Ferment the water kefir for 6 more hours on the counter with the paper towel.

Then store in fridge and use as needed.

When you have used the liquid down to about an inch in the jar start a new batch in a new jar and pour the water kefir grains plus the liquid their in right into the new jar, cover and ferment.

You can order water kefir culture (as well as kombucha and kefir culture)  at www.culturesforhealth.com. They send dehydratedwater kefir grains with instructions for rehydrations.


Subscribe to RSS - Lactobacillus