The Fresh Loaf

A Community of Amateur Bakers and Artisan Bread Enthusiasts.

jeffrey hamelman

dmsnyder's picture
dmsnyder


One of my thoughts in purchasing a Brød & Taylor Folding Proofer was that I would be able to make Three-Stage Detmolder rye breads with more precise temperature control than I could otherwise achieve. After using this device for fermenting other starters, fermenting doughs and proofing loaves over the past couple of months, I my first rye by the three-stage Detmolder method employing the Folding Proofer this weekend.

My one previous bake of a Detmolder 3-stage rye was almost 3 years ago. (See: http://www.thefreshloaf.com/node/12742/hamelman039s-70-3stage-rye-sourdough) I do recall that bread as having a delicious, sweet, earthy, complex flavor. The bread I baked this weekend was the very similar 80% Three-Stage Rye from Bread. This bread has an hydration of 78%. 37.8% of the flour is pre-fermented.

As described by Jeffrey Hamelman in Bread (pg. 200), this method, developed in Germany, “develops the latent potential of a mature rye culture through a series of builds,” each of which optimizes the development of yeast growth, lactic acid and acetic acid production, respectively. The builds differ in hydration, fermentation temperature and length of fermentation.

Hamelman calls the three stages or builds “Freshening,” “Basic Sour” and “Full Sour.” The first build encourages yeast multiplication in a moist paste fermented at a moderate temperature. The second build is much firmer and is fermented for a long time at a relatively cool temperature to generate acetic acid. The third build is, again, moister, and it is fermented at a warm temperature for a short time. This build is to increase the lactic acid content of the sour. After that, the final dough is mixed.


Freshening

Wt (g)

Baker's %

Medium Rye flour

8

100

Water

12

150

Mature rye culture

4

50

Total

24


Ferment 5-6 hours at 77-79º F.


Basic Sour

Wt (g)

Baker's %

Medium Rye flour

100

100

Water

76

76

Freshening sour

24

24

Total

200


Ferment 15-24 hours at 73-80º F. (Shorter time at higher temperature.)


Full Sour

Wt (g)

Baker's %

Medium Rye flour

270

100

Water

270

100

Basic sour

200

74.1

Total

740


Ferment 3-4 hours at 85º F.


Final Dough

Wt (g)

Medium Rye flour

422

High-gluten flour

200

Water

422

Salt

18

Instant yeast (optional)

8

Full sour

740

Total

1810

Procedures

  1. Mix all ingredients 4 minutes at Speed 1 then 1-1 1/2 minutes at Speed 2. DDT=82-84º F. (Note: Hamelman's times are for a spiral mixer. If using a KitchenAid, I double these mixing times.)

  2. Bulk ferment for 10-20 minutes.

  3. Divide into 1.5-2.5 lb pieces and shape round.

  4. Proof about 1 hour at 85º F.

  5. Dock the loaves. Bake for 10 minutes at 480-490º F with steam for the first 5 minutes, then lower temperature to 410º F and bake 40-45 minutes for a 1.5 lb loaf and about 1 hour for a 2.5 lb loaf.

  6. Cool on a rack. When fully cooled, wrap in linen and let rest for at least 24 hours before slicing.

These loaves scaled to 807 g. After baking and cooling, each weighed 700 g.

Crumb and loaf profile

Slices

I sliced the bread after it had sat, wrapped in linen, for 24 hours. The crust was chewy, and the crumb was moist and tender. The flavor was very mellow and balanced. It was not as sweet as I remember the 3-stage 70% rye being, but that was 3 years ago(!). The sourdough tang was present but subdued. A lovely flavor.

I had been planning on leaving the loaves unsliced for another 12 hours, but my wife decided she wanted rye with smoked salmon as an appetizer for dinner. How could I refuse such a tempting proposition?

Delicious!

I also made a couple loaves of Hamelman's Pain au Levain today. As simple and straight-forward as it is, this is one of my favorite breads.

Pain au Levain bâtards

Pain au Levain crust

Pain au Levain crumb

 David

Submitted to YeastSpotting

dmsnyder's picture
dmsnyder

I finally got around to making Hamelman's "Pain au Levain with Whole Wheat Flour." For comparison, I also baked his Pain au Levain. The former was cold retarded overnight. The latter was not. However, I did retard the firm sourdough starter used for both breads overnight, and I believe this resulted in a tangier pain au levain than my previous bakes. 

On to some photos:

Pain au Levain boules

Pain au Levain crumb

Pain au Levain crust

If I were nit picky, I'd say this dough was slightly over-fermented, and I think the loaves were slightly over-proofed. However, it had a thin, crisp crackly crust that I wish I could reproduce at will, and the flavor was delicious, with more of a tang than usual, as mentioned.

Pain au Levain with Whole Wheat Flour

Pain au Levain with Whole Wheat Flour crumb

This bread had a more complex flavor that the "regular" pain au levain when tasted 2 hours out of the oven. There was a slight WW grassiness, which I do not enjoy, and a lingering sourdough flavor, which I do enjoy. This type of bread usually tastes better to me on the day after it was baked, and I trust this bread will follow the pattern.

It's hard for me to say which of the three version of pain au levain in "Bread" is my favorite. Experience suggests it's whichever one I'm eating at the moment. I really, really like all three.

David

dmsnyder's picture
dmsnyder

It has been almost a year since I first made the “80% Sourdough Rye with Rye-Flour Soaker” from Hamelman's Bread. At the time, I said it was my new favorite high-percentage rye bread, and I can't say its status has changed. Actually, it's been a while since I have made a high-percentage rye bread. I've been thinking about it, but Codruta's lovely bake of this bread finally inspired me sufficiently to do it.

There are some surprising things about the dough for this bread. Hamelman describes it as “loose and sticky,” but the last time I made it, I now recall, both the hot rye soaker and the final dough were less loose and less sticky than I thought they should be. Looking back at my notes of last November, I said I would double check the numbers in the “Home” version of the formula, which I used, against the formula Hamelman provides for a larger production. Well, the numbers check out okay. I also looked at the Errata Sheet Hamelman made available in May, 2010, and there are no corrections to the formula for this bread.

Hmmm … Maybe my whole grain rye flour is thirstier than Hamelman's. In any case, I did add an extra 1/4 cup (2 oz) of water during the mixing of the final dough, which took the total dough hydration from 78% to 84% hydration.


Overall Formula

Wt. (oz)

Baker's %

Whole-rye flour

25.6

80

High-gluten flour

6.4

20

Water

27

84

Salt

0.6

1.8

Instant Yeast

0.16

1.5

Total Yield

59.76

187.3


Rye Sourdough

Wt. (oz)

Baker's %

Whole-rye flour

11.2

100

Water

9.3

83

Active levain

0.6

5

Total

21.1


Soaker

Wt. (oz)

Baker's %

Whole-rye flour

6.4

100

Boiling Water

6.4

100

Total

12.8


Final Dough

Wt. (oz)

Whole-rye flour

8

High-gluten flour

6.4

Water

11.3

Salt

0.6

Instant Yeast

0.16

Soaker

12.8

Sourdough

20.5

Total

59.76


Procedure

  1. Mix the rye sourdough and ripen it for 14-16 hours at room temperature.

  2. Mix the soaker at the same time as the sourdough. Weigh the rye flour into a 6 cup mixing bowl, and pour the boiling water over it. Cover tightly immediately and let it cc sit at room temperature with the sourdough. (Note: Hamelman says the soaker will be thick and will have absorbed all the water. On both occasions I made this bread, there was dry flour left in the soaker, even when I mixed it. I think, for future bakes, I will add extra water to the soaker – maybe 2 or 3 oz.)

  3. Add all the Final Dough ingredients to the mixing bowl of a stand mixer and combine using the paddle (2 minutes). Then, switch to the dough hook and mix at Speed 2 for about 6 minutes. There will be little if any perceptible gluten development. (Note: I combined the soaker, sourdough and water and mixed thoroughly. In a large bowl, I weighed the two flours, salt and yeast and whisked them to distribute the ingredients. I then added the dry ingredients to the mixer bowl and mixed with the dough hook. I added the additional water mentioned above during this step, but, in the future, I think I would add it to the soaker, as noted above.)

  4. Scrape the dough together. Cover the mixer bowl tightly and bulk ferment for 30 minutes.

  5. Scrape the dough onto a lightly floured or a wet board. With wet hands, shape it into a ball, as smooth as possible on the top side, gathered on the bottom side. (Note: I made one large round loaf. Alternatively, you could divide the dough into two equal pieces to make smaller loaves, and shape as above.)

  6. Place the loaf (or loaves) seam side down into a well-floured brotform (or two). Place in a food-safe plastic bag.

  7. Proof for 50-60 minutes at 80ºF. (Note: I heated a mug of water in the microwave for two minutes, then put the bread in the microwave to proof.

  8. 45 minutes before baking, pre-heat the oven to 490ºF with oven stone and steaming apparatus in place.

  9. When it is proofed, transfer the bread to a peel, seam side up, and then to the baking stone.

  10. Turn the oven down to 470ºF. Steam the oven. Bake for 15 minutes.

  11. Remove the steaming apparatus. Turn the oven down to 430ºF, and bake for another 45-50 minutes, or until the bread is nicely browned and the internal temperature is at least 205ºF.

  12. When the bread is done, transfer it to a cooling rack. When it is completely cooled (2-4 hours), wrap the bread in baker's linen or a clean kitchen towel and leave it on the cooling rack for at least 24 hours to stabilize the crumb texture before slicing.


The crumb was dense and a bit sticky. My analysis is that the dough was under-fermented, and the loaf was under-baked. This loaf is larger than what Hamelman specified, and, in hindsight, should have baked longer, probably with an additional lowering of the oven temperature for the last portion of the bake.

The flavor, on the other hand, was assertively sour with a delicious earthy rye flavor. I'm hoping that toasting can salvage this bread. Otherwise, I have an abundant supply to use as altus in future rye bakes.

When well-made, this bread is best, in my opinion, sliced thin and eaten with smoked meats or fish, pickled fish, strong or smoked cheeses and dark, braised meats. It has amazing keeping qualities and also freezes well.

Enjoy!

David

Submitted to YeastSpotting

dmsnyder's picture
dmsnyder

Besides the Whole Wheat Breads, I also baked a SFBI Miche and Hamelman's "Pain au Levain with Mixed Sourdough Starters" this weekend. 

As I have for the last few bakes, I used 50% Central Milling "Organic Type 85" and 50% Central Milling "ABC" flours for the "bread flour" in the final dough. I haven't tasted it yet, but when I sliced it 24 hours after baking it has a lovely wheaty and sour aroma with toasted nut notes from the boldly baked crumb.

When I last made Hamelman's Pain au Levain with Mixed Sourdough Starters, Andy (ananda) suggested using a more firm wheat levain and a more liquid rye sour for this bread. For this bake, I did that. I just put the amount of water called for in the rye sour into the wheat levain and the amount of water called for in the wheat levain in the rye sour. (Both call for the same weight of flour.) I can't say this accounted for any difference in the final product, although this batch was denser than usual and had a more pronounced rye flavor. This is a delicious bread, in any case. I had it for breakfast, untoasted, with just a little butter and Santa Rosa plum jam (very tart) and for lunch with Toscano salami in a sandwich.

Happy baking!

David

dmsnyder's picture
dmsnyder

Well, I'm back from a lovely week at the beach with family. I surely enjoyed the week, including Glenn's fabulous pastrami and corn beef with his and my rye breads. Glenn's Tartine BCB and my SFBI miche were also appreciated. 

Yesterday, I thawed dough made for pizzas 4 and 6 weeks ago and frozen. I made a couple of pies, one with each of the doughs made with Maggie Glezer's and Jeff Verasano's recipes.


Pizza using Maggie Glezer's dough

Pizza made with Jeff Verasano's dough

Glezer's pizza dough retained its distinctive crispness. Verasano's dough was still more elastic than Glezer's but not as chewy as it had been before freezing. I would say that neither was quite as good, but both were better than any you could get at the chains.

Today, I baked a couple bâtards of Pain au Levain from Hamelman's Bread. This has become a favorite. Today's tweak was to shape the loaves using the method portrayed on the KAF videos but proofing the loaves in cotton-lined oval brotformen rather than on a couche.


The loaves assumed a rounder/less elongated shape during baking. I wonder if, en couche, with lateral support but no support at the ends, the loaves spread longitudinally more. Hmmmm ….


I have dough for my version of Gosselin's Baguettes Tradition in the fridge to finish tomorrow. I'll update this entry accordingly.

David

dmsnyder's picture
dmsnyder

These are a couple of 755 gm bâtards of Hamelman's Pain au Levain I baked today. I think they illustrate the points made recently in discussions of scoring, ears and bloom, for example in Varda's topic To ear or not to ear.

To quote Michel Suas from Advanced Bread and Pastry again,

If the angle is not achieved and the cut is done with the blade vertical to the loaf, the two sides of the dough will spread very quickly during oven spring and expose an enormous surface area to the heat. The crust will begin to form too soon - sometimes before the end of oven spring - penalizing the development of the bread. If the cut is properly horizontal, the sides of the loaf will spread slower. The layer of dough created by the incision will partially and temporarily protect the surface from the heat and encourage a better oven spring and development. (Suas, pg. 116.)

These loaves were scored with a razor blade mounted on a metal lame. The blade was held at a 30º angle. The cuts were about 1/2 inch deep. I think the coloration of the bloom attests to the slow spread to which Suas refers.

I think you can clearly see three distinct colors in the bloomed crust, progressively lighter in color from right to left, with the lightest color being that under the ear. As the cut opens up during the bake, it does so slowly over a prolonged period. The darkness of the bloom demonstrates the length of time each area was directly exposed to the oven's heat. The ear keeps the area under it sheltered from the heat so it doesn't form a crust, but, as the bloom widens, the previously sheltered area becomes uncovered by the ear, and it begins to brown.

Scoring with the blade perpendicular to the loaf surface thus results in less bloom, and the blooming is terminated sooner in the bake. The coloration of the bloom is more uniform. An example - a Vermont Sourdough I also baked today:

I hope this helps clarify the point of the ear - how you get it and why you might want to.

David

Submitted to YeastSpotting

dmsnyder's picture
dmsnyder


This is the “80 Percent Rye with Rye Flour Soaker” from Jeffrey Hamelman's “Bread.” It's a wonderful bread about which I've blogged before. (Sweet, Sour and Earthy: My new favorite rye bread) These loaves were made applying a number of tips and tricks contributed by a number of TFL members, and I have to say, I was pleased with the results of every tip I used. So, a big “Thank you!” to MiniO, hansjoakim, nicodvb and the other rye mavens who contributed them.

I followed the formula and methods according to Hamelman, with the following techniques added:

  1. Rather than dividing and shaping on a floured board with floured hands, I wet the board, my hands and my bench knife. I kept all of these wet, and experienced much less sticking of this very sticky dough to the everything it touched.

  2. I shaped the boules “in the air,” rather than on the board. Again, less dough sticking to the board, and I think I got a smoother loaf top without tears.

  3. I proofed the loaves in brotformen, floured as usual with a rice flour/AP mix, with the seams down. This results in the loaves opening at the seams, yielding a lovely chaotic top to the loaves and no bursting of the sides.

I am very happy with these loaves. I'll continue to use these techniques and recommend them to others struggling with high-hydration, high-percentage rye breads.

David


dmsnyder's picture
dmsnyder

The “Miche, Pointe-à-Callière” from Jeffrey Hamelman's Bread has been one of my favorite breads and was my favorite miche for a long time. It's been quite a while since I last baked it. Since then, I've been doing more hand mixing of doughs I formerly machine mixed. I've found a new and wonderful high-extraction flour, Central Milling's “Organic Type 85.” And last, but my no means least, I've baked miches according to the formula we used in the SFBI Artisan II workshop last December. Many TFL members have baked this marvelous miche since I posted the formula, and they know what a wonderful bread this can be.

After these months of enjoying the SFBI miche, as well as Chad Robertson's somewhat similar “Basic Country Bread” from Tartine Bread, it seemed time to revisit the “Miche, Pointe-à-Callière.” I made it using Central Milling's “Organic Type 85” flour. I followed Hamelman's formula. I altered his procedures only by mixing the dough entirely by hand.


Overall Formula

Wt.

Baker's %

High-extraction whole-wheat flour

2 lbs

100.00%

Water

1 lb, 10.2 oz

82.00%

Salt

0.6 oz

1.80%

Total

3 lb, 10.8 oz

183.80%


Levain Build

Wt.

Baker's %

High-extraction whole-wheat flour

6.4 oz

100.00%

Water

3.8 oz

60.00%

Mature culture (stiff)

1.3 oz (3 T)

20.00%

Total

11.5 oz


Final Dough

Wt.


High-extraction whole-wheat flour

1 lb, 9.6 oz


Water

1 lb, 6.4 oz


Salt

0.6 oz


Levain

10.2 oz (all less 3 T)

Total

3 lb, 10.8 oz

Procedure

  1. Make the levain about 12 hours before you want to mix the dough. Dissolve the mature culture in the water, then mix in the flour.

  2. On the day of the bake, mix the Final Dough flour and water to a shaggy mass and autolyse in a large covered bowl for 20-60 minutes.

  3. Sprinkle the salt over the dough and add the Levain in several chunks. Mix thoroughly.

  4. Transfer the dough to a clean, lightly oiled bowl and cover tightly.

  5. Ferment the dough for 150 minutes, with stretch and folds on a floured board at 50 and 100 minutes.

  6. Form the dough into a tight boule and transfer it, seam side up, to a floured banneton. Place the banneton in a large plastic bag or cover with a towel or plasti-crap. (Note: Hamelman recommends the usual pre-shaping and resting before the final shaping. I did not do this, since the dough was rather slack, and the gluten did not require “relaxing,” in my judgement.)

  7. Proof for 2-2 ½ hours.

  8. One hour before baking, pre-heat the oven to 500ºF with a baking stone and steaming apparatus in place.

  9. Transfer the miche to a peel. Score it with a single square, “tic-tac-toe” pattern or diamond pattern. Load the miche onto the baking stone.

  10. Steam the oven and turn it down to 440ºF. After 15 minutes, turn the oven down to 420ºF, and bake for about another 45 minutes.

  11. When the miche is fully baked (internal temperature is 205ºF), turn off the oven. Leave the miche on the baking stone with the oven door ajar for another 10-20 minutes to dry the crust.

  12. Transfer the miche to a cooling rack and cool thoroughly. Then wrap it in baker's linen and let it rest for at least 12 hours before slicing.

Note: All times are approximate. Watch the dough, not the clock.

Miche, Pointe-à-Callière: Profile

Miche, Pointe-à-Callière: crumb

I rested the loaf for about 18 hours before slicing. The crumb structure was similar to that pictured in “Bread,” but I think I slightly under-fermented the dough and over-proofed the loaf.The crust was chewy. The crumb was rather dense and chewy. The flavor was not really sour but was very wheaty – more intense than I recall from other bakes with this flour.

Next time I make this miche, if I hand mix it, I'll add some S&F's in the bowl during the first part of the bulk fermentation and lengthen the fermentation, hoping to increase flavor complexity.

David


dmsnyder's picture
dmsnyder


Horst Bandel's Black Pumpernickel

Jeffrey Hamelman's Bread – a Baker's Book of Techniques and Recipes is highly esteemed by TFL members. Which of his formulas is most commonly baked is unknown, although the Vermont Sourdough would be my guess, especially if you include SusanFNP's “Norwich Sourdough” version of it. There is little question regarding which of his several stories from the bakery is the favorite. It has to be the story of Horst Bandel's Black Pumpernickel, found on page 221 of my printing. This tale has an almost mythic quality that truly touches the heart, as it says so much about the age in which we live, the culture of the artisan baker and the character of the pastor, Horst Bandel, and that of Mr. Hamelman himself.

Hamelman's “Home” formula for this bread makes 3 lb, 12 oz of dough. The bread is to be baked in a covered Pullman/Pain de Mie pan. Hamelman specifies 4.4 lbs of dough for the most common (13 x 4 x 4 inch) size Pullman pan, so the formula needs to be re-calculated accordingly. I decided to bake in a 9 x 4 x 4 inch Pullman Pan, which I figured would take 3 lbs of dough. The weights in the following tables are for a quantity of dough just under this.


Overall Formula

Wt (g)

Baker's %

Rye meal (pumpernickel flour)

206

30

Rye berries

137

20

Rye chops

172

25

High-gluten flour

172

25

Old bread (altus)

137

20

Water

481

70

Yeast (instant)

4.6

1.3

Salt

14

2

Molasses, blackstrap

27

4

Total

1350.6

197.3


Sourdough

Wt (g)

Baker's %

Rye meal

206

100

Water

206

100

Mature sourdough culture

10

5

Total

422

205

Note: I used KAF Pumpernickel flour.


Rye-Berry Soaker

Wt (g)

Rye berries

137

Water

Enough

Total

137


Old Bread Soaker

Wt (g)

Old bread (altus)

137

Water

Enough

Total

137

Note: I used Hamelman's “80 percent Rye with a Rye-Flour Soaker” as altus. I did the soaking the day before the bake, wrung out the altus, saving the water, and refrigerated them. I believe it was George Greenstein from whom I learned that altus will keep refrigerated for a few days.


Final dough

Wt (g)

Sourdough

412

Rye berry soaker

137

Rye chops

172

High-gluten flour

172

Old bread (altus) soaker

137

Water

275

Yeast (instant)

4.6

Salt

14

Molasses, blackstrap

27

Total

1350.6

Note: I made the rye chops by coarsely grinding rye berries with the grain mill attachment to a KitchenAid mixer.

Procedures

This bread has multiple components, and the sourdough and the two soakers require advance preparation. Counting the minimum rest time between baking and eating, the procedures can easily stretch over 4 days. They did for me. I weighed out the ingredients and fed my starter on Day 1, milled the grain, made the altus, fed the sourdough and soaked the soaker on Day 2, mixed and baked the bread on Day 3 and 4 (overnight) and let the bread rest on Day 4.

The procedures as listed below assume you have already gathered the ingredients and have a mature sourdough culture. Where my procedures deviated from those specified by Mr. Hamelman, I have added parenthetical comments or notes.

  1. Feed the sourdough and ripen it for 14-16 hours at 70ºF.

  2. Soak the whole rye berries overnight. The next day, boil them in about 3 times their volume of water until they are soft and pliable, about an hour.

  3. Cut the “old bread” into cubes, crust and all, cover in hot water and let soak for at least 4 hours. Squeeze out as much water as possible, and reserve the water for use, if needed, in the final dough. The bread can be sliced, dried and browned in the oven before soaking, which Hamelman says provides a “deeper flavor.”

  4. Mix all the ingredients in a large bowl or the bowl of a mixer. Hamelman says to not add the reserved altus soaker water unless needed, but it is not clear whether the Final Dough water includes this or not. The dough description is “medium consistency but not wet, and it will be slightly sticky.” Mix at Speed 1 for 10 minutes. DDT is 82-84ºF. (I mixed the dough for about a minute with the paddle without adding any additional water. The ingredients mixed well and formed a ball on the paddle. I felt the dough was about the right consistency, but I did add 10 g of the altus water. I then attempted to mix with the dough hook. The dough just went to the side of the bowl, leaving the hook spinning without grabbing the dough. After about 5 minutes of this, with multiple scrape-downs of the dough, I gave up. I tried kneading on a floured board with little effect. This was the stickiest dough I've ever encountered. I finally formed it into a ball and placed it in an oiled batter pitcher.)

  5. Ferment in bulk for 30 minutes.

  6. Prepare your pullman pan by lightly oiling the inside, including the lid, and dusting with whole rye or pumpernickel flour. (I'm not sure this was necessary, since my pan is “non-stick.”)

  7. Form the dough into a cylindrical log and place in the pan. Slide the lid onto the pan.

  8. Proof for 50-60 minutes at 80ºF.

  9. Pre-heat the oven to 350ºF. If you have a baking stone, pre-heat it, too. You will be doing most of the bake with the oven turned off. The baking stone will act as a heat buffer, so the oven temperature falls more slowly.

  10. When the dough has risen to within about ¾ inches from the top of the pan, place it in the oven, covered.

  11. Bake at 350ºF for one hour. Then, turn the oven down to 275ºF, and bake for another 3-4 hours. Then, turn the oven off, and let the bread continue to bake for another 8-12 hours. The range of times given is due to the variability in ovens, specifically how well they retain heat, and how quickly their temperature falls once they are turned off. Hamelman says, “You will know when this bread is baked: The aroma will fill the entire room.” (The aroma of the baking bread was very present 2 hours into the bake. At about 4 hours into the bake, I turned the oven off. The next morning, the aroma in the room was not discernible. When I took the pan out of the oven, it was still warm, but not so hot I couldn't hold it in my bare hands. When I opened the pan, the bread was very aromatic, with the molasses smelling most strongly but the rye very much there as well.)

  12. When the bread is baked, remove it from the pan, and let it cool completely. It should then be wrapped in baker's linen and let rest for a minimum of 24 hours before slicing.

As you can see from the domed top of the loaf, it did not spring enough to fill the pan. I don't know if there was not enough dough, not enough water or whether it was inadequately mixed or proofed. Comments on this would be more than welcome.

Addendum: I sliced the pumpernickel about 36 hours after it was baked. It was very firm and sliced well into thin slices without any of the crumbling I feared. The crust is very chewy. The crumb was moist but extremely dense. The flavor was molasses and rye - very strong flavors.

Discussion and comments by more experienced pumpernickel bakers convinced me that I should have added much more water to the dough, but this bread is not bad as baked. Here are a couple crumb photos:

David


dmsnyder's picture
dmsnyder


Almost all the breads I bake are hearth loaves, but I've been tempted for some time to make one of the German-style ryes that Hamelman says should be baked in a pullman pan (AKA pain de mie pan).

Pullman or pain de mie pan

I purchased a pullman pan from KAF's Baker's Catalogue. It is from the new line of bakeware they are carrying, and it is a beautiful piece of metal. But this is not a review of baking pans, so back to bread …

Today, I baked the “70 Percent Rye with a Rye Soaker and Whole Wheat Flour” from Hamelman's Bread. It is made with medium rye, all pre-fermented. The rye soaker is in the form of rye chops – an equal weight to that of the medium rye. The remaining 30% of the flour weight consists of whole wheat flour. The dough is 78% hydration and has 2% salt and ¼ tsp of instant yeast.

Not having rye chops at hand, I hand-chopped the 390 g of rye berries needed for making 2 kg of dough, which is what is needed to fill my 13” pullman pan. (Did I tell you how beautiful it is?) Now, I believe that Andy (or was it MiniO?) claims the proper way to make rye chops by hand is to slice each berry into 3 equal pieces. I didn't do that. After trying to chop the berries on a cutting board with a chef's knife, which sent berries – whole and in fragments of varying sizes and shapes – flying everywhere, I turned to the chopping method I learned at my mother's knee. She never chopped rye berries, I'm sure, but she sure chopped a lot of fish for gefilte fish in the years before the coming of the Cuisinart. I still have her chopping bowl and hackmesser. (I believe that's what she called it.) 

Well, I made a lot of little pieces of rye, but I figure I ended up with a mix of coarse rye flour, cracked rye, rye chops and whole (and very smug) rye berries. So, I poured boiling water over the whole mess and ordered a grain mill.

This morning my rye sour was ripe and smelling wonderfully sour and fruity. My soaker was soaked. I mixed the dough.

Now this is a 70% rye, since the cracked rye is included as a flour in calculating baker's percentages. But, really, if you look at the flour, it's about 50% rye and 50% whole wheat. I've made several other 70 and 80% ryes before, and this was different. There was much less gluten development with mixing. I've not yet made a 100% rye, but I imagine it's not much different from this dough. Maybe it was the whole wheat flour, whereas the other ryes I'd made used high-protein white flours. This dough was completely like sticky clay. But not insurmountable.

I mixed the dough in my KitchenAid – about 2 minutes at Speed 1 and 6 minutes at Speed 2. Then, the dough was fermented for 60 minutes. (Hamelman says ferment for 30 minutes, but my kitchen was only about 67ºF today.) I formed the dough into a log and placed it in the pullman pan which had been lightly oiled and dusted with pumpernickel flour. After 60 minutes proofing with only a little expansion of the dough, the loaf was baked with steam for 15 minutes at 480ºF, then for another 60 minutes in a dry oven at 415ºF. The last 15 minutes of the bake was with the loaf out of the pan, on a baking sheet, to dry the sides of the loaf. There was really nice oven spring. The loaf crested well above the top of the pan. (Sorry, I neglected to photograph the baked loaf still in the pan.) In hindsight, I probably should have proofed more fully. There was some bursting of the loaf on one side, at the point it expanded over the top of the pan. 

Rye dough in pan, sprinkled with pumpernickel flour and ready to proof

Rye bread cooling

After cooling, I wrapped the loaf in baker's linen, as instructed. 

Rye wrapped in linen

The loaf was wrapped in baker's linen for 24 hours before slicing ... and tasting.

Pre-slicing (Big bread, isn't it?)

Coronal section with crumb
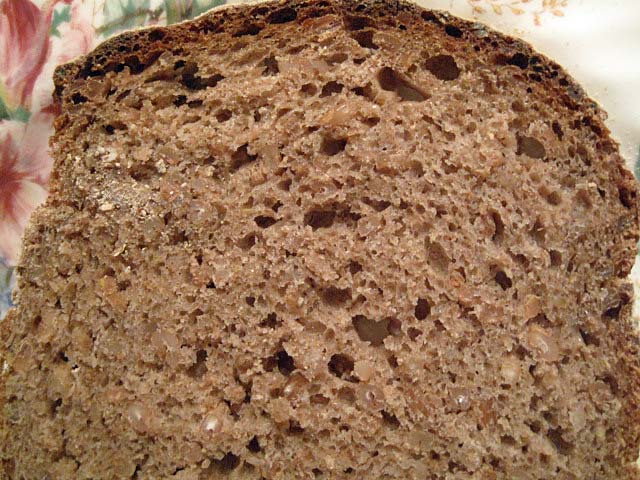
Crumb, close-up

Another close-up
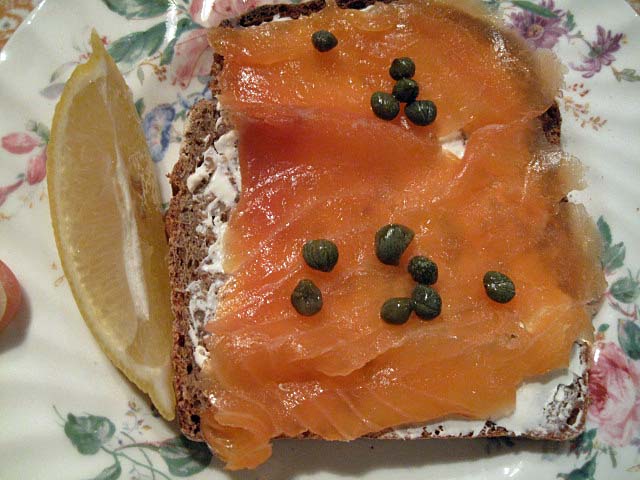
Delicious plain. More delicious with smoked salmon!

The crust was firm but not hard. The crumb was soft and moist but slightly crumbly and less dense than I expected. The aroma is powerful with rye, yet the flavor is relatively mild. It is rye with no distinctive whole wheat tones, yet the whole wheat must have mellowed the rye flavor. There is a sweet note to the aftertaste. The rye "chops" are very chewy, which I like.

This bread has lots of character, and I enjoyed it unadorned. I had another slice with a thin schmear of cream cheese and a thin slice of Scottish smoked salmon, with some capers and drops of lemon juice. Fantastic! 

David


Pages

Subscribe to RSS - jeffrey hamelman