The Fresh Loaf

A Community of Amateur Bakers and Artisan Bread Enthusiasts.

hydration

rhaazz's picture

80% hydration = pancake batter

March 10, 2011 - 11:00am -- rhaazz

I was getting burnt, no-bounce sourdough loaves and thought this problem might be fixable with higher hydration. 

So I mixed an 80% hydration sourdough.  It  was so soupy that despite several stretch and folds, it remained the consistency of pancake batter.  I could not shape it at all.  I literally had to pour it into a loaf pan.

What am I doing wrong?  I used 400 g flour (including the flour in the starter) and 320 g water (including the water in the starter).  That results in a dough that is 80% water by weight.  Am I not using correct baker's math?

davidg618's picture
davidg618

I routinely make baguettes with a straight dough at 70% hydration, and an overnight ferment at 55°F.  Curious, in yesterday's mix I reduced the hydration to 65%, all other ingredients (KA AP flour and sea salt) and processes were the same: DDT set to 55°F with ice water, and the dough chilled during autolyse, between S&Fs and overnight retarding for 15 hours. I was motivated to try a lower hydration based on a smattering of comments scattered in various TFL threads that argue open crumb isn't only about hydration. This dough, developed an extraordinary strength--I did the 3rd S&F only because I  always do three, it didn't need doing. The crumb is nearly as open as I experience in the 70% dough. However, the dough seemed to have less than the usual elasticity; note the broken surface between the scorings. I detected no apparent difference in flavor.

David G

cranbo's picture
cranbo

So I've been baking breads for some years now and experimenting with various recipes. 

Today I've been working on these English Muffins as well as my version of Theresa Greenway's Griffin's Bread.

The versions I'm making are 62% and 68% hydrations respectively. 

Most of the time I use a KA mixer with C-hook to knead.

Both doughs clear the sides of the bowl reasonably well, but neither of these totally clear the bottom of the bowl. I ran them both for maybe 1 minute at KA speed 2 to combine, then about 3-4 minutes at speed 3. 

In the case of the muffins (which use about 70% preferment), there was about a 2.5" diameter circle at the bottom, and I added some additional flour (about 10g) and it shrank to about 2". 

In the case of the sourdough (which uses about 82% preferment), it stuck to a large circle at bowl bottom, probably 5-6" around. I had to add probably 30g of flour to make it clear the sides better, leaving about a 2-2.5" diameter circle at the bottom of the bowl. 

My questions are about hydration and mixing to clear the bowl: 


  1. Am I correct to assume that all 62% and above hydration flours will never totally clear the bottom of the bowl? 
  2. What hydration typically will clear the bowl bottom? 
If I was more accurate with my starter maintenance, I'm sure this would be less of an issue (I think my preferment hydration varies anywhere from 60-85%, because I eyeball it). I just want to get a better feel for the behavior of hydration and my mixing machine, so that I can make adjustments as necessary. At least I've learned not to add more flour to sticky ryes, I've ended up with quite a few bricks over the years. 


Scott Grocer's picture

Hydration: Effect of potatoes?

February 22, 2011 - 5:25pm -- Scott Grocer

Does anybody have a good rule of thumb for calculating the hydration of a dough when it includes plain, cooked and mashed potato?

According to the USDA: Potatoes, baked, flesh, without salt (100 grams) contain on average 75.42 grams of water. That sounds right I guess, but how much of that moisture is available to the dough, and how should I adjust hydration in relation to potato content?

Thanks

jowilchek's picture

hydration, kneading or stretch and fold

December 27, 2010 - 8:49pm -- jowilchek

when working with a high hydration dough it is hard for me to knead...

the dough is wet and sticky, should I oil up my hands? (don't want to add flour that will alter hydration)

should I not knead high hydration dough? and always do stretch and fold?

Is there a cut off % level for kneading/stretch and fold (like 50% or under hydration knead and over 50% hydration stretch and fold? If no rule of thumb applies can you use either for all types of dough?

PeterPiper's picture

Pillow ciabatta

October 20, 2010 - 8:58am -- PeterPiper

I've been playing around with the no-knead ciabatta recipe for a while, and am finding a major problem:  my ciabatta comes out with one giant air pocket.  Last night I made three loaves all from the same 100% hydration recipe.  With the first I stirred the 18-hour proofed batter then poured out one loaf and put it right in the oven.  Here's how that one came out.

Franko's picture
Franko

This past Sunday I was in the book store browsing...where else.. but through the cooking section. One of the books that interested me the most was Richard Bertinet's 'Crust', in particular for some of the unique recipes in it. It also included a DVD of Bertinet demonstrating his techniques for hand mixing and kneading brioche and levain. The book has some very good photography as well and the price was reasonable so I went for it. Mr. Bertinet has been mentioned a fair bit lately on TFL so I was curious to see what I could learn from him. While the book is not particularly technical, primarily being meant for an advanced home baker I think, his methods are that of an expert baker who has a clear and easy style of explaining a formula or procedure.

When I mentioned in a thread on Sunday http://www.thefreshloaf.com/node/19547/richard-bertinet-wins-major-uk-award that I'd picked up the book a couple of members replied mentioning that they had it as well and thought it was a good one to have, although they both thought the hydration for his Ciabatta formula was too low. I looked at it and didn't think it seemed out of range but decided to try it for myself and see. Now normally I'm not a real stickler for being exact when it comes to scaling water, but going more for the feel of the dough as described by the author or any included photos. This time though I weighed out all the ingredients right to the specified gram and followed his times and oven temps fairly close as well. Of the half dozen or so ciabattas I've made over the last eight months I think this is one of the better ones. It may be partially due to having used a lower protein flour (10%) for this one than I have in the past or maybe because I spent more time developing it by hand than I normally do, but whatever the reason it made a good loaf. The crust is fairly thin and splintery and the crumb while being a bit more open than I prefer, has a good chew to it for an all white bread. The flavour is just what I expect a ciabatta to taste like, wheaty, toasty, with a bit of richness from the extra virgin olive oil coming through. Very tasty!

Franko


ehanner's picture
ehanner

This past year has been very interesting for me. I made learning rye breads a goal at the years end, and while I now know enough to understand it's going to take a lot longer, I'm making progress. Recently I did an experiment with scalding rye that worked out well. We have had some great threads here on the benefits of autolyse and mixing patterns. I was reminded of a post from Shiao-Ping where she  made a Gerard Rubaud bread and another one from James Macguire that utilized long cool ferment at high hydration.

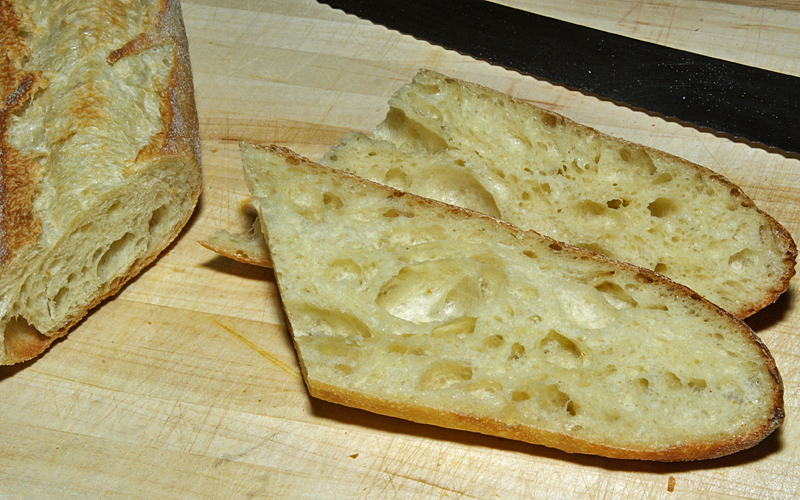
One thing that these breads have in common is hydration in the area of 80% and small amounts of yeast. This combination requires longer fermenting times and allows the development of flavorful acids. When handled gently, the bread that develops is airy and moist with great color and nutty after tastes.

I decided to make a single 900 gram loaf at 80% hydration. My plan was to start with a 90/10 ratio of AP/Dark Rye so it would darken well and hold moisture better than a straight white loaf. This is a plan for a small miche (if there is such a thing). Only the basic ingredients of flour, water, salt and yeast.This was a hand mixed dough. Just a plastic scraper, wire whisk, larger bowl and my hands were used. A key element to making this dough behave like I wanted was to control the water temperature so as to end up at a desired dough temperature of 70 degrees F. The natural reaction of the water being absorbed by the flour raises the temp by around 4 degrees F. So it's important to start near 70 at the warmest. My ambient room measures at 75F along with the flour.

The formula for adjusting the variable (water) follows. 215F - room temp - flour temp -5F = Water temp. For me this looks like 215F-75 -75 -5= 60F. When everything is mixed together the dough will be at or near 70F. Prof. Calvel and James Macguire both have made a point to stress that correct dough temp is the MOST important and critical aspect of making the dough you want. You just can't treat that as idle chatter form the masters and expect greatness in your oven. I like this bread because it can be made in a single day. In fact if you start at 11 AM, you should be done by 4ish, in time for dinner. The methods employed are from the old European school. My next batch will be with only 5% dark rye

Ingredients:
450g AP flour
50g Dark Rye flour
1/2 teaspoon Instant Dry Yeast (IDY)
10g Sea Salt
400g Water (cool)

Method:
Start by measuring the room and flour temperature and doing the calculation for the water temp. If you need to use ice to cool the water to arrive at a DDT of 70F, so be it.

Combine all dry ingredients in a large bowl and make sure the flours are well combined. Add water all at one time and stir with a spoon, switching to a scraper. This should involve no more than 2 minutes and should result in a rough mass with no dry flours in the bowl. Cover and rest for 20 minutes.

After 20 minutes, fold in the bowl for 8-10 repetitions rotating as you go. Alternatively, pour on the counter and fold with a scraper using double letter folds.Return to the bowl and cover.

Repeat the folding process every hour for a total of FOUR folds. That means 4 more folds after the first. When it is time for the last fold, don't fold, dust flour around the seam between the dough and the bowl and using the scraper, loosen the dough ball up so you can pour it out on a floured counter.

Brush any loose flour off the top of the dough and cover it with the bowl for about 20 minutes. Removing the bowl, pull the edges up to the center around the dough to tighten the lower surface and roll the ball over to the seamed side down. Prepare a linen lined basket with flour rubbed into the fabric and lightly dust the top of the dough. Roll the dough into your hands and place it into the basket seems up. Cover with a towel and proof for around 45 minutes. The dough will have become light and puffy and will test with the finger poke test.

Pre heat the oven to 450F when the dough goes into the basket using a stone and steam producer.

Load dough when it is ready and steam normally for 15 minutes. LOWER oven temp to 350F after the 15 minutes and start checking for done around 45 minutes total bake time. The idea is to bake the interior more slowly and not to over do it with color.

I left the loaf in the oven with the heat off and door ajar for another 5 minutes to help draw the moisture out. Remember it was an 80% hydrated mix. Cool and enjoy.

Eric

Pages

Subscribe to RSS - hydration