Real Italian Hoagie Rolls
After a week in the Philly area rediscovering my local sandwich joints, I came back to Seattle with the fresh taste of hoagie rolls lingering in my mouth. Over the next few weeks, with some hints from the folks at the Conshohocken Italian Bakery, I managed to replicate them.
I'd had Conshohocken Bakery's rolls at Pudge's, famous for steaks and hoagies in Blue Bell, PA. My first attempts came out more like baguettes, and so I tweaked the humidity and the flour content, but once I got close the cross-section of my rolls were not super round, and the bite was still too dense.
One morning I called the people at Conshohocken Bakery (voted #1 Italian bakery in the region) and told them what I was doing. Their head baker listened to my techniques and sorted a few things out.
So here you go, sandwich rolls that are as close to authentic East Coast sandwich rolls as you're ever likely to get in a home kitchen. Call them what you want: torpedos, hoagie rolls, subs or zeps. In any case, I think you'll agree they make the best sandwiches around!
Makes 6 rolls, 9" long
14 hours for overnight rise (8 hours for fast rise)
2 teaspoons dry yeast (+ 1 teaspoon for fast rise)
4 teaspoons sugar
½ cup water at 100°
14 ounces (2 ¾ cups) unbleached all purpose flour
6 ounces (1¼ cup) High Gluten flour
2½ teaspoons salt
¼ teaspoon ascorbic acid, available as Fruit Fresh
2/3 cup whey*
2/3 cup water at 100°
½ cup extra flour for bench work
2 Tablespoons of cornmeal or semolina to coat pans
Necessary for producing high-rising rolls:
2 heavyweight cookie sheets or jelly roll pans
6 quarry tiles to line oven rack, or a pizza stone
A good spray bottle to create steam in your oven
A humid 80° environment
*To make whey: 32 ounces of plain low-fat yogurt will yield 2/3 cup whey in about 2 hours. Line a strainer with paper towels or several layers of cheese cloth and set it over a pan or shallow bowl. Pour in the yogurt, cover lightly and set it to do its stuff in the refrigerator. The whey will drain from the yogurt and collect in the bowl. Measure carefully before adding.
(The resulting strained yogurt is great drizzled with honey for breakfast. You can also mix it with shredded cucumber, salt, garlic and thyme to make tatziki - our favorite Greek dip.)
Make the dough: In a large mixing bowl, stir together yeast, sugar and ½ cup of warm water. Let sit for 10 minutes until foam forms on the mixture. Add 20 ounces of flour, salt, ascorbic acid, whey and water and mix to form a cohesive mass, scraping down the sides of the mixing bowl as necessary.
Knead for 10 minutes, using as little extra flour as possible to keep the dough from sticking to your counter and hands. Clean out the mixing bowl.
First rise: You can start these rolls in the morning (using an extra teaspoon of yeast in the dough) and let rise, lightly covered, for 4 ½ hours at room temperature. In order to have the rolls ready for lunchtime, however, it's best to make your dough the evening before and let it rise, covered, in a 55° environment overnight. Set the dough at room temperature for an hour or two in the morning before continuing. By this time either method will yield dough that has roughly tripled in bulk.
Second rise: Punch down the dough and turn it out onto a lightly floured work surface. Push the dough into a fat snake and fold it into thirds. Gently push the dough into a fat snake shape again, letting it rest for a few minutes as it resists. This method will elongate the gluten, yielding the best rolls. Fold in thirds, put back in the mixing bowl, cover lightly and let sit at room temperature (70°) for 1½ hours, until nearly doubled in bulk.
Shape the rolls: Turn the dough out onto a lightly floured work surface. Gently shape into a snake again, tucking the long outer edge over itself and squeezing in to the bottom seam by using your fingers. Your emphasis from here on out is to create a gluten cloak, a continuous skin on the top and sides of the rolls.
When the snake of dough is about 2 feet long, cut it in half. Form each half into an 18" snake and cut it into three equal pieces. You will now have 6 portions of dough, each weighing between 6 and 6½ ounces. Tuck into cigar shapes and let them rest for 15 minutes.
Sprinkle cornmeal onto the cookie sheets or jellyroll pans and have them handy. Warm your 80° humid environment. (See Creating an 80° Environment at the bottom of Aunt Marie's Dinner Rolls.) Your environment should include a pan of hot water.
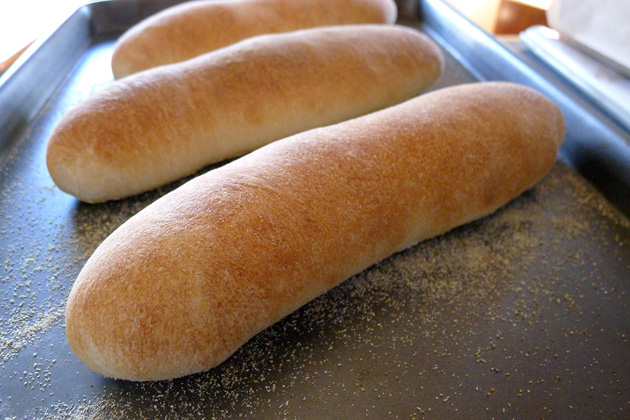
After your rolls have rested, flatten them somewhat to expel the largest gas bubbles, and then fold them gently into torpedoes of dough that are 9" long. Pull the gluten cloak over each roll evenly and tuck into one long seam. Put three rolls on each pan, seam-side down onto the cornmeal.
Third rise and preheat: Let finished rolls rise for 1 hour to 1 hours 10 minutes in an 80° humid environment. Line the center rack in your oven with a pizza stone or quarry tiles and preheat the oven to 450° a half hour into this rise. Have a good spray bottle with water in it beside the oven.
Bake with steam: Put a pan of the fully risen rolls directly on the quarry tiles or pizza stone and quickly spray the hot sides and bottom of the oven with 6 or 7 squirts of water. Clap the door shut to keep in the heat and the steam. Bake rolls for 10 minutes without opening the oven door. Turn oven off for 2 more minutes, and then remove rolls to a rack to cool. (As oven temperatures and spray bottles vary, your results may as well. Rolls are ready when the crust is medium brown.)
Repeat with the other pan of rolls.
When rolls have cooled, split them and pile on your favorite sandwich ingredients. My favorite Ham Hoagie is shown below. Enjoy!
Many thanks to the Conshohocken Italian Bakery for advice on this recipe. If you live nearby, run - don't walk - to their bakery.
Copyright © 2011 by Don Hogeland. For original post, sandwich stories and more photos go to http://www.woodfiredkitchen.com/?p=1657
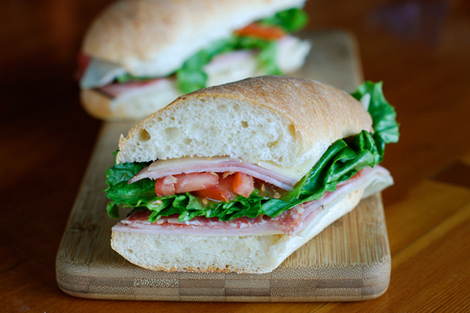
Ham Hoagie made the a Real Italian Hoagie Roll


