The Fresh Loaf

A Community of Amateur Bakers and Artisan Bread Enthusiasts.

high-extraction

dmsnyder's picture
dmsnyder


Even before the recent crop of beautiful breads made with James McGuire's “Pain de Tradition” formula, I had been planning to bake the “Miche, Point-à-Callière” from Hamelman's “Bread” this weekend. Hamelman attributes this bread to McGuire, whose intention was to replicate the type of bread baked by the first French settlers of what ultimately became Montreal. The name of the bread, “Pointe-à-Callière,” was the name of their first settlement.

Miche, Pointe-à-Callière

The other, more well-known, bread meant to approximate French bread of that era is Pain Poilâne. Hamelman's formula is for a 82% hydration Miche (very large boule) made with high-extraction flour. It is a pain au levain with no added yeast. The principal difference between McGuire's and Poilâne's miches is the higher hydration of McGuire's. Actually, I make this bread with 2 oz less water than Hamelman calls for, which makes it a 76% hydration dough.

I have made this bread with first clear flour, Golden Buffalo Flour (a high-extraction flour from Heartland Mills) and with a mix of bread flour and whole wheat. Personally, I prefer the results with first clear flour over the others.


Overall Formula


High-extraction whole-wheat flour

2 lbs

100.00%

Water

1 lb, 8.2 oz

76.00%

Salt

0.6 oz

1.80%

Total

3 lb, 8.8 oz

177.80%


Levain Build


High-extraction whole-wheat flour

6.4 oz

100.00%

Water

3.8 oz

60.00%

Mature culture (stiff)

1.3 oz (3 T)

20.00%

Total

11.5 oz


Final Dough


High-extraction whole-wheat flour

1 lb, 9.6 oz


Water

1 lb, 4.4 oz


Salt

0.6 oz


Levain

10.2 oz (all less 3 T)

Total

3 lb, 8.8 oz


Procedure

  1. Make the levain about 12 hours before you want to mix the dough. Dissolve the mature culture in the water, then mix in the flour. Cover tightly and ferment at room temperature. (I let the levain ripen at room temperature for about 10 hours overnight. I then refrigerated it for another 6 hours. This was a matter of my convenience. It probably did increase the sourness of the final dough, which happens to be fine with me.)

  2. To make the dough, mix the flour and water in a large bowl or the bowl of a stand mixer, if you have one that can handle this much dough. Cover and let stand for an autolyse of 20-60 minutes. At the end of the autolyse, sprinkle the salt over the dough, add the levain in chunks and mix thoroughly. Hamelman says to mix the dough at second speed for 2 to 2 ½ minutes to get a loose dough with only moderate gluten development. This time would be for a professional spiral mixer, of course. DDT is 76F. (I mixed the dough in a Bosch Universal Plus. It took about 4 ½ minutes to get what I regarded as “moderate gluten development.” I think one could easily use the “stretch and fold in the bowl” technique with this bread and achieve equally good results, if not better.)

  3. Transfer the dough to a lightly oiled, large bowl, cover tightly and allow to ferment for 2 ½ hours. Fold the dough twice at 50 minute intervals. If the gluten development was less than “moderate” after mixing, a third fold may be needed. If so, do the three folds at 40 minute intervals.

  4. After fermentation, transfer the dough to a floured board and lightly pre-shape into a round. Allow the dough to rest for a few minutes, then gently round up the dough and transfer it to a well-floured banneton. Cover with a slightly damp towel or with plasti-crap. (The miche could be proofed on a well-floured linen couche, in principle. I have never attempted to transfer a slack dough loaf of this size from a couche to a peel. I imagine the results would be … amusing.)

  5. While the bread is proofing, pre-heat the oven to 500F and set up your steaming method of choice. (Hamelman calls for heating the oven to 440F.)

  6. After steaming the oven and loading the bread, turn the oven down to 440F. After 15 minutes, remove the steam source and turn down the oven to 420F. Hamelman says the total bake time is “about 60 minutes.” You can leave the miche in the turned off oven with the door ajar for 10 minutes after the bread is done. This will dry out the crust somewhat, but this is a very wet bread, and the crust will soften.

  7. Cool thoroughly on a rack. Hamelman prescribes covering the cooled miche with baker's linen and delaying slicing for at least 12 hours. (I think I actually did forgo slicing it for 12 hours once. It is an excellent idea, but I am weak.)

Miche Crumb

Miche crumb close-up

The flavor of this bread, like Poilâne's Miche, definitely improves over 1 to 3 days. I personally like the flavor best the day after it was baked. Of course, the next day is also pretty terrific, and the next … Hamelman says that the bread gets more sour and the “wheat flavor intensifies” over several days. My experience has been that the sourness does increase. I would describe the change in flavor as “mellowing” rather than intensifying. I think that is the same as what Hamelman describes as “the flavors melding.”

This bread has excellent keeping quality. Kept in a bread bag or bread box, it is very enjoyable for a week. It also freezes well. I usually cut it in quarters to freeze, wrap each quarter in 2 layers of freezer wrap and place them in food-safe plastic freezer bags.

Enjoy!

David

Submitted to YeastSpotting


bwraith's picture
bwraith

Workhorse Sourdough - Crust and Crumb

Workhorse Sourdough - Loaves

This recipe is a basic sourdough that I make frequently and use as an all purpose basic bread. It has more components of whole grain in it than a typical white country loaf, yet because of the high extraction flour, it has a more refined texture and less grassy flavor than a typical whole grain loaf. At least for me, it blends better with food than whole grain or close to whole grain loaves I would make for toast at breakfast, peanut butter or tahini, or sometimes as a vehicle for more strongly flavored salted meats and cheeses. I could use it as a substitute for a rustic French bread to have along with a roasted meat or an eggplant parmesan, for example.

Some additional photos are posted, as well as spreadsheets of the recipe and rise time calculations in xls and html formats.

Levain:

  • 40g white flour paste starter (I used 80% hydration white flour starter) You can use 50g of 100% hydration starter or 35g of 60% hydration firm starter and get about the same rise times.
  • 90g whole rye flour (I used Homestead Grist Mills Whole Rye Flour)
  • 180g strong whole wheat flour (I used Wheat MT Bronze Chief)
  • 68g high extraction flour (I used Heartland Mills Golden Buffalo)

The levain is designed to ripen in 10 hours at 70F or about 7 hours at 76F. In my case, it was left to ripen on the counter overnight at about 70F for a total of 10 hours. The levain can be made ahead and refrigerated after it has just doubled. It will keep for a day or two stored in the refrigerator. Ideally, if it is refrigerated, it should be removed from the refrigerator an hour or two before you put it in the dough.

Soaker:

  • 540g high extraction flour (I used Heartland Mills Golden Buffalo)
  • 540g water

Mix the flour and water enough to form a shaggy mass. Let it rest overnight. I just left it on the kitchen counter next to the levain for the night. You can also mix it ahead and store it in the refrigerator along with the levain. Remove it an hour or two before you are ready to mix the dough.

High extraction flour is a less refined flour that has some or most of the bran removed but contains most or all of the remaining components of the whole grain. Heartland Mills Golden Buffalo has the germ and a small amount of bran in it.

Dough:

  • Levain from above
  • Soaker from above
  • 18g barley malt syrup
  • 34g salt
  • 608g water
  • 975g AP flour (I used Heartland Mills Organic AP with Malt)

Mixing

The dough was mixed with a DLX mixer for about 10 minutes on low/medium. The dough is medium soft to soft. It spreads a little bit when you first pour it on the counter and is a little sticky. The dough was folded a few times after mixing, using a wet dough folding/kneading technique, in order to form it into a round ball. The dough was then placed in a covered container to rise.

Bulk Fermentation and Folding

The bulk fermentation phase was designed to last 3.7 hours at 75F. During that time the dough was conventionally folded three times, about once per hour. As the gluten develops, the dough will become stiffer and will no longer spread out when turned out onto the counter. Fold more often if the dough is too slack or fold less often if it seems too stiff and resistant to folding.

The dough should expand to about 1.7 times the original volume and become puffy during the bulk fermentation. The dough is not intended to double in volume during the bulk fermentation.

At 70F the bulk fermentation should take about 5 hours, somewhat longer than at 75F.

Shaping

The dough was halved and two large rectangular loaves were formed. The two loaves were placed in a couche on a half tray and placed in a Ziploc "Big Bag" with two bowls of hot water. The loaves were proofed for 2.6 hours at 75F. At 70F the loaves should proof for about 3.5 hours.

Slash and Bake

The loaves were slashed, put on parchment paper on a large peel and placed in a brick oven. The oven hearth temperature was about 525F at the beginning of the bake. The loaves and interior of the oven were sprayed with a fine mist using an orchid sprayer (1/6 gal/minute for 25 seconds), and the oven was sealed with a towel covered door. After 15 minutes, the loaves were rotated and the door of the oven was left open. The loaves were baked for a total of 45 minutes until dark brown. Since the dough is fairly wet, it helps to give the loaves a thorough bake. The internal temperature was 209F, but I've found that internal temperature can be an unreliable indicator of doneness with higher hydration loaves.

In my kitchen oven, I would preheat the oven to 500F with a stone and cast iron skillet. After placing the loaves on the stone, put water in the skillet and drop the temperature to 450F. After 15 minutes, drop the temperature to 400F for the rest of the bake.

The loaves are fairly large, as my brick oven has room for them. In a kitchen oven the loaves could be done one at a time, possibly shaped a little wider and shorter. To do a more typical quantity of bread for a kitchen oven, halve the recipe and make two smaller loaves that can be baked at the same time.

Cool

Allow the loaves to completely cool on a rack that allows the entire loaf, top and bottom, to be exposed to air.

Results

This bread is named Workhorse Sourdough because it can be used for almost any job. It will work in place of a white country bread for dinner, for sandwiches, for toast, or even for dipping in olive oil. The sourdough flavor of the levain with the rye and whole wheat is a little stronger than breads I've made with a white flour or spelt levain. One could put all the whole grains and Golden Buffalo flour in the soaker, and make the levain from a portion of the white flour. Water would have to be moved from the dough to the larger soaker in that case.

umbreadman's picture
umbreadman


This is my High Extraction loaf I made the other day. I'm finally understanding the idea of a full bakeand cooling before eating. In the past I'd think it was done baking, only to find the loaf soft and lacking in crust shortly afterwards. This one though had a nice crunchy crust (a little thick onthe bottom) with a solid, hearty crumb. Chewy, not too dense, and definately not too airy to be lacking in stubstance, very satisfying.

If I remember correctly, this was (for 2 loaves)

3 lbs Heartland mill golden buffalo flour (a high extraction flour)

75% * 3lbs tap water (add most to flour/salt for 1hr autolyse, add rest with starter dissolved in it afterwards)

~.7 oz salt

a few tablespoons of starter dissolved in the water


I've been taking a rather lax approach to refreshing my starter right before use, which I know is a recommended method. Generally, I've been taking my starter out of the fridge, mixing it in lukewarm/warm water, and adding it straight to the dough/autolyse. Since gas always escapes my sealed starter jar when I take it out, I take that as a sign that it is still active, and assumed that the flour in the final dough would be enough food for it to rise the dough. I do this partly because I'm impulsive, and partly because it's just more convenient... One day I plan on doing a side by side comparison straight starter addition vs. refreshed starter/sponge in a final dough to see if there's a difference. (any comments on this would be nice).

Ultimately though, a very tasty, smooth bread. No sweeteners, nothing. Very nice. I think I like this flour a lot, since it combines the best of white and whole wheat flours in terms of taste, nutrition, and texture.

u.m.breadman

bwraith's picture
bwraith

Pane Casareccio e Lariano di Genzano

Daniel Leader's Local Breads has a fascinating story of his visit to Genzano, where he saw them make large, almost charred looking, bran dusted breads raised with a biga naturale, an Italian firm sourdough levain. I enjoyed hearing about his visit with Sergio, while they mixed, raised, and loaded 64 very large loaves into a wood-fired oven. Now that I have a brick oven in my back yard, I thought I'd give a try at making these loaves in the size he says he observed at the bakery he visited. He says they created approximately 8 pound loaves that were loaded eight at a time into an eight foot long by one foot wide by about 4 inches tall box with divisions in it for eight loaves. Thanks to Zolablue for doing this recipe as shown in Leader's book and writing about it in her blog, which provided inspiration as well as lots of information and photos.

I've included some photos of the process and spreadsheets for the high extraction flour loaf in html and xls format and for the white flour loaf in html and xls format.

I only did two loaves of 8 pounds each, which I proofed in a 26 inch by 17 inch by 4 inch roasting pan, and then baked in my brick oven, which is a dome 37 inches in diameter - enough room for two of these loaves. The dough is very wet and is kneaded in a mixer at increasing speed for over 20 minutes or more to fully develop the gluten. The dough is hard to handle, as it is very soft, sticky, and puffy.

There are two styles of this bread, one with a high protein white flour and one with a high extraction flour. I used Heartland Mills Strong Bread Flour for the white flour loaf and Heartland Mills Golden Buffalo for the high extraction flour.  

Levain

  • 15g of 90% hydration white flour starter (12g for the high extraction loaf, as it rises a little faster)
  • 392g flour (use the appropriate flour for each loaf, as described above)
  • 273g water

The levain was mixed the night before and allowed to rise overnight at room temperature. The amounts are such that by mixing the white flour levain at about 10PM and the high extraction flour levain at 11:30PM, the white flour levain would be ready at 9:00AM the next day and the high extraction levain would be ready at 10:00PM the next day, allowing me to mix them successively in the morning with my DLX mixer such that both loaves would be ready to bake at the same time later on the next day. The high extraction flour rises more quickly than the white flour, so it is being mixed later to account for that difference.

Dough

  • All the levain
  • 1.6 Kg flour (use the appropriate flour for each loaf as described above)
  • 1240 g water with the white flour loaf, 1420g flour with the high extraction flour loaf
  • 5 g instant yeast
  • 40 g salt

According to Leader, the dough is mixed for a long time at high speed. I used a DLX mixer, first at a low speed to mix the ingredients for about 10 minutes, then at medium speed for about 8 minutes, then at high speed for another 4 minutes.

The dough is supposed to be very soft and wet. I had to add a little flour to the white flour loaf, as it was so wet, it wouldn't come together, even after 20 minutes of kneading. I had to add some water early in the mixing of the high extraction flour loaf, as it was clearly too stiff to begin with. Eventually, they were both fairly wet and gloppy, but with reasonable gluten development. I ended up folding the white flour dough a couple of times and the high extraction flour once. It seemed necessary to get some additional gluten development later on.

The inoculation for this recipe is 20% fermented flour to total flour weight, which is a little lower than the recipe in Local Breads (30% fermented flour). The idea was to let it rise a little longer to get more sourdough flavor in the dough. I've had better results starting at inoculations below about 25% with my starter in any event. For the same reasons, the amount of instant yeast was reduced to only 5 grams in 2Kg of total flour. My plan was to let the dough rise for about 3.5 hours in bulk fermentation and about another 2.5 hours in final proof. However, it went faster, as I forgot how warm the dough would be and how long it would stay warm due to the long machine kneading and the large volume of the dough. The dough rose almost too quickly, even with the lower inoculation and amount of instant yeast. I would consider reducing the yeast even further in a subsequent attempt, to match the timing I wanted for the sourdough fermentation with less need to punch down the dough.

Bulk Fermentation

Each dough was placed in a rising bucket. The white flour dough was folded twice, at one hour intervals. The high extraction flour dough was folded once two hours after mixing.

Final Proof

The loaves were placed seam side up in a large roasting pan measuring 26x17x4 inches. A piece of wooden board was placed between the loaves and separate couches were placed on each side of the board to facilitate lifting each large piece of dough out onto the peel. The couches were dusted with KA white wheat bran, which worked beautifully as a "teflon" dusting. After about 2 hours and 15 minutes, the loaves seemed ready. To place them on the peel they were lifted in the couche and basically "dumped" onto the parchment lined and bran dusted peel unceremoniously. They spread out beyond the edges of my 16 inch peel, so I had to quickly but gently fold the edges underneath to get the loaves to fit on the peel, which didn't sound completely inconsistent with the description Leader gave of the process followed in the Italian bakery he visited. He said the loaves were very soft and gloppy, were handled minimally, and quickly moved from one spot to another. I'm sure it was far more graceful than what I ended up doing on my first shot, but it did seem to work. The basic advice here is plow ahead, don't look back, don't waste time worrying about the shape or the tightness of it. This is a rustic loaf, after all.

Bake

The oven hearth floor was raised to about 525F and then the flame was put out, the oven door sealed, so the temperature inside could equilibrate and drop over the course of the last hour of the final proof. The loaves were dumped on the peel, adjusted minimally in shape as needed, and transferred into the oven in quick succession. The oven and loaves were sprayed with a fine mist to generate steam, and the oven door was sealed with a wooden door covered with damp towels.

The kitchen oven equivalent would be to preheat to about 450F with baking stone, and use a skillet with water or other steaming method, and drop temperature to 400F immediately shortly after putting the loaves in the oven.

The loaves were rotated after about 20 minutes, and the steam was removed from the oven by replacing the towel covered door with a metal door positioned to allow some air flow out the chimney.

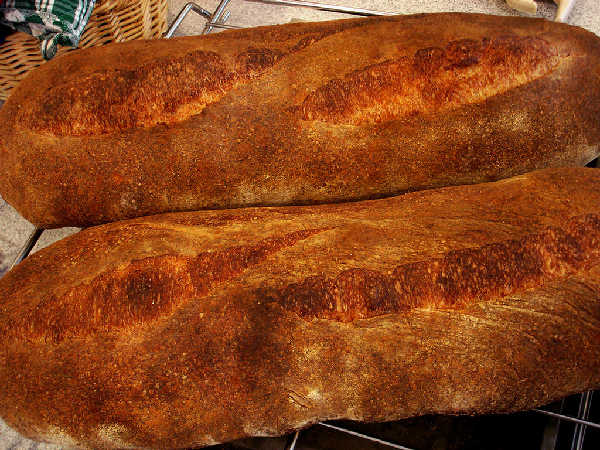
The total bake time was 1 hour and 20 minutes, but the oven door was open and the outside air was fairly cold today, so the hearth temperature was only about 400F and the air temperature about 350F for the last 20 minutes. The idea was to make sure the loaf was fully baked inside, since they are large, wet loaves. The internal temperature was about 207F at the end. In retrospect the oven could have been a little hotter, as they didn't get quite as charred as was intended.
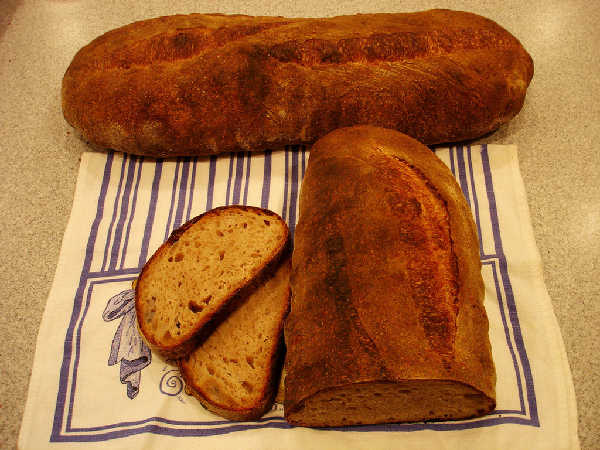
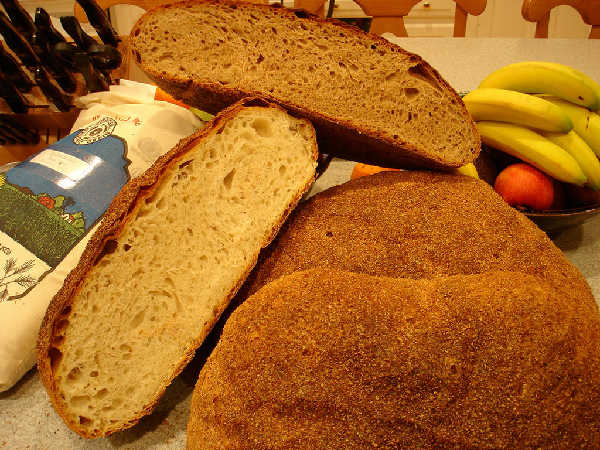
Results

The loaves have a nice color but aren't quite as dark as Zolablue's loaves. My sense of the right temperature for different situations with the new brick oven is still developing. The crumb is just what I like for both loaves, moist with irregular hole structure and a mild but distinct sourdough flavor. The white flour loaf, which may have been made a little too wet, had fewer large pockets and less crust separation than expected, given the excess hydration. As a high extraction flour miche, the high extraction flour Genzano loaf may become a standard, although the Thom Leonard Country French made with Golden Buffalo is similar and also a wonderful miche.

Subscribe to RSS - high-extraction