The Fresh Loaf

A Community of Amateur Bakers and Artisan Bread Enthusiasts.

Glezer

yy's picture
yy

Over the weekend, I finally worked up the courage to try making Bruno's Pandoro from Maggie Glezer's Artisan Baking. I followed the the formula almost exactly. The one thing I changed was to replace all of the whole eggs in the formula with an equal amount of egg yolks by weight. I had the idea in my mind that this would give the final product better color and flavor (more on this later).

Though time consuming, the process was much easier than I anticipated. The dough wasn't entirely successful. As you can see in the photo below, there were little coagulated chunks that never broke up. I'm guessing they came from the step where I added flour and egg yolk to the first dough. The egg yolk bound with the dry flour to form little chunks that couldn't be dispersed by mixing. 

It took a full 27 hours at around 72 degrees F for the dough to go from this:

to this:

Here's the result (from the larger mold)

In retrospect, I should have filled the molds just a tad more to get that big pillowy base that pandoro should have. Given the limited amount of oven spring, it was the correct decision to bake when I did, or the loaves would have collapsed. I had to decrease the oven temperature from recommended 350 F to 325 F about twenty minutes into the bake because the tops were getting too dark. 

The crumb:

I wasn't too happy about the crumb, which had a spongy cake-like texture. I'm looking for a pillowy soft bread-like texture with shreddable strands. I'm not sure how much of this shortcoming is attributed to the amount of egg yolk I used, and how much is attributed to adding the butter/cocoa butter to the mix too rapidly or too soon. The uneven chunks indeed proved to be unpleasant in texture. 

The egg yolk flavor turned out to be too strong and gave the bread a "gamey" flavor, if that makes any sense. Next time, I'd like to make the loaf a little sweeter, use whole eggs just as the formula prescribes, increase the vanilla, and perhaps increase the proportion of cocoa butter, which I would like to stand out more in the flavor profile. 

Despite the pandoro not being perfect this time around, it still makes for a great breakfast (smeared with nutella), and it was a lot of fun to work with the silky, runny dough. 


FlourChild's picture

Craig Ponsford's Ciabatta from Artisan Baking- help with crumb?

January 5, 2012 - 2:19pm -- FlourChild

This is from Maggie Glezer's Artisan Baking.  Wonderful flavor, glossy sheen to the crumb and slightly chewy, can't wait to make it again.  The only issue I had was that the large holes were clustered just under the top crust, rather than being more or less evenly distributed throughout the crumb.  And the crumb in the bottom half of the loaf was more dense, with no large holes.  Anyone know how I might improve upon that?

Ryan Sandler's picture
Ryan Sandler

Well, I quite failed to get around to blogging last weeks' ciabatta attempt, and now here it's Saturday and I have another bake to describe.  

Last week I made another stab at SteveB's double hydration ciabatta.  If you recall in week 1, I got very nice flavor and crust, but an unimpressive crumb.  I also found the process, which involves almost 30 minutes of mixing, rather cumbersome.  The first time I modified Steve's process to add a French fold halfway through the rise, and I figured this time I either needed to modify the recipe more, or stick strictly to Steve's directions.  I went for the latter, cutting down the mixing time, and adding 2 stretch-and-folds to the rise.  The results, however, were quite similar to week 1:


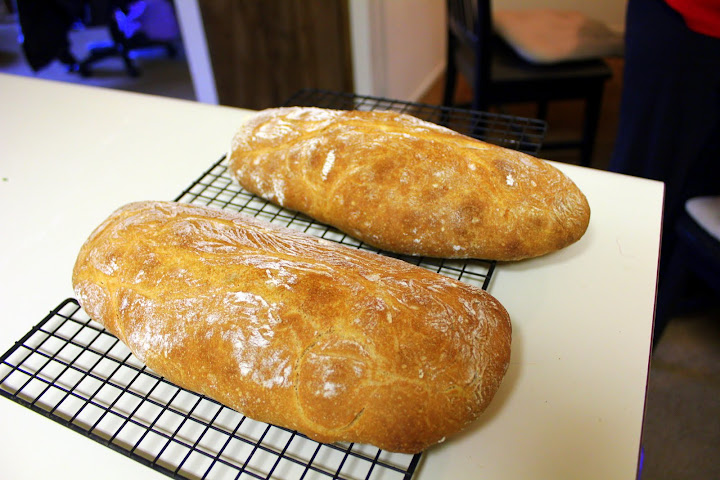
Crumb was perhaps a little better, flavor a little worse.  So much for modifications.

Anyway, this week I took a shot at Craig Ponsford's ciabatta, as interpreted by Maggie Glezer, as interpreted by these two blogs (the first has better directions, the latter had weight measurements).  This formula involves a very stiff biga with a little bit of whole grain and just the teensiest bit of yeast, which is fermented for a full 24 hours (28 in my case).  Hydration is just north of 80%, and it takes 4 stretch and folds to make it behave.  

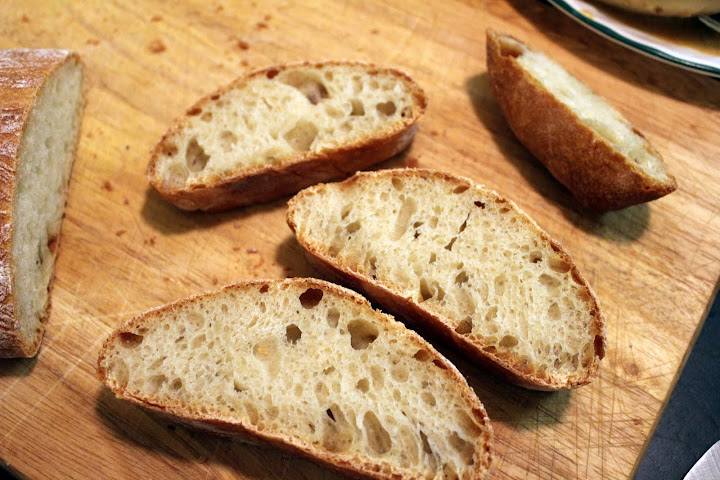
The results, however, were phenomenal

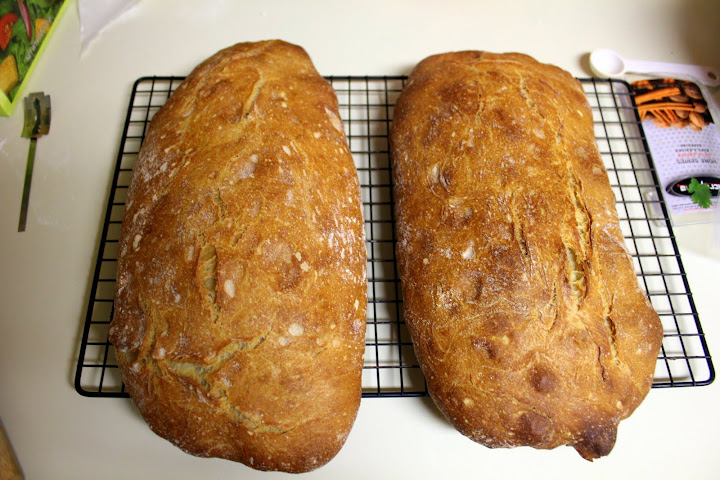
And here's the kicker:


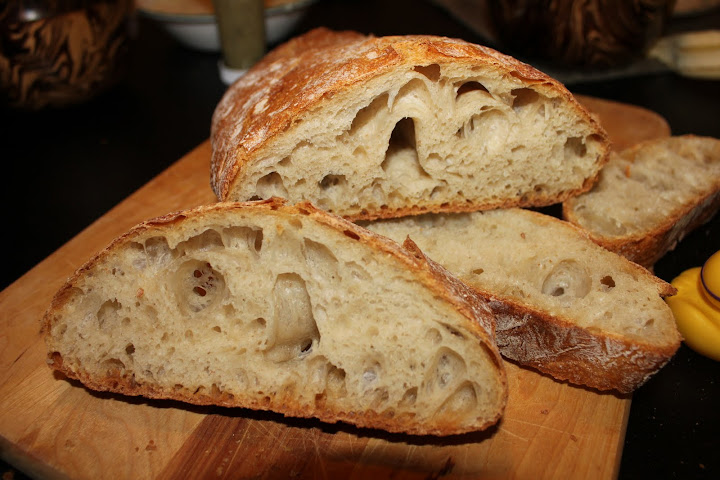
You may notice the loaf on the right is a little funky looking--it stuck to the couch a bit, and I failed to get it all on the parchment when flipping it over, and so I had to manhandle it a bit to clear the couche and slip a scrap of parchment underneath.  

As you can see, nicely caramelized crust (nice and crispy too), crumb wonderfully open (nicely chewy too), and the flavor...oh the flavor.  This was one of the best tasting breads I have made, period.  The combination of a big dose of poolease-y nuttiness, a tinge of sour, and notes of whole grain in the background was just heavenly.  

I think this formula is a keeper.  Beyond getting fabulous results on this occasion, I enjoyed making it.  I like doing stretch-and-folds, feeling the dough and watching it mature and come together.  Even if it gets the same results, I'd take a recipe with stretch-and-folds over one with none and a long mixer time any day.  Just a matter of personal taste there.

There's still some work to do--I still need to work out my flipping technique, and I still have some kinks to work out in the formula itself, in order to get the exterior shape more even (enough kinks that I'm going to refrain from posting my take on the formula just yet).  But this is a positive step for sure!

Happy baking, everyone,

-Ryan 

freerk's picture
freerk

Glezer versus Reinhart

After getting Reinhart's "Bread Baker's Apprentice" for X-mas this year (thank you sis!) I baked my first bread "from the heart" and I loved it!!! So far I've been a "follower" of the Maggie Glezer-way of going about business:


I've been meticulously studying formulas and weighing ingredients to the milligram, producing very nice loafs as a result. But after baking with my head so much, it is time to start baking with my heart!


Reading Reinhart made me take a leap of faith; or to be more exact; it awakened my faith in myself! Look at the dough, feel the dough, work it the way you feel it's right! I love this whole approach, and I guess I was ready for it, knowing about the basics of bread by now (thank you Maggie!)


So, when I was looking around for a good formula using the chestnut flour I brought back from Rome two weeks ago, I decided to just go ahead and DO IT! Based on the general knowledge about the chestnut flour I concocted my own little dough and produced a batch of wonderful rolls, fragrant with the smell and taste of chestnut, with a nice crust and an okay crumb (I guess this would be the moment where, if Glezer were to read this post, she would comment: If you would do it my way, your crumb would have been more than okay as well...)


Very tasty! If you want to see my "year in baking" slideshow, you can find that here


I really hope you all enjoyed a wonderful X-mas. Check my blog in the coming days if any of you TFL'ers in the good old USA are interested in some traditional Dutch New Year's eve baking. I will show you how to make  "oliebollen", the precursor to what you guys have turned into.... donuts! I will also be baking the traditional "knieperties", a New year's treat that stems from the region in the north that i grew up in, and that I love because there is a wonderful simplistic symbolism attached to them. More to follow! Have a good week!


Freerk

taparker's picture
taparker

I decided to try my hand at making this bread.   I don't think I quite have the hang of making the starter.  Need to work on that.  Glezer's book seems to indicate that the starter should be made in a semi-airtight container and I've read elsewhere that the starter should be allowed to breathe and collect wild yeasts from the environment.  I ended up with a not-quite-sour starter but used it anyway.  Instead of using the non-diastatic malt syrup I settled for a barley malt powder from my local brew shop.  I let the first rise go for 3 + hours, divided it, rested it, then shaped it before proofing for another 2 to 3 hours.  I put both batards on a silicon mat to proof and then just transferred everything to the baking stone when the time came.  I thought I had botched the batard shaping process but the loafs were very forgiving and came out looking better than I expected.  The recipe called for spritzing the loaves with water before baking and the use of a garden sprayer arrangement to add additional moisture.  I opted for a pan in the bottom of the oven to which I added a cup of water immediately after inserting the loaves.


I liked the color and crumb however the taste was not sour enough(have to work on starter) and the malt flavor was not subtle enough.  I'll try reducing the amount of malt powder the next time as well as using a more sour starter.


ejm's picture
ejm

Royal Crown's Tortano

This spectacular bread is made with bread and a little wholewheat flours, potato and a little honey.  If you haven't made it yet, you've got to try it. It's fabulous!

- Elizabeth

my take on the recipe: Tortano, based on Royal Crown's Tortano in 'Artisan Baking Across America' by Maggie Glezer

ejm's picture
ejm

Glezer bread

For a recent dinner featuring shrimps in Pernod, there was special request for the bread to be made WITHOUT using my wild yeast. So I fell back on one of our favourites from Maggie Glezer's book Artisan Baking Across America: Acme's Rustic Baguettes. On first reading, the recipe seems a little complicated with its double preferment but it is almost fool proof. And it's NOT sour. Not even remotely.

The bread was so successful and so good and so free of any sour taste that it is the primary reason for the fit of pique when I threw our wild yeast starter down the drain.

I feel so free!

Even though the shape isn't quite right, everything else about the bread was great. Some day I might actually shape the bread in baguettes but boules are SO much easier. The only thing that I haven't managed to get right is to keep the loaves from growing into each other as they rise.

Glezer bread

To learn more about our feast, please read here.

ejm's picture
ejm

challah

After seeing Eli's version of Maggie Glezer's sourdough challah from her book A Blessing of Bread, I really wanted to make challah. But this particular bread uses a firm starter. (Firm starter?! I don' know noth'n' 'bout makin' no firm starters, Mizz Scahlet!) I don't have A Blessing of Bread yet (I do have Glezer's wonderful book Artisan Baking though and it's one of my favourites). And my other cookbooks talk about how to make firm starters but, but, but... I need hand-holding with new techniques. ESPECIALLY where wild yeast is concerned.

So I did an internet search to see if anyone else had made Glezer's challah. And found yet another version of Glezer's challah on Tatter's blog, "The Bread Chronicle". This one is made with a liquid levain. Ah, that's what I like to see!! I'm familiar with liquid levains. Not exactly an expert with them but at least I've used them frequently.

I had fun braiding challah.

challah weavingchallah weaving

challah weavingchallah weaving

I'm sure that it's incorrect to have that little bit of whole wheat flour but I really like to add just a little (using Carol Field's idea of adding wholewheat flour to our highly refined white flour to mimic stoneground flour). I think the tiny bit of whole wheat adds flavour as well, making the bread seem not quite so much like "white bread" that can be so flavour-free.

Our challah was wonderful! Wonderful and flavour-full. I loved the honey in it. And it was really fantastic for breakfast with hard boiled eggs and strong coffee with lots of cream.

challah
  • semi-wild challah recipe based on the recipe for basic sourdough in Piano Piano Pieno by Susan McKenna Grant and a recipe for challah in Maggie Glezer’s cookbook A Blessing of Bread

And yes, Glezer's book A Blessing of Bread is now on my "wish list". I think I neeeeed to have it.

-Elizabeth

Pages

Subscribe to RSS - Glezer