The Fresh Loaf

A Community of Amateur Bakers and Artisan Bread Enthusiasts.

farro

Isand66's picture
Isand66

I decided to make a couple of breads to bring to my cousin's house for Rosh Hashana this weekend and she requested I make my Farro Hard Cider Multi-grain.  I didn't have any hard cider available nor did I have time to make a Farro starter so I used a nice Long Island toasted lager and substituted my stock AP starter which I recently refreshed.

I also ground some soft white wheat berries I just purchased at the store from Bob's Red Mill.  The package says this is similar to a pastry flour and it did seem to make a very soft flour.

For the soaker I added some rolled oats in addition to the cracked wheat I used last time.

I have to say the second version of this bread is definitely better than the first try.

This is a nice hearty bread great with some cheese or stew or for a nice pastrami or corned beef sandwich.

AP Starter

227 grams AP Flour

71 grams AP Seed Starter

151 grams Water at Room Temperature (80-90 degrees F.)

Mix ingredients in a bowl until thoroughly combined.  Cover the bowl and let it sit at room temperature for around 8 hours.  The starter should almost double when ready to proceed.  You can either mix in final dough or put in refrigerator for at most 1 day before using.  If your kitchen is warmer than mine which is usually about 70-72 degrees with my air-conditioning you can proceed sooner.

Soaker

60 grams Cracked Wheat

40 grams Rolled Oats

280 grams Boiling Water

Mix ingredients together in a bowl and cover.  Let rest for 30 minutes or longer until ready to use.

Drain the liquid before mixing in the final dough.

Main Dough Ingredients

425 grams Refreshed AP Starter (65% hydration) from above

100 grams Soaker from above

190 grams Freshed Milled Farro Flour

80 grams Quinoa Flour

75 grams Wheat Germ

21 grams Potato Flour

65 grams AP Flour

55 grams First Clear Flour (KAF Brand)

120 grams Freshly Ground Soft Wheat Flour

60 grams Pumpernickel Flour (Dark Rye or Course Rye Flour)

50 grams Molasses

16 grams Sea Salt or Table Salt

445 grams Toasted Lager

Procedure

Mix the flours with the Lager and molasses in your mixer or by hand for 1 minute.  Next cut the starter into small pieces and put in bowl and mix for 1 minute to incorporate all the ingredients.  Let the dough autolyse for 20 minutes to an hour in your bowl and make sure to cover it.  Next add in the salt, and the soaker and mix on speed #1 for 3 minutes or by hand and on speed #2 for 2 minutes.  The dough should have come together in a ball and be tacky but not too sticky.

Next take the dough out of the bowl and place it on your work surface.  Do a stretch and fold and rest the dough uncovered for 10 minutes.  After the rest do another stretch and fold and cover the dough and let it rest for 10 minutes.  Do one more stretch and fold and put the dough into a lightly oiled bowl and let it sit at room temperature covered for 2 hours.  After 2 hours you can put the dough into the refrigerator for 24 hours or up to 2 days before baking.  Feel free to do some additional S & F's if you feel it is necessary.  I baked the bread about 24 hours later.

The next day (or when ready to bake) let the dough sit out at room temperature for 1.5 - 2  hours.

Next, form the dough into your desired shape and put them in floured bannetons, bowls or on a baking sheet and let them rise covered for 2 hours or until they pass the poke test.  Score the loaves as desired and prepare your oven for baking with steam.

Set your oven for 500 degrees F. at least 30 minutes before ready to bake.  When ready to bake place the loaves into your on  your oven stone with steam and lower the temperature immediately to 450 degrees.   The total baking time was around 45 minutes.  When both loaves are golden brown and reached an internal temperature of 200 degrees F. you can remove them from the oven.

Let the loaves cool down for at least an 6 hours or so before eating as desired.


Isand66's picture
Isand66

After reading about how much better freshly ground flour is compared to store-bought I finally decided to wiggle a couple of toes in the water and try grinding some of my own.  I used my Krupps coffee grinder to make some Farro flour and also some Hard Red Wheat from grains I had purchased at Whole Foods previously.

To make it interesting I used a portion of my standard AP starter along with a much larger portion of a Farro starter I prepared.

I didn't have enough whole grains to grind all my own flour so I used King Arthur flour for the rest of the ingredients.

I also made a soaker using some cracked wheat.

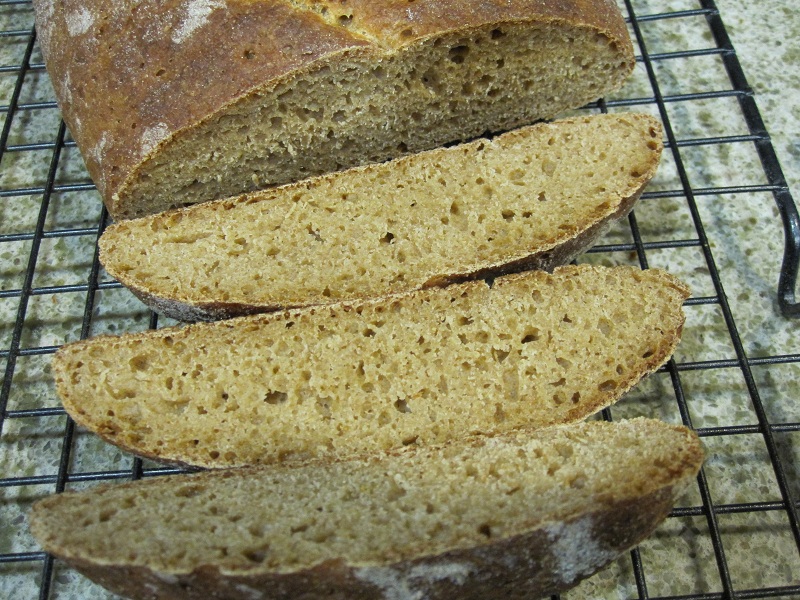
I have to say I made a mistake by thinking the extra liquid from the soaker would increase the hydration of the dough which only comes in at 57%.  Since the freshly milled flour also sucks up more water than store-bought the final dough ended up much drier than I would have liked and the crumb was denser than my usual multi-grain bakes.  Next time I will increase the liquid amount probably another 15-20%.

I think I shall have to invest in an attachment for my wife's Kitchen Aid to mill my own flour which should be much easier to do larger batches than the Krupps.

In any case the final bread while not being one of my favorites still tasted very earthy with a nice sour flavor and nutty undertones from the Farro and Wheat Germ.

Farro Starter

184 grams Farro Flour ground from fresh kernels

71 grams AP Starter

117 grams Water at Room Temperature (80-90 degrees F.)

Mix ingredients in a bowl until thoroughly combined.  Cover the bowl and let it sit at room temperature for around 10 hours.  The starter should almost double when ready to proceed.  You can either mix in final dough or put in refrigerator for at most 1 day before using.  If your kitchen is warmer than mine which is usually about 70-72 degrees with my air-conditioning you can proceed sooner.

Soaker

90 grams Cracked Wheat

280 grams Boiling Water

Mix ingredients together in a bowl and cover.  Let rest for 30 minutes or longer until ready to use.

Drain the liquid before mixing in the final dough.

Main Dough Ingredients

75 grams Refreshed AP Starter (65% hydration)

351 grams Farro Starter from above (should be all of it)

90 grams Cracked Wheat Soaker from above

75 grams Quinoa Flour

70 grams Wheat Germ

40 grams Potato Flour

200 grams French Style Flour (You can substitute AP flour)

195 grams Freshly Ground Hard Red Wheat Flour

100 grams Pumpernickel Flour (Dark Rye or Course Rye Flour)

50 grams Molasses

16 grams Sea Salt or Table Salt

430 grams Hard Cider

Procedure

Mix the flours with the Hard Cider and molasses in your mixer or by hand for 1 minute.  Next cut the starters into small pieces and put in bowl and mix for 1 minute to incorporate all the ingredients.  Let the dough autolyse for 20 minutes to an hour in your bowl and make sure to cover it.  Next add in the salt, and the soaker and mix on speed #1 for 3 minutes or by hand and on speed #2 for 2 minutes.  The dough should have come together in a ball and be tacky but not too sticky.

Next take the dough out of the bowl and place it on your work surface.  Do a stretch and fold and rest the dough uncovered for 10 minutes.  After the rest do another stretch and fold and cover the dough and let it rest for 10 minutes.  Do one more stretch and fold and put the dough into a lightly oiled bowl and let it sit at room temperature covered for 2 hours.  After 2 hours you can put the dough into the refrigerator for 24 hours or up to 2 days before baking.  Feel free to do some additional S & F's if you feel it is necessary.  I baked the bread about 24 hours later.

The next day (or when ready to bake) let the dough sit out at room temperature for 1.5 - 2  hours.  Next, form the dough into your desired shape and put them in floured bannetons, bowls or on a baking sheet and let them rise covered for 2 hours or until they pass the poke test.  Score the loaves as desired and prepare your oven for baking with steam.

Set your oven for 500 degrees F. at least 30 minutes before ready to bake.  When ready to bake place the loaves into your on  your oven stone with steam and lower the temperature immediately to 450 degrees.  Since these loaves were a little lower in hydration and were not cooking as quickly as normal, I lowered the temperature to 430 degrees.  The total baking time was around 45 minutes.  When both loaves are golden brown and reached an internal temperature of 200 degrees F. you can remove them from the oven.

Let the loaves cool down for at least an 6 hours or so before eating as desired.

The crust the next day was very hard and the crumb like I said before was much denser than I would have hoped but this bread still makes some nice pastrami or corned beef sandwiches for sure along with a nice sour pickle.  Now I have to go get some to eat for lunch!

dabrownman's picture
dabrownman

After having such good luck with Phil's no stress recipe for 40% Rye and Caraway, I was additionally inspired by hanseata's seeded loaf's.  So, I thought I would try to marry up the two and take on my requirement for more whole grain and less white flour.  I was hoping that by adding some spelt and farro home ground berries to the rye replacing some of the white and adding some anise and fennel to the caraway, this new concoction would be a decent bread.  Plus, another important test, I could try out for the first time my new 'double Y chicken foot' slash!!!!

I also got a new way to final prove these ill shaped breads with a new bamboo containment thing-a-majig that has some doohickey handles for the containment challenged like myself.  Don't laugh.  This thing, what ever it is,  cost a buck.  We can't sleep at night worrying about these contraptions and they are real issues for us !!!  The used, so much better than new,  parchment paper is the crowning achievement of getting the loaves out of the trash bag and into the oven without disfiguring oneself unnecessarily - by hot oven.

The loaves sprang nicely.  The crust was crisp, crunchy yet chewy.  The taste of the bread was more earthy and more to my liking as expected.  The crumb wasn't quite as open as before probably due to the extra 20% whole grains in place of the white - but still OK.  The slash produced a wide flatish gash where the loaf pooled through lazily.  No ears - so fancy pants still needs some work before the double chicken foot slash is a keeper.

The disappointment was that I replaced some of the caraway seeds with the anise and fennel and the resulting seed taste was too slight and muddied.  I was too chicken to go for a bold taste with these seeds.  Don't you be !!! It would be much better just adding the same grams of anise and fennel as the caraway.  I think it would be perfect that way - if it didn't kill you of course ;-) 

Here are some more pics...

I really like it that you can make these breads in half a day if you have some decent rye sour built all the time.  Next time, and there will be one if only the for the double Y chicken foot slashs' sake, More seeds will be boldly incorporated.  I think I am still making progress.

Thanks again Phil and hanseata.


ph_kosel's picture
ph_kosel

I recently got some emmer (farro) flour from bluebirdgrainfarms.com ( link ) and have made 3 loaves with it so far.  I got interested in emmer after researching biblical era bread making. This post includes photos of my most recent loaf and a recap of my experience so far with this flour.

For those unfamiliar with emmer, it is an "antique" grain and genetic ancester of modern wheat.  I think it was used (along with barley) in Egypt and the middle east until about the time of the Roman conquest but I wasn't there so you'll have to ask the antiquarians about exact dates.

Anyway, I got curious and ordered some emmer flour from the folks at Bulubird Farms.

I've made three yeasted loaves so far with the flour: (1) an artisan loaf, 60% hydration; (2) a pan loaf, 67% hydration; and (3) another artisan loaf, 67% hydration.  Each loaf was made using 450g flour, 0.5 tablespoon instant yeast, 0.5 tablespoon salt, and either 300g or 270g water.

This is a low-gluten flour that behaves differently from my usual bread flour.  Emmer dough seems stickier than dough made with King Arthur flour and doesn't seem to gain "elasticity" from kneading/mixing.  Labeled protein content is almost identical to King Arthur bread flour as is labeled protein content of King Arthur All Purpose flour, which I find confusing.  I think 60% hydration is better than 67% to reduce stickyness.  Pan loaves should only be baked in a thoroughly greased pan.

The emmer flour is a "whole grain" product that produces a crumb similar in color to regular whole wheat.

The taste of the emmer bread is quite distinctive, sort of "nutty",  and I find it tasty and less harsh than whole wheat bread.  The emmer flour seems a little coarse and the emmer bread feels vaguely granular in my mouth.  Overall I like the bread quite a bit and it might be even better with stuff in it like sugar and raisins and such.  The package label has a muffin recipe that might be very nice (if I ate  muffins).

One drawback to this flour is the cost.  Including shipping it's close to $4/pound!

River Elderholly of River Organica.com's picture

Farro is not emmer

October 8, 2007 - 8:12pm -- River Elderholl...
Forums: 

Farro is an old Italian word for Iron and as such can ONLY mean emmer because emmer is the only grain in the world whose limiting factor is iron and will provide 100% of the bodies needs in one cup a day. Farro from italy most often isn't even emmer any more but is spelt. The Italians think the americans can't tell the difference (and they are right - most everybody but I cannot) tell emmer from spelt from barley from wheat from einkorn, especially pearled.

Subscribe to RSS - farro