The Fresh Loaf

A Community of Amateur Bakers and Artisan Bread Enthusiasts.

enriched dough

d_a_kelly's picture
d_a_kelly

Hi bakers everywhere!

I made this a few weeks ago but have only had the chance to post it now. I took the recipe from Cresci, by Massari and Zoia. In the book it's for a panettone but I thought I'd try to make it in the form of a colomba because it was around Easter and I still had a few colomba cases left to use :)

This is a very unusual panettone recipe in the all the flour goes into the first dough. The traditional method is to split the flour between the two stages. I'm not quite sure what the benefits of this are (allowing for more autolysis) but there are a few recipes in the book where this happens. I'm pretty certain that these "non-traditional" formulae are associated with Achille Zoia. I've been working on his panettone paradiso (another flour-all-in-one recipe) on-and-off now for over a month and I kid you not, I've only made it work once, despite about 15 attempts!! Fool that I am, the one time it worked I didn't take any photos, but the crumb was the softest and moistest of any panettone I've ever had, so I'm determined to persever. But back to the colomba...

The recipe calls for hazelnut paste and gianduia amara. I bought the hazelnut paste online (very expensive) because I don't have the equipment to make a truly smooth paste at home. The gianduia I made myself, using the following recipe (in grams). I took amara here to mean the use of dark chocolate rather than milk. I used Amedei toscano black - a really delicious, and Italian, chocolate.

hazelnut paste 50

dark chocolate 70% 20

cacao butter 6

icing sugar 50

melt the chocolate and cacao butter together and then blend in the icing sugar and paste. It's important to stir constantly and drop the temp as quickly as possible to 26C to prevent it from separating. I took this recipe from Valrhona's cooking with chocolate book.

I made the first impasto at about 10pm so that I could go to bed and rise the next day with it ready.

sugar 79

water 177

hazelnut paste 32

very strong flour 316

Italian sweet starter 63

butter 63

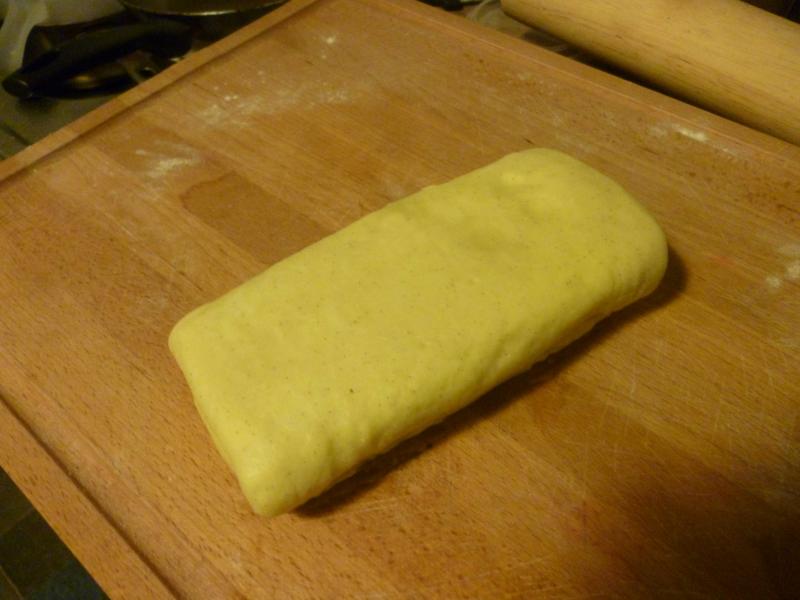
I left the flour, sugar and water to autolyse for half an hour and then added the other ingredients, working it until the dough was stringy.

The next morning it had tripled in volume (12 hours precisely) so I reworked it with the following:

sugar 47

honey 32

butter 47

gianduia (melted) 47

hazelnut paste 32

yolk 73

salt 2.5

vanilla quarter of a pod

water 9

milk chocolate 62

dark chocolate 47


take 991 of the  impasto and add chocolate pieces. For the milk choc I used Valrhona's Jivara, and a mix of Amedei toscano black and Valrhona's Manjari for the dark. 

My last attempt at forming a colomba hadn't been a success, so taking inspiration from thefreshloaf, I decided to fold and stretch it repeatedly until I had a nice tight ball. I let this rest for an hour and then repeated the process, before putting it into the shape. I was much happier with the shaping this time, the dough had a better, tighter skin on it.

I had just enough dough left over to make a "panettoncino" of about 85g. 

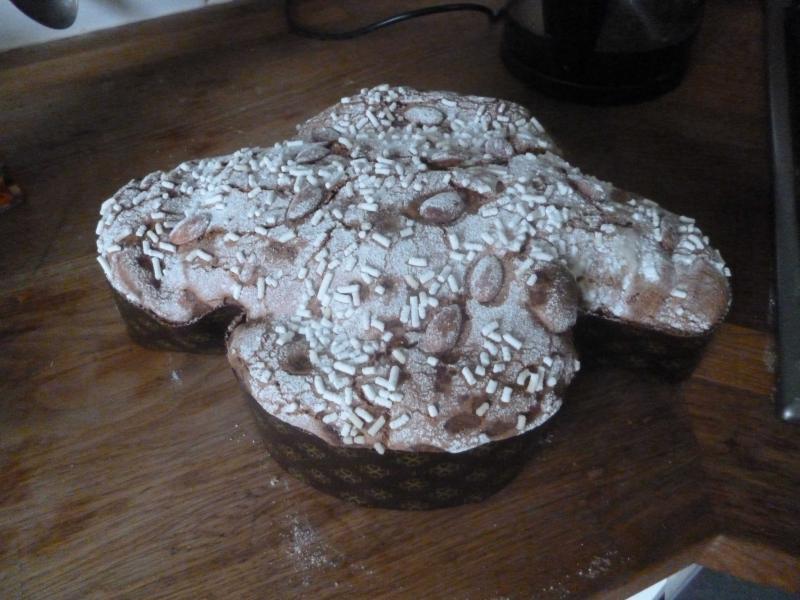
About 6 hours later (held at c. 30C) it was ready to go in the oven. I glazed it, covered it was sugar granules and almonds, and then dusted it was icing sugar.

My glaze this time was a little thicker than I've made it before - too thick I think, even though I followed my usual recipe. I should have added a tiny bit more egg white. It was just a tad too thick to be easily spreadable. In the oven then for 50 minutes at 170C. I didn't bother with steam because I was worried about the icing sugar. I'm not sure it made any difference.

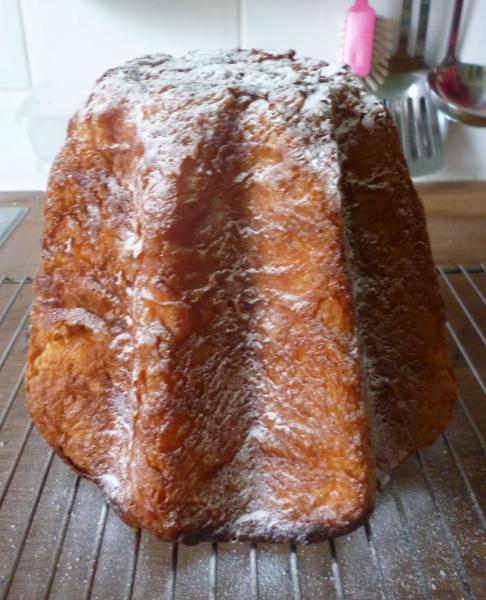
Oven spring was enormous. The top photo doesn't really do it justice. I doesn't show just how much over the edge of the form it is. I slightly crushed it with my hand when I was turning it upside down (idiot!!!) but apart from a crack on the surface, it popped right back out when it was hanging during cooling. 

The colomba itself was a present, so the only crumb shot I have is from the panettoncino. I think there was just a little too much impasto in the pirottino... BakeryBits.co.uk markets them as 100g cases, but I think even 80g is too much if you are using them for a panettone. I think perhaps 70g might have been better. 

Well, my conclusions...

I tasted both the baby panettone and the colomba and I was very... disappointed!!! There was zero(!!) taste of hazelnut from it. Zero!!! The hazelnut paste I used was professional quality (it certainly had a professional price) but it didn't even leave a trace of flavour in the finished product. The photo in Cresci implies a deep brown crumb, but my crumb looks more beige. I didn't know what industrial strength paste Zoia must be using to achieve any flavour or colour on this one. The crumb itself, although very shreddy, as it should be, was also quite dry. The driest of all the panettone I've made so far. All I can say is thank God I used good quality chocoalte, because otherwise the entire thing would have been very uninteresting. 

It's a great shame, because I'd been looking at the recipe for ages, thinking it would be great. Where is the hazelnut flavour?!?!? Another thing I've noticed is the how much growth in the colomba is lost to sideways motion. The circular shape of the panettone form is very strong, so all the growth is directed upwards. The colomba seems structurally weaker, you can see how the sides have bulged out and become distored. 

I need a break from panettone making for the moment... the repeated disasters with the panettone paradiso have knocked my confidence terribly. Hopefully a break will allow me to... what? I'm not giving up on it though. I refuse to be beaten by a bit of flour, butter and egg!


David

d_a_kelly's picture
d_a_kelly

This one isn't very seasonal at the moment, but I love eating it for breakfast. It's so buttery and soft that I really don't think it needs an accompaniment. The recipe is taken from "non solo zucchero vol.II" where it is called pandoro evolution, but it is very similar to the pandoro a sfoglia from Cresci. 

Main impasto - in grams

sweet starter (50% humidity) 45

dry active yeast 3

very strong flour 179

sugar 36

unsalted butter (soft but not melted) 27

egg 107

salt 3.5

half a vanilla pod 

melted butter flavour 0.3 (I've made this before without the flavouring and it tasted exactly the same - but it's in the recipe so I've included it here).


mix all the ingredients together and work it until it forms a smooth, elastic dough. It should be strong and windowpane, but still very slightly sticky. Wrap it in plastic and put it in the freezer. I left it in there for an about an hour, but the book actually recommends overnight at -10C. While this is firming up, I worked on the butter for lamination:

softened unsalted butter 147

icing sugar 39 


mix the two ingredients together thoroughly, then pat into a square, wrap, and put in the fridge to firm up. When both parts are at the right consistency, take 362 of the dough and laminate it as if you were making croissants - 3 simple turns in total, with at least half an hour between each turn. It ought to look something like this when you've finished:


the total weight is 550g.

The difficult bit is then forming this into a ball without breaking the laminations. The book gives absolutely no guidance here whatsoever! I usually fold the ends underneath and then roll it around until it looks more or less spherical. I doubt very much that this is the best method! The dough by this point is really quite resistant to being shaped. 

It looks so tiny in the tin - it's hard to believe that it can possibly fill it!

Leave it to prove at about 27C and at least 60% humidity for about 10 - 12 hours. I left mine for 10 hours. 

I think it could easily have grown even more than this, so next time I might put less dough in the pandoro tin. As it was, it was just about to start spilling over the edge. If my shaping of the ball had been better then I also think this might have helped.

Leave it in the open air for about 30 minutes in order to form a skin on the dough and then it goes in the oven for 30 minutes at 170C. Leave it in the tin for a few hours after cooking before turning out. Mine stuck a little bit - I should have used more flour and butter to grease the form. 

When it's ready to eat (after a few days), dust it in icing sugar and enjoy! 

I was very happy with the crumb on this one - really light and shreddy, with a wonderfully complex buttery taste. It just fell to pieces as I was cutting and eating it. 


David

Postal Grunt's picture
Postal Grunt

After seeing Glenn's posting of his weekend bake, I thought that I'd show a couple of pictures of my project. It's what I often call my "house loaf" lately though this particular loaf appears to look better than most I've turned out. Maybe it was good fortune but I like to think that I keep learning from all the information being shared here on TFL.

Baking bread here in Kansas in the summertime has been another learning experience in that even with air conditioning, the room temperature averages around 80F. My sourdough starter doesn't seem to be consistent in its speed this summer, but it still does a good job. Practice, pratice, practice.

It's still good, if slightly messy, fun to bake and enjoy the results. I posted barely coherent babblings on the loaf at my blog.

http://chaosamongstthefloursandflowers.blogspot.com/2011/07/countdown-begins-but-blather-is-same.html

Comments, editing suggestions, humor, and questions are always welcome.

La masa's picture
La masa

The Roscón de Reyes is the traditional breakfast in Spain for the Epiphany day. It's also found in many Latin American countries and it's very similar to the Gâteau des Rois from the Provence.

I don't have a mixer, and don't really miss it... except when I make this bread. Kneading this dough is hard work, by far the hardest of all the doughs I make.

Fortunately, it's the traditional breakfast for the Epiphany day, and not the traditional breakfast for Saturdays :-)

For this dough, you need a flour with a pretty high protein content.

Make a preferment with:

  • 50 gr flour
  • 40 gr milk
  • 10 gr fresh yeast

While it's rising mix in a bowl:

  • 200 gr flour
  • 100 gr milk
  • 55 gr sugar
  • 3 gr salt
  • 1 egg
  • Grated lemon zest
  • Grated orange zest

You'll get a very wet and sticky dough, almost a batter:


Now, you'll have to work out some way of kneading this thing. Well, you cannot really knead it. I did a kind of light French fold.

Pour the dough onto the counter, pick it with one hand and stretch it upwards, repeat for ten minutes, wait ten minutes (keep an eye on it, it could fall from your counter!), knead again for ten minutes. At first you'll think that you will never get a workable dough, but eventually things change. You'll still have a very wet dough, but now you can see a good amount of gluten strands and it looks like a dough more than a batter now.

Knead in 50 gr of soft butter, and knead again, and again, and again. The gluten develops more and more, and you'll begin to feel more confident.

Knead in the preferment, wich at this stage should have doubled, and knead again till you have a proper dough. Now you should be able to do a proper French fold.

Shape in a ball (if you can). Cover and let rest in a greased bowl until doubled.

Punch down the dough, make a few stretch and fold and let it double again.

Transfer the dough to a slightly floured surface (I like wood), poke a hole right in the centre with your finger and gently ease the dough outwards (as shown in BBA for the couronne):

In a perfect world, the crown would be the same width all around. But this is not a perfect world.

Let it proof. You'll have to trust your experience now. If in doubt, bake it. If it's overproofed, when you take it out of the oven, it will colapse.

Paint with egg and spread a fair amount of moist sugar over the top:

Preheat the oven to 200C or 400F. Place your dough into the oven and lower the temp to 160C or 320 F. Bake for 35 min.

The smell while it's baking is awesome.

It should be reddish brown, tender, slightly moist in the inside. The crumb is light, soft, fluffy. This size is plenty enough for four persons.

¡Buen provecho!


Stephanie Brim's picture
Stephanie Brim

Adapted from the recipe in Bread Baker's Apprentice by Peter Reinhart

I'm finding the sweet dough as he made it too sweet. 6.5 tablespoons of sugar is just too much to me. I reduced it a little in my final dough, but just by 1/2 a tablespoon. The next time I make this it will be with the amount I show here.

6 tablespoons butter, shortening, or margerine (I used butter, but that's a taste thing)
4.5 tablespoons sugar (evaporated cane juice here)
1.5 teaspoons salt (slightly course sea salt)
2 eggs
1 pound flour
2.5 teaspoons active dry yeast
1 cup buttermilk

Cream first 3 ingredients. I proofed the yeast in about 1/4 cup of the buttermilk, lukewarm, then added that with the rest of the milk with the rest of the ingredients. I mixed for about 10-12 minutes by hand until the dough was starting to come together really well and the gluten had started forming, then did 2 stretch and folds at 40 minute intervals, letting the dough have an hour before shaping and proofing. I filled the rolls with 1 tablespoon of cinnamon to 6 tablespoons dark brown sugar and proofed them for about an hour before putting them in a 350 degree oven for about 35 minutes.

This produced the lightest, flakiest cinnamon rolls I've made to date. I really love them. I have a feeling that this may become my go-to sweet dough.

Sorry about the no picture thing. Maybe tomorrow if they're not all gone. :)

Subscribe to RSS - enriched dough