The Fresh Loaf

A Community of Amateur Bakers and Artisan Bread Enthusiasts.

durum

Isand66's picture
Isand66

I had a new brand of store bought guacamole in the refrigerator just calling for me to use it in a bread.  I made bread before with fresh avocados and I've been meaning to try it again with a higher percentage of avocados this time.

The pre-made guacamole had some tomatoes, peppers, cilantro and onions which ended up adding a nice kick to this bread.

I also added some left over mashed potatoes as well as greek yogurt and I used Durum flour as well.  The idea was to create a moist, soft bread with a sour undertone and I think I achieved this.

The crumb was nice and moist and open with a buttery yellow/green texture.  The addition of the guacamole and yogurt made this a very wet dough even though by the strict definition of hydration it really wasn't it.  This would have made great Ciabbata bread but I decided to stick with traditional Boules.  The second one I made stuck to the cloth liner since I guess I didn't add enough rice flour so it ended up a little flatter than the first loaf.

If you decide to make this and are intimidated by wet dough feel free to increase the flour percentage or cut back on the water.

Starter

71 grams Seed (Mine is 65% AP Flour Starter)

227 grams AP Flour

151 grams Water (85 - 90 degrees F.)

Mix seed with water to break up for a few seconds and then mix in flour until the starter form a smooth dough consistency.  Put it in a lightly oiled bowl and loosely cover and leave at room temperature for at least 10 hours.  The starter should double in volume.  Put the starter in the refrigerator for up to 1-2 days or use it immediately.

Main Dough

Ingredients

385 grams Starter from above (you may have a little left over from above)

315 grams European Style Flour (KAF...you can substitute bread or AP flour or a combination of the two)

251 grams Durum Flour (make sure not to use Fancy Semolina as it is too gritty)

122 grams Mashed Potatoes

308 grams Guacamole

73 grams Greek Style Plain Yogurt

335 grams Water (85 - 90 degrees F.)

16 grams Sea Salt (or table salt)

Procedure

Mix the starter with all the water except for 50 grams just to break it up.  Next mix in the flours for 1 minute on low in your mixer or by hand and let them autolyes for 15 minutes up to an hour.    Next add the salt, guacamole and yogurt.  Mix on low for 1 minute and then add the remainder of your water unless you feel the dough is already too hydrated.  Mix on low-speed or by hand for 4 minutes.  Remove the dough from your mixing bowl to your work surface.  The dough will be very sticky so you may want to use a bench scraper to help you do 4-5 stretch and folds.  Leave the dough uncovered for 10 minutes on your work surface or put it in a slightly oiled bows.  After 10 minutes either on your work surface or in your bowl do another stretch and fold, cover the dough and let it rest for 10 minutes.  Repeat this S & F procedure one more time and let it rest another 10 minutes.  Do one last S & F  and put the dough in a lightly oiled bowl for 2 hours.  If you don't feel the dough has developed enough feel free to do some additional stretch and folds while the dough is in the bowl and then put it in the fridge overnight.

The next day when I returned from work I removed the dough from the refrigerator and  I let the dough sit out at room temperature for 1.5 hours.  I then formed it into loaves and put them in floured bannetons and let them rise covered for 2 hours.

Score the loaves as desired and prepare your oven for baking with steam.

I then baked on my oven stone with steam at 450 degrees until both loaves were golden brown and reached an internal temperature of 205 - 210 degrees F.  I left them in the oven for 15 minutes with the heat turned off and the door open a crack to get the crust a little harder.

The end result was a nice golden-yellow crumb with a hint of green.  The crust was nice and crispy and the bread was moist and flavorful.

This bread has been submitted to Yeast Spotting here at http://www.wildyeastblog.com/

Cosmo Waiting for the Bread to Bake
varda's picture
varda

I haven't had a chance to comment or post lately due to difficult circumstances.   I have been reading and enjoying people's posts from time to time and regret that I haven't had a chance to comment on them.    Today I finally had time to uncover my Wood Fired Oven and bake.    I gave it a long firing since I haven't used it since a brief hot spell in March - then baked a couple of durum loaves.    It was hot, too hot and when I came out to check the loaves after 25 minutes, they were done, done, done, with a bit of char to boot.  

I have been frustrated lately with the raggediness of my score openings, and thought that it probably was a function of air flow in my gas oven.   Despite fiddling this way and that, I wasn't able to fix the problem to my satisfaction.    Today, I think I confirmed that it is oven related, as I was much happier with the result in the WFO.   

I only sprayed the loaves with water before loading and didn't put a steam pan in the oven.  

And here's the crumb:

Formula and method:

Seed hydration

67%


King Arthur All Purpose

95%


Whole Rye

5%


1st feeding


Total

percent

Seed

32


King Arthur AP

18

143


161

95%

Whole Rye

1

7


8

5%

Water

13

100


113

67%


282


Feeding factor


8.8


Final

Starter

Total

Percent


King Arthur AP

0

137

137

21%


Whole Rye

0

7

7

1%


Durum

300

0

300

47%


KA Bread Flour

200


200

31%


Water

334

96

430

67%


Salt

12


12

1.9%


Starter

240


22%


1086

169%


Starter factor

0.9


Mix all but salt - autolyse for 1 hour


Mix for around 5 minutes with salt


Bulk Ferment (BF) 1 hour 5 minutes


Stretch and Fold


BF 55 m


Stretch and Fold


BF 45 m


Cut and preshape


Rest 20 m


Shape and place in couche


Proof for 1 hour 25 minutes


Slash and spray with water


Bake in very hot WFO for 25 minutes


dabrownman's picture
dabrownman

Found some Canadian durum attta in the Indian aisle at the Lee Lee’s Chinese grocery- real globalization at work.  The brand was Golden Temple.  The ‘atta’ makes this flour different than regular durum or semolina since it still has the bran in it.


We love the way the yellow durum flour softly colors the inside of white breads and gives the outside a rich brown hue.   This was more of a basic white bread with just a hint of rye and WW in the starter, levain build and dough at a total of 10%.  The durum makes up 47% of this bread with AP flour comes in at 43%.  The hydration was 73%.

 For some reason, probably because I froze it the week before,  the 33% each AP, rye and WW starter that we keep 80 grams of in the fridge, was weaker than normal so it was slow to build strength over the normal 12 hour, 3 stage, levain build.   Usually it is ready to go in 8 hours in the summer heat but it took a full 12 hours to double this time.  Maybe it didn’t like the white flour diet it hardly ever sees too.

Preheating and Sylvia’s steaming method went well but the dough stuck to the wooden articulating form and deflated as it released but it sprang back very nicely in the oven like a ciabatta.   I’m guessing poor forming and slashing caused the batard to split along the length of both of the long sides of the bottom - so the bloom at the slashes was pretty weak.


The crust browned nicely and came out of the oven slightly blistered and cracked.  The crust was very crispy when it came out of the heat and then softened as it cooled like a ciabatta. 

The crumb was a pale yellow shade due to the durum and it had some nice holes, was airy, soft and moist.

This is tangy SD bread that tastes good.  It will make some kind of fine sandwich for lunch.  Method and formula follow the pictures. 

Method

This was a 2 day build where the levain was built and the flours autolysed with the salt  in the fridge for 10 hours waiting for the 12 hour levain build to finish .  At the 10 hour mark the autolyse was removed from the fridge so it could come to room temperature over the next 2 hours.

When the levain was ready it was mixed with the autolyse by hand with a spoon, kneaded on a floured surface for 1 minute.  The dough was then placed in a covered oiled bowl to rest for 15 minutes.  

5 S&F’s  were done on an oiled work surface every 15 minutes and the dough allowed to rest in the covered oiled bowl between each one.  The dough was then allowed to ferment and develop for 1 ½ hours on the counter before being refrigerated overnight.

The dough was removed from the fridge in the morning and allowed to come to room temperature for 1 ½ hours.    It was then pre-shaped into a batard and allowed to rest for 10 minutes before final shaping.  The batard was placed into a rice floured wooden contraption and allowed to double in a plastic trash sack until it passed the poke test – about 3 hours – about an hour longer than normal due to the levain not being as active as normal.

The batard was removed from the wooden contraption by folding it flat and upturning the batard on to parchment and a peel.  We liked the Egyptian stepped mastaba shape (it almost nearly left) on the bread so much, we will call this forming articulating appliance  the ‘Pharaoh’s Mastaba.’

Sylvia’s steaming method was used in the 500 F mini oven using a 1 cup Pyrex measure, half full of water, with a face towel.  This apparatus was micro waved for 1 ½ minutes to get the water boiling before putting it onto the cold broiler top as batard was load on it and placed with the steaming cup into the oven.

4 minutes into the bake the temperature was turned down to 450 F and steaming continued to the 12 minute mark when the steam and parchment was removed and the temperature tuned down to 400 F convection this time.  The batard was rotated 180 degrees ever 5 minutes until the batard was done, 205 F inside temperature  – about 20 more minutes – 32 minutes total.

 The batard was left in the mini oven for 10 minutes with the oven turned off and door ajar to further crisp the skin before removing it to a cooling rack.

Sourdough Durum Atta Bread      
      
SD LevainBuild 1Build 2 Build 3Total%
SD Starter1000102.00%
Rye50051.30%
AP1020104010.39%
Durum Atta030306015.58%
WW50051.30%
Water20504011028.57%
Total Starter501008023059.74%
      
Levain     
Hydration100.00%    
Levain % of Total26.38%    
      
Dough Flour %   
Durum Atta17545.45%   
AP17545.45%   
Oats153.90%   
Rye51.30%   
WW51.30%   
Potato Flakes102.60%   
Dough Flour385100.00%   
Salt71.82%   
water25064.94%   
Dough Hydration64.94%    
      
Total Flour500    
Total Water365    
T. Dough Hydration73.00%    
Whole Grain %4.00%    
      
Hydration w/ Adds73.00%    
Total Unbaked Weight872    
Baked Weight 77388.65%   
Isand66's picture
Isand66

Now that I have taken the dive bait and started baking with my Yeast Water Starter, it was time to try something a little more complicated.  Following the lead of my friend DA Brownman, I decided to try a combo yeast water levain and AP sourdough levain.  To make it interesting I made the yeast water levain using 100% durum flour in a 2 build process and combined this with my existing refreshed AP sourdough starter.

For the final dough I mixed in some Oat flour and some Wheat Germ for nuttiness along with a majority of Durum flour, some mashed potatoes with the skins and some walnut oil.

I have to say that this ended up being a great tasting bread with a wonderful crust and crumb.  I'm going to grill some for dinner tonight with some olive oil and grated cheese mixture which I anticipate will be mouth-watering.

The final bake had some excellent oven spring and like I said, the crust is nice and crispy with a perfect buttery and open crumb.

Yeast Water Starter Build 1

50 grams Durum Flour (KAF)

50 grams Yeast Water Starter

Mix the flour and Yeast Water in a bowl until thoroughly combined.  Cover the bowl and let it sit at room temperature for around 4 hours.  The starter should almost double when ready to proceed to build 2.

Build 2

Add ingredients below to starter from above and mix until incorporated.  Cover with plastic wrap and let sit at room temperature for 4 hours.

100 grams Durum Flour

50 grams Yeast Water

Main Dough Ingredients

125 grams Refreshed AP Starter (65% hydration)

250 grams Durum Yeast Water Starter (all of starter from above)

40 grams Roasted Wheat Germ

50 grams Oat Flour

455 grams Durum Flour

161 grams Mashed Potatoes (I like to mash them with the skins on and used red potatoes)

8 grams Walnut Oil

18 grams Salt (Sea Salt or Table Salt)

400 grams Water (80 to 90 degrees F.)

Procedure

Mix the starters with the water and stir to break it up.  Next mix in the flours into the starter mixture and mix for 2 minutes with your mixer or by hand.    Let the dough autolyse for 30 minutes to an hour in your bowl covered with a cloth or plastic wrap.  Next add in the salt, mashed potatoes and oil and mix on speed #2 for 4 minutes or by hand.  The dough should have come together in a ball and be tacky but not too sticky.

Next take the dough out of the bowl and place it on your work surface.  Do a stretch and fold and rest the dough uncovered for 10 minutes.  After the rest do another stretch and fold and cover the dough and let it rest for 10 minutes.  Do one more stretch and fold and put the dough into a lightly oiled bowl and let it sit at room temperature covered for 2 hours.  After 2 hours you can put the dough into the refrigerator for 24 hours or up to 2 days before baking.  Feel free to do some additional S & F's if you feel it is necessary.

The next day (or when ready to bake) let the dough sit out at room temperature for 2 hours.  After 2 hours form the dough into your desired shape and put them in floured bannetons, bowls or on a baking sheet and let them rise covered for 2 hours.  Score the loaves as desired and prepare your oven for baking with steam.

Set your oven for 500 degrees F. at least 30 minutes before ready to bake.  When ready to bake place the loaves into your on  your oven stone with steam and lower the temperature immediately to 450 degrees.  It should take around 20 - 30 minutes to bake  until both loaves are golden brown and reached an internal temperature of 200 - 210 degrees F.

Let the loaves cool down for at least an hour or so before eating as desired.

.

HeidiH's picture

Using Durum flour for "Non-Bread" (and other flours, too)

June 19, 2012 - 4:27pm -- HeidiH
Forums: 

I love using Durum patent flour in bread.  Yummy, yummy.  But for the last week or so, since I finally bought a motor for my pasta roller, I've been using the durum patent flour for fresh pasta.  Oh, happy, happy tummy!  Hubby has been looking over the flour shelf and giving hints about rye noodles and whole wheat noodles.  

dabrownman's picture
dabrownman

Boule and crumb.

We are continuing to discover a better method of summer baking in the Cuisinart mini oven.  This time we tried Sylvia’s steaming method by using a 1 cup Pyrex measuring  cup half full of water with a dish rag rolled up inside and microwaving it before putting it onto the preheated 500 F mini oven.

 No stone was used.  We think this steaming method is a good as covering the boule with a stainless mixing bowl and that both would be better with a stone.

 Even though the loaf was not slashed, since we managed forget to do so, I though for sure it would split somewhere but it only cracked down one side.  There wasn’t much spring - about an inch.  It browned up nicely though.  We love the color that durum brings to bread inside and out and about 50% of this bread was durum with the other 50% whole grains of various varieties with wheat germ and the flax ground.  The whole grains overpowered the yellow color of the durum with barn on the inside though.  This bread is much more about being a hearty multi-grain variety.

 The only slightly unique addition to this bread was using Vietnamese 902 Green Jasmine Tea for the liquid.  I just love Vietnamese jasmine tea and used one that is especially fragrant with jasmine blossoms. 

Boule crumb

 The crust was nicely browned and chewy after coming out of the oven very crusty.  The crumb was very moist and light and tastes very sour. It made a fine sammy and it was delicious as toast or plain.   I have noticed that, if YW and SD starters are mixed from the beginning of the levain build, the bread is less sour.  The boule sprang more than the loaf and the crumb was a little more open.

Loaf crumb

 This bread didn’t have the usual sprouts and pumpkin or sunflower seeds (since I also forgot to put the pumpkin seeds in) we like so well, but it is a very hearty and satisfying bread to munch on – until it is gone!  Formula and method follow:

Method

 The YW and SD levains were built separately this time and used 3 builds.  The first 2 builds for each were 4 hours apart and the levains were refrigerated overnight at the 8 hour mark right after the 3rd build as each had already doubled. 

 All mixing was done by hand.  The flours, ground flax seeds, wheat germ, chia seeds, salt and green tea with the salt were autolysed for 1 hour before the levains were added the next morning.   After mixing the levains in completely the dough was allowed to rest for 20 minutes.

 4 sets of S&F’s were done every 15 minutes.  The first 2 were done on a floured surface the last 2 in a well oiled, bowl.  The dough was rested in a plastic covered oiled bowl between the S & F’s.  The dough was allowed to ferment and develop on the counter for 1 ½ hours before retarding in the refrigerator for 12 hours.

 The dough doubled in the refrigerator overnight. The next morning the dough was divided in half and half returned to the refrigerator since it would be baked one hour after the first half.  The other half was allowed to come to room temperature for 1 hour and then pre-shaped into a loaf rested 10 minutes and final shaped into a loaf and placed into a Pyrex loaf tin and allowed to proof.  The other half of the dough went through the same process but shaped into a boule and placed into a rice floured basket to proof.

 After an hour and half the loaf had doubled, passed the poke test and ready to bake .  Sylvia’s steaming method was used with a wash rag heated in a half full Pyrex 1 cup measure in the microwave and the placed in the back of a 500 F preheated Cuisinart Mini Oven.  No stone was used.  The loaf was not slashed but was steamed  for 12 minutes and then the steam removed and the temperature turned down to 425 F convection this time.

 The bread was then rotated every 5 minutes until if reached 205 F internal and then was removed to the cooling rack with no extra crisping in an off oven.  After the first 5 minutes of convection baking the loaf was removed from the Pyrex loaf pan and baked directly on the rack. 

 A similar process was used for the boule except it was slashed and steamed on parchment paper on the top cover of the broiling pan for the first 12 minutes and then baked at 425 F directly on the rack.  The loaf took about 30 minutes of total baking time and the boule 3 minutes less.

50% Whole Multi Grain Durum Atta with Wheat Germ, Flax and Chia Seeds     
      
Mixed StarterBuild 1Build 2 Build 3Total%
SD Starter25100354.50%
Yeast Water503008016.00%
Rye50350858.00%
AP02530555.00%
Durum Atta0030306.00%
WW50400909.00%
Water5060011022.00%
Total Starter2252006048597.00%
      
Starter     
Hydration74.77%    
Levain % of Total33.24%    
      
Dough Flour %   
Durum Atta30060.00%   
Oats255.00%   
Dark Rye255.00%   
White WW5010.00%   
Whole Barley255.00%   
Whole Bulgar255.00%   
Potato Flakes102.00%   
Ground Flax Seed102.00%   
Whole 6 Grain Cereal306.00%   
Dough Flour500100.00%   
Salt91.80%   
Green Tea 42585.00%   
Dough Hydration85.00%    
      
Total Flour777.5    
Green Tea - 425, Water - 207.5632.5    
T. Dough Hydration81.35%    
Whole Grain %53.05%    
      
Hydration w/ Adds80.32%    
Total Weight1,459    
      
Add - Ins %   
Wheat Germ102.00%   
VW Gluten102.00%   
 Chia 20204.00%   
Total408.00%   
Ruralidle's picture

Altamura bread

June 1, 2012 - 2:21pm -- Ruralidle

I have been able to get some De Ceccio durum wheat flour from an online retailer in London (Luigi's).  I have been trying to bake a version of Pane Tipo di Altamura - the one that looks like a Cardinal's hat with four points - but I can't get the points to look good. 

I made a biga using 75g ciabatta flour (from Shipton Mill), 125g of Durum wheat flour, 120g bottled water and 1g fresh yeast.  That fermented for about 15 hours (it was quite warm in the UK overnight into yesterday so at about 21C).

Isand66's picture
Isand66

I was inspired to try adding some balsamic vinegar into one of my breads after reading about Karen Hanseata's Wild Rice bread on the Fresh Loaf this past week.  I have some cherry balsamic  that I love using so I was curious to see if it would have any affect on the taste of my bread.

While looking for some different components to add to my next bake I discovered that my wife had stashed some Toasted Almond Flour in the refrigerator so I figured why not give it a try.

I also used some Potato flour and Durum flour along with some hickory smoked sea salt and assorted all natural grains for this bake.

I cut back on the hydration slightly from my previous multi-grain breads and not counting the 359 grams of water used in the soaker it comes in at only 56%.  There is no doubt that the water from the soaker makes the final dough much moister than 56%.  I also did not count the soaker grains as part of the flour.  According to the BBGA (Bakers Guild of America) soakers including the water and other ingredients should be considered "hydration neutral".  This is obviously a difficult concept to control but none the less that is the prevailing rule in the industry.

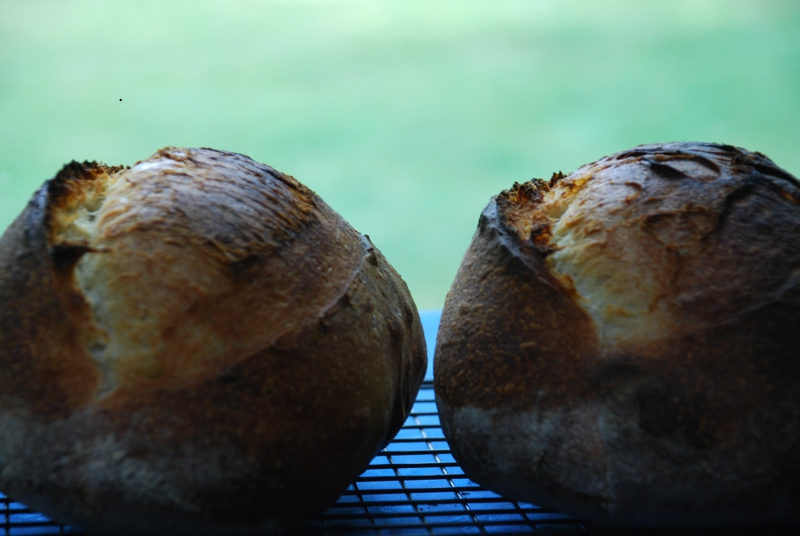
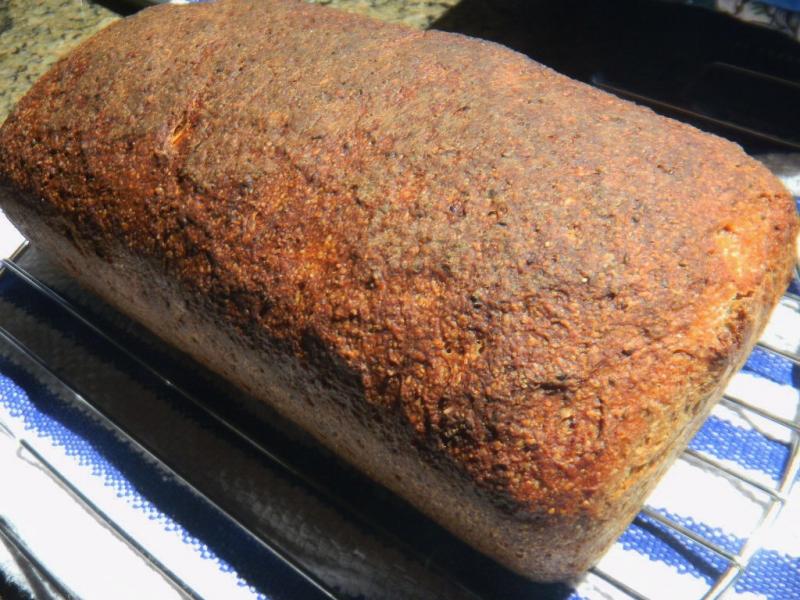
For this bake I made a boule as well as a circular shape similar to a large donut.

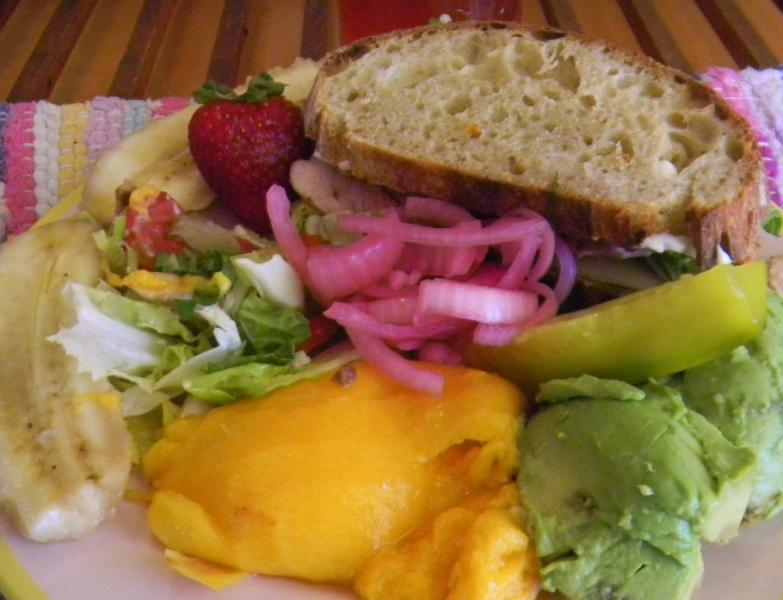
The final dough came out very tasty. You can see the toasted almond flour imparted a slightly orange tinted color in the crumb and it gives it a very nutty flavor.  I can't say that I tasted the cherry balsamic vinegar but I'm sure it added to the overall flavor profile somehow.  The crumb is nice an open and moist and you can see some of the soaker grains melded together.

If you venture to try this, please let me know how your attempt comes out.

Ingredients

Soaker

28 Grams English Malted Flakes

60 Grams Bulgar Wheat

55 Grams Organic Oat Bran

55 Grams Cracked Wheat

285 Grams Boiling Water

Final Dough

425 Grams White Starter recently refreshed (65% Hydration Seed Starter)

200 Grams Durum Semolina Flour (KAF Brand-make sure  you don't use the Fancy Semolina flour which is too gritty)

250 Grams Bread Flour (KAF)

58 Grams Toasted Almond Flour (KAF)

35 Grams Potato Flour

14 Grams  Hickory Smoked Seas Salt or Table Salt

264 Grams Water, 90 degrees F.

12 Grams Cherry Balsamic Vinegar (Feel free to substitute any Balsamic you have or just add more water)

Directions

Mix all ingredients for soaker in a bowl and add boiling water.  Let it sit for 2-3 hours covered until the grains are soft.  (I actually only let it sit for 1 hour which was long enough).

Add the water and flours into your mixing bowl and mix for 2 minutes on low.  The dough should come together in a shaggy mess and should be relatively moist at this point.  Let it rest (autolyse) for 25 minutes and then add the salt, balsamic vinegar and the soaker and mix for 4 minutes more on medium low-speed.  If necessary you can add some additional water or flour but be careful not to make the dough too dry.  It should be relatively sticky but not soupy.

Remove dough from mixing bowl to work surface and do a stretch and fold.  You may need to wet or oil your hands and the work surface since the dough will still be very sticky at this point. Form the dough into a ball and let it rest uncovered for 10 minutes.  Let the dough rest uncovered for 10 minutes.  After 10 minutes do another stretch and fold and cover the dough with a moist lint free towel or plastic wrap sprayed with non-stick cooking spray.  Do another stretch and fold two more times letting the dough rest 10 minutes each time.

 After the last stretch and fold put the dough into an oiled bowl and cover it tightly.

Let the dough sit in your bowl for 2 hours at room temperature.  It should only rise slightly at this point.  After the 2 hours are up put in your refrigerator for at least 12 hours or up to 3 days.

When ready to bake the bread take your bowl out of the refrigerator and let it sit at room temperature for around 2 hours.  After 2 hours shape the dough as desired being careful not to handle the dough too roughly so you don't de-gas it.

To make the circle bread I formed half the dough into a cylinder and formed it into a circle.  I placed a small glass bowl in the middle wrapped in plastic wrap that I sprayed with cooking spray to prevent it from sticking to the dough.  I placed the dough into a large banneton and let it rest per below.

Let it sit at room temperature for 2 hours covered with oiled plastic wrap or a moist cloth.

Pre-heat oven with baking stone (I use one on bottom and one on top shelf of my oven), to 500 degrees F.

Slash loaves as desired and place empty pan in bottom shelf of oven.

Pour 1 cup of very hot water into pan and place loaves into oven.

Lower oven to 450 Degrees and bake for 25 - 35 minutes until bread is golden brown and internal temperature reaches 200 degrees.

Shut the oven off and leave the bread inside with the door slightly open for 10 minutes.  This will help dry the loaves out and keep the crust crunchy.

Let cool on cooling rack and enjoy!

breadforfun's picture
breadforfun

Every once in a while, things don't go exactly as planned, but the result is really good anyway.  This is one of those times - a happy accident.

I promised to bring some bread to a dinner party with friends.  I made a delicious loaf of David's San Francisco sourdough, and I wanted to make a durum flour loaf, like Leader's Pane di Altamura.  I also wanted to try a loaf shaping technique that I saw in this video.  [I think the original reference to the video was posted recently on TFL, but I can't find it, so my thanks to the poster and my humble apologies for not being able to give credit.]  Having never tried either the recipe or the technique, and reading some posts on TFL about some problems with Leader's formula, at the last minute I decided to bail and modify the recipe to one I felt a little more comfortable with. 

I had already built the levain in three stages and was ready to mix the dough.  I started with my stock 100% hydration starter, and converted part of it to an 81% H using whole wheat durum as the first refreshment (formula below in the "Method" section).  A second refreshment was done after fermenting overnight, and the final build was mixed after 13 hours and left to ferment again overnight.  I found the whole wheat durum peaked too quickly (6-7 hours), so for the final build I switched to Extra Fancy durum.  This was beautifully peaked and full of gas bubbles the next morning (sorry, no pics).

After looking at some past Altamura-type loaves that I had baked in the past, I decided on a 40% AP flour/60% Durum blend for the final dough.  It turned out to be fairly easy to work with, even though the final hydration was in excess of 70%.  The dough had excellent structure, but when it came time to score the loaves, I found that it was too wet a dough to score like in the video and the result is the top loaf in the photo below. It was scored with the baker's knife, but the dough was too wet to coax up the corners into the desired peaks.  The second loaf was scored with a lame.

The oven spring was so huge you can barely see the score in the bottom loaf.  It was also underproofed, but overall look didn't suffer too badly.  The crumb was extremely moist and chewy with lots of irregular sized holes.  The crust was also chewy, perhaps a bit too soft for my tastes, but the overall flavor was very good. 

Here's the formula and method. [Note: this formula is revised based on discussion below.]

I think that in order to be able to shape as in the video, the hydration needs to be in the 60-65% range.  I will definitely try this again.

-Brad

Pages

Subscribe to RSS - durum