The Fresh Loaf

A Community of Amateur Bakers and Artisan Bread Enthusiasts.

dan lepard

hanseata's picture
hanseata

Dan Lepard, master baker from England ("The Art of Handmade Bread"), travels (and bakes) all over the world. He also contributes regularly to the weekend issue of the "Guardian", and is always good for an interesting recipe.

I tried several of them, and never had a bad experience. Whether marmalade, pancakes, pasties, cakes or his "boozy" Ale House Rolls, we liked them all. When I saw his recipe for Stilton Crust Sausage Rolls, I was intrigued by the idea to spruce up simple store-bought puff pastry with layers of blue cheese.

There was still some puff pastry in the freezer, and I overcame my inner Scrooge to purchase real, imported Stilton.

Preparing the crust was easy. I crumbled the Stilton evenly over one sheet of thawed puff pastry, placed the second sheet on top, pressed it down with my hands to adhere, and then rolled it out to two times its original size.

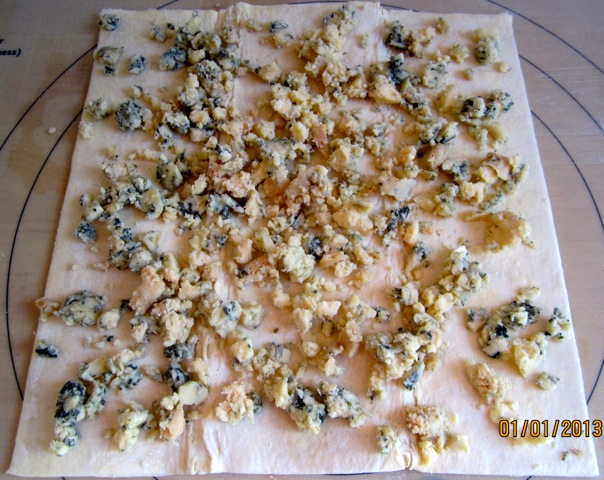
The package is then folded, re-rolled, and folded again, creating several layers of cheese within the pastry. After these turns it needs a nap in the refrigerator for at least half an hour.

While the dough was resting, I prepared the sausage filling. An opened package with Johnsonville's "Stadium Brats" - the only American bratwurst that tastes like a German one - was my sausage choice, and, instead of the ground pork the recipe suggests, I took 80% lean ground beef (another leftover in the fridge.)

The idea of a fennel seasoning didn't appeal to me too much. Though I like fennel, and use it regularly in my breads, I do not care for the pervasive anise-y flavor of American Italian sausages (something never heard of in Italy, as my half Italian husband assures me.)

Bratwurst, ground beef, marjoram and white breadcrumbs are mixed for the filling

With the German type bratwurst a marjoram seasoning instead of the fennel seemed the obvious choice (I used only 1/2 teaspoon.) "Stadium Brats" don't have casings that need removing, and my food processor made mixing a cinch. (I recommend chilling the filling until using.)

The next step was arranging the filling on the chilled pastry. I wasn't quite sure what size of rolls I would end up with - you have to consider that before you roll out the dough - but mathematical imagination is not my forte, and my rolls turned out a bit larger than Dan Lepard's.


The blue cheese is visible through the  pastry

I placed the filling on the lower half of the pastry, leaving a free edge for the seam. The upper half is then folded over, and crimped with a fork. To create a neat edge, I used a pizza roller to cut off the excess dough.

Shaped loaf with crimped edges

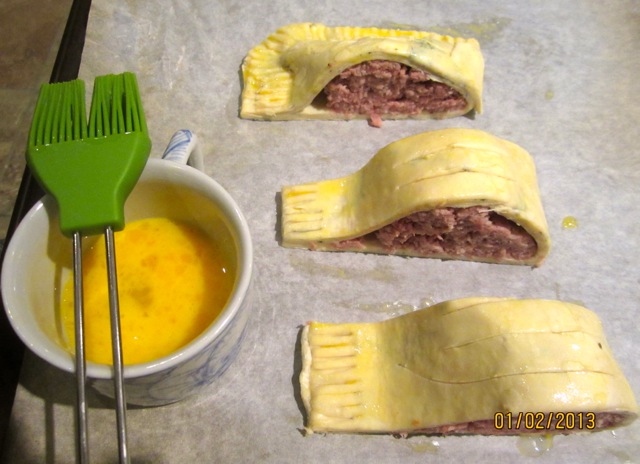
Since I wanted to freeze some of the rolls, I did not apply egg wash over the whole loaf, but cut it first into slices. My loaf yielded 10 slices/rolls (about 1 1/2 inch wide.)

After brushing the rolls with the beaten egg, I slashed them with a sharp knife, parallel to the cut sides.

The sausage rolls baked for 25 minutes, at 400ºF/200ºC, to be golden brown and sizzling. I realized, though, that a lot of fat was rendered from the filling during the bake, leaving the bottom of the rolls soft. Next time I would follow Breadsong's advice to render the fat from the meat before mixing the filling. Or elevate the rolls with a rack on top of the baking sheet.

We had the Stilton Crust Sausage Rolls for dinner, and LOVED them! The blue cheese in the crust added a pleasant spiciness, and the seasoning of the sausages, plus the marjoram, was sufficient to flavor the whole filling - no extra salt or pepper is needed.

Dan Lepard's recipe in the "Guardian" you can find here.

TO MAKE AHEAD: The cheese pastry and the filling, or the filled loaf (without egg wash), can be kept in the refrigerator for at least a day.

The shaped rolls (without egg wash!) can be easily frozen, individually wrapped in plastic, and placed in a container with lid. They don't need to be thawed, but before baking, brush them with beaten egg, and slash the top with a sharp knife. The baking time will be a bit longer for frozen rolls.

PiPs's picture
PiPs

As the holiday season rapidly approaches I decided to squeeze in what’s likely to be my last ‘real’ rye bake of the year before concentrating on the light and sweet Christmas goodies.

Andy’s fascinating and instructive posts on Borodinsky, Auerman Formulas and other high rye breads have kept me fascinated and entertained while perched in a bus to and fro from work. At first I found the list of ingredients overwhelming and that was before even fully digesting the multi-stage processes … I was going to have to be present and pay attention, plus top it off with a little planning. This was even more apparent with the amount of time needed to translate this formula to the blog …

I settled upon Andy’s Borodinsky – The Auerman Formula [or thereabouts anyway] but tweaked it slightly … um … quite a bit - sorry Andy :)


Altus and coriander (I love to chew on the altus crusts)

The dark ryes I have baked up until now have been a one stage process with a rye sour built and fermented before being added to the final ingredients. This formula is a tad more involved and uses a three stage process. A rye sour is built and fermented. With the sour fermenting, a scald of boiling water, flour, and other ingredients is produced. The sour and scald are then combined into a sponge which is fermented further until it is mixed with the remaining ingredients for the final shaping, proving and baking.

I deviated/strayed from Andy’s formula in a few ways. Firstly I have altus which I planned on adding to both the sour build and scald. Instead of the red malt asked for in the formula I used roasted rye malt that I had produced earlier in the week. It is richly coloured flour with a bright sweet roasted flavour and was bound to add some flavour to the finished loaf.

I kept the overall hydration level the same, but altered the hydration of the sour and scald builds to allow for a small amount of water to autolyse the wheat flour used in the final paste. This is a tip I received from minioven that allows the gluten in the wheat flour to develop before being mixed into the final paste. Finally, I sifted the final addition of rye and wheat flour.


Roasted Rye Malt


Scald and sponge


Further abroad Borodinsky

Overview

Weight

% of flour

Total flour

1405g

100%

Total water

1195g

85%

Prefermented flour

702g (30% +20%)

50%

Desired dough temperature 25°C


1. Sour build – 18 hrs 24°C


Starter (Not used in final dough)

21g

1.4%

Fresh milled rye flour

421g

30%

Altus (100% rye sourdough)

50g

3.5%

Water

492g

35%

Total

963g


2. Scald


Coarsely milled rye

281g

20%

Roasted rye malt

70g

5%

Blackstrap molasses

84g

6%

Altus (100% rye sourdough)

50g

3.5%

Freshly ground coriander seed

14g

1%

Water

492g

35%

Salt

21g

1.5%

 Total

1012g


3. Sponge – four hours @ 25°C


Sour from (1.)

963g

68%

Scald from (2.)

1012g

72%

Total

1975g


4. Final paste – one hour @ 25°C


Sponge

1975g

140%

Fresh milled rye flour sifted

423g

30%

Fresh milled wheat flour sifted

210g

15%

Water

210g

15%

Total

2818g


Method

  1. 4:00pm day before, prepare the rye sour.
  2. 10:00pm day before, prepare the scald. Grind coriander seeds and combine with remaining dry ingredients. Measure the molasses into a saucepan cover with boiling water and bring to a rolling boil. Quickly stir in the dry ingredients with a wooden spoon and remove from heat and cool. Weigh scald and add further boiling water if necessary to account for evaporation.
  3. 9:00am following day, combine and mix the sour and scald and ferment a further four hours.
  4. 12:00pm combine sifted wheat and final water together and mix thoroughly with wooden spoon or whisk and allow to autolyse for one hour.
  5. 1:00pm add autolyse dough, remaining portion of sifted rye flour to the sponge and form the final paste.
  6. Shape and place into greased tins (mine were 8 x 4 x 4 Pullman) seam side down.
  7. I proved these for one hour before docking and placing into oven with lids on for 15 minutes at 270°C  then a further hour at 210°C

The final paste felt drier than the dark ryes I have baked recently – perhaps the molasses or malt flour? It was still a paste but felt it lot easier to handle. I as a little worried that the rye flour was absorbing too much water which may be a sign of excessive starch damage …

As seems to be the case with the rye breads I bake using freshly milled flours the final proof was exceptionally quick. I am hesitant to take my eyes from these breads during their final rise … the first sign of readiness and its straight into the oven … I don’t even debate myself anymore.

When pulled from the oven the bread felt soft and springy to the touch … the crust a dark brown with red hues. After cooling they were wrapped in a tea towel before storage in a plastic bag for a day … with me looking on longingly – all the time fingers crossed. I still lack confidence in my rye baking …

Finally I could slice – it was a cinch with a crust that was soft and smooth. The crumb was still moist but that will decrease over the coming days. A slice could be folded in half without breaking … did I mention it was soft?

The flavour is bright and I can pick the brightness of the coriander and tartness of the molasses. On the first day the molasses seemed stronger but by the next it had equalled out to rich round flavour. Most of all I am struck by the gentle mouth feel. It does not feel like a heavy rye bread and I look forward to the flavour developing throughout the week.

I also started playing with a rye crsipbread based on the formula in Dan Lepard’s Handmade Loaf. I omitted the commercial yeast and added some flavours inspired by his sweet rye formula – honey, ground cardomann seed, aniseed, and lemon zest. They are crunchy on the edges with a chew towards the centre. I love this combination of flavours …

All the best and best holiday wishes,
Phil

saumhain's picture
saumhain

It's been a month since I started baking with sourdough. So far every single recipe I tried (and there were plenty of them really) was successful and delicious!

This loaf is made with Italian 00 flour, corn flour (in the recipe white corn flour is used; I used simply fine corn flour, don't know whether it's the same thing) and whole-wheat. Oh and whey. I made it, as suggested by Dan Lepard, by stirring a bit rennet in milk and then straining mixture through cheesecloth.

cornandwhey

I baked with steam at somewhat 220 C (my oven is damn old, it's hard to tell) for 40 minutes.

I really like the way it turned out, the colour, the crumb and holes - everything is perfect! I bet, the colour could have been more deep, but I was sort of afraid that the bottom might burn.

jennyloh's picture
jennyloh

With the starter that I made a week ago, I finally got to try a recipe using Dan Lepard - The Handmade Loaf.  White Leaven Bread Pg 28.

I halved the ingredient as I was not sure how it'll turn out.  With the freshly made starter,  I just did 1 refrehment.  Made a little too much,  and the rest went to making muffins and pancakes.

Ayway,  it was quite an experience.  I wanted a good well developed gluten,  and I wanted to nice holes in the crumbs.  I decided to do more rest,  stretch and fold and add my salt last.  

Thursday night:  Prepare Leaven.

Friday night:  Prepare dough - did a few 1/2 hour stretch and fold.  I almost forgot the salt,  added in after my 2nd or 3rd stretch and fold.   Shape - was really really careful not to burst those bubbles that were forming,  retard in fridge - wasn't sure about this step as I didn't want to over proof the dough.  But I needed my sleep.

Saturday morning:  Final baking - Heated my oven with cast iron skillet (since I had difficulty finding a baking stone,  this is a good alternative). I score the dough,  should have scored deeper.  I was not sure whether to steam the oven,  as the book only described to spray water on the dough.  I went ahead to steam the oven as well, every 10 minutes, squirt on the iron cast skillet.  I had difficulty sliding the dough from my pizza peel onto the skillet,  one of the ends drooped down,  tried to push it but was too late,  that portion would not budge.  Well,  I went ahead anyway.  Turning every 10 minutes as my oven couldn't turn with the skillet sitting on top of the turntable.  

I was really really pleased with the outcome.  The dough had a great oven spring, browned nicely,  and there were open crumbs,  and you can see the stretching of the gluten.

Even my father was happy about the outcome (he had been staying with me for the past month), and not exactly giving me compliments on my other breads so far. I think I can add a little more salt...The bread was not sour at all,  but has a nice fragrant to the taste.  


Jenny

More details - click here.


Doughtagnan's picture
Doughtagnan

As it is Easter I made my 1st ever bun attempt (ditto using a piping bag for the crosses!) the recipe is from Dan Lepard's baking column in the UK Guardian newspaper. As iv'e never used a piping bag before I should have opted for the atheist no cross buns!, but I managed okay despite a piping bag malfunction (it split) which caused a little spillage. The result was very tasty and would have been richer if I had used Mackeson Stout (I subbed a Dark Mild Ale). For the recipe please follow this link

http://www.danlepard.com/front-carousel/2010/03/2131/spiced-stout-buns/

And the pic's before and after baking with compulsory crumbshot before a good helping of french butter, cheers Steve


SallyBR's picture

Bake Along with Dan Lepard

November 30, 2009 - 9:15am -- SallyBR
Forums: 

Yesterday I participated of a great event organized by Dan Lepard - called Bake Along.  A bunch of folks from all over the world baked together a Dundee Cake, following Dan's instructions, posted step by step online


it was absolutely great!  If you want to see the results, here is the link at The Guardian


http://tinyurl.com/yk3k8hn


tigressbakes's picture
tigressbakes

mill loafmill loaf crumb


This is the second bread that I've baked with my white sourdough starter and it is mmm-mmm good!

This is the Mill Loaf that is in Dan Lepard's The Handmade Loaf. Which I might add is a beautiful book!

I must say that I followed this recipe pretty much to the T - and it really worked! I have to work on my shaping and scoring but YUM! And I am very happy with the rise, much higher than my first sourdough attempt. I think that is due to my getting a bit better at shaping. 

It has 60% white, 30% wholewheat, and 10% rye, that is pretty much it, and water at 55% and 2% salt. I did not add the malted grains which were optional. Dan suggested that one could work with any grain flours to fullfill the 40% - as long as 60% was white flour. I did it as the recipe said the first time around. 

What was interesting was the technique of basically kneading the dough for only 10-15 seconds for 5 rounds - and than letting it set for 10 minutes to 1 hour depending on the round. This was actually the series for each round: 10 min, 10 min, 30 min, 1 hr, 1 hr. And then the final proofing for me lasted just bit over 5 hours. Scored and put the loaf in the oven on the preheated stone at 430 - sprayed the top and put a cup of hot water in a pan I had preheating in the oven. And then did 2 more rounds of spray to create steam. The recipe said 50 to 70 minutes. But after 40 it looke done - and interenal temp was 200. (I tried a new oven rack position and unfortunately the rise was so good the top got a little close to the heat source - I think the bottom could have gotten just a tad darker but I was afriad to ruin the beautful top crust).

I would recommend this loaf highly. I lived in Paris for almost 5 years and this bread reminds me of a country loaf that I used to buy at the local bakery.

It is a hearty loaf, quite substantial, but moist and lightly sour. It is VERY good! I am very pleased with myself I must say!

I am hooked more than ever! 


Subscribe to RSS - dan lepard