The Fresh Loaf

A Community of Amateur Bakers and Artisan Bread Enthusiasts.

Ciabatta

Shutzie27's picture
Shutzie27

1:52 p.m.:

Well, the dough has risen once and, as instructed, I have shaped it into two "irregular ovals," or at least what I hope are irregular ovals. Now they are sitting atop parchment paper, hopefully doubling in size again, waiting to be transferred to my pizza stone on the bottom of rack of the oven, which I will turn on to pre-heat in about 10 minutes. Here they were, just before I covered them:

So, there they are. I've never baked bread on parchment before, so here's hoping I can slide these on to the stone and not ruin the shape.

Niggling worries: The dough did have some bubbles, but I don't know that I would call it "bubbly." It is elastic, certainly, but awfully sticky. Since the recipe says the dough will be sticky, I suppose this is alright, but I am a bit worried. Ok, time will tell.....literally.....

Update to follow!


OldWoodenSpoon's picture
OldWoodenSpoon

On Friday night I baked the ciabatta from Rose Levy Beranbaums's The Bread Bible (TBB).  On Saturday I decided to try Peter Reinhart's recipe from Bread Baker's Apprentice (BBA) for comparison.  I am glad I did.  My results were success-failures.  I failed to properly shape the loaves from TBB, and as a result I ended up with broad, flat, spreading loaves with little or no loft/spring.  As a consequence of that I nearly over-baked them, although by appearance you would not think so.  I should have pushed the hydration more in the BBA loaves, because they ended up a bit "bready".  Here are my results.

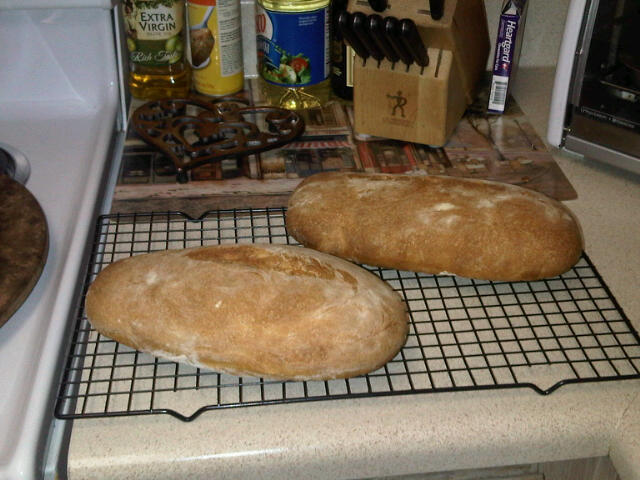
First, Friday night from The Bread Bible:


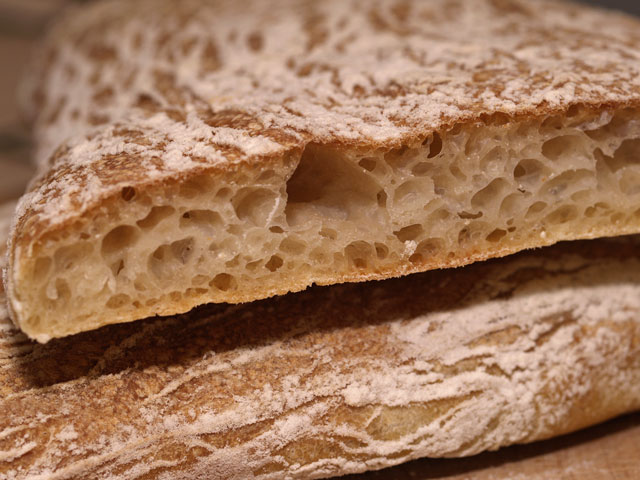
As you can see, there was little true "spring" in these loaves, but the crust came out thin and crisp as it should, and the crumb is filled with holes both big and small.  I especially like the gelatinization of the starches that is evident here.  This bread is not perfect, but it is good to both the eye and the palate.  We have been slicing it big, then splitting it crosswise, and making very tasty sandwiches from this.

After these results I decided to try a comparison to broaden my experience, so I let Peter Reinhart challenge me.  Saturday night I baked the ciabatta from the BBA.  I have a couple more pictures from that bake than I do of the TBB bake above.

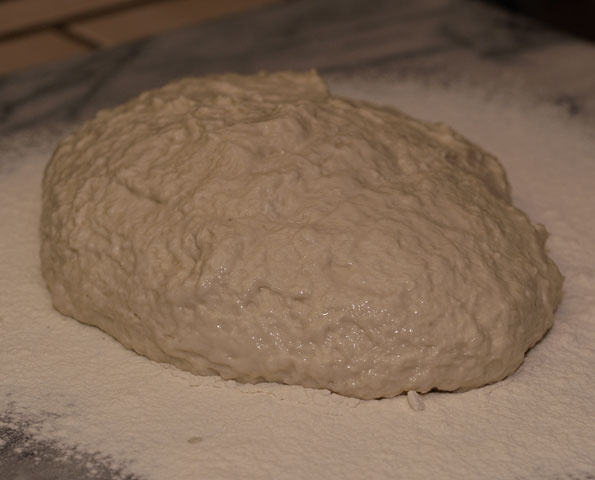
The shot above attests to how wet this dough was, although after the bake I concluded it needs to be wetter still.  Below are the (very) rustic loaves proofed, loaded on my "Super Peel" and ready for loading into the oven.

I baked these on my unglazed quarry tiles, as exactly according to direction as possible, even spraying the oven repeatedly during the early 90 seconds of the bake.

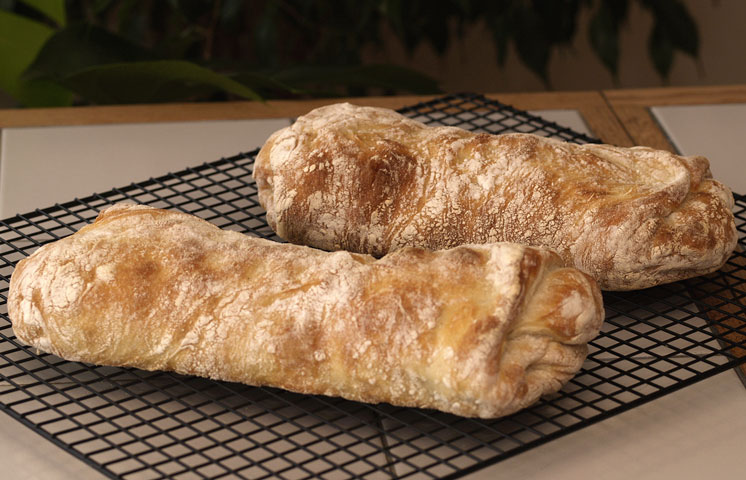
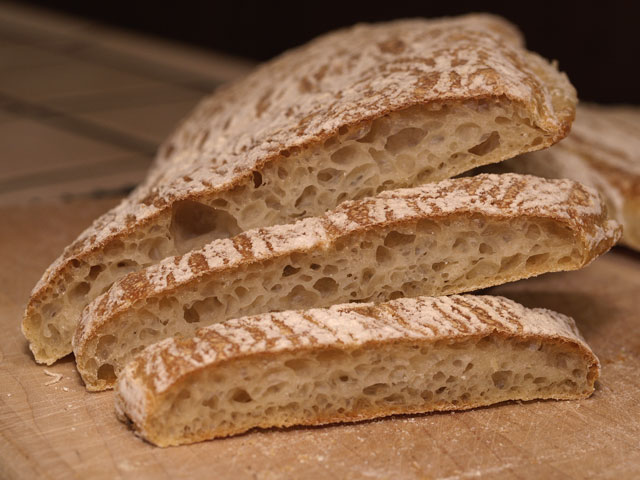
These loaves were not shaped perfectly, but they live up to "rustic" in character.

The folds are quite evident in my loaves, not that I think that is a bad thing.  It adds to the rustic character, and does not detract from the taste at all in my opinion.  The overabundance of flour, however, is another thing entirely, as the next shot shows.

This dough needed to be wetter, and the crumb attests to this.  The directions specify a variable amount of water from 3 to 6 ounces.  I used most of the 6 ounces.  In a sidebar Mr. Reinhart advocates raising the hydration even more, so long as the dough will sustain the stretch and folds needed to develop the gluten.  My loaves indicate this is not only a good idea, but necessary to achieve truly good results.

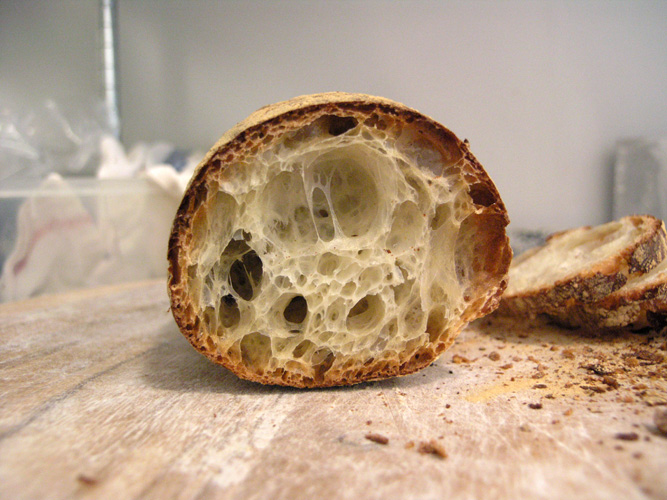
This closeup of the crumb shows how truly "bready" the crumb turned out.  It very much needed more water/less flour.  In addition, the small white "scrolls" in the crumb disclose my excess in flouring the dough between stretch and folds, and in shaping.  I was a bit too enthusiastic in "generously" flouring the dough between operations.  Controling this, too, will help me improve next time.

These recipes are for the same bread, but as I turned them out they seem to be from different planets.  Despite the lack of loft in the RL version I think I did the bestjob of that bread.  I got a much more true result, albeit altitude challenged!  The BBA recipe bears repeating as well, because with still higher hydration, and more moderation in that "generosity" between operations it will, no doubt, turn out a beautiful loaf.  I much prefer the bBA approach to shaping, and I like the rustic nature of the loaves once they are baked.

Two pairs of slippers: Two different ciabattas.  Too much fun!
Thanks for stopping by.
OldWoodenSpoon


Footnote:  For those not aware:  ciabatta is Italian for "slipper" and the shape of this loaf is supposed to evoke the image of a slipper when done correctly.  Hence the name.

varda's picture
varda

The other day I stopped into a Whole Foods store in the hope that I could find some white rye.   I couldn't, in fact the person I spoke to had no idea what white rye was.  But there on the shelf were bags of King Arthur Italian Flour.   Wow!   No shipping.   But what to make?   I decided on Ciabatta.   Specifically Hamelman's Ciabatta with Poolish (p. 107 of Bread).   Only after I had mixed everything up did I remember that the Italian Flour bag had a note recommending less water for this flour than others - and I had even accidentally put in around an extra ounce of water.   So it was wet.   I just decided to go with it instead of adding more flour.   It was too wet to take out of the bowl to stretch and fold, so I used the in the bowl method.   Then I decided it was too wet to move it around too much so after the first rise, I poured it (yes poured) into a dutch oven and let it do the second rise there.   Then  baked with the top on for 30 minutes, and the top off for 25.   What did I get?    Well it looks a bit like a three pound muffin.  

with an extremely blistery top:

and the lightest feathery texture I've ever managed to produce.

Yum!  

songwritergirl's picture
songwritergirl

I'm new to the Fresh Loaf website, and a new student of home bread-baking. I want to chronicle my journey on this blog, and I'm definitely after that ultimate taste and texture in creating bread.  

These whole wheat ciabattas aren't my first attempts at baking bread, but they are my favorite flavors and textures so far. They're made with white whole wheat flour, (hard white wheat), using the recipe formula for Whole Wheat Focaccia from "Peter Reinhart's Whole Grain Breads:New techniques, Extraordinary Flavor."

The flavor and crust are excellent, although I was hoping for a little more open and airy crumb. I think next time I'll try using regular whole wheat, (hard red spring wheat), a better thermometer, and either a shorter or longer delayed fermentation in the fridge, depending on how the dough seems to be developing. Once I learn to create my own natural leaven, I may try that with this recipe too.

Here's short list of ingredients and tools that I use:

King Arthur Flours

baking stone

parchment paper

pizza peel

oven thermometer

I'm really enjoying this learning process, and eating the bread I bake is such an immediate and gratifying creative experience. I love the community that sharing food can create, and one of the things I love doing most is sharing an evening with great friends, food and conversation.

And great bread.


PeterPiper's picture

Pillow ciabatta

October 20, 2010 - 8:58am -- PeterPiper

I've been playing around with the no-knead ciabatta recipe for a while, and am finding a major problem:  my ciabatta comes out with one giant air pocket.  Last night I made three loaves all from the same 100% hydration recipe.  With the first I stirred the 18-hour proofed batter then poured out one loaf and put it right in the oven.  Here's how that one came out.

breadbakingbassplayer's picture
breadbakingbass...

Sorry for the late update of this post...  This is my attempt at a no knead ciabatta a la Jim Lahey.  It's basically his same ciabatta recipe at 87.5% hydration but with a little more salt, and some improvisations with technique.  I am very happy with my result except that I should have squished them down with my fingertips during the initial stages of the final proof to prevent the cavern that you will see in one of the crumbshots.  This result though is the most aerated crumb that I have ever gotten...  Ever...  I got a 28% water loss after bake...

Recipe:

400g AP

350g Water

10g Kosher Salt

1g ADY

761g Total

Method:

9/23/10

11:07pm - Mix all ingredients in bowl, cover.

11:54pm - Stir again, cover.  Go to bed...

9/24/10

8:15am - Dump dough out onto well floured surface, turn dough, place onto well floured iinen couche, cover and let rest.

8:40am - With a bench knife, cut the dough in half lengthwise, flour more, pull up couche to separate the two loaves, cover and let proof for 1 hr.  Arrange baking stones in oven along with steam pan.  Fill pan with water and lava rocks, Preheat oven to 500F with convection.

9:40am - Turn off convection.  Turn loaves carefully onto floured peel and place them into the oven directly on the stone.  When last loaf is in, pour 1 cup water into steam pan, close door.  Bake for 10 minutes at 450F, no convection.

9:50am - Take out steam pan, close door, bake for another 30 minutes, rotating loaves half way through bake.  Loaves are done when the internal temp reaches 210F, and are about 15% lighter than their pre baked weight...

Note: Here is my kitchen set-up.  I have a gas/convection oven, which vents out.  In NYC, we don't have exhaust systems that exhaust to the outside.  Instead, they exhaust into your face...  Fortunately my stove/oven is near the window.  I have a big fan that I point towards the outside.  When I start preheating the oven, I turn the fan on full blast...

10:10am - Let loaves cool before cutting...  At least 1 hour or so...  Notice the crackly crust, and the slug like shape...

Here are a bunch of crumbshots...

Oops!  That hole is big enough to put a sausage into...

Playing with bread...


Notice the crispy crackly crust...  This was so messy...  But really yummy...

Some more parting crumbshots...  Enjoy!

Tim

Franko's picture
Franko

This past Sunday I was in the book store browsing...where else.. but through the cooking section. One of the books that interested me the most was Richard Bertinet's 'Crust', in particular for some of the unique recipes in it. It also included a DVD of Bertinet demonstrating his techniques for hand mixing and kneading brioche and levain. The book has some very good photography as well and the price was reasonable so I went for it. Mr. Bertinet has been mentioned a fair bit lately on TFL so I was curious to see what I could learn from him. While the book is not particularly technical, primarily being meant for an advanced home baker I think, his methods are that of an expert baker who has a clear and easy style of explaining a formula or procedure.

When I mentioned in a thread on Sunday http://www.thefreshloaf.com/node/19547/richard-bertinet-wins-major-uk-award that I'd picked up the book a couple of members replied mentioning that they had it as well and thought it was a good one to have, although they both thought the hydration for his Ciabatta formula was too low. I looked at it and didn't think it seemed out of range but decided to try it for myself and see. Now normally I'm not a real stickler for being exact when it comes to scaling water, but going more for the feel of the dough as described by the author or any included photos. This time though I weighed out all the ingredients right to the specified gram and followed his times and oven temps fairly close as well. Of the half dozen or so ciabattas I've made over the last eight months I think this is one of the better ones. It may be partially due to having used a lower protein flour (10%) for this one than I have in the past or maybe because I spent more time developing it by hand than I normally do, but whatever the reason it made a good loaf. The crust is fairly thin and splintery and the crumb while being a bit more open than I prefer, has a good chew to it for an all white bread. The flavour is just what I expect a ciabatta to taste like, wheaty, toasty, with a bit of richness from the extra virgin olive oil coming through. Very tasty!

Franko


tinmanfrisbie's picture

Ciabatta not browning, help

September 9, 2010 - 3:33pm -- tinmanfrisbie

So I tried making some ciabatta bread from Peter Reinhart's The Breadmaker's Apprentice.  I had to change a few things but am unsure if these were things that ultimately affected the browning.  Considering it was my first artisan bread that I've tried, it tasted pretty good.  Listed below are some of the deviations I made:

1.  Used active dry yeast instead

2.  Did not have a vegetable oil spray on hand, so I used Pam to coat

3.  Had to use the bottom of a large jelly roll pan to cook the bread on instead of a stone

marlnock's picture

Just started baking and loving it!

September 7, 2010 - 8:56pm -- marlnock

Hi guys,

I'm so glad to have found such an informative, vibrant and very much alive forum like this. 

I'm a student from Adelaide, South Australia and i love to cook in my spare time.  Recently, being a typical student living on a typical student income, i have decided to start baking my own bread.  This is for two reasons, 1. because it's loads cheaper than buying it. and 2. I love the beautiful taste and texture of proper bread that is worthy of decent toppings and that just tastes good on its own.

Pages

Subscribe to RSS - Ciabatta