The Fresh Loaf

A Community of Amateur Bakers and Artisan Bread Enthusiasts.

buns

Second Cooking's picture
Second Cooking

I received an assortment of chocolates in my Christmas stocking this year. I prefer dark chocolate exclusively, but an 82% cacao is too much even for me, as an eating chocolate. I have couple desert recipes I could have worked it into, but they were all a little too sweet for my mood. I like to make rolls with a piece of chocolate in the center, from time to time. I figured I would play around a little bit with something like that and see how it turned out.


I knew I had to add some additional sweetner and decided to go with honey. I wanted to use some walnuts and figured that would be a good binder as well for the filling. I'd made some cookies the other day for the boys, and chopped up one of the 60% cacao chocolates instead of chips. I liked the way that kind of blends into the dough, so want to do something to that effect with the rolls. I've been using white whole wheat a lot lately, so that's what I went with for the flour. The last time I refreshed my starter, that's what I used as well, so this is basically a 100% white whole wheat recipe, with some added gluten for better rising power. This is what I made:


Overall Formula:

360 g White whole wheat 90%*

40 g Gluten 10%

260 g Water 65%*

30 g Honey 7.5%

15 g Walnut oil 3.75%

8 g Salt 2%

1 teaspoon Instant yeast ~0.5%

45 g Walnuts 11.25%

45 g Dark chocolate (82% Cacao) 11.25%


*I used a 25% of the flour as a pre-frement sourdoughed at 100% hydration.

100 g White whole wheat

100 g Water


 Filling

45 g Walnuts 11.25%

45 g Dark chocolate (82% Cacao) 11.25%

30 g Honey 7.5%


Mix together first seven ingredients, including pre-frement and knead for 2 minutes. Chop walnuts and chocolate for the dough into consistancy of meal. Fold them into the dough and knead another 30 seconds. Stretch and fold the dough twice at 30 minute intervals. Let rise approximately two hours @ 80° F. For the filling chop walnuts and chocolate coarsely and combine with honey in a small bowl.


After the dough has risen, punch down lightly and divide evenly into eight pieces. Shape each piece into small rounds and place a spoonful of filling on the middle of each, dividing the filling evenly. Fold the edges inward to cover the filling and pinch to seal the seam. Shape quickly into rounds and place seam side down on a parchment lined baking sheet. Cover with plastic wrap and let rise approximately 45 minutes @ 80° F.


Preheat oven to 400° F. Bake for approximately 18 minutes. Cool 5 to 10 minutes on wire rack and serve while still warm.


I was actually quite pleased with the results. With the honey and nuts it had a pleasant taste overall and didn't leave a bitter after taste. If I make these again, I would probably choose a different chocolate though, just to be safe. These re-heat well covered in foil. I just pop them in the toaster oven for about eight minutes.

Salilah's picture

Help - spare biga! What to do - pref sweet?

November 30, 2012 - 10:56am -- Salilah

Help - any ideas please?

My other half has got interested in bread (I tend to do most of the bread, sourdough mainly) - but he hasn't quite yet "got it" about recipes etc.  We have around 550g of biga gradually growing - and his recipe only needs 200g (he hasn't spotted this, and I don't want to make any more "suggestions"!!)...

Urchina's picture

ITJB Week 12: Sweet Egg Dough (for buns), 2/25/12 - 3/3/12 (or thereabouts)

February 25, 2012 - 1:25pm -- Urchina
Forums: 

I think buns have got to be one of the most wonderful things you can do with a bit of dough, and I like them all ways -- sweet, savory, steamed, fried, baked, grilled -- love 'em. They're like the ultimate and original fast food, portable and delicious. 

bryoria's picture
bryoria

My first post!  I keep my bread notes in a cheap notebook stuck to my fridge, but thought a bread blog might work better, and enable me to share my notes.  I am fairly new to bread baking and find some of the posts here rather intimidating.  I took an artisan bread baking course at our local technical college last fall, developed a wild yeast starter during the class, and was off and running with the longer-fermentation methods.  Before the class I had been making all our bread, but  just plain whole wheat sandwich loaves from my own flour, mixed and kneaded and baked all in one morning. 

Although my freeform sourdough loaves always turn out well, I have not had much luck with 100% whole wheat sandwich loaves using the long fermentation methods, even after experimenting with aging my flour.  I would like to learn how to make a 100% whole wheat sandwich loaf that doesn't crumble in the centre.  Until then, I use my old, all-in-one-day method for sandwich loaves and alternate with the partial white flour sourdoughs I learned in my class.

Today I tried to make buns from one of the recipes we learned in the class, a multigrain sourdough.  It was my first time making buns from one of the class recipes.  They turned out great.

Notes on today's buns:

  • recipe from NAIT course
  • first time trying the dough as buns
  • divided dough into 16 pieces and formed as flat hamburger buns
  • placed on cookie sheets to rise for 30-40 minutes
  • baked on cookie sheets at 400 for 18 minutes, no steam, turning pans halfway through
  • buns softened as they cooled
  • good size for hamburgers
  • flavour fantastic, good texture

(updated to add photo showing crumb)

Grandma Dawn's picture
Grandma Dawn

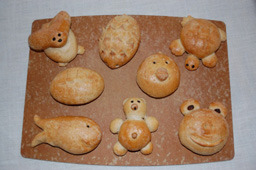
After forty plus years of baking breads I decided to create "fun buns" for my grandchildren.  Each weekend I would make a batch of buns.  I kept notes about what worked and what didn't.  Since I wanted the option of using the buns for sandwiches I started with ones that were basically round in shape.

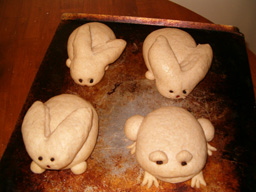
My first attempt was four turtles.

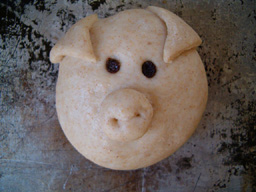
I then wanted a pig.  I thought it would be cute to serve pulled pork on a piggy bun.  Ironically, the pig proved to be the most difficult for me.  Even now I'm not confident the ears and nose will stay in place.  I tried to cut the ears in but couldn't secure the tips.  And then the nose . . . but for now I'll post pictures and talk how to's in a later post.  I did finally find a design I liked . . . but it's a rather difficult one.

At one point I got so frustrated with trying to make the quantity of buns I needed to feed a group that I even considered making heads and tails . . .

Since dough is a living organismI decided I needed some easy designs so I could make some difficult and some easy in the time frame I had to work in.  I created a chick and hedgehog that are relatively easy.

At this point I was using whole wheat dough.  I decided to try sweet roll dough for Easter bunny and chicks.  The dough raised so much after shaping that the designs were distorted.

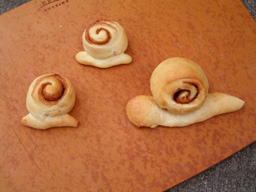
Snails worked okay, the center raising up was actually desirable.

I continued on with the bunny and came up with options.  One has cut in ears and the other is basically two pieces, body and head with the ears cut with scissors.

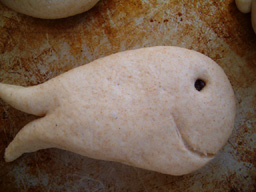
Then came the fish.  Since my sons had aquariums I decided to start with tropical fish.  I wanted texture and tried grated cheese on top . . . but, I got "ick" . . . for those of you who don't know what that is, it's a fungus.

Being a Minnesotan, I needed more fish, lots of fish.

Then it was football for the guys.

I love frogs . . . one easy, one difficult.

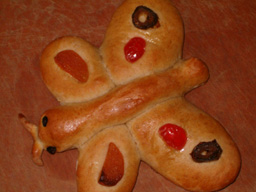
Want to ruin my day?  Ask me how to keep ears on the mouse.  I sure don't know how . . .

Ahhhh, bears!  Who doesn't love bears!

How about a family of bears?

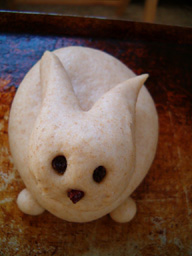
At this point I started looking on the internet for ideas.  I found the book Kids' Ideas with frozen dough by Rhodes.  I made several of their designs and learned some new techniques.

I especially liked the cat for Halloween.

And now the reason I bake.  My grandson's first batch of "fun buns".  HE LIKES THEM!


Pages

Subscribe to RSS - buns