

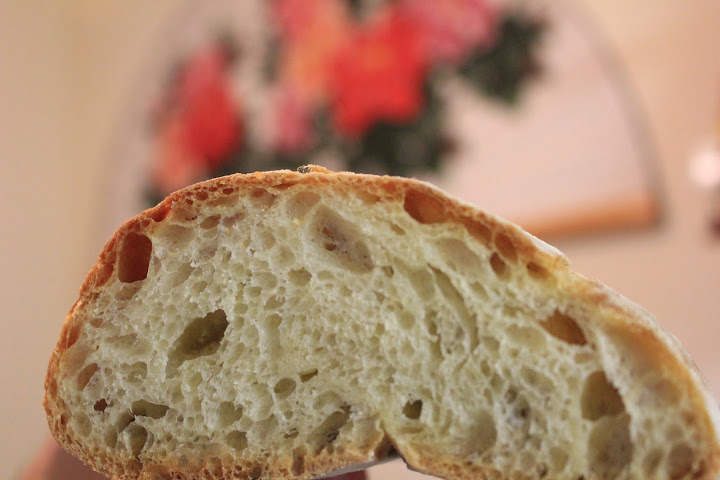
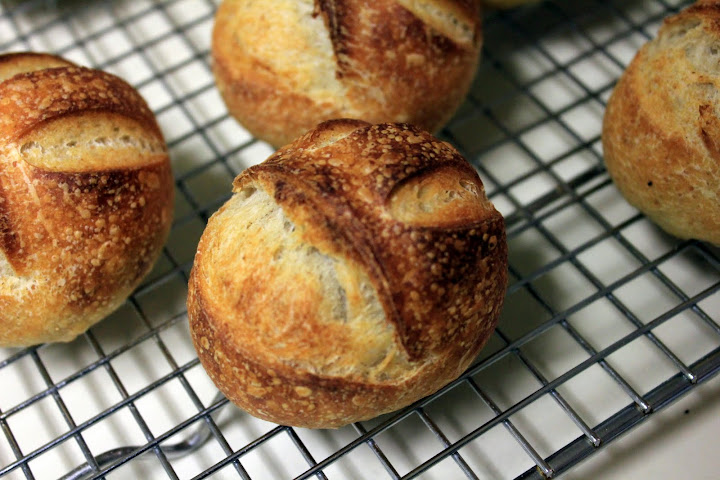
In the recent past a number of TFL bakers have asked me for the recipe for Bernard Clayton’s S.S. France Petite Pain rolls. I sent the recipe to all who requested. The requests got me to thinking. Mr. Clayton’s rolls are baked using the direct method, using only yeast for leavening. Recently I began thinking how this recipe might be improved, or at least made differently, with the addition of a poolish. With that in mind I began experimenting and testing the recipe and have come up with what I believe are rolls with a somewhat better flavor than a direct method baking. The added flavor is, I believe, a result of using an overnight starter (poolish). Above are some photos and below is the recipe for anyone who may be interested in what I believe are really good breakfast or dinner rolls.
Note: This recipe can be halved.
Howard
Petite Pain – Howard’s Formula
Starter Dough Mixture (Poolish)Ingredients
Unbleached all-purpose flour………………………………………………… 10.4 ounces
Instant yeast………………………………………………………………………….... 1/4 teaspoon
Malt powder (optional)…………………………………………………………..... 2 teaspoons
Water, at room temperature (70-90 deg. F.)…………….…..... 8 ounces
Total Starter Dough Mixture……………………………….. 18.8 ounces
Six hours or up to 2 days ahead, make the starter dough (poolish). In a medium bowl or 2 quart plastic container, combine all the ingredients for the poolish and stir the mixture with a wooden spoon for 3 to 5 minutes or until it is smooth and comes away from the side of the bowl/container. It will be slightly sticky to the touch.
Cover the bowl/container tightly with a lid or oiled plastic wrap (or place the poolish in a 2 quart food storage container with a lid) and set it aside until tripled in volume and filled with bubbles. Note: when the poolish has reached its peak there should be lines and creases on the surface and the mixture should be bubbly/foamy-like and it should be beginning to fall back on itself but not collapsing entirely. At room temperature, this will take about 6 hours. Note: After 3 hours the poolish can be stored in the refrigerator for up to 2 days.
If refrigerated, remove it to room temperature for 1 hour before mixing the final dough.
To proceed with the rolls add the water from the Final Dough Mixture (below) to the poolish container, stir it down and proceed with mixing the Final Dough per the instructions below.
Final Dough Mixture Ingredients
Unbleached all-purpose flour………………………………………………… 25.0 ounces
Instant yeast………………………………………………………………………....….. 1 teaspoon
Salt……………………………………………………………………………………….......… 2 teaspoons
Water, at room temperature (70-90 deg. F.)………………….. 16 ounces
Poolish (from above)……………………………………………….……………….18.8 ounces
Total Final Dough Mixture……………………….......…….. 65.36 ounces
Mix the Final Dough.
In the mixer bowl (I use a KitchenAid), whisk together the flour and yeast. Then whisk in the salt (this keeps the yeast from coming into direct contact with the salt, which could affect the yeast’s leavening properties). If you haven’t done so, add the Final Dough water to the container with the poolish and loosen the poolish from the container with a rubber spatula or wooden spoon, loosely mixing it with the water.
Add the water/poolish mixture to the mixing bowl. Using the paddle attachment, mix on low speed for a couple of minutes (#1 speed if using a KitchenAid) adding the flour/yeast/salt mixture ½ cup at a time, until the flour is moistened into a shaggy mass. Turn off the mixer and cover the top of the mixer bowl with plastic wrap or a clean kitchen towel and allow dough to autolyse (rest) for 20-30 minutes.
Remove the film/towel and turn the mixer on to speed #2 and continue for about 5 minutes until it starts to develop gluten has strands. After 5 minutes increase the speed to # 6 for about 30-60 seconds, or until the dough pulls away from the sides of the mixer bowl. If the dough hasn’t pulled away after about a minute, scrape down the sides of the bowl and beat on medium-high (#6 Kitchen Aid) for another 2 minutes. If it still doesn’t pull away from the bowl, beat in a little flour, 1 teaspoon at a time, on low speed (#2 KitchenAid). The dough should cling to your fingers when touched.
Let the dough rise.
Using an oiled spatula or dough scraper, scrape the dough from the paddle and container into a 4 quart food storage container, light oiled with cooking spray or oil. (The Final Dough will weigh 65.3 ounces and be 62.5% hydration) Push down the dough and lightly spray or oil the top with cooking oil. Cover the container with a lid or plastic wrap. With a piece of tape, mark the side of the container at approximately where triple the height of the dough would be. Allow the dough to rise (ideally at 75 deg. F) until tripled in volume, 1 ¼ to 2 hours.
Note: At 20 minute intervals, during the first hour of bulk fermentation, empty the dough onto a slightly wet work surface (not floured but lightly misted with water) and stretch the dough, folding it into thirds, like a business letter. Turn it a quarter turn and fold it into thirds again. Then place it back into the container seam side down.
Do a total of 3 stretch and folds at 20 minute intervals during the first hour of bulk fermentation.
Divide and shape the dough and let it rise.
Distribute a moderate amount of flour onto your work surface in a square 16” X 16”. Using an oiled spatula, gently scrape the dough onto the floured work surface. Lightly dust the top of the dough with flour. Handle the dough gently at all times to maintain as much gas in the dough as possible. Using a sharp knife or the edge of a dough scraper and a kitchen scale, divide the dough into 4 ounce pieces. You should end up with approximately 16 pieces of dough, each weighing 4 ounces.
Divide the remaining piece of dough (1.3 ounces) into a half dozen, or so, pieces and spread it around, randomly adding a piece of it to the 4 ounce dough pieces. Shape the 4 ounce dough pieces into rolls, using the dry edge of the work surface to get traction in shaping.
Place the rolls on a parchment lined baking pan, cover your rolls lightly with a cloth, plastic wrap, sprayed with cooking oil (to keep it from sticking to the dough), or, as I do, with a rectangular plastic bin large enough to accommodate your baking pans. Let the rolls rise in a warm spot until doubled in volume, 1 ½ to 2 hours.
Use a floured finger to test the rolls to check for spring back.
Do not let them over proof.
Score the tops of each roll with 2 quick slashes made at a 90 degree angle and place them into a preheated 475 degree oven.
Add a cup of water to a preheated pan or skillet to product a large burst of steam.
After 5 minutes reduce the oven temperature to 450 degrees and bake for 20-25 minutes, turning the pans around midway through the baking cycle.
The internal temperature of the rolls, when done, should be 205-210 deg. F.
Notes:
Bobs Red Mill Flour – unbleached, unbromated
KAF instant yeast
Sea salt
KitchenAid Mixer and 5 minutes of hand mixing (Richard Bertinet's slap and fold method)
3 stretch and folds at 20 minute intervals


 I made into three different shapes, flower shape ones (this picture), bread rolls in bread tin, bread rolls in cake pan
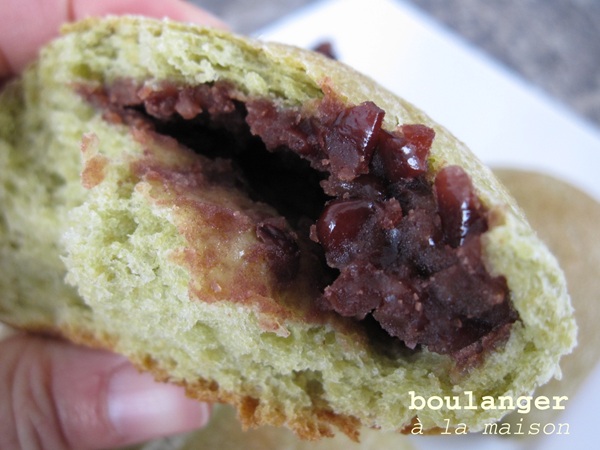 Yummy red bean paste that I can just have them straight without any bread or ice cream.