The Fresh Loaf

A Community of Amateur Bakers and Artisan Bread Enthusiasts.

baguette

suzyr's picture
suzyr

First

A walnut sized of fully risen dough, such as pizza

1/4 cup of warm water

2/3 cup of all purpose unbleached flour

Mix this well and place in bowl and cover at room temp.  Let sit for 8 hours then move on to second stage.

Second

The first starter

1/4 cup of warm water

3/4 cup of all purpose flour

Pour water over first starter and then add flour and mix in well.  Cover again and let this sit at warm room temp for 4 hours.  Then place in refrigerator for up to 8 hours. Take out and get ready for final day.

Third

The Final Dough

1 1/4 cups of cool water

1/2 tsp of instant yeast

the second starter

3 1/3 cups of flour all purpose

1 tab of salt

Take the starter out of the bowl and cut up into pieces, like 4 and place in work bowl add water and yeast.  Let soften for 5 minutes and add flour and then salt. Mix well and switch to dough hook. Let this sit for 10 minutes and then start hook for about 8 minutes on medium speed. Then place in oiled bowl for 1 1/2 hours at 80 degrees. Fold this, not punching down at all.. then cover again and let this finish covered for 45 minutes.  Take out and shape into baguettes or boule’s.  Baguettes are around 10 ounces each.

Bake baguettes for 30 minutes at 450 with steam.

tomdrum's picture

Baby baguettes

November 15, 2011 - 1:58pm -- tomdrum
Forums: 

Hey guys

I am pretty new around here but I am a bit of a bready and thought I would share last nights baguettes with you all. There were a pretty simple bake but super tastsy and highly recomended, should have made more than four little babies but now I have the formula I can..and so can you :)

Pre ferment

100% Flour (I Used yorkshire Organic 85% extraction)

100% Water (cool)

2.6 % rye sour (mine is 50% hydration and was taken from the fridge)

jennyloh's picture
jennyloh

I've on a quest to make baguette,  fluffly,  thin crust,  light, open crumbs.  My baguettes so far has been on a thicker crust,  not so open crumbs and a little too chewy. I'm not sure when I will be able to to achieve what I want to achieve, but I'm starting to keep track of this records in my blog.  https://sites.google.com/a/jlohcook.com/jennycook/latest-postings/baguette-experiment2

So far,  I've done 3 experiments,  they are still not ideal at all.  I'm looking to improve my techniques before I go for taste.  Currently,  I'll stick to a recipe from Peter Reinhart on french loaf. I'm going to continue trying until the day that I can consistently achieve what I'm looking for.

Perhaps I'm so used to having Asian baguettes, especially the Japanese bakeries here.   Actually I have no idea how a french baguette looks or taste like,  only from the local french bakery here,  not sure if it is authentic.  Anyway,  we like the taste of baguettes that are really light,  crusty, flaky crust,  open crumbs and doesn't quite fill your stomach even when you eat up a full loaf.

I'd be happy to hear from anyone who has suggestions for me on my techniques.  Here are also some pictures to show you what I've done so far.


ronnie g's picture
ronnie g

My hubby can't get enough of these babies.  If I ask him 'What bread should I make?' his reply is ALWAYS 'Baguettes!'  I just use Chad Robertson's baguette recipe, but substitute 150g organic wholemeal stoneground flour for part of the all purpose flour in the final mix and add 65g extra water.

suzyr's picture
suzyr


Great weekend for rest and relaxation and baking. I had been wanting to make Brioche and try my hand at new French Baguette recipe. The Brioche was truly pretty easy but, to me it tasted like Challah without the braid. The Baguette recipe came from another source, Cooks recipe, “The New Best Recipe Book”. I took the time and followed the whole recipe through. At 12 noon I started my “sponge” and at 6 PM it was ready according to the directions. After the first rise which was around 8PM I was able to form and out in refrigerator.Then the next AM took the bread out of the refrigerator and then baked. So almost 24 hours for this one.
If you have the time to do this it is a great and easy recipe with nothing special called for. Meaning no special yeast or flour and it doesn’t even call for 6 cups of flour like a lot of recipes.

Sponge Recipe First:

1/8 tsp of yeast
3/4 cup of warm water
1 cup of white flour plus 3 tab

Mix and cover with plastic wrap with a few holes in the top of wrap. This will take around 6 hours. It will double and have little holes all over. And it will depress in the middle when it is completely ready.

Dough Recipe:

1/2 tsp of yeast
1/2 cup of water, warm
2 cup of flour
1 tsp of salt

Glaze:

1 large egg white
1 tab of water

For Dough put your water and dry yeast into the sponge. Mix well with fork and add to dough mixture in mixer bowl/ Mix well and use dough hook for several minutes. Remove from bowl and knead with hands til good feel of elastic. Place in well oiled bowl for 30 minutes and then reform in a ball. Now is the time when you let this double in bulk. Probably about 1 and half hours. Take out of bowl and cut into 2 pieces. Start forming into baguettes. Needs to measure at 12 inches by 2 or 3. Place on parchment paper on cookie sheet and put a clean trash bag over these and refrigerate now for 12 hours, no longer than 16. Will rise in frig, take out 1 hours before baking and get glaze ready. Have a VERY sharp knife handy or razor blade . You need to cut 6 diagonal slits on top of each loaf. Apply glaze with a pastry brush. Bake at 450 for 10 minutes. Serve with butter and jam….These are very nice and wonderful texture…wonderful smell and success…


Salilah's picture
Salilah

Stout in both senses of the word!

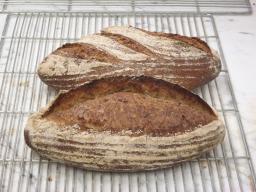
I decided to have a go at a sourdough version of Katie's stout & linseed loaf - waiting for the barm to ripen, I wondered what to do with the rest of the beer and decided "sort of baguette but a bit bigger!"

150g 100% white starter
25g rye flour
290g strong white bread flour
200g beer (Thwaites Very Nutty Black bottle conditioned, Tesco)
8g salt

I didn't have time to do an overnight retard, so just autolyse without salt for 30m, then a thorough S&F at 30min intervals, shape roughly, shape for batard and proof in couche (the skin hardened a bit too much I felt here).  Baked under a cover for 15mins (220C) then 10+10 I think...

Not bad flavour - quite rich and full, not tasting of beer, a good medium brown colour

Not bad!  The stout & linseed is in the fridge, need to get it out and shape (dinner interfered with this last night) and final proof - will try to post that later

Nate Delage's picture
Nate Delage

Hi to everyone on TFL! I've been lurking here for a while, trying to absorb as much information as I can. I finally feel like I have some success worth sharing.

I've been practicing baguettes for some time now and the past few weeks I've been more determined to make small tweaks and hopefully improve the results.

My most recent attempt used 50% KA AP and 50% KA bread flour. This gave me the best combination of chew and crisyness to the crust.  I've been reducing my hyrdration (I started at 78% originally) and I've more or less settled at 72%. I was worried the lower hyrdration wouldn't yield an open crumb, but that hasn't been an issue. The lower hyrdration has made the dough much easier to work with and my scoring results are improving. Though I'm waiting for a proper lame to arrive in the mail. I'm still waiting for the grigne that let's me hang the bread from my fingertip!

I start with a short bulk fermation, using cold water so the dough never really 'explodes' with gas. I just autolyse for 30 min they stretch and fold every 20min for about 2 hours.

Then it's into the fridge for ~20hs. Once I take it out of the fridge I let it warm up over 1 hours time, stretching and folding a few times. Then a pre-shaping, bench rest, final shaping and a 25min proof. I think I'll try a longer proof next time.

The baguettes are all 250 grams and just fit in the oven at 18", so they are quite thin. This time I let my oven (and stone) warm up for almost an hour, which made a huge impact on the bottom crust. It was nice and thick, but not burned.

I spray the oven with a water bottle ever few minutes during the first 10min of baking. Another trick I've been using (mentioned on TFL frequently) is to leave the bread in the oven for another 5min once they've finished baking. This helps ensure a crisp crust.

I've been lusting for a mixer, but the stretch and fold approach works so darn well I'm not sure if I can every justify the cost. The oven stone was worth it though!

Here are some pictures:


dolcebaker's picture

baguette - crust looks weird

August 12, 2011 - 10:28pm -- dolcebaker

I made a couple baguettes, due to time, I had to retard them in the refrig overnight after shaping.  When I baked them they did not brown as they should, but looked weird.  No blisters, but maybe like they were going to, as soon as the browning started so did the bad appearance.  What went wrong?  I had a pan of hot water in the bottom of the oven.  Could they have been too wet from the fridge? suggestions?

Pages

Subscribe to RSS - baguette