The Fresh Loaf

A Community of Amateur Bakers and Artisan Bread Enthusiasts.

bagels

jcking's picture
jcking

Dragels (dray-gulls like bagels)
My first attempt at bagels made with a Durum sourdough starter and Durum flour. This is a seat of the pants, see what happens, work in a few different ways to make bagels. I'll go into detail and a formula when I'm happy with the results.

Quick rundown: sourdough Durum dough treated like a no knead with an overnight rise in the fridge. Out of fridge, stretch and fold, one hour bulk ferment, shape and short proof. All good up to this point. Poaching; didn't go very well as illustrated by the odd look, too much molasses made them too dark, once in the poaching fluid they became very weak and wanted to fall apart. Did my best to hold them together and here are the results.

As far as taste; not too bad. The molasses over powered the sweet I was expecting from the Durum.

For me it was fun and enlightening.
Bakers always rise to the occasion ~ Jim

ehanner's picture
ehanner

I have been working on learning to mix, shape, ferment properly, boil and bake Bagels. Everyone in our household and all of my friends and neighbors likes these delicious breads and are happy I have taken up with this obsession.I have migrated to using Hamelman's formula for home bakers which makes 12-120 gram bagels. It's a very simple ingredient list, adding only malt powder to the basic 4. When I am making a batch destined for my In-Laws, I swap whole milk for 20% of the water to make the crumb softer. There are lots of bagel recipes out there. I say, find your favorite multi grain recipe and mix it to 58-60 % hydration. I frequently make a 20% rye or WW mix which we love. That's what is shown below.

There are a lot of small nuggets of information in the text below. I have discovered there are many variables and "must do" bits of advice out there on this subject. I want to finally get to the bottom of this and find out what matters and what doesn't

My personal goal is to find an easy way to make delicious Bagels quickly in the morning. No complicated thinking at 5:30 AM please. It's a two day process, and the putsey stage is the evening before, mixing, kneading and shaping. The next morning, I get up, turn on the oven to 500F, turn on the stove to boil the water I drew the evening before. It takes 45 minutes to bring my stone up to 430F. So at 45 minutes I boil the first set of 3 bagels and prepare them for baking. I leave the sheet pans in the refrigerator until just before I'm ready to boil the dough in the water. No bench time to warm the dough. They usually float right off and I'm only using 1/2 teaspoon of IDY instead of the 3/4 tsp Hamelman calls for.

My first major discovery was that I could make at least as good of a dough by hand as I could by machine. It is far easier to work the flour and water together by hand than it is to try to use my DLX mixer fitted with the dough hook. The DLX isn't taxed by the job but at 58% hydration, the dough just doesn't wan t to be moved, once the gluten starts to form and become strong. I can stand there pushing and prying the strong dough into position so it will travel around the bowl and be forced between the bowl and hook. Honestly it's much easier to just combine the ingredients by hand in the bowl. A series of 3 stretch and folds at 20 minute intervals will produce a beautiful smooth dough and well developed gluten.

The next thing I wanted to understand is the whole shaping thing and if the requirement to refrigerate overnight is warranted. I am convinced that the slow extended fermenting in the refrigerator is a beneficial step in developing a better flavor. AND, if you shape your bagels right after mixing/fermenting briefly, they stick together and don't come unglued in the boiling water. As a sub set of shaping I get best results when using the dog bone shape and then grinding the ends together as shown in Ciril Hitz video on bagels The pre-shaping method Hitz demonstrates is beautiful. I had to watch it several times to fully appreciate the subtle aspects of his technique. He uses the Dog Bone roll out which I have found works perfectly if I remember to remove one finger and "grind" out the joint using 3 fingers. If you are at all perplexed about making bagels, do your self a favor and watch the Hirtz video.

The next decision is weather or not to use ice water after the boil as Hamelman suggests or to place the boiled circles on a rack to cool and dry briefly before seeding. Hamelman says to boil 1 minute each side, Hitz says 10 seconds. I like my results using a 1 minute per side. As for the ice water bath or not, I think Hitz method of a shorter boiling time followed by cooling/drying on a rack works fine and simplifies the production line on the stove top. I don't see any benefit of adding an ice water bath. It's just one more thing to mess with, adding ice after each batch.

I wanted to be a purist and use bagel boards. If I was using a rotating oven in a production setting, bagel boards would be the answer to drying out the bottoms and getting a well done product. After baking maybe 15 batches of bagels during the last few Months, most using my home made red wood boards. I can see a minor difference on the bottom but certainly nothing that would indicate the need to flip the bagels over after a few minutes. This process is risky for me and I frequently end up having one or more not turned  over properly and need to go in the back of the oven with tongs to fix my errors. It is way easier to seed the dough after the rack and place them on the parchment they proofed on in the cooler. The sheet pan slides in on top of the stone nicely. Yes, I have been steaming when I bake on a sheet pan. The wet webbing on the  boards negates the need for additional steam.

One other small thing I have found I can eliminate that makes the process a little cleaner is to skip the corn meal. I noticed Hitz places his seeded bagels on clean parchment where most other authors say to sprinkle cornmeal on the proofing sheet. I have been spraying a light coat of Pam on the parchment to make it easier to remove the cold dough from the paper, with out disfiguring the shape on the way to the hot water. The boiling water stays cleaner and there is no down side after baking. So again I find the Hitz method to be preferable.

The last big question is what to put in the water, if anything. I have tried a heaping Tablespoon of Baking Soda, Barley Malt Syrup, Honey, Molasses and Sorghum Syrup. Oh and also plain old water too. Hamelman says use enough Malted Barley to make a dark tea. That's about 2 tablespoons. Hitz says something similar or to use honey for a slightly sweet flavor on the crust.  Honestly, I can't taste any difference but it does smell nice when the barley is steaming in the pot. All of the add in ingredients smell great in the pot but not much of that good aroma is transferred to the bread product. So, if you feel like you have a pallet that is sophisticated enough to notice, go for it. But if you thought you had to wait for another day because you didn't have Malted Barley, don't bother waiting. The crusts MIGHT be a wee bit softer, less crispy if you use a syrup. Take a good hard look at the photo below of two bagels side by side. One was boiled in clean water, one was boiled in water with a large scoop of Baking Soda. Both have a soft sheen and are very close to the same color. Both boiled for 2 minutes total,  17 minutes @500F with steam for 4 minutes on a sheet pan.

I hope this lengthy write up is of interest to those of you who have hesitated in making Bagels. I know they seemed complicated from start to finish at first. I was sure if I did a few batches I could make uncomplicated the process and gather the proper equipment to be able to easily make authentic NY style water bagels.

Eric

Column 1 and 4 are boiled in water only. 2 and 3 had Baking Soda added.

Can you tell which bagel was boiled in water only and which had baking soda mixed in? I had expected the one with baking soda to be darker. If there is a color difference, I'd say the one on the left is slightly darker. That's the water only version.


The crumb structure is still more open than I would like. I have reduced the amount of yeast and I am lowering the DDT temp to try and control the activity. But, it looks pretty good now and has a nice chew. This is 80% All Trumps High Gluten flour and 20% fresh ground WW from Country Creations (Flourgirl51).


Baked on parchment on a sheet pan. Certainly not burned and just a nice crisp crust on the bottom.


amy bassett's picture
amy bassett

Ok, so here are my bagels, not my first time making them.  I've actually been making bagels for several years now.  I haven't had any complaints about them, in fact, many people say they really like them!  However, I was on a quest to see if I could get more out of my bagels, see if I could make them better.  So, I tried Peter Reinhart's recipe, minus the baking soda in the water on most of the bagels. I did do 2 bagels in the baking soda.  I always thought that having baking soda in the water would make it taste a lot like a pretzel and I don't think that's how a bagel should taste!  Well, I was wrong, well according to my husband :)  Definitely a little tougher crust, in a good way and the malt adds a little but more flavor!  Other than that, they taste just like the bagels I've been making for years. 

But.....I'm not sure that the process I went through makes this bagel any better than the way I've been doing them.  I've been following a very simple recipe, flour, water, yeast, salt and sugar. Let is rise until double, divide into 4 oz pieces, shape, let rest for 20 minutes, boil for a minute each side and bake for 15-20 minutes at 400-425.  If I left the bagels to rise overnight in the fridge, they would turn out the same.  I just don't know if the retarding process is really necessary.  What do you think?


ehanner's picture
ehanner

Those of you who have been following the forum have noticed the frequent posts on Bagels of all kinds. I have been experimenting with toppings and flavoring myself. Lumos has her beautiful WW bagels displayed on the front page. There has been much written about how firm/dense bagel dough is and warnings about not over heating our mixers by too large of loads or repeated batches. I decided to try Mike Avery's Sourdough Bagel recipe as written in his book "Back to Bagels" but instead of using a Kitchen Aid or my DLX mixers, I would do the entire mixing and kneading development process by hand. Mikes basic recipe includes a small amount of olive oil which makes the crumb softer and easier to chew. Of all the bread theme books I own, Back to Bagels is the very best value at $5 for the PDF form and I would say the most comprehensive book on the subject. I highly recommend the book for new and old timers alike. Mike details 8 different bagel flavors and how to prepare them. If you like blueberry bagels, spring for the $5. book and try the sourdough version. Utterly delicious!

Let me say I didn't expect to be able to easily develop the dough to a nice window pane condition, using only my hands. With all we have all learned about how time will do what we used to beat into the dough, I doubted a 56% hydration dough would stretch and fold well enough to do the job.--I was wrong.  Here are the photos in evidence.

I apologize for the lengthy number of images. The idea of hand mixing and kneading bagel dough is so novel I thought some of you might like to try it. Since it is almost entirely a matter of technique, I thought the photos would answer most questions and encourage people to try this simple and gratifying process.

I'll post the recipe for these as soon as I hear back from Mike. Enjoy! Recipe now added courtesy of Mike Avery. This is just the recipe. The mixing and shaping techniques are described in detail in the book. There is a selection of other bagel recipes, each one delicious. Here is a link to the entire Bagel section which goes into much more detail about the process. It's a good read for anyone just learning about sourdough and bagels.

Eric

Sourdough Plain Bagels

These are a simple bagel, the same bagel that I featured in section 4, but with a larger batch size. This bagel is the basis for all of our bagel recipes.

Ingredients:

6 bagels                        12 bagels            Ingredient

230 grams                   460 grams          Water

8 grams                        16 grams             Light Olive Oil

45 grams                      90 grams            Sourdough Starter

450 grams                    900 grams          High Protein Bread Flour

10 grams                      20 grams             Salt

15 grams                      30 grams             Malt Powder

 Mix the ingredients, and allow to rise about 2 hours, or until they are ready. Cut into 6 or 12, 120 gram pieces, round or roll into cigars, cover and let rest 30 minutes. Do final bagel shaping, put them on a baking sheet covered with parchment or Silpat, oil, cover, give them an hour of

floor time, and then refrigerate them for 12 to 24 hours. Boil in malted water, seed if desired, and then bake at 500F for about 15 minutes.


Mise en Place


All in the bowl, ready for the spoon.


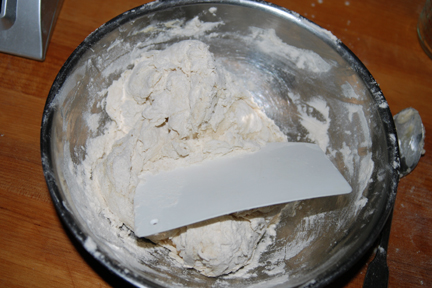
Started with a spoon and switched to the plastic spatula to incorporate this dry dough.


After a minute of scraping and turning , still some dry flour at the bottom.
This is where you could be tempted to add additional water. Fear NOT. It will eventually be fine.


It took a mere 2 minutes to get to this point. All flour is incorporated and the dough is one mass.


I hand kneaded just long enough to be sure there were no lumps of dry dough. You can see the mass is lumpy and not smooth at all.


Dough is now resting for 20 minutes covered with an expensive shopping bag.


Now rested, on to the first stretch and fold. There were 3 S&F's in 20 minute increments.


The second stretch. It teases out easily and letter folds nicely. Now getting smooth.


This is after the 3rd S&F. Dough is smooth and silky if firm. Quite impressive for a firm hand mixed dough.


I was able to tease out a nice window pane. It doesn't show well in this photo but I could see my finger through the membrane. The time since first mixing the dough is now 1 hour and 20 minutes.


All the dough is spread out on the counter ready to be divided into squares this size and shape.


Each 125g piece is flattened into a square/rectangle and tightly rolled into a log as a pre shape.


Ready to rest and roll.


Resting under plastic.


Rolled log, about to be wrapped around 3 of my fingers. Hand for scale.


Notice blunt ends are overlapped. When you roll the joint on the counter, it spreads out and becomes even or the same thickness all around the ring. (at least that's the idea)


Stretch the inside out gently or it will close up later. I usually go back and open the ring again before the fridge.


This is a half batch. Just the right amount for a small family for a couple days.
The recipe calls for  1 hour bench time after shaping and before refrigerating. The one hour is allowing the dough to warm to room temp and begin to wake the yeast. Depending on your starter, the room temp and how much gas was produced during the ferment yesterday, your bagels may or may not float test at this point. Try floating one in cool water. If it floats go ahead to the next step of boiling. If not wait another 15 to 30 minutes and try again.


Here are my first 3 bagels sitting on the bottom. They had not proofed long enough. The next 3 did float. You can see in the crumb photo that the crumb is dense and not as open as I would like. The float test will prevent this happening.


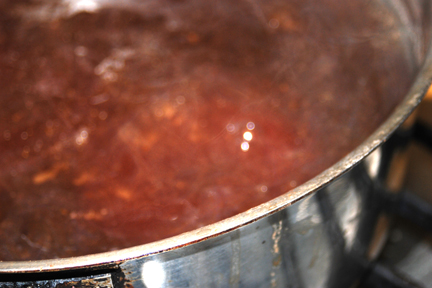
This image is out of order. I am holding a cold dough ring about to drop it into the boiling malted water.


Out of the hot and into the ice water. Still not floaters.


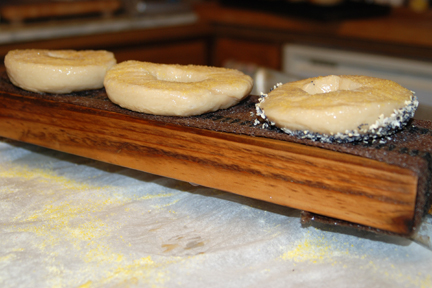
One seeded and two plain on the board, ready for baking.


Done baking. They are a little blotchy to my eye. i was trying to cook them more blond this time.


A better close up I think.


The crumb is just barely done and slightly dense. Never the less quite delicious. Next time I'll add 1 minute to the 15 minute baking time.


My breakfast this morning, plus a cup of strong, black coffee.


ehanner's picture

Onion Bagels Question

September 17, 2011 - 3:43pm -- ehanner

For the last week or so I have been experimenting with Bagel recipes, trying to get comfortable with one. I've been using Hamelmans at 58% hydration and Reinharts which is a little higher. Today I made a batch of PR's mix that was modified for egg yokes. Some were topped with poppy seeds, some with onion chips and a few plain. I have been baking on a stone at 500F in the middle rack. I had purchased 10 Lbs of All Trumps from NY Bakers and I must say I really like it. Nice crispy crust and chewy and a little open crumb. Delicious.

Elagins's picture

What Becky and I baked this weekend

August 21, 2011 - 3:18pm -- Elagins
Forums: 

As many of you know, one of the high points of my week is baking with my Down syndrome daughter, Becky.  She's absolutely taken to baking like a fish to water and is my indispensable right hand gal. 

So here's what we made.

Yesterday (8/20/11), we baked her sandwich loaves -- 30% buckwheat in an enriched sandwich bread matrix. We love the flavor of buckwheat and try to use it whenever we can in breads, pancakes, waffles, etc.

dmsnyder's picture
dmsnyder

We have my sister and brother-in-law and my younger son's two daughters staying with us this week. This morning, we had a traditional Sunday brunch with bagels, smoked salmon, farmers' chop suey and sourcream coffee cake. My neighborhood bread tasters joined us.

The bagels were made with the Krakow Bagel formula I tested last Summer for Inside the Jewish Bakery. The bagels are supposed to be twisted, but I shaped them in the more usual manner. They are very chewy with a crisp crust and delicious flavor. They received rave reviews. If you want the formula, you will have to buy Stan and Norm's book when it's released in the next few weeks.

I also baked a couple loaves of my San Joaquin Sourdough to have with our dinner of proscuito and melon and fettucine with ragu.

I loved five year old Naomi's comment on the bloom as I took the loaves out of the oven: "Ooooo .... They got so big, they broke!"

Hope you all are having as much fun this weekend as I am!

David

ngolovin's picture

Bagels are falling

August 2, 2011 - 9:02pm -- ngolovin
Forums: 

Hi All,

I am new to this forum.  I have recently started baking bagels, since you really can't get a good bagel in Indiana! (OK, this is probably open to arguement).  I originally had good luck with Peter Reinhart's formulation from his book, " The Breadbaker's Apprentice".  First few batches were perfect.  Now they seem to fall right after boiling.  The crust is the same, and the middle looks risen, but they are physically flat.  I am curious if anyone has a suggestion.  I pretty well follow the formulation in the book, and use King Arthur bread flour.  

Thanks,

ngolovin's picture

Transplanted Easterner

August 2, 2011 - 5:02pm -- ngolovin

Hi Everyone.

I am an easterner (from Boston) transplanted here in Indiana.  Life's fine, except noone here knows how to make a decent bagel.  So I started making them myself (why not!).  I have one problem.  They fall after the boiling step.  My bagels come out flat.  They taste great.  Have that crust that fights back when you bite into it.  I am relatively new to bread baking (did it alot twenty years ago, my life got complicated).  I am looking for suggestions as to what may be going wrong.  Thanks, in advance, for any asstance anyone may offer!

sglanders's picture

Bagels in Big Green Egg

July 24, 2011 - 7:10am -- sglanders
Forums: 

I have a Big Green Egg (ceramic bbq).  I'm really excited to cook my bagels in it instead of the oven.  The problem...I don't know what temperature to cook the bagels at.  I was thinking I'd try 600 degrees, but I thought I would ask others their experience with baking bagels in the BGE and what temperature they bake at. Thanks for your help!  I'm making pizza on it tonight for the first time (I'm very excited about that) and was thinking that 600 degrees would be a good temperature for that also.  Thanks again!

Pages

Subscribe to RSS - bagels