This is what I made for myself of all the things that I have learned so far. I'm finding that there's a huge amount of information from various sources, all with spoon-fed amounts of usefulness. So, here's my attempt to help others out there, whomever might actually find this. Please note that my use of the word "yeast" means the brewer's instant yeast, and starter means the friendly creatures (or "the fish", as it is called in our home) that are cultivated from flour and water. The numbered parts are all of the steps to actual bread making that I've found out. I'm just now gleaning information about the preferment/poolish step (just learned a few weeks ago about the existence of such a step, and was relieved to find that "sponge" "poolish" "pate fermente" are all the same thing phew). Here is basically what I've learned in the past four years:
EQUIPMENT scale, oven peel/large spatula, unglazed quarry tiles or baking stone, measuring spoons/cups, bowls, wooden spoons, towels for bread, thin long stemmed thermometer to HIGH temperature
ABOUT STARTER
Not rigid method. Repeatedly successful recipes can fail.
Use variables to gain some control and predictability.
Variables include-- time, temperature, humidity, water quality, dough density/hydration
Use scientific method---only change one variable at a time
Starter bread characteristics: large irregular holes, crumb, structure; spreads, advantages (can make starter yourself, doesn't need extra food in the recipe, more room for creativity, ability to do more with texture and flavor, English Muffins, French bread), disadvantages (rise time less predictable, needs help to keep shape, needs to be tended and fed)
Starter eats flour, doesn’t eat sugar. Any sugar in recipe you will end up eating yourself
Yeast bread characteristics—small crumb, regular small holes, less notable structure), tends to rise not spread, advantages (more predictable rise time, not need fed), disadvantages (cannot make yeast yourself, needs food added to recipe, flavor is entirely in the recipe--little creativity, has to be degassed)
MAKING STARTER
½ c whole grain flour with ¼ c water (equal weight). Keep in glass or stainless steel with lid
Watch for life signs (bubbles) after 12 hours, if no signs for a few days, start over (check water quality)
Check the PH of your water---should be neutral or slightly acidic….basic is no good for starter. Add fruit juice or citric acid if needed
Feed when life signs, every 12 hours: throw out ½ amount in there. Put in exact same amount flour in there as in there already, plus ½ that in water (or equal weight of both)
*change container often*
Recommended stainless steel, glass, or glazed ceramic containers with lids (to keep bugs and children out, and moisture in) starter reacts to most metals
After 3 days of consistent rising and falling, switch to white flour (to avoid bad critters)
Will smell like fish, should change to wheaty smell
After 1 week of consistent doubling, ok to use
Only use small amount of old starter to new starter (Tablespoon at most), keep discarding/baking—do not keep….ends up being a sponge not a starter
Note peak and fall times starter:flour:water
Recommended 1:2:1 once a week feed fridge always, keeping Tablespoon amount or so
Once get good, can keep different teaspoon sized starters for each type of bread (CHEF)
More flavor=more time between feedings
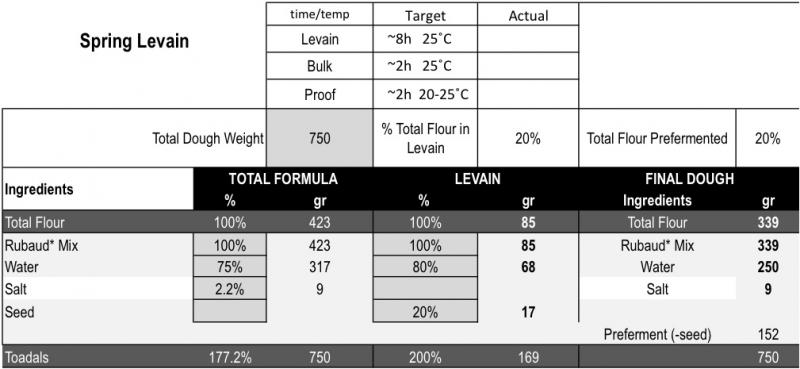
1 PREPARE STARTER
Called preferment, sponge, poolish, bigas, levaine, pate fermentee (all the same)
Develops flavor, texture, lighter bigger air
More sour, more acid, longer shelf life
Note peak and fall times
Recommended 8-12 hours before dough mixing/kneading, 25% of total dough (so subtract from recipe flour and water used)
Add to bread at peak time
More starter % in bread, less proof time---acidity breaks down gluten
2 AUTOLYSE AND MIXING
Mix flour, water and poolish together, let rest five minutes or so (keeps from adding too much flour, and helps in kneading)
Most variable amounts are water and flour (coarse/fine ground flour, humidity, etc)
Set aside CHEF
Starter eats flour, doesn’t eat sugar. Any sugar in recipe you will end up eating
oil--lending or not lending its flavor depends on recipe
Do NOT add salt directly to starter—mix in flour as a buffer first to keep starter alive
Do NOT use iodized salt—iodine becomes a gas in the oven—messes up your bread
3 KNEADING
-helps prevent too much flour being added--easier to add flour than water
-Palm push quarter turn only good for FLAT breads like pie crust, crackers
*Stretch&Fold: adds air and builds structure—gluten sheath. Also called French Kneading, or Slap Happy, etc. Take the dough; slap the furthest side away from you down on the counter and away, while drawing the nearer side towards you. Taking the nearer side in your palms (do not break, draw evenly like drafting wool) draw up and over further side, stretching sideways under and around, making a heart shape almost. Make sure while you are drawing the dough over the further side to incorporate a nice big air bubble. Turn the dough over and a quarter turn around (flip and turn like clockwise/counterclockwise). Repeat. Should change in feel and look—it will begin to pull dough off the counter and fingers. Only dust the counter with flour if large pieces of dough are sticking—you want it to be tacky. Shoot for 20 minutes of kneading.
-Windowpane test—dough stretches between fingers fine enough to let light through without breaking
4 BULK FERMENTATION
Do not let ferment on pan---acidity tarnishes pans
Use oil to keep from sticking (using flour at this stage creates flour dumplings inside your bread)
Use heat during winter to help, especially in the North—direct heat ok at this step 70-90 degrees F optimal
Stretch and fold at least every thirty minutes to keep gluten structure from relaxing, and to distribute temperature evenly (fermentation heats up dough) S&F twice minimum during this stage
For smaller crumb, deflate while S&F
Bigger holes, keep as much air as possible
5 SHAPING AND PROOFING
This is the stage to choose your shape: boule, baguette, loaf, braid, rolls, etc. A shape doesn’t define a recipe, a recipe enhances the shape. (good recipe, good rolls, etc)
Do not let proof on pan---acidity tarnishes pans
Starter spreads---need to use something to help. Linen towels with flour method, proofing trays/counters, baskets heavily floured, etc.
use flour to keep from sticking--lightly
Do NOT use direct heat source (like oven light) to keep warm --creates a second crust that will not fill
Harder crust---use towel and let dry out to create a rind
Softer crust—let proof in moist environment (covered with bowl, etc)
More starter % in bread, less proof time---acidity breaks down gluten
Overproofing---when bread collapses---gluten stretched too far and cannot recover (make toast!)
Ready for oven: when you poke it, it fills back your fingerprint but not all of the way
6 BAKING
Use flour on baking pan to keep bread from sticking (oil fries the bread and usually sticks)
Oven spring—put in already hot oven. Oven high temp for 5 minutes, then lower temperature for optimal oven spring (example 450 degrees F, lower to 425 or 415)
Baking stone acts as heat sink to increase oven spring, can use unglazed quarry tiles---ALWAYS put into cold oven and let heat up and cool down with the oven (or break)
Slashing loaves a way to make the oven spring more predictable. If bulges out near tray---temperature different in pan and air, etc.
Harder crust—spray dough with water right before putting in oven. Do NOT steam oven directly if electronic---it will destroy oven entirely
Internal temperature 204 degrees F and above best indicator of doneness. Cutting open stops the cool pressure cooker effect of the inside. Thump test does NOT work.
If bread fell or didn’t bake well, make toast immediately
7 STORING
Sourdough: Store in paper bag and bread cabinet if have one. Fridge hastens going stale, Plastic keeps too much moisture
If bread contains milk products (milk, lots of butter or sourcream), or has a lot of moisture and sugar (cornbread or banana bread prime example of both), keep in fridge. They only last about 2 days before going bad : (
Sourdough: make toast if going stale or out too long. Bread should last for about 4 days, unless quick pour sugary breads like banana bread.