The Fresh Loaf

A Community of Amateur Bakers and Artisan Bread Enthusiasts.

Altamura

Ruralidle's picture

Altamura bread

June 1, 2012 - 2:21pm -- Ruralidle

I have been able to get some De Ceccio durum wheat flour from an online retailer in London (Luigi's).  I have been trying to bake a version of Pane Tipo di Altamura - the one that looks like a Cardinal's hat with four points - but I can't get the points to look good. 

I made a biga using 75g ciabatta flour (from Shipton Mill), 125g of Durum wheat flour, 120g bottled water and 1g fresh yeast.  That fermented for about 15 hours (it was quite warm in the UK overnight into yesterday so at about 21C).

dabrownman's picture
dabrownman

We were inspired by Varda’s recent Priests Hat  Altamura Style Bread Revisited here: http://www.thefreshloaf.com/node/28663/altamura-style-bread-revisited 


and thought we would convert it to our new, nearly normal, 3 day, multi-grain with sprouts and seeds process – no nuts this time.  We reduced the semolina and added some; rye, 6 grain cereal, white WW, AP and bread flour. 

 I suppose we like the way the dough was shaped the most and what drew us to this take onAltamurastyle bread.  With our college age daughter home for the summer, she wanted to learn how to bake and cook so when she moves off into her apartment next year she won’t starve.  So she learned some French slap and folds and regular S& Fs on this loaf.   But didn’t make it out of bed early enough to do the unusual Altamura Priest’s Hat shaping.

 The dough rose well during the 20 hour retard period in the refrigerator and, after coming to room temperature the next morning, it nearly folded itself into the hat shape.  At about 2 ½ hours it was ready for the oven having passed the poke test.

 The crust browned very nice and dark, the way we like it, the seeds and sprouts were popping out here and  there.  Best of all the crust was very tasty. The crumb was fairly open with all the whole grains, seeds, and sprouts but the taste and texture were just great.  We really like how this bread tastes.  The SD tang was deep and complex so the 3 day process worked.  Can’t wait to taste it tomorrow.  Formula and methods follow the lunch shot.

It took years of genetic engineering to get a home grown heirloom tomato color to match Green Rooibos, Honeybush, 4 Fruit Tea but even longer to get the same tonato to match the shape of Altamura 'Priest's Hat' Bread.

Semolina, Rye and WW Bread With Sprouts, Sunflour and Chia Seeds     
      
SD StarterBuild 1Build 2 Build 3Total%
SD Starter2000203.48%
Rye10100204.44%
Semolina0025255.56%
WWW1000102.22%
AP1515205011.11%
Water3535209020.00%
Total90706522550.00%
      
Starters %   
Flour12527.78%   
Water10022.22%   
Hydration80.00%0.00%   
Levain % of Total 19.98%   
      
Dough Flour %   
6 Grain Cereal5011.11%   
Semolina10022.22%   
White WW5011.11%   
Rye5011.11%   
Bread Flour10022.22%   
AP10022.22%   
Dough Flour450100.00%   
Salt92.00%   
Water33273.78%   
Dough Hydration73.78%    
      
Multigrain Sprouts %   
WW153.33%   
Rye153.33%   
Spelt153.33%   
Total Sprouts4510.00%   
      
Add - Ins     
Sunflower Seeds4510.00%   
Chia204.44%   
Total6514.44%   
      
Total Flour575    
Total Water432    
T. Dough Hydrat.75.13%    
      
Hydration w/ Adds75.13%    
Total Weight1,126    

Method

Start the sprouts by soaking the berries in water for 5 hours then spread them out on a damp paper towel, cover with another paper towel and then cover in plastic.  Set aside to sprout until needed – about 1 ½ days.

Start the SD levain build by following the 3 builds 3 hours apart and then refrigerate overnight.

Start the autolyse by combining the flour and water in the mixing bowl, cover with plastic and refrigerate for 24 hours.

Remove the levain and autolyse from the fridge and allow them to come to room temperature - about 90 minutes.

Mix with a dough hook, the levain and the autolyse in the mixing bowl on KA 2 for 4 minutes add salt and continue kneading for an additional 2 minutes .  Place in a well oiled bowl to rest for 15 minutes.  Do a few minutes of French slap and folds and let rest for 15 minutes, then do 4 S&F on 15 minute intervals.  Add the sprouts and seeds on the 3rd S&F and allow to rest for and ferment for 1-2 hours after the 4th.  Form into a boule and refrigerate overnight.

 Remove from refrigerator and allow dough to come to room temperature – about 90 minutes.  Flatten gently into a 8 x 18 rectangle and form into a priests hat by folding in half  from the short end and sealing the top edge.  Then fold up from the short end again but only go ¾ of the way up sealing the top and sides.  Allow to proof on parchment paper, on a peel, inside a trash bag until it passes the poke test about 90 minutes.

 Preheat oven to 500 F with steaming method and stone in place for 45 minutes.  Slide hat onto the stone and turn the oven temp down to 425 F after 4minutes.  Allow to steam for another 12 minutes.  Remove steam, turn down to oven to 425 convection this time, and allow bread to bake turning every 8 minutes, 120 degrees, until center reaches 205 F.  Turn off oven and leave on stone for 10 more minutes, with the door ajar, too allow skin to crisp up.  Move to wire rack to cool completely.


varda's picture
varda

Recently I've been trying to bake a 100% Whole Durum loaf loosely following Franko's Altamura project.    After a couple of attempts, I backed off and baked 40%, 60% and 80% durum loaves, trying to get a feel for working with a high percentage of durum flour.   For the 40, 60. and 80% versions, I used my regular wheat starter so that at least I didn't have to worry about a whole grain starter on top of everything else.   I was reasonably happy with the 40% and 60% versions and felt that I could bake them happily at any time.   The 80% came out too dense - the really hard part is developing the dough without breaking the fragile gluten of the durum. 

Yesterday I decided to give it another shot at 100%.   I took my semolina seed starter and fed it up - then added durum in three more feedings - the third last night.   There was no way I was going to leave it on the counter overnight - anything could happen while I was asleep, so I popped it in the refrigerator right after feeding, and then took it out in the morning.   It only took 3.5 hours to ripen even cold from the refrigerator.    So I mixed everything up by hand and proceeded with trying to develop the dough.   Every half hour I rotated the bowl while using the fingers of my hand like a scoop to turn the edges into the middle, then pressed down with my palm.   This seemed to me  to be the happy medium between being gentle and yet still developing the dough.   After two hours and the 4th scoop and press I felt there was a sudden softening of the dough which up to that time had been fairly puffy.   I pressed it out into a thick disk and folded one edge on top of the other just past the middle and placed on a floured cloth, sprinkled the top with flour and covered with the end of the cloth.   Then proofed for a little over an hour.   Then baked as usual at 450F for 20 minutes with steam and 20 without, then 10 in the oven with the door cracked open and heat off.    It got more oven spring than I expected, and while not as light as the 40 or 60% versions, nor as light as Franko's (made with more baker skill and extra fancy durum rather than whole durum) I thought it was reasonably respectable.   Actually we had it for dinner with fish and sauted vegetables and it was definitely people food rather than fit for the coyotes.  

Formula:

Semolina Starter


65%

 Hydration


on 8/9/2011


1:30 PM

3:30 PM

7:45 PM

10:40 PM

      Total

           %

Seed

26


Durum


30

51

75

172

90%

Semolina

16

20


20

10%

Water

10

20

20

35

47

132

69%


324


  Final

    Starter


   Total

           %


Semolina


15


15


Durum

500

133


633


Water

340

102


442

68%


Salt

12


12

1.9%


Starter

250


23%


This has several deviations from proper Altamura:

1.   Higher percent prefermented flour because I'm just more comfortable with that

2.  Whole Atta durum - that's what I have

3.  No attempt to simulate WFO - I had enough balls in the air as it was

4.  Higher hydration - the 80% with  62% hydration was just dry, dry, dry - it did go out for the coyotes.

varda's picture
varda

Franko's projects have a way of capturing my imagination.   His Altamura bread did that in spades.   Then to top it off when Sylvia showed her Altamura loaf sitting on her WFO floor, I couldn't resist.    Today I followed Franko's formula http://www.thefreshloaf.com/node/24172/first-success-altamura-project to the tee.   The only problem was I didn't have the Giusto fancy durum flour - just my Golden Temple Atta.   I took Franko's advice and did the 4 Stretch and Folds in the bowl.   I wouldn't call them regular in the bowl stretch and folds though, since I used my hands and just gently manipulated the dough.   I had watched the clip of the Italian housewife (in the comments of Franko's post) handling the dough, and I tried to channel her, even though there is a big gap between us.   I also did all the mixing and initial kneading by hand.   The dough is very easy to handle and not sticky so this was fine.   It is the first time since forever that I haven't mixed in my Kitchen Aid. 

I hadn't really thought about baking with fire in, door open when I built my oven but it worked fine for one loaf.  


I didn't get quite as much oven spring as I would have hoped for, so I think there's plenty of room for improvement.   But I'm pretty happy with this bread.   Of course, my title is a misnomer.   This isn't Altamura bread since it's made with Atta - whole grain durum flour, most likely sourced from just about every country but Italy.   Maybe next time.

Juergen Krauss's picture
Juergen Krauss

Inspired by the recent blogs about Pane di Altamura by Franko

http://www.thefreshloaf.com/node/24102/pane-di-altamuramy-ongoing-project

http://www.thefreshloaf.com/node/24172/first-success-altamura-project

and David Snyder

http://www.thefreshloaf.com/node/24139/pane-tipo-di-altamura-quotlocal-breadsquot,

and by the then hot weather I decided to try out this intersting bread.

In Britain I found three suppliers of Italian flours, so I ordered some.

I got semola di grano duro rimaccinata (the semolina used for bread) by Divella, from near Bari. The grains seem to be a blend from European countries.

I also got tipo 00 soft wheat flour "La Farina di Don Arcangelo", and durun semolina by the same make, both from Altamura. The semolina is coarser and makes wonderful pasta.


Here a picture of the flours:

No 1: TRS fine semolina (durum), which is availlable in Asian shops. Origin: EU countries (to compare)

No 2: La Semola di Don Arcangelo, from Altamura

No 3: Semola di grano duro rimaccinata by Divella, milled near Bari

No 4: La Farina di Don Arcangelo, from Altamura (tipo 00)

No 5: Shipton Mill No 4 organic strong white flour (my current standard flour, to compare)

To try out the Italian flours I wanted to make a bread I knew well: I used the Pugliese formula I learned at the Lighthouse Bakery with two changes:

1. I used 20% semola rimaccinata and 80% tipo 00 (for biga and dough)

2. I found an interesting baking profile in Italian bread blog: Preheat at maximum temperature, bake for 60min with no steam and turn to 200C immediately.

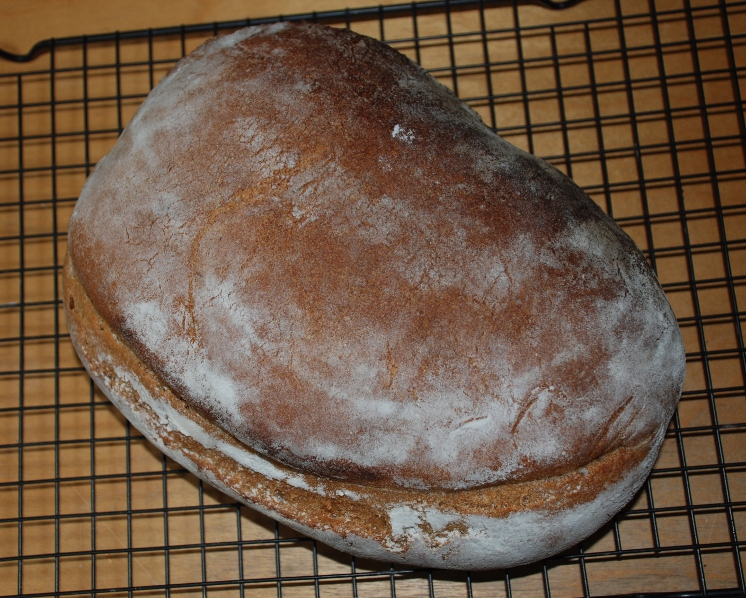
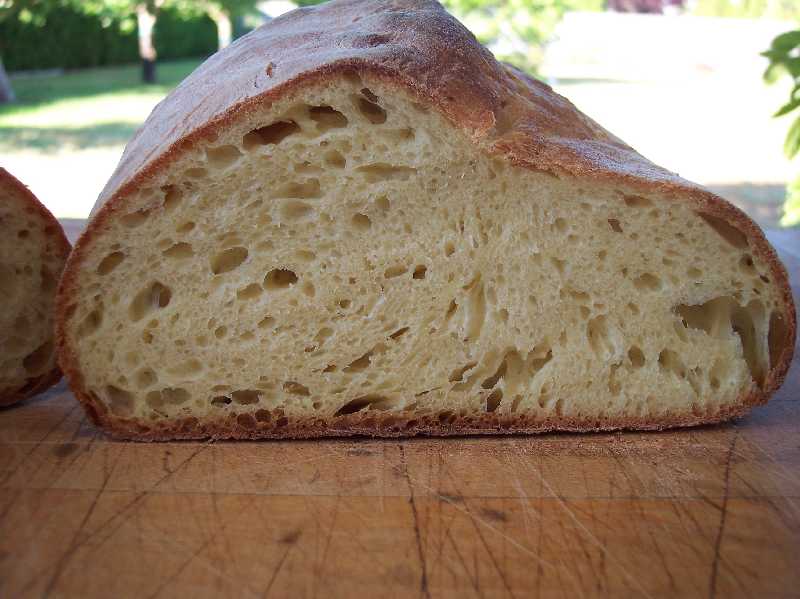
The result is quite amazing, my best Pugliese yet. The taste is not as sweet as the one made with English flour, but it has more depth, and an amazingly elastic yellow crumb. A good contrast to the thick crunchy crust.

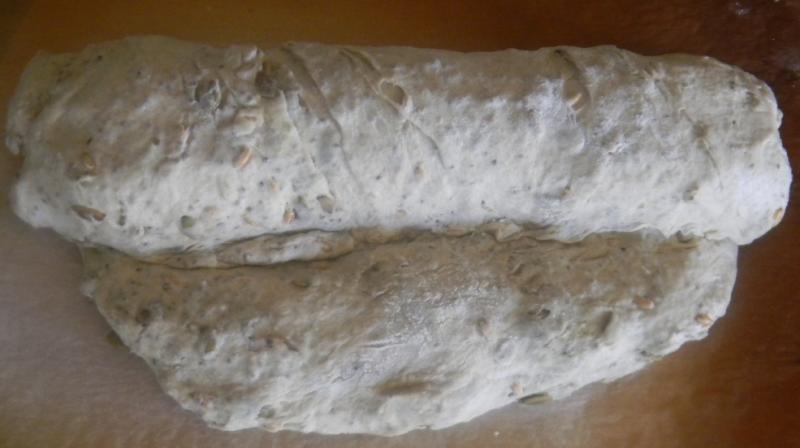
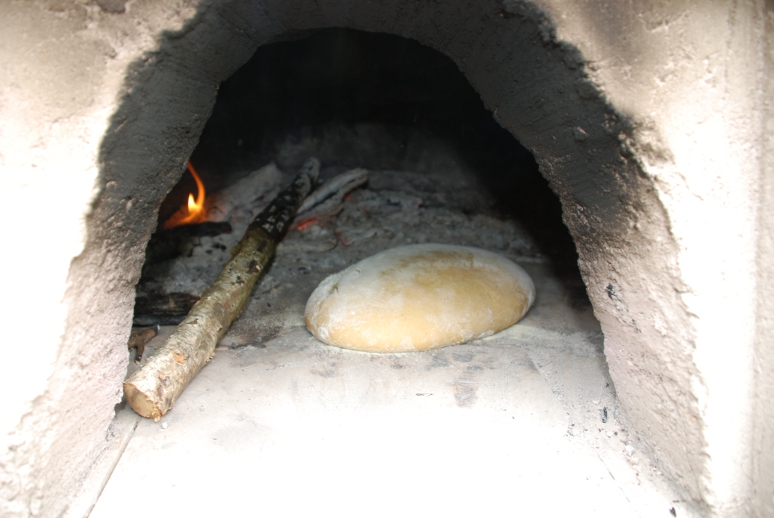
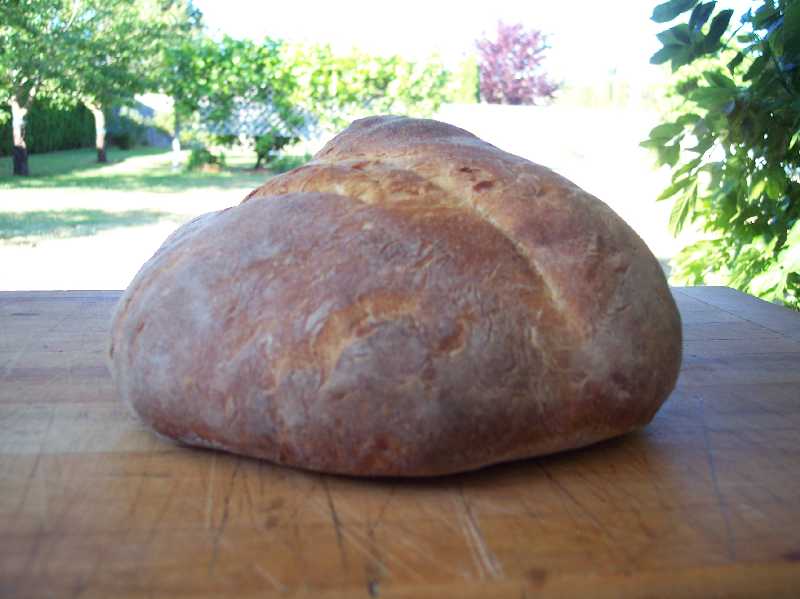
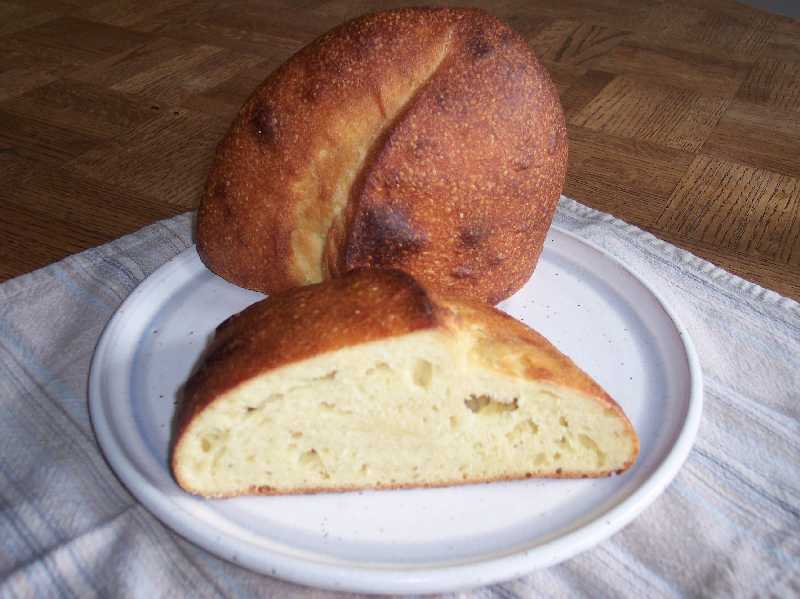
Next I tried an Altamura style bread, but I got rushed, and the temparature in our kitchen dropped.

Not quite understanding the durum leaven I mixed too early. The resulting bread took a long time to raise, the crumb is uneven and it tastes very sour. But I am satisfied with my first attempt, I really like the consistency and feel of the semolina dough.

Here a picture of the loaf:

All in all it is great fun to work with these flours,

and it is really wonderful to find so much inspiration here on TFL.

Special thanks to Franko and David,

Juergen

 /* UPDATE */

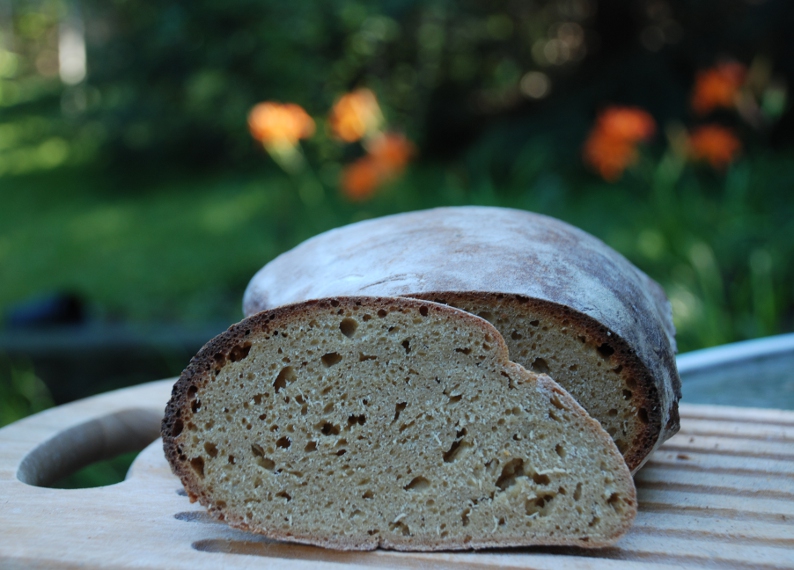
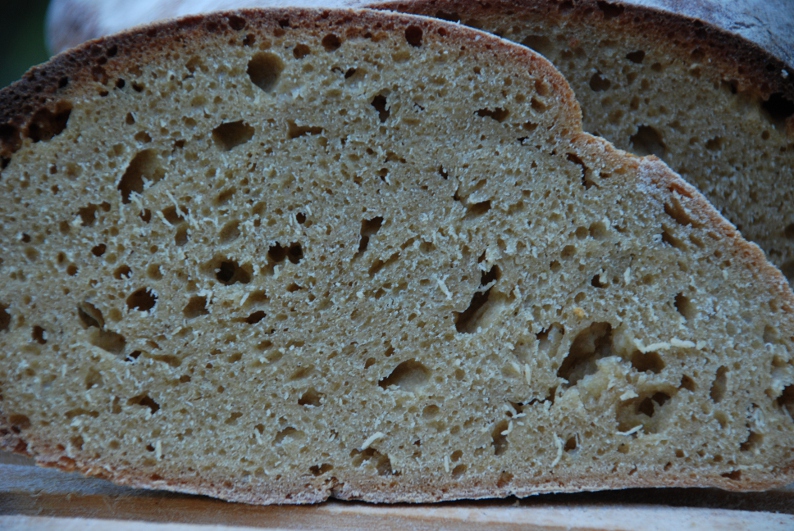
The inside of the Altamura bread:

I think the main problem here was fermentation control: The temperature in the kitchen dropped by about 5C during the last elaboration of the starter, and the effect was more drastic than on wheat or rye starters. I used the starter far too early. Lesson learned

The sources for the flours:

http://www.mattas.co.uk for the Divella semolina

http://www.mediterraneandirect.co.uk/ for the altamura flours - they seem to be out of stock now (as of 8 July 2011)

DeCecco has an online shop (for European countries) where they sell Semola di grano duro rimacinata. They are based in Puglia,but like Divella they seem to use grains from all over the place. I didn't try that (yet).

http://www.dececco.it/eshop/en/


Franko's picture
Franko

Since posting my last effort at making the Pane Tipo Altamura http://www.thefreshloaf.com/node/24102/pane-di-altamuramy-ongoing-project it's been an unexpected pleasure to have received so much interest and support for this project from so many TFL members. Thanks to everyone who's responded with new information, tips and suggestions, videos, etc, but especially to David Snyder for taking enough interest in the project to do his own bake of the bread. http://www.thefreshloaf.com/node/24139/pane-tipo-di-altamura-quotlocal-breadsquot

It's always a bonus when you have David's insight and scrupulously well taken notes to refer to. I found them very instructive before beginning this latest bake. Thanks David!

Although I strayed slightly from some of the criteria outlined in the Altamura DOP document, http://eur-lex.europa.eu/LexUriServ/LexUriServ.do?uri=OJ:L:2003:181:0012:0019:EN:PDF I feel I could have stayed within the criteria and produced a bread of similar quality and attributes as this latest effort. Something I'll endeavor for future bakes now that I have a much better understanding of the process.

The most significant difference between the DOP regs and what this mix included is the percentage of preferment. The DOP calls for 20% of preferment and I used 24.25%. Overall hydration (not counting that of the starter) was slightly higher than 60% regulation at 62% . Other than that it stayed reasonably close to what was outlined in the DOP.

The differences between this dough and the last one were like night and day in terms of the texture and fermentation. The preferment was considerably stronger, and why I'm sure that had I used only 20% instead of the 24%, I would have achieved very similar results. The lower hydration of this dough also made a world of difference to the crust and crumb.The crust is crackly, with a good chew to it, and a rich, toasty flavour.The crumb is wonderfully moist, almost spongy, with a medium level sour background that lasts on the palate well after eating. It's not so strong that it wouldn't compliment anything within reason on the sweet side, and pretty much everything on the savory. Very tasty stuff indeed!

Taking this bread out of the oven last night was one of those classic whooohooo! moments I know all of us have from time to time in our baking pursuits. It's been a while since I've had one of those, and the first I've had since starting this endeavor, so it's a genuine pleasure to be able to share what I regard as a first success of the project with everyone here on TFL.

Formula, procedure and photos below.


Best Wishes,

Franko


Pane Tipo Altamura


Ingredients

%

Kg/Grams

Preferment


Semolina flour starter

32

32

Duram flour

100

81

Water

100

81

Total


194


Final Dough


Durum flour

100

800

Water

59.2

474

Preferment

24.2

194

Sea salt

1.9

17

Total weight


1.49

Total Hydration

62.9


PROCEDURE:

Semolina flour starter;

Mix equal portions of semolina flour and tepid water and keep covered at 65-70F. Refresh daily over the course of 3 days. Reduce the water by 50% on the last feeding to thicken the starter and build acidity.


Preferment;

Build the preferment over 24 hours in 3 stages using equal increments of the total flour and water indicated in the formula. Keep covered at 70F.


Final Dough; Hand Mix- DDT 76-79F Oven temperature of 450F


Combine the flour, water, and preferment and autolyse for 30-40 minutes. Add the salt and adjust the hydration slightly if needed to form a medium firm dough. Knead the dough on the counter for 3-4 minutes until the dough is smooth and cohesive.

NOTE: throughout the kneading and the stretch and folds to come be aware of any signs of tearing on the dough surface. When this starts to show, stop working the dough and let it rest.

Place the dough in a bowl and cover with linen or plastic wrap and begin the 2 1/2 hr bulk ferment.

Stretch and fold the dough in the bowl every 30 minutes during the course of the bulk ferment. The S&F's can be done several times (8) before tearing begins to show depending on the individual tolerance of the dough at hand.

After the last S&F allow the dough to rest for 15-20 minutes then round and rest a further 15minutes. On a well dusted counter press the dough into a thick disc. Fold the bottom half of the dough to almost meet the edge of the top half, or approximately an inch back from the edge.

Place the dough on well floured piece of linen, cover with another piece of floured linen and begin the final rise of 1 to 1-1/2 hours. When the dough is not quite fully proofed slide a peel under the dough and transfer it to a 450F preheated oven and stone. Leave the door ajar and the vents unblocked for the first 10 minutes. Note: No steam is used.

Close the door and bake for 15 minutes before rotating the bread for even colouring. Continue baking for 10 minutes before lowering the temperature to 430F with a further 15-20 minutes of bake time. Lower the temperature to 300F, prop the door ajar and bake for 10minutes. Tap the bottom of the loaf for a hollow sound to ensure complete baking.Turn the heat off and leave in the oven for ten minutes then remove to a wire rack and cover with linen. When the bread has cooled for 6 hours or more dust off the excess flour before slicing.

Franko's picture
Franko

Carol Field's 'Italian Baker' is the oldest book in my ever growing collection of books on bread and pastry making, and still one my stand-bys that I refer to often. One of the breads included in her chapter on regional and rustic breads is the Altamura bread from the town of the same name in the region of Puglia. The bread is one I've wanted to make for many years but have never run across a local source for the type of durum flour needed to make it. Finally this Spring, as some folks may remember from previous posts to this blog, I was able to have some shipped from Giusto's in San Francisco to my home on Vancouver Island. A bit of an indulgence as far as the shipping costs involved and not one I'll be repeating anytime soon.


While I was waiting for the flour to arrive I began doing some online research on Pane di Altamura, as well as putting in some queries to Nico/nicodvb and Andy/ananda , both of whom kindly responded with lots of useful information from their own experiences with the bread. Many thanks to both of them for sharing their knowledge with me! One of the things I wasn't aware of, and that Andy mentioned in our correspondence is that Altamura bread has protected or 'DOP' status in the EU. "The bread of Altamura is 'officially the first product in Europe to bear the DOP in the category''Bread and bakery products.'' http://translate.google.co.uk/translate?hl=en&sl=it&u=http://www.panedialtamura.net/&ei=z8ypTaaxK5CahQe2kdzFCQ&sa=X&oi=translate&ct=result&resnum=11&sqi=2&ved=0CHQQ7gEwCg&prev=/search%3Fq%3Dpane%2Baltamura%26hl%3Den%26rlz%3D1R2ADFA_en%26site%3Dwebhp%26prmd%3Divnscm


With further searching I found the EU document proclaiming the status and historical background of the bread, along with information outlining the material and methods used to produce authentic Pane di Altamura, here; http://eur-lex.europa.eu/LexUriServ/LexUriServ.do?uri=OJ:L:2003:181:0012:0019:EN:PD


After reading through this document I decided to try and follow the authentic formula as much as possible rather than using Ms Field's recipe, which she describes as an "Altamura type" that uses a biga instead of the traditional natural leaven called for in the DOP formula outline. Developing an active durum/semolina flour starter from scratch takes a little less than 48 hours I discovered. Natural yeast just gobbles up the available nutrients of durum at a rate I've never seen before with other grains. This fact has been the biggest obstacle to me in trying to achieve a reasonably acceptable loaf, simply because the starter or the leaven was reaching it's peak long before my sleep and work schedules permitted me the time needed get a mix going. The first mix I made was pretty much a disaster and needed to be rescued with baker's yeast, the second and third attempts had slightly better results but still not great. This last attempt, while not a home-run by any means, is the best to date in terms of the final shape. This one has a much better flavour than the last three as well, but the crumb is not as open as I think it could be and the crust is not at all crusty. The original formula indicates a 60% hydration level, however I increased this by 9% as the dough was a little stiff for my liking. This, along with the fact I used steam instead of baking with the oven door open for the first 15 minutes as indicated in the DOP procedure,was likely a critical error on my part towards achieving a proper crust. Old habits die hard, so I've highlighted that part of the procedure in my notes for the next attempt.

Regardless of the fact I've only had what I'd call marginal results with this project so far, I am enjoying the challenge of trying to reproduce this ancient and venerable bread.

Best Wishes,

Franko

summerbaker's picture

Recipe for Altamura?

July 9, 2009 - 7:37pm -- summerbaker

One of my favorite multi-purpose breads is the Italian bread, Altamura.  However, I have never made it myself and am now hoping that someone out there knows of a good recipe.  Quite a few recipes come up in a Google search, but I trust the folks here on TFL to be more likely to come up with a winner!  Don't feel obligated to write up the whole recipe; a source would be much appreciated.  Thanks!

Summer

karladiane's picture

What's your signature loaf?

October 2, 2008 - 10:54am -- karladiane
Forums: 

Hi all. I've taken on breadbaking and have been reading and baking very regularly for the past 6 months. BBA, Leader's Local Breads, and Emily Buehler's Bread Science have been my good companions and teachers. Leader suggests baking certain breads a lot to tweak them and to make them your own "signature" loaves. So far, I think that I have several that I'm working toward "signature" status. They are: (1) Pain de Campagne based on Leader; (2) Altamura Bread (a la Leader again); (3) Pane Siciliano based on BBA; and (4) Chocolate Babka (pieced together from various sources).

Subscribe to RSS - Altamura