The Fresh Loaf

A Community of Amateur Bakers and Artisan Bread Enthusiasts.

Advanced Bread And Pastry

dmsnyder's picture
dmsnyder

Progress is being made!

After my disappointment with the Kline, et al San Francisco Sourdough method, I re-read and re-digested what I know about time, temperature, ingredients and the care and feeding of sourdough flora. I suppose the principal new concept to sink in was that the fermentation temperature matters a whole lot, and what's best for yeast growth is not best for lactobacillus growth, and what's best for lactobacillus multiplication is not what's best for acid production. In a way, I rediscovered something I found out several years ago but neglected to pursue. (Reading old blogs was interesting.) Those very smart fellows at Detmolder were on to something: You can have it all, if you do it in stages. I'm pretty sure that what I did was not the only way to achieve pretty much the same result. It may not be the best way, but it worked for me. Note that I achieved the necessary temperature control with a Brød & Taylor Folding Proofer, but you can achieve this with a home-made proofing box as well.

My goal has been to make a moderately sour, mostly white “San Francisco style” sourdough bread that has a crunchy crust, an open crumb and a nice, sweet, complex flavor, not just sourness. Today's bake achieved all of these characteristics, and I'm a very happy baker (and bread eater)!

I started with the “San Francisco Sourdough” formula in Michel Suas' Advanced Bread and Pastry, but modified the method, as described below:

My stock starter is 50% hydration. My sourdough starter is fed with a mix of 70% AP, 20% WW and 10% whole rye.

I started by refreshing my stock starter with 40 g starter, 100 g water and 100 g flour mix and fermenting it at room temperature for 12 hours. I used this to build the stiff levain. (Note: This is a liquid starter - 100% hydration.)


Stiff levain

Bakers' %

Wt (oz)

Bread flour

95

2.5

Medium rye flour

5

0.15

Water

50

1.25

Liquid starter

80

2.15

Total

230

6.05

  1. Dissolve the starter in the water. Add the flour and mix thoroughly until the flour has been completely incorporated and moistened.

  2. Ferment at room temperature for 6 hours.

  3. Cold retard overnight.

  4. The next day, take the levain out of the refrigerator and ferment at room temperature for another 2-4 hours. The levain is ready when it has expanded about 3 times, and the surface is wrinkled (starting to collapse). 

Final dough

Bakers' %

Wt (oz)

AP flour

100

14.85

Water

72.8

10.85

Salt

2.53

0.35

Stiff levain

40

6.05

Total

215.33

32.1

Method

  1. In a stand mixer, mix the flour and water at low speed until it forms a shaggy mass.

  2. Cover and autolyse for 1-2 hours. (Yup. I autolysed for 2 hours.)

  3. Add the salt and levain and mix at low speed for 1-2 minutes, then increase the speed to medium (Speed 2 in a KitchenAid) and mix for 5 minutes. Add flour and water as needed. The dough should be rather slack. It should clean the sides of the bowl but not the bottom.

  4. Transfer to a lightly floured board and do a stretch and fold and form a ball.

  5. Place the dough in a lightly oiled bowl and cover tightly.

  6. Ferment at 78º F for 3 hours with a stretch and fold at 1 hour.

  7. Divide the dough into two equal pieces.

  8. Pre-shape as rounds and rest, covered, for 10 minutes.

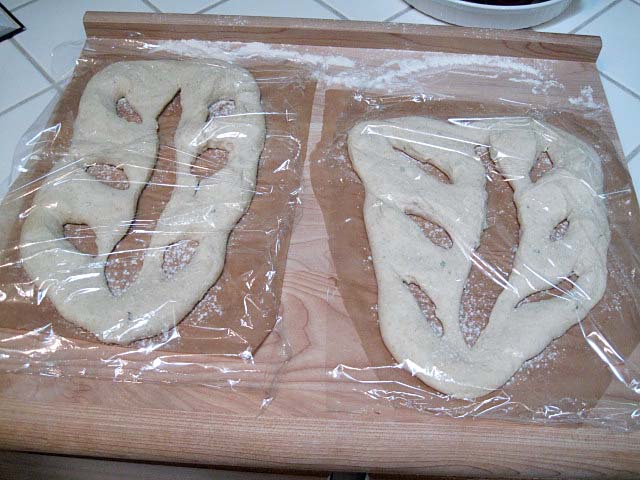
  9. Shape as boules or bâtards and place in bannetons. Place bannetons in plastic bags.

  10. Proof at room temperature (68-70º F) for 1-2 hours.

  11. Cold retard the loaves overnight.

  12. The next morning, proof the loaves at 85º F for 2-3 hours.

  13. 45-60 minutes before baking, pre-heat the oven to 480º F with a baking stone and steaming apparatus in place.

  14. Transfer the loaves to a peel. Score the loaves as desired, turn down the oven to 450º F, and transfer the loaves to the baking stone.

  15. Steam the oven.

  16. After 15 minutes, remove the steaming apparatus, and turn down the oven to 425º F/Convection. (If you don't have a convection oven, leave the temperature at 450º F.)

  17. Bake for another 25 minutes.

  18. Turn off the oven, and leave the loaves on the stone, with the oven door ajar, for another 10 minutes.

  19. Transfer the loaves to a cooling rack, and cool thoroughly before slicing.

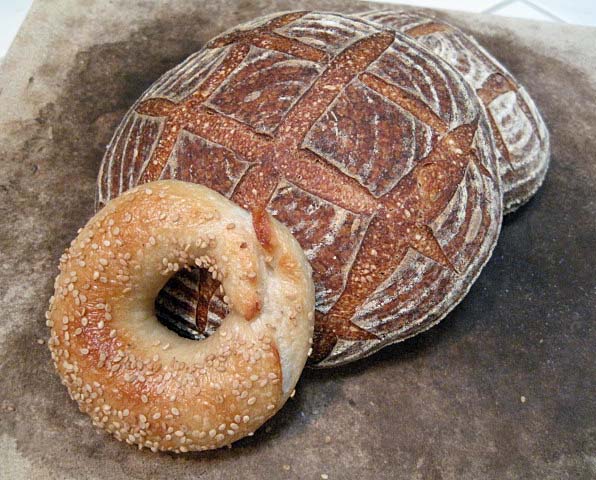
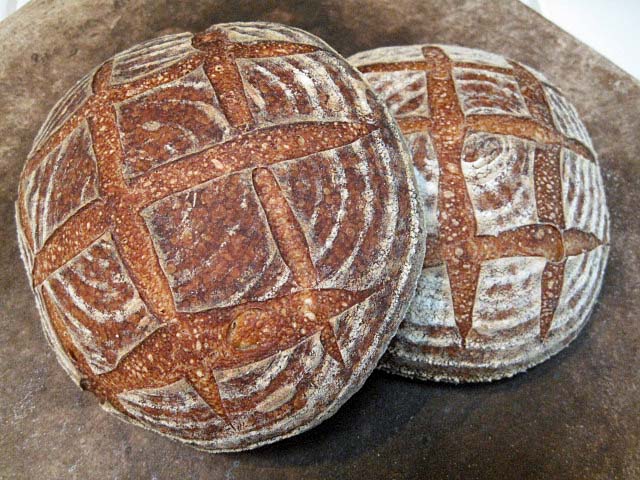
San Francisco Sourdough (and New York Bagel from ITJB. This weekend's "Coast to Coast" baking.) 

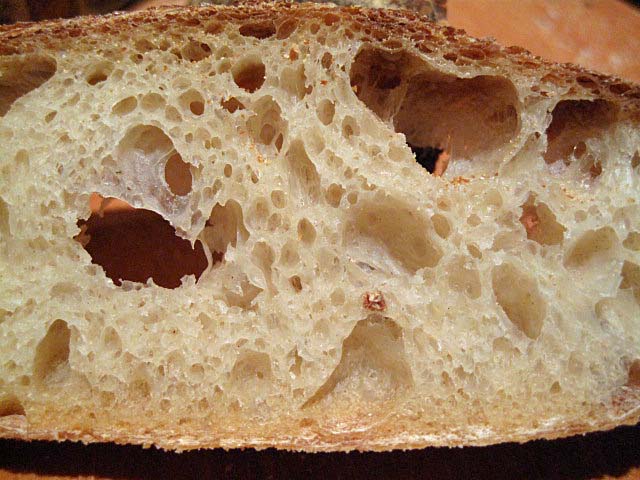
San Francisco Sourdough Crumb

These loaves had a rather flat profile but did have fair oven spring and bloom. When sliced after cooling for 4 hours, the crust was crunchy. The crumb was open. The aroma was decidedly sour. The crumb was tender-chewy and cool in the mouth. The flavor of the crumb was a bit sweet and wheaty with a moderately sour after taste. The crust was nutty, but I would have personally enjoyed it more had it been darker, even though that would not have been strictly in the the “San Francisco Style” of old.

This method is spread over 3 days, so it requires some advance planning. Since it requires little time, except on the second day, it should be easy to fit into almost anyone's schedule. It this is the kind of bread you're after, it's definitely worth the effort.

Future plans

  1. Substitute 5-10% whole wheat for some of the AP flour in the final dough.

  2. Make some larger loaves.

 David

Submitted to YeastSpotting

Addendum added 2/4/2012: Please see My San Francisco Sourdough Quest, Take 2 for my next bake. The modifications resulted in improvements in the crumb and a more assertively sour bread.

Josh.S's picture

Focaccia technique question

September 23, 2011 - 10:09am -- Josh.S

I made Reinhart's focaccia recipe from the BBA a couple weeks ago and it turned out very well.  Interestingly, I noticed that the olive oil and water are simultaneously mixed with the flour.  I understand that fats are typically added later in the mixing process so that the gluten is given more time to form and so the fat doesn't lubricate the gluten and prevent it from forming longer strands.

dmsnyder's picture
dmsnyder

Apple Breakfast Cake

I happened upon the formula for “Apple Breakfast Cake” while browsing Michel Suas' Advanced Bread and Pastry looking for something or other I've now forgotten. My wife loves cakes that are loaded with fresh fruit, and the photo in the book looked pretty wonderful. I was also thinking about the fabulously delicious Coffee Cake we were served for breakfast several mornings at SFBI, and hoped this cake might be as good.

I'm not a cake baker. My one attempt at a genoise resulted in a wonderful, eggy-flavored, dry and crumbly, 8-inch cookie. That was 20 or 25 years ago. I have recovered sufficiently from that traumatic humiliation to be able to consider baking something called a “cake” without panic. The process for Suas' Apple Breakfast Cake had only one step that seemed like it might present a challenge, so I decided to make it.


Ingredients

Baker's %

Wt

Eggs

65.38

2 7/8 oz

Sugar

57.69

2 ½ oz

Raisins

57.69

2 ½ oz

Walnut pieces

38.46

1 5/8 oz

Butter, melted

57.69

2 ½ oz

Apples, peeled, diced

384.62

1 lb, ¾ oz

Vanilla extract

1.54

½ tsp

Bread flour (KAF AP)

100

4 3/8 oz

Baking powder

3.46

1 tsp

Salt

1.54

¼ tsp

Total

768.07

2 lb, 1 ½ oz


Notes

  1. I used two whole large eggs.

  2. I rinsed and drained the raisins, although not instructed to do so in the recipe.

  3. I toasted the walnuts for 8 minutes at 325ºF.

  4. I used two golden delicious and about 1 1/2 braeburn apples.

Process

  1. Spray an 8 inch cake pan with nonstick spray (or butter and flour it).

  2. Sift the flour, baking powder and salt, and reserve.

  3. Whip the eggs and sugar to the ribbon stage.

  4. Add the raisins, walnuts and meted butter. Mix to incorporate.

  5. Fold in the diced apples and vanilla extract.

  6. Fold the sifted ingredients into the mixture until well-incorporated.

  7. Pour the batter into the pan.

  8. Bake at 335ºF (168ºC) for about 45 minutes. (I found my cake needed 60 minutes' baking to be sufficiently browned and firm. This may be because of the added water in the plumped raisins, or just because.)

  9. Allow to cool in the pan for 15 minutes before transferring to a cooling rack or onto a cardboard circle.

  10. Glaze with a flat icing made with powdered sugar, orange juice and orange zest. (I did not make the icing. I just used a light sifting of powdered sugar on each slice, just before serving.)


Suas' description of this pastry is, “This country-style cake is tasty, moist, and dense with apples.” All true. The cake is very moist. The texture is close to that of a moist bread pudding. There is really just enough batter to hold all the apples, raisins and walnuts together. It is rather sweet, but not too sweet. I just dusted slices with powdered sugar and was glad I skipped the icing. The cake is quite rich. I think it makes a nice dessert for any meal or a little something to have with a cup of tea or coffee. I couldn't make a whole breakfast out of it.

This is a lovely cake. It is delicious to eat and has aided in my recovery from the old cake trauma.

David

dmsnyder's picture
dmsnyder

Tre Franceses


“Pan Francese” simply means “French Bread” in Italian. It is a long, thin loaf that is the Italian version of a baguette. Daniel Leader has a formula in Local Breads which he titles “Italian Baguettes” and says are called “Stirato,” which means “stretched” in Italian. Michel Suas' Advanced Bread and Pastry includes a formula for “Pan Francese,” and we made this bread during the Artisan II workshop at SFBI.

The differences between Leader's and Suas' formulas are relatively minor. Leader uses a biga at 60% hydration, and the biga is 61% baker's percentage of the total dough. Leader's dough hydration is 70%. Suas' hydration is 76% - a significant difference. Suas uses a poolish (100% hydration), and the poolish is 50% baker's percentage of the total dough. Leader uses all AP flour, while Suas' formula uses 13.6% whole wheat flour, the rest being AP. Leader's mixing instructions, as usual for his high-hydration doughs, call for an intensive mix (10-12 minutes at Speed 4). Suas specifies a short mix but 2 or 3 folds during bulk fermentation. Their shaping instructions are also significantly different: In spite of pointing out that “Stirato” means “stretched,” Leader tells you to shape the loaves like you do baguettes. Suas has you simply cut long strips of dough and stretch them to shape.

Of course, there is no end to variations with breads. The Il Fornaio Baking Book, from the bakery chain of the same name, has a recipe for “Sfilatino” which they call “Italian Baguettes.” Theirs are made with a biga. They are shaped as demi-baguettes, then stretched to about 15 inches long.

The “Pan Francese” I made followed Suas' formula and method from AB&P.


Poolish

Baker's %

Wt. (oz)

AP flour

100

3 5/8

Water

100

3 5/8

Yeast (instant)

0.1

1/8 tsp

Total

200.1

7 1/8

  1. Mix all the ingredients until well-incorporated.

  2. Ferment for 12-16 hours at 65ºF.


Final dough

Baker's %

Wt. (oz)

AP flour

79.52

11 7/8

WW flour

13.48

2 3/8

Water

70

10

Yeast (instant)

0.35

¼ tsp

Salt

2

¼ oz

Malt

0.98

1/8 oz

Poolish

50.03

7 1/8

Total

223.36

2 lb


Total dough

Baker's %

Wt. (oz)

AP flour

86.4

15 1/2

WW flour

13.6

2 3/8

Water

76

13 5/8

Yeast (instant)

0.3

1/2 tsp

Salt

1.6

¼ oz

Malt

0.78

1/8 oz

Total

178.68

2 lb


Method

  1. Prepare the poolish the evening before mixing the dough.

  2. Measure all the Final dough ingredients into the bowl. (I used a KitchenAid mixer.)

  3. Mix with the paddle until ingredients are well mixed – 1-2 minutes -then switch to the hook and mix at speed 2 or 3 for about 5 minutes. There will be some gluten development, but the dough will not clear the sides of the bowl. It will be like a thickish, glutenous batter.

  4. Transfer the dough to an oiled bowl and cover tightly.

  5. Ferment for 3 hours with 2-3 stretch and folds on a well-floured board.

  6. Prepare your oven with a baking stone and your steaming apparatus of choice in place. Pre-heat the oven to 500ºF about 30 minutes before the end of fermentation.

  7. Transfer the dough to a well-floured board. De-gas the dough and stretch and pat it into a rectangle about 8 x 12 inches. Dust the top with flour.

  8. Using a bench knife, divide the dough into 3 strips. Stretch them to about 15” long and place them on a well-floured linen couch. (I suppose parchment paper would serve.). Cover with linen or a towel.

  9. Proof for 30-45 minutes.

  10. Transfer the loaves to a peel and then to the baking stone. Turn the oven down to 460ºF and steam it.

  11. Bake for 22-25 minutes.

  12. Transfer the loaves to a cooling rack. Cool for at least 30 minutes before slicing.

Francese cross section crumb

Francese longitudinal section crumb

The loaves had a thin, crisp crust that got chewy as it cooled. The crumb was very open with some chewiness. The flavor of the whole wheat was present when tasted still slightly warm. I expect it to meld by tomorrow. The flavor was similar to ciabatta, not surprisingly. The bread was nice as a chicken salad sandwich for dinner.

David

Submitted to YeastSpotting


dmsnyder's picture
dmsnyder


I have made miches from Peter Reinhart's BBA, from Daniel Leader's “Local Breads” and the Miche, “Pointe-à-Callière” from Jeffrey Hamelman's “Bread.” All were good breads. Reinhart's was the closest to the Pain Poilâne I remember from my single tasting in Paris some 25 years ago.

This weekend, I baked the miche from Michel Suas' “Advanced Bread and Pastry” for the first time. Suas references Pain Poilâne as the best known miche, but he does not say his formula is an attempt to replicate it. His “miche” is a 2 lb boule. This is smaller than my notion of a miche, but what do I know? I'll ask M. Suas the week after next when I'm at the SFBI for the Artisan II class and report back.

Suas' formula and procedures are quite unusual in several respects. It uses 3 builds and specifies a mixture of high-extraction, bread and medium rye flours. The final dough has 50% pre-fermented flour from the levain, and almost all the water comes from the 120% hydration levain. Even more remarkable is the very brief bulk fermentation of 15 minutes. I assume this works because of the very high percentage of pre-fermented flour. After shaping, the miche is retarded overnight before baking.


First levain feeding

Wt.

Baker's %

High-extraction flour

1 3/8 oz

100

Water

1 ¾ oz

120

Salt

1/8 tsp

0.6

Starter (stiff)

1/8 oz

10

Total

3 ¼ oz

230.6

  1. Mix all ingredients well with a DDT of 70ºF

  2. Ferment 16 hrs at room temperature.


Levain formula

Wt.

Baker's %

High-extraction flour

8 1/4 oz

100

Water

9 7/8 oz

120

Salt

1/4 tsp

0.6

First feeding

3 1/4 oz

40

Total

21 5/8 oz

260.6

  1. Mix all ingredients well with a DDT of 70ºF

  2. Ferment 8 hours at room temperature.

Note: I fermented at room temperature for 6 hours, then refrigerated overnight. I allowed the levain to warm up and ferment another 2 hours before mixing the final dough


Final dough formula

Wt.

Baker's %

Bread flour

5 5/8 oz

60

High-extraction flour

1 7/8 oz

20

Medium rye flour

1 7/8 oz

20

Water

7/8 oz

10

Salt

3/8 oz

3.8

Levain

21 5/8 oz

230.6

Total

21 5/8 oz

344.4

Note on ingredients: I used "Organic Type 85" flour from Central Milling for the high-extraction flour, KAF Bread Flour and KAF Medium Rye flour.

Process

  1. Mix water and Levain

  2. Mix flours and salt. Add to water/levain mixture and mix to medium gluten development. (I mixed this dough in a Bosch Universal Plus for 3 minutes at first speed and 6 minutes at second speed.)

  3. Transfer to a lightly oiled bowl and ferment for 15 minutes.

  4. Pre-shape the dough into a light ball and rest it for 20-30 minutes.

  5. Shape into a boule. Place it in a banneton and cover well with plastic or place in a food grade plastic bag.

  6. Retard overnight in the refrigerator. (Suas specifies a temperature of 48ºF, actually.)

  7. The next morning, pre-heat your oven to 500ºF with baking stone and steaming apparatus in place.

  8. Pre-steam the oven. Transfer the miche to a peel. Score the miche. (Suas specifies a diamond pattern.) Transfer it to the baking stone. Stem the oven. Turn the oven down to 440ºF. (See Note, below.)

  9. Bake for 45 to 50 minutes or until the internal temperature is 205ºF and the bottom gives a hollow sound when thumped. (Note: I baked this in a Lodge Combo Cooker – Convection bake for 20 minutes covered at 460ºF, covered then 25 minutes at 440ºF, uncovered.)

  10. Transfer to a cooling rack and cool thoroughly before slicing.

Suas doesn't mention it, but most authors recommend waiting 12 to 24 hours before slicing this type of bread.

The miche

Miche crumb

I sliced and tasted the bread after it had cooled for about 4 hours. The crust was crunchy. The crumb was chewy. The aroma and flavor were unlike any bread I've ever tasted. It did have a mild sourdough tang, but the flavor was uniquely wonderful. It had some nuttiness I associate with wheat germ and sweetness I've only tasted before in some baguettes that have had a long, slow fermentation or were made with pâte fermentée. I assume the wonderful flavor can be credited to the combination of the "Type 85" flour and the unusual process commented on above.

I'm looking forward to baking some other miches using this flour. It's wonderful.

David

Submitted to YeastSpotting


dmsnyder's picture
dmsnyder

In my continuing search for whole wheat breads to add to my list of favorites, today I baked the “Sourdough Whole Wheat Bread” from Michel Suas' “Advanced Bread and Pastry.” I had previously baked the Honey Whole Wheat from AB&P, but still prefer Peter Reinhart's 100% Whole Wheat from BBA to it.

Most of my bread baking is with sourdoughs, and I want to have a sourdough whole wheat bread that I really enjoy in my repertoire. The one I have made - I can't remember where I got the formula - was not to my taste. I just didn't like the combination of sourdough tang and whole wheat flavor. On the other hand, I have enjoyed other sourdough breads with a high percentage of whole grains, so the AB&P formula seemed worth trying.


Levain


Ingredients

Baker's %

Wt (oz)

Bread flour (KAF)

95

2 3/8 oz

Medium rye flour (KAF)

5

1/8 oz

Water

50

2 oz

Starter (stiff)

80

2 oz

Total


5 7/8 oz


Final dough


Ingredients

Baker's %

Wt

Bread flour

40

5 7/8 oz

Whole wheat flour

60

8 ¾ oz

Water

76.6

11 1/8 oz

Yeast (instant)

0.16

1/8 tsp

Salt

2.53

3/8 oz

Levain

40

5 7/8 oz

Total


2 lb

Yes. I know it's not “pure” sourdough, and it's not close to purely whole wheat, but if Chef Suas wants to call it “Sourdough Whole Wheat,” who am I to quibble?

Procedure

  1. Mix levain ingredients and ferment at room temperature for 12 hours.

  2. Mix all ingredients to medium gluten development. The dough should be quite tacky.

  3. Bulk ferment for 2 hours.

  4. Divide into 2 equal pieces and preshape for boules or bâtards.

  5. Let the pieces rest, covered, for 20-30 minutes.

  6. Shape as desired.

  7. Proof en couche or in bannetons for 60 to 90 minutes.

  8. Bake at 450ºF for 35 minutes with steam for the first 12-15 minutes.

  9. Cool completely before slicing.

I mixed the dough in a KitchenAid stand mixer for 3 minutes on Speed 1 and about 7 minutes on Speed 2. After bulk fermentation, the dough was still tacky but very extensible. I rested the loaves seam side down after pre-shaping. This was a mistake. There was enough flour on the seam side to interfere slightly with final shaping. (See my boule tutorial.) I recommend proofing seam side up.

I think I slightly over-proofed (90 minutes) and got less oven spring than I thought I should get with this bread.

The crumb was quite chewy. The flavor was rather simple – A very slight sourdough tang and a straight ahead whole wheat flavor with no grassiness or bitterness. I look forward to tasting the bread as toast in the morning and as a sandwich for lunch tomorrow.

David


dmsnyder's picture
dmsnyder

Davesmall's recent postings of his Fougasses (Fougasse with refrigerated dough ) inspired me to finally make this bread from Provence and the Côte d'Azur. I first had this bread in Lourmarin, in the Vaucluse. My wife and I visited an old high school French teacher of mine. His French wife has a family connection with that village going back generations. We spent a delightful day on a motor tour of the area, including several stops at bakeries, because each had different specialties. We ate the fougasse with a delicious daube de boeuf for lunch that day.

I made these fougasses from the formula in Michel Suas' Advanced Bread and Pastry. it uses a levain but is also spiked with a small amount of instant yeast. Per Suas' formula, I added some rosemary to the dough, fresh from the garden. We dipped it in EVOO with a bit of balsamic vinegar and had it with salmon cakes and a salad of tomatoes, cucumber and radishes with a mustard vinaigrette. A lovely Navarro Pinot Gris was a perfect accompaniment, although a rosé would have been more traditional with this bread.

Fougasses proofing

Proofed, ready to bake (450ºF for 20 minutes with steam)

Fougasses

Fougasse is a crust-lovers' bread. It is very crunchy but with enough tender, highly aerated crumb to absorb dipping oil. I enjoyed dipping it in the salad dressing more than the oil and balsamic. I ate 3/4 of one myself at dinner, demonstrating my customary restraint.

David

dmsnyder's picture
dmsnyder


I've been baking the San Francisco Sourdough from Michel Suas' Advanced Bread and Pastry frequently over the past few months. It's very good. This weekend, I decided to try a couple of his other sourdough breads.

Right after the formula for “San Francisco Sourdough,” Suas gives two other formulas for Sourdough Bread, differing in the levain used. One uses a 100% hydration levain and the other a 50% stiff levain. Both differ from the San Francisco Sourdough in using a smaller starter inoculation for a levain that ferments for 24 hours. This week, I chose to make the one with the stiff levain, which Suas calls “Sourdough Bread One Feeding.”


Levain Formula

Wt (oz)

Baker's %

Bread flour

3 1/4

95

Medium rye flour

1/8

5

Water

1 ¾

50

Starter (stiff)

7/8

25

Total

6

175


Final dough

Wt (oz)

Baker's %

Bread flour

14 7/8

100

Water

10 7/8

72.8

Yeast (instant)

1/8 tsp

0.1

Salt

3/8

2.53

Levain

6

40

Total

2 lb

215.43

Note: The over-all hydration of this dough is 64%.


Procedure

  1. Mix levain thoroughly.

  2. Ferment for 24 hours at room temperature.

  3. Mix the dough ingredients to medium gluten development. DDT 75-78ºF.

  4. Transfer to an oiled bowl. Cover tightly and ferment for 2 hours.

  5. Divide into two equal pieces and pre-shape into balls.

  6. Rest for 20-30 minutes, covered.

  7. Shape as boules or bâtards.

  8. Proof in bannetons or en couche for 90-120 minutes at 80ºF.

  9. Pre-heat oven to 500ºF for 45-60 minutes, with baking stone and steaming apparatus in place.

  10. Pre-steam oven. Transfer loaves to the peel. Score with “chevron” or “sausage” pattern, and transfer to the baking stone.

  11. Steam oven and turn temperature down to 440ºF.

  12. Bake for 30-35 minutes or until done.

  13. Remove loaves to a cooling rack and cool completely before slicing.

Note: My oven has a convection mode and a conventional baking mode. My actual baking procedure is to pre-heat the oven on Convection-Bake to 500ºF. After the bread is loaded and the oven steamed, I turn the oven to the recommended temperature using conventional (non-convection) baking. When the bread has started to color and has had full benefit of the steam, I switch to Convection-Bake again and lower the temperature by 20-25ºF. (This assumes I'm not baking with “falling temperatures,” as with some rye breads.)

The loaves were proofed at 80ºF for 2 ½ hours and expanded by 50-75%. I was concerned about the long proofing. One of the boules did deflate slightly with scoring, but I got very nice oven spring and bloom.  

The crust was crunchy and the crumb was soft - not very chewy. (I made this bread with KAF AP flour.) The flavor was sweet and wheaty with the barest hint of sour, and that was of the lactic acid type ... I think. Frankly, I missed the tang and the flavor tones of whole grains, which my preferred breads all have. On the other hand, this may approach the French ideal of a pain au levain, which is not sour in flavor. 

For those who prefer a not-sour-sourdough, I would recommend this bread without hesitation.

David

Submitted to YeastSpotting


dmsnyder's picture
dmsnyder


I have some experience baking Jewish Sour Ryes and German-type rye breads. Suas' formula for “Sourdough Rye Bread” (Advanced Bread and Pastry, pp. 212-213) seems to me to be for a French-style “Pain de Seigle,” although Suas does not label it as such. It uses a stiff levain identical to the one Suas uses for his “San Francisco Sourdough,” but then the final dough is 60% rye flour. Overall, the rye content is 52% of the total flour. The overall dough hydration is 70%.


00">

Levain Formula

Wt (oz)

Baker's %

Bread flour

2 1/2

95

Medium rye flour

1/8

5

Water

1 1/4

50

Starter (stiff)

2 1/8

25

Total

6

230


Final dough

Wt (oz)

Baker's %

Bread flour

6

40

Medium rye flour

8 7/8

60

Water

10 7/8

72.8

Yeast (instant)

1/8 tsp

0.12

Salt

3/8

2.53

Levain

6

40

Total

2 lb

215.43


Procedure

  1. Mix levain thoroughly.

  2. Ferment for 12 hours at room temperature.

  3. Mix the dough ingredients to achieve some gluten development. DDT 75-78ºF. (I mixed for 7 minutes at Speed 2 in a KitchenAid stand mixer.)

  4. Transfer to an oiled bowl. Cover tightly and ferment for 2 hours.

  5. Divide into two equal pieces and pre-shape into balls.

  6. Rest for 20-30 minutes, covered.

  7. Shape as bâtards.

  8. Proof in bannetons or en couche for 90-120 minutes at 80ºF.

  9. Pre-heat oven to 500ºF for 45-60 minutes, with baking stone and steaming apparatus in place.

  10. Pre-steam oven. Transfer loaves to the peel. Score as desired, and transfer to the baking stone.

  11. Steam oven and turn temperature down to 450ºF.

  12. Bake for 30-35 minutes or until done.

  13. Remove loaves to a cooling rack and cool completely before slicing.

This dough does develop some gluten from the 12.7% protein bread flour used, but it otherwise handles like a high-rye bread. The dough is clay-like and sticky, although less so than if it had had higher hydration. It was easy to shape with a light dusting of flour on the board.

The loaves expanded by no more than 50% after over 2 hours proofing at 80ºF on a couche, and they had modest oven spring. The cuts opened up nicely, considering.


The crust was hard and crunchy. The crumb was soft and moist. This is a pretty thin loaf - marginally bigger than a baguette. The ratio of crust to crumb is relatively high with a marked contrast in texture, which makes it quite interesting in the mouth.

The flavor is mildly sour with a sweetish, earthy rye flavor. Very nice. The French prefer this type of bread with smoked meats, soft cheeses and fish. We are having salmon for dinner tomorrow, and I have a nice Laura Chanel Chevre in the fridge. This rye should be delicious with both.

David

Submitted to YeastSpotting


dmsnyder's picture
dmsnyder

This weekend I made a miche with Gérard Rubaud's flour mix for the first time. It's nowhere near as beautiful as the ones with which Shiao-Ping introduced Rubaud's formula to TFL, but it is delicious. The miche does seem to have a more mellow flavor than the other breads I've made with this flour mix, but then I didn't slice and taste it for a good 15 hours after it was baked.

The flour mix and formula I used was ...

Gérard Rubaud Pain au Levain

Ingredients

Baker's %

Total Dough

Flour 1 – AP

70

583.33

Flour 2 – WW

18

150

Flour 3 – Spelt

9

75

Flour 4 – Rye

3

25


Total Dough: 

Baker's %

Weight

Flour

100

833.33

Water

78

650

Salt

2

16.67

Conversion factor

8.33

1500


Pre-Ferment:

Baker's %

Weight

Flour

100

183.33

Water

56

102.67

Starter

47

86.17

Total

372.17


Final Dough: 

Baker's %

Weight

Flour

100

650

Water

84.21

547.33

Salt

2

16.67

Pre-Ferment

44

286

Total

1500


I also made a couple 1 lb boules of the San Francisco Sourdough from "Advanced Bread & Pastry" by Michel Suas. It was an extremely extensible dough, made this time with WFM AP Flour (non-organic. They were out of the organic). I retarded the loaves overnight but wanted to give them an early start, so I took them out of the fridge and turned on my oven when I first got to the kitchen this morning.


I trust you correctly inferred this was done before my first cup of coffee. Always risky. 


Well, I did have my baking stone in the oven when I turned it on but not my steaming setup. I discovered this when the loaves were ready to load, of course. I did give the oven a series of spritzes with a spray bottle, but my result was a nice illustration of why we bake with steam. So, for your interest ...


Note the dull crust and the modest bloom and spring.


I haven't cut it yet. I'm sure it's fine eating, but beautiful it ain't.


David


Pages

Subscribe to RSS - Advanced Bread And Pastry