
Baking in the land of typhoons and earthquakes
I've decided to blog my baking and look forward to sharing recipes and getting advice from y'all.
For the past 15 years here in Taiwan, I had made far too many doorstops and hockey pucks instead of edible bread, until a couple months ago I decided to invest in a few good books on baking (I got PR's BBA (Peter Reinhart's The Bread Baker's Apprentice), RLB's BB (Rose Levy Beranbaum's Bread Bible), and NS's BLB (Nancy Silverton's Breads from the La Brea Tarpits), and also found this wonderful forum. It's helped immensely -- thank you all!
I've learned not to work so much flour into the dough (wetter is better!), and have also learned to weigh, not scoop and pack (!) flour. Equally importantly, I've learned to let it rise and proof by volume and not by the clock. I've started doing lots of pre-ferments, using sourdoughs as well as commercial yeast, and using pâte fermentée. Finally, I've gotten a hotter oven and started using steam.
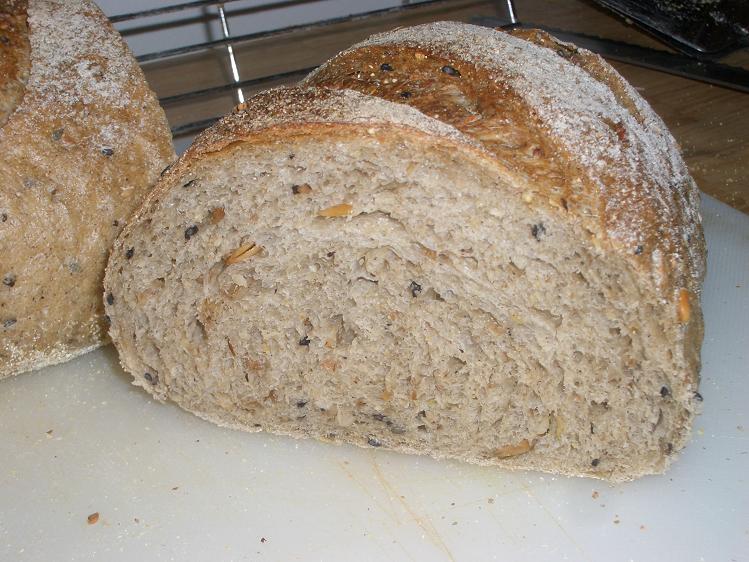
My first big success was my Fifteen-grain Torpedo, based on the Tyrolean Ten-Grain Torpedo in RLB's BB p. 394. I changed the flour to 日清特高筋麵粉 extra-high gluten flour (sorry, but the brands here aren't generally in Roman script -- I'll sometimes post the original Mandarin because there's at least one other forum member here in Taiwan who might want to know the brand name or the product name in Mandarin; you can just ignore it if you don't read Chinese). I also added vital wheat gluten (小麥蛋白). The very high gluten content gave this loaf incredible shape-retention during its rise.
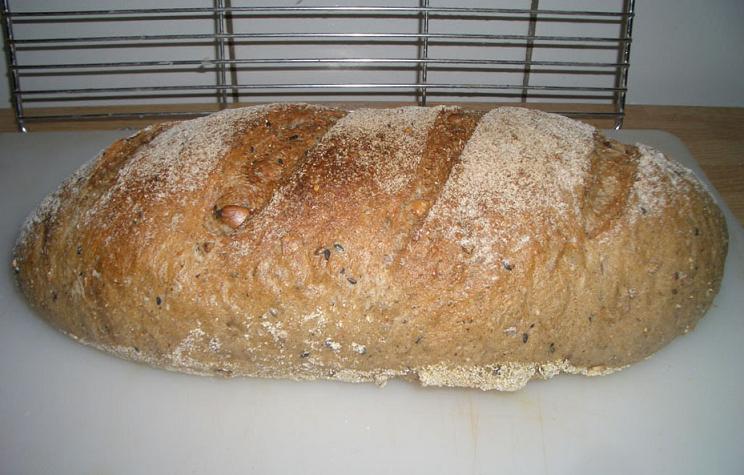
Dragonbones Fifteen-Grain Bread
This was baked in my old oven, which I got rid of a couple weeks ago. It didn't get hot enough (only 400F max, sometimes 365F), especially the lower element, so the bottom crust in the above pic could obviously be improved upon.
DAY ONE:
Make sponge.
- ¼ tsp instant yeast
- ½ TBSP malt syrup
- ¾ cup + optional 1-2 TBSP water, RT
Should be DRY, to make up for the very wet mixture of grains and seeds to be added later. Let hydrate an hour, then add 100g (about 2/3 c) extra-high-gluten flour (日清特高筋麵粉 brand). Original recipe called for bread flour (throughout).
Make flour mixture (dry mix). In a separate bowl, mix these:
- 200 g (about 1.25c plus ½ TBSP) extra-high-gluten flour
- ¾ tsp instant yeast
- 4 tsp (12 g) vital wheat gluten (小麥蛋白))
Whisk these 3 items together, dry. Spoon onto the sponge to cover it completely. Cover this with plastic, ferment 4 hours at RT, then overnight in the fridge. This will form the 'dough' on day two.
Soak grains and seeds: Mix the following (or your own creative mixture of seeds and grains) in a small bowl, then add ½ c minus 1 TBSP HOT water, stirring well. Cover tightly, soak overnight at RT.
RLB's Original: ten-grain cereal mix, ½ c plus 2 TBSP, or 100 g
My version - equal amounts of the following, mixed into a larger bag (then measured out ½ cup of the mix, saving the rest for a subsequent batch):
- buckwheat flour, fine
- pumpkin seeds, toasted
- sunflower seeds, toasted
- cornmeal
- whole oats (chopped in my spice grinder) then toasted
- pearl barley; briefly chopped in spice grinder then toasted
- barley tea (=roasted unhulled barley), cracked (in my spice grinder)
- whole millet, toasted
- sesame, white
- sesame, black
- rye crumbs
- caraway
- spelt flour
- wheat germ and wheat bran
- zaliang 雜糧 (multi-grain) powder
DAY TWO:
Mix the dough on low (KA2) 1 min., then medium (#4) SEVEN mins; will be dryish. Rest 20 mins (do not skip). Add salt (1.25 tsp) and presoaked seed mixture including liquid.
Knead another 3-5 mins until well incorporated; should be slightly sticky. Adjust with flour or water; will weigh 680 g (24 oz). Taste to check whether salt was added. Due to errors on my first attempt (failure to realize sponge should be so dry, leading to adding too much water), I kneaded longer, working in flour, for about 15 minutes before dough was smooth; it was a very firm dough, resilient, slightly tacky.
Put in greased, flat-bottomed bowl; turn once. Push down to make top level, and mark this and the double level. Cover tightly. Let rise RT til double. Dough becomes more slack, workable.
Oil spatula. Scrape onto floured counter, press into rectangle. Letterfold, turn, repeat; return to oiled bowl, turn, cover, let rise until doubled again, 45-60 mins.
Shape and final rise: Turn onto lightly floured counter, press into a rectangle. Shape into a torpedo-shaped loaf or bâtard. Spray parchment with oil then dust heavily with cornmeal. Set parchment on a peel or the back of a cookie pan; set torpedo atop this, and cover with a large container, proofing box, or loosely with oiled plastic wrap. Let rise until doubled. Meanwhile preheat oven to its maximum, with stone on lowest shelf, and cast iron pan on oven floor.
Dust with light or medium rye flour and score. Prepare a cup of boiling water. Open the oven, slide the dough with its parchment sheet onto oven stone directly, and pour water onto cast iron pan underneath. Shut door quickly. After 30 seconds, spray water and shut door. Repeat once more. I didn't lower the oven temp because my old oven maxed out at a wimpy temperature. A hotter oven might need to be turned down at this point, especially the top element. Bake 20-30 mins, turning once, or until golden brown; internal temp should be about 208°F. Cool completely on rack before cutting.
RESULT: Excellent! Chewy, full of grain, nice crust, nice flavor. Maintained shape, rose more than expected during final rise (had to orient diagonally on parchment to fit in oven!). Cuts opened well, looked great! Cornmeal on bottom contributed nice texture too.
My first real bread success! (This was about 6 weeks ago, I guess). I'll be trying it again with a hotter stone this time for a better bottom crust, now that I have a new oven.


Comments
Here's another early success of mine, from about a month ago, using my old oven:
Roasted Red Pepper Fougasse, my recipe adapted from a loose combination of an online recipe by "Jeff", http://www.artisanbreadinfive.com/?p=609 calling for the red peppers in fougasse, and Nancy Silverton's recipe for fougasse dough, Breads from the La Brea Bakery pp.90-95.
DAY ONE: Make Starter: (The first figures are for an 8-cups-of-flour recipe; the ones in parentheses are the half-batch figures I used. This was before I started weighing my flour.)
Mix, cover, ferment 8-12 hours. (I was in a hurry so I left it at room temp only 2.5 hours or so then I moved to the day 2 steps).
DAY TWO:
Preheat oven to MAXIMUM for 1 hour (my old oven only reached 365-400F or so); Char six red bell peppers (half recipe = 3; I used mixed red and yellow bells), quartered and de-seeded, under broiler; pop into a paper bag to steam them, so the skins will come off more easily. When cool, peel them and discard skins. Cut pieces in half or so.
Melt basil ice cubes (6, or 3 for half recipe). I buy fresh basil by the bag at the wet market for 30 cents US, set aside what I'll use in other recipes, then purée it in XV olive oil and freeze it in ice cube trays to preserve it. These are 3.5x3x3 cm cubes; substitute olive oil (required) and fresh or dry basil (optional) as needed.
Mix sponge and other ingreds:
Mix with dough hook on low, 4 mins. Should be soft, slightly sticky. Let rest 20 mins.
Mix 4 mins more, scraping down.
Mix on medium (KA spd 4), for 5 min.. Should be soft, resilient
Knead by hand a few more mins.
Put dough in oiled bowl; I recommend XV olive oil for this dough; cover tightly w/ plastic. Let ferment 3 hrs at room temp. (Due to time constraints, I left it fermenting overnight.)
Uncover; turn out onto floured work surface. Stretch into rectangle. If not stuffing with peppers (or basil, or whatever) make it 24x18", at least 1" thick, never thinner; max 1.5" thick. If stuffing, make it HALF an inch thick, as it will be folded over, doubling its thickness.
Cut down middle to get two rectangles (full batch only). Cover one.
Fold in edges of longest sides of dough to meet in middle. Invert, seam side down, onto parchment-covered baking sheet. Dimple slightly to seal the seam underneath. Cup hands around top, shape into half oval (tombstone shape) w/ pushing motion. Do same on bottom. Leave edges slightly squared like tombstone. Uncover and shape 2nd piece.
Cover with cloth; let rest 15-30 mins. Uncover one.
If making a simple fougasse, not stuffed: Cut two 4" vertical slits in the middle, 2" apart and 2" from edge. Make 3 diagonal cuts upward from this, each 3" long, 1/5" from edge and from vertical slits. Enlarge cuts with fingers to 1-1.5" wide each. If not that wide they'll close in baking. Stretch whole piece as needed. Make add'l cuts on edges, between diagonal cuts.
If making stuffed fougass: Slip a THIN cutting board or other stiff flat item like a cardboard sheet, covered with waxed paper under the right half. Slit as above but only on the right side, and brush other side with olive oil, except for edges. Pat the peppers dry with paper towels. Lay out the peppers on the other (left) side (with their outer, peeled surface facing up). Sprinkle with thyme and coarse salt to taste. The salt will bring out the flavor of the peppers. Use a pastry brush to paint a little water around edges to help make a good seal. Fold the slitted half over the peppers (lifting the cutting board may help) and crimp it to seal onto the dampened side. If the edges don't meet nicely, just trim off the extra with kitchen shears or a knife.
EITHER WAY: Then brush with good XV olive oil. Lightly sprinkle with flour, cover with cloth, let relax 45 mins. Spray water into oven, close door. Open door, slide one baking sheet with bread in, close door. Open door, spritz or pour boiling water onto lower tray, close door. Lower temp from max to 450F. After 15 mins, check and rotate. Bake another 10-15 mins as needed; bake longer if stuffed with peppers. Color should be even brown. Remove to rack.
Mine was good, although I'm sure it will improve when I try it again in my much hotter new oven!
Next, I made a nice ciabatta with mushrooms following Reinhart's BBA p.135, and it was lovely! I also made an onion version, but did not take pictures. Both were very easy.
Then I made an Artos Greek Celebration Bread (PR's BBA p.111-114, specifically the Christopsomos variant). This was 3 weeks ago. I followed the recipe exactly, but since my old oven wasn't very hot, I baked it longer to get it browner. I think this dried the crumb out, so it really wasn't that good. I will try again sometime with a higher temp in my new oven, and perhaps a bit more liquid and oil in the dough. Any other suggestions for avoiding a dry crumb in a bread like this?
My Basic Soft Fig Bread -- I had been looking for a soft, fluffy, light fig bread with a soft crust for a while but couldn't find any suitable recipes, so I created one. After research, failure and revision, I got a decent recipe put together, very similar to a typical raisin bread dough. This is perfect with coffee in the morning.
1. In hot water, soak raisins or chopped dried figs with stems removed; set aside.
2. Chop and toast walnuts; set aside.
3. Dissolve yeast in warm water with 1 tsp sugar to proof. If it's foamy after 10 mins, then proceed; skip if you know your yeast is fresh and it's instant (not active dry).
4. In mixer bowl, combine milk, water with yeast, and one fourth of the flour called for. Use whisk to mix slowly, then whip on high to incorporate air until frothy, about 3 minutes.
5. Switch to paddle. Add half of remaining flour. Mix gradually until incorporated, then beat on high (KA 8) for about 6 minutes to develop gluten while the batter is still very wet.
6. Cover and let rest 10 minutes (mixer may need to cool, too).
7. Add egg, salt, honey, lecithin (helps rise to lighter, fluffier crumb) and melted shortening (for softer bread than butter). Mix 5 minutes. Slowly add as much more high-gluten flour as necessary to reach a tacky dough that can be hand-kneaded.
8. Transfer to lightly floured counter and knead manually for 5 minutes, kneading in ONLY as much flour as necessary to keep it workable. Tacky and soft-firm, smooth and resilient is good.
9. Put in oiled bowl, turn and cover. Let rise til almost double in bulk.
10. Punch down. Fold in the chopped figs (be sure to dry between paper towels then flour them first!) and walnuts. Knead 2 minutes. Place in oiled bowl, turn and cover. Let rise until increased 1.5x. Punch down and let rise again until increased 1.5x.
11. Divide dough into smaller-than-fist-sized pieces on lightly floured counter; the above amounts make 8 pieces. Roll into balls. Cover and let rest 5 minutes to relax gluten.
12. Tuck dough into itself, forming small bolillos (short torpedos); seal seam. If nuts or figs interfere with getting a really tight skin, keep tucking until you get it right, resting to relax gluten if needed. Place on greased non-stick cookie pan, optionally dust lightly with flour, and cover with a large clear plastic bag or proofing box.
13. Let rise until fully doubled or so. Meanwhile, preheat oven to 250C (485F) with stones on floor, cast iron pan atop stone, and shelf set on low.
14. When doubled, put in oven. Cover oven glass with foil or towel. Pour HALF a cup of boiling water onto the steam pan, leave foil in place or remove towel, close door, and immediately turn oven down to 160C top, 170C bottom. Set timer for 10 minutes. Do not spray loaves or spray water into oven. After 10 minutes, check bread, rotate and remove steam pan if not dry. Tent bread with foil if browning too much. Bake another 2-5 minutes or until golden brown.
15. Remove onto cooling racks; cool 45+ mins. Good with olive oil, butter or jam and coffee.
The book is Nancy Silverton's Bread from the La Brea Bakery, not Tarpits! LOL!
All your breads look wonderful and I'm sure there were very happy campers at your house! The 15 grain looks really good!!
Betty
Thanks! Just testin' to see if you're reading carefully, Betty! :)
I like the idea of fig bread - looks very appealing. You are very creative!
Summer
Thanks, Summer! I also tried freezing one shaped loaf before baking it, and last night I pulled it out, let it rise, and baked it. It turned out just like the others, although perhaps a hint more dense. Next, I'd like to figure out how to get this bread even fluffier. Maybe I just need to be more patient with the rise? I was trying not to overproof it, but for an inexperienced baker, that's a very tough call. Yeah, I did the poke test and baked it when it only sprang back halfway, and very very slowly at that. Or maybe a little more yeast, or wetter dough?
The problem with wetter dough (for bigger holes) is that the slacker doughs don't seem to hold their freeform shapes well, and the loaves get too flat. For instance, I'm trying Susan's Ultimate Sourdough now, and after folding and folding and folding for almost half an hour, the dough is still slack and spreading out. I'm afrraid it will stick in my willow brotforms despite flouring (my last rye did), and that it will sag after being turned out and baked.
Oh, been there done that with the wet dough not holding it's shape and sticking to everything! For some recipes I just gave up and baked the dough in a bread pan, which can work very well. If you're working on a particular recipe (making it multiple times with little tweaks) you could try different shapes, pans, and rising containers. For high hydration enriched doughs I will not hesitate to use cooking spray in a bowl (I figure if there's fat in the dough what could a little more hurt on the outside). This definitely keeps it from sticking.
These are just some ideas from a fellow "not very experienced" baker!
Summer
Yeah, I almost gave up but I think I messed up in not trusting the recipe -- I thought it looked too dry at first so I worked some water into it to get the 'slack' dough which was described. But Susan has reminded me that a dough can change after it rests, so I should have just trusted the recipe the first time. Or maybe I mismeasured? Who knows?
In the end, I managed to get eight boules, four freeform, two in linen-lined plastic baskets and two in spiral willow brotforms, with no sticking. I used regular flour to dust the dough, and used 50:50 rice flour and regular flour to dust the baskets and brotforms. I think I'll try one in an oiled stainless bowl sometime just to see what happens!
Well, I baked up EIGHT (!) boules today, four each of Susan's Ultimate Sourdough and Eric's Rye.
Above is Eric's Rye, with a crispy, flavorful crust, and tender, only slightly chewy and mildly tangy crumb, with a warm wheat flavor. Not too shabby!
I realize I shouldn't make double or quadruple batches of breads I've never made before, but several people were coming over later to help us out with a few things, so I thought I'd send each home with two loaves of home baked bread. And failure would just be a few bucks in flour, no big deal.
I screwed up the hydration in the SUSD at first, but Keith (Just Loafin') kindly set me straight, and I managed to fix it in time to save the batch.
I got a lot of practice in with new tools and techniques, too:
Good practice shaping boules.
Practice with lames for scoring. The pricy Japanese lame with a small razor tip and black handle in this picture turned out to be a very lame lame.
The small, pink-handled, disposable razor knife that I got for 1/30th the price worked pretty well, especially in firmer loaves without too thick a skin, and when I dipped it in olive oil first. The tip I'd read about just using the tip didn't actually work as well as using the length of the blade -- no idea why!
I also got to try out a bunch of different scoring patterns: the pinwheel, tic-tac-toe, sand dollar and so on. The pinwheel and no scoring both got good height.
Using my new spiral willow brotform, dusted with a 50:50 mix of rice flour and white flour, I got nice lines on a couple of SUSD loaves -- not perfect, but a good start. (I had tried the same thing before with a sticky rye dough but it stuck badly and didn't have pretty white lines.) These, unscored, got better height than any other loaves.
had recently decided to keep baking the same bread (Susan's Ultimate Sourdough) while getting my basic technique right (with generous help from others, especially Susan -- she's a real sweetie). Most vital, at this point, is learning to get a feel for what 'slightly underproofed' means so as to get resistance to deflation on transfer from the brotform and during scoring, and good oven spring too (something I had previously only read about and never seen). Recent breads have been good, tasty, but just not lofty enough. But here are last night and today's loaves, both baked slightly underproofed, the second even more so, and both baked in a very hot dutch oven (fully preheated to 250C):
I've conquered sourdough! Woohoo!
These are based on Susan's recipe (but increased 50%), with the following alterations: 1st loaf, added 1 tsp commercial yeast, to push the bread to be done in time for dinner. 2nd loaf, mixed at the same time as the 1st, had only the sourdough starter, ice water instead of room temp water, did its initial bulk ferment for 12 hours in the fridge overnight, was brought out to dechill then continued with regular routine.