
Five-Grain Seeded Sourdough Bread Recipe
I have been tinkering with PR's Basic Sourdough Bread recipe for a while and have come up with the following recipe, which I really enjoy baking and eating:

Five-Grain Seeded Sourdough Bread
(based on Peter Reinhart's Basic Sourdough Bread, The Bread Baker's Apprentice)
Firm Starter
4 oz. sourdough starter
4.5 oz bread flour
1/4 cup lukewarm water
Soaker
2 to 4 oz Bob's Red Mill 5-Grain Cereal
2.2 oz unsalted sunflower seeds (optional)
2.5 oz unsalted pumpkin seeds (optional)
0.2 oz salt (omit if seeds are salted)
3/4 cup boiling water (approx.)
Dough
20.25 ounces bread flour
0.5 ounce salt
Starter
Soaker
1 ½ to 1 ¾ cups lukewarm water
Directions
Day 1
- To make firm starter, remove sourdough starter from refrigerator and allow to warm up for about 1 hour. Combine starter ingredients and knead just long enough to evenly distribute flour and sourdough starter. Spray zipper seal bag lightly with oil. Place firm starter in bag and seal. Allow to double at room temperature, approximately 4 hours. Refrigerate overnight.
- Place cereal, seeds (if using), and salt in small bowl. Add boiling water to cover. Cover bowl with plastic wrap and allow to sit at room temperature overnight.
- Remove starter from refrigerator 1 hour before making dough. Combine flour and salt in large mixing bowl. Add soaker and mix well. Remove starter from zipper bag, cut or tear into pieces, and add to flour mixture. Using large spoon or your hands, mix in enough water to bring dough together in a ball.
- Allow dough to autolyse for 30-40 minutes. Turn dough out onto lightly floured surface and knead for 13-16 minutes, until dough passes the windowpane test. Dough should be firm but tacky, like French bread dough. Lightly oil a large bowl. Place dough in bowl, roll to coat with oil, and cover bowl with plastic wrap.
- Ferment dough at room temperature for 3 to 4 hours or until it nearly doubles. Gently divide dough into two pieces and shape as desired. Mist dough with spray oil, cover loosely with plastic wrap or floured towel, and place in refrigerator.
- Remove loaves from refrigerator 3 to 4 hours before you plan to bake them. Make sure not to overproof. When the imprint of a finger poked gently into dough springs back slowly, the dough is ready to bake.
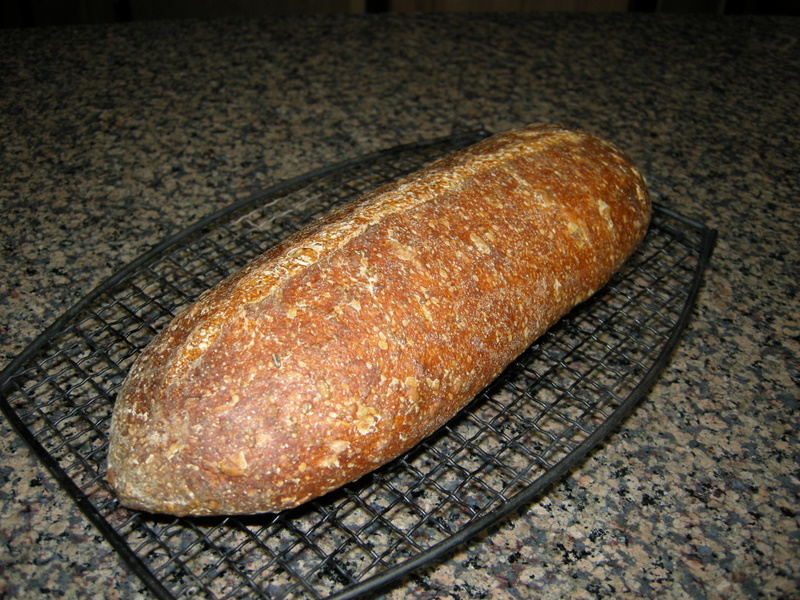
- Preheat oven to 500 degrees F for 45 minutes to 1 hour with baking stone and steam pan in place. Slash loaves and transfer carefully to baking stone. Immediately pour 3/4 cup hot water into steam pan. Close oven and lower temperature to 450 degrees F. Bake for 10 minutes, then rotate loaves to ensure even baking. Continue to bake for 10 to 20 minutes, until the loaves register 200 to 205 degrees F in the center.
- Cool for 45 minutes before slicing.
Day 2
Day 3
Note: If you want to make the bread in 2 days instead of 3, after dividing, shaping, and misting the dough in step 5, cover the loaves and allow to proof at room temperature for 2 to 3 hours, then bake as directed.


That's a great looking bread, Gaaarp.
Mind if I feature this post on the front page? You did a very nice write up too.
Thanks, Floyd!
Phyl
I love the look of your bread and I bet it tastes just wonderful..I also really enjoyed your writeup. Very nice!!
Sylvia
I really want to make this. It looks like it would be the perfect bread for a turkey sandwich. I LOVE seeded bread for that particular application. ;)
Gaarp - beautiful bread and nice clear write-up, I love both pumpkin and sunflower seeds in bread. I've never bought the Bob's 5-grain cereal, do you know what is in it that I could substitue for similar? I have a lot of different grains around the pantry already that are probably in it I'm guessing. Thanks... MD
Ingredients are listed as :
Rolled whole wheat
Rye
Oats
Flaxseed
Barley
Triticale
I found the 10 grain at my local store, but I can't find the 5 grain. I'm hoping to be able to soon now that my starter is up and working.
I'll just have to try Eric's rye first. :)
Stephanie, I picked up some of the 10 grain the other day, and I'm going to try the "Five Grain" bread with it. They are similar -- the 10-grain seems a bit finer ground, but they are both hot cereals, so I don't expect it to be a lot different. I suppose more grains might mean more flavor?!? I have seen 7- and 8-grain, too. I don't see why you couldn't substitute any of them for the 5-grain.
I'm also experimenting with using a cold soaker instead of boiling water to see how it changes the texture of the bread. I'll post my results after I bake, probably Sunday.
Phyl
Going to see if I can find the bags of 5 grain at the bigger grocery store in Ames, Iowa tonight. The other option is to go to the local organics store and buy their bulk hot cereals there. They go through a lot so I know they'd have fresh product.
I'll let you know what I find. This bread is on the to-do list for sometime this week. :)
I have been using a KA 12 grain flour I just love. Maybe this is similar to your 10 grain! But does it say it's flour or cereal blend? I have KA 12 grain flour and used it in several bread recipes.
Sylvia
You probably have found a flour blend. Bob's makes a 5 grain is a Cereal Blend. That's why the flour is much finer.
Sylvia
The 10 grain I found was a cereal blend. Course ground and not as fine as flour, but not as course as, say, the 5 grain cereal I've seen at bigger supermarkets.
The cereal is what I got, too. I'm going to try this recipe with it sometime, probably next weekend.
I wonder about different formula's with flour and grain blends...might make for some interesting wild yeast breads!
Sylvia
This looks like a great bread. Good job. I'm going to pick up pumpkin seeds and multi grain cereal at the HFS today so I can make this.
What hydration is your starter?
Thanks,
Tonya
Tonya,
I keep my starter at 100% hydration. Check out my post on starting a starter, which also details my maintenance routine.
Phyl
My local co-op had a 7 grain blend that's grown and mixed 30 miles from where I was, so I picked that up. They also carry local flours, so I picked up the 7 grain flour that they had for another experiment. I'm going to end up buying the 10 grain cereal and see what I get.
I was also pondering museli in a bread more geared toward breakfast...possibly in a sweeter application...
Eh, we'll see. I'm to the point where active experimentation sounds good. ;)
I made this recipe over the weekend. Well, I started Saturday night, so I baked Monday morning. I started out late in the afternoon with my starter that had been refreshed Friday night and again Saturday morning. I mixed up the stiff starter and let it rise until I was ready to go to bed at which point I refrigerated it. I let the soaker sit out over night. I used a full cup of the Bob's Red Mill 6 Grain cereal I found at my local HFS. They had 6, 8, 10 and 12 grain, but no 5 grain. Silly stores. I also used roasted, salted pumpkin seeds because that is what they had available.
The next morning I removed the starter and let it warm up for an hour and then mixed the dough as described. It took about 8 hours for this to double in my 72 degree house. Actually it didn't quite double, but I needed to go grocery shopping so I wanted to get this shaped and in the refrigerator. I was a little worried at this point. My dough was smelling strongly of acetic acid (vinegary smell).
The next morning I let the dough warm up for 4 hours before baking. I baked on a sheet pan instead of a stone and had a skillet of boiling water for steam. I have a gas oven that pretty much vents everything out, so steam may not have much affect. You can see below I didn't get much oven spring.
I was so ready to eat this but I did manage to wait about an hour to cut into it. The crumb was pretty dense, but man, this is one tasty bread. It has a rich sour taste that reminds me of yogurt. The pumpkin seed and sunflower seed flavor are both noticeable.
I'll be making this again for sure. Probably this weekend. I'll try it covered to see if that improves my oven spring.
I've been really hesitant to make a multigrain bread. The sourdoughs I've made with a significant portion whole wheat haven't been that good (too much acetic acid taste) so I was afraid this would be the same. I'm glad I got over my fear because this is an excellent bread.
I'm glad to hear you tried this bread and that you were pleased with the results. I made it again this weekend. As an experiment, I made two batches and used a cold soaker for one of them. The bread made with the cold soaker tasted pretty much the same as the hot soaker, but it had a bit more tooth to it, which I thought I might like. In the end, I preferred the method described in the recipe using the overnight hot soaker.
Did you cut back on the salt, since your pumpkin seeds were salted? The first time I made this, I used salted sunflower seeds and no additional salt, and it came out just fine.
I did not reduce the salt, but I've never been one to think stuff is too salty. I'm more likely to think something needs more salt :)
Tonya
I edited the recipe slightly to list weights for the cereal and seeds and to note that the seeds should be unsalted, or if salted, the salt in the soaker can be omitted.
Thanks for the additional info! I just bought some raw pumpkin and sunflower seeds, and I already have most of the grains lying around that are in the 5-grain mix, so I'd like to try out your recipe next weekend hopefully, it looks so good. I also have some home-grown and home-ground coarse cracked white corn meal that was a gift from an organic farmer friend that I'd like to use in a bread, anyone ever used cracked corn and know how long I should soak it for?
I made a bread recently with coarse ground cornmeal. I'm not sure how that compares to cracked corn, but I used an overnight hot soaker for the coarse ground, and it worked well. Assuming the cracked corn to be similar, you should be able to add it to your soaker and be OK.
Hot overnight soaker for the cracked corn sounds like a good idea, I'll give it a try, thanks! Sounds like a good idea for my feet as well! :-)
And Congratulations!
Mini
Where've you been?? I've missed seeing your posts for a few days.
I followed this recipe pretty much according to the post, but I made a few adjustments (out of necessity).
- i couldn't find the 5-grain cereal, so I went with 4 oz of rye flour, 2 oz sunflower seeds, and 1 oz rolled oats for my soaker
- i did a long rise (24 hours) before baking. My wife tells me that this makes our bread safer for our 16 month old to eat. Something about being the equivalent to soaking nuts or seeds.
Pictures!
This is the dough after I had put it to the first rise:
After 12 hours of rising, I folded it over:
I put it in my banneton (which I'm loving, it's the 2nd time I've used it), and this is how I found it this morning:
After 45-50 minutes at 450:
We couldn't resist and we had to try it (it's so good, my 16 month old son immediately asked for more):
Thanks for the recipe! I'll definitely be trying it again with the proper ingredients.
I'm glad you tried the recipe and liked the results! And an endorsement from a toddler is really all the proof you need that you did a good job.
Hi: I noticed that you have used a clay pot to bake your bread in. I have one and have never used it. Do you have to do anything special, like soaking the pot in water before you use it? Also does the cooking time vary. I am going to make Gaarp's recipe and I would love to cook it in the clay pot. If you have any recommendations I sure would appreciate it.
Thanks
Lucy
I think you are mistaking the banneton for a clay pot. A banneton is a basket used to hold a ball of dough as it is proofing(rising) and in doing so, helps to give the loaf it's shape, and design markings. I think sometimes a banneton is just referred to as a proofing basket or bowl.
After the dough has risen, the loaf is turned out and over onto a baking stone, pan, or yes, even a clay or another type pot, to bake on(in).
Here's a nice video showing how to use a banneton, and a type of clay pot. Scroll down the page just a little and play the first video:
http://www.breadtopia.com/basic-no-knead-method/
Another video showing a way to use pots for baking:
http://www.youtube.com/watch?v=13Ah9ES2yTU
Thank you mrfrost for posting these links, very helpful to me.
I was inspired by this post to try using Bob's Red Mill cereal mix (I had some in the freezer) in Hamelman's 5 Grain Seeded Levain bread. Normally I don't like heavy multigrain breads, but the description of the Hamelman bread was that it was light in crumb....so I thought I would try it.
It came out great! The crumb was light and the bread had a light multigrain taste that will be wonderful for sandwiches or breakfast.
I normally don't experiment enough, so I am thrilled that someone else did some experimenting with the multigrain hot cereal mixes! Much easier than having all of the grains on hand.
Since I used Flax seeds also, I am glad that I used hot water for the soaker, but if I don't use seeds next time, I am going to use cold water instead. The soaker sits for quite a while so I imagine that the grains would absorb enough water.
I did two batches of this bread side-by-side, the only difference being that one used a hot soaker, the other cold. I liked the hot soaker better. Both were quite tasty, but the bread made with the cold soaker had just a bit too much tooth.
Thanks for the comparison. I liked the texture of the grains with the hot soaker, so if you found that the cold soak didn't give the grains enough hydration, I will stick with the hot soaker.
I tried this formula with a few tweaks. I used 4 oz. of the Bob's Red Mill 5-grain cereal mix. I mixed it with 3/4 cup boiling water for the soaker. I keep a stiff starter at 50% hydration (per Leader's stiff levain), so I compensated when preparing the levain for this bread by doubling the water (1/2 cup instead of 1/4 called for). I accidentally omitted the salt in the soaker. I think the lack of salt may have caused the grains to become too mushy. I didn't use the fridge method, just used cold water instead of lukewarm and let the soaker and starter sit overnight. The starter was easily doubled by morning. Here's where I went wrong: I used the whole 1 3/4 cups water instead of just mixing in enough water to form a dough for the autolyse. So after about 40 minutes of sitting, my dough was extremely sticky and loose. I mixed for a while in my stand mixer, adding a little extra ap flour (i used high gluten in the dough phase) til it started to at least pull off the sides of the bowl a bit. However, it was still a very loose feeling dough. I let it ferment for almost four hours til it was almost double, then tried to shape one loaf and use the other half for rolls. The dough was sticky and difficult to work with. I used a banneton and thankfully it plopped out easily when I was ready to bake. Unfortunately, there was little structure to the dough and it spread like a ciabatta dough. The result was a very flat loaf. It actually rose a bit, and the resulting bread tastes ok and the crumb is actually open but firm enough to hold spreads/meats. I ended up trashing my rolls before trying to bake them. I had no space for them and they were already overproofed, so there was little reason to bother. In summation, I liked the recipe and will try it again with some more adjustments--namely holding back some water.
If I may tell a little story about it - back in 2003 when I lived in Paris, me and hubby would always stop by a street market on Saturdays because they sold the most amazing "mixed grains" bread. Particularly the sunflower seeds were quite abundant
ever since those days, I dream of making a bread more or less like it.
well, this is probably IT! :-)
I was just a little unsure about how the dough should feel - the amount of water contributed by the soaker seemed to be a bit much, but I was afraid to add too much flour, so I just went along with a very tacky dough.
After overnight, it had spread quite a bit to the sides, so I made a VERY shallow score, hoping it would help it to rise up. I am posting some photos, I guess I should have scored it deeper.
Overall, a fantastic flavor, great recipe! Thank you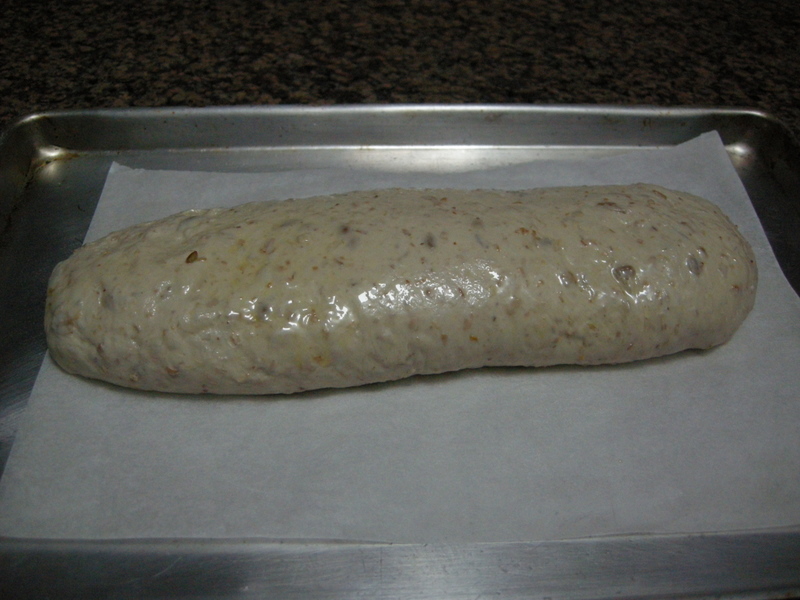

Hi Garp, I know this thread is ancient, but I wanted to thank you for posting this recipe because it is one I can use since I don't have a Kitchen Aid. It is also easy to follow your directions. You may remember me asking for help when I made my sourdough starter here in Thailand. My starter is making good breads, I have a lot to learn, though, and I can't get a lot of specialty items here, but it has been a lot of fun! My starter acts a little different here, super fast & super hungry-Thailand is microbe heaven. I noticed you mentioned using your discards for compost & I did that-so while I was trying to cultivate the good microbes all my frankenstein stuff just added to my compost mix. I noticed that my compost is super fast here too. :)
Glad to hear it works well for you. It's still one of my favorite reicpes. Sounds like your starter is alive and well!
Here's the bread I baked based on your recipe-it was delicious! (I did change a few things, like adding a lot of whole wheat flour & using a 7 grain mix.) :)