
Bread Scoring Tutorial (updated 1/2/2009)
Please Note: This tutorial has been updated extensively with additional material and new and improved videos. Here is a link to the updated Bread Scoring Tutorial: Scoring Bread: An updated tutorial
Scoring Bread
What is scoring?
“Scoring” is the word used to describe the cuts made in a loaf of bread before it is baked. Some breads are not scored. For example many loaves baked in pans are not. However, almost all free-formed “hearth breads” are scored.
When is scoring done?
Scoring is generally performed just prior to loading the loaves in the oven.
Why are breads scored?
The purpose of scoring is primarily to control the direction in which the bread will expand during “oven spring.” Intentionally creating a weak spot on the surface of the loaf prevents the loaf from bursting at weak spots created during shaping.
The pattern of cuts made, the angle at which they are made and the depth of the cuts also influence the rate of expansion and the formation of an “ear” - a raised flap of crust at the edge of a cut.
The pattern of cuts also can create a pleasing visual pattern on the surface of the loaf. While there are some very traditional patterns, for example for baguettes, the baker can use the scoring pattern to identify the type of bread or to create an unique pattern that identifies the loaf as coming from his or her oven.
The effects of scoring on loaf shape are discussed in more detail below.
How are breads scored?
Breads are scored with very sharp cutting implements. These may be straight or curved razor blades, which may be held in the hand or mounted on a handle. Scoring may be performed with other sharp, straight blades, even with a straight razor. Some bakers prefer serrated blades. Some examples are pictured below:
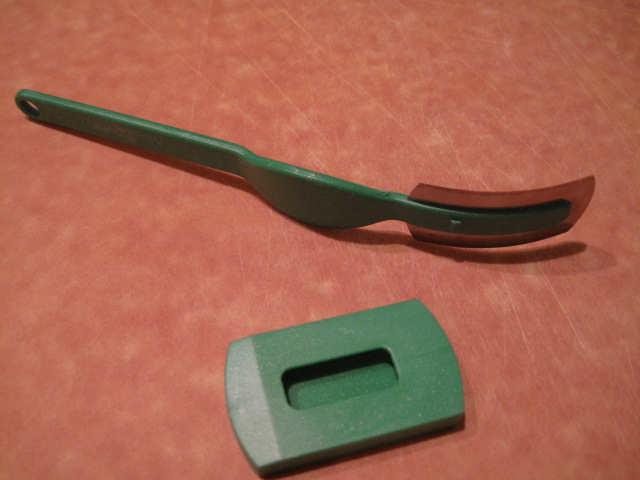
This is a “lame,” the French term for a razor blade used to score bread. This one is permanently mounted on a handle. Others are made with replaceable blades.
This lame holds the blade in a curved position. Others hold the blade straight. The curved lames are generally used for long breads like baguettes which are scored with cuts parallel to the long axis of the loaf. The cuts are made with the blade held at a shallow angle to the surface of the loaf, about 20-30 degrees or so. The blade is held with the concave surface facing up (away from the loaf). A flap of dough is created that will lift up to create an “ear” as the loaf expands and, by lifting gradually, slows the expansion of the loaf. This prolongs the time during which new areas of dough are exposed to the direct heat of the oven and results in greater overall expansion – a larger “bloom.”
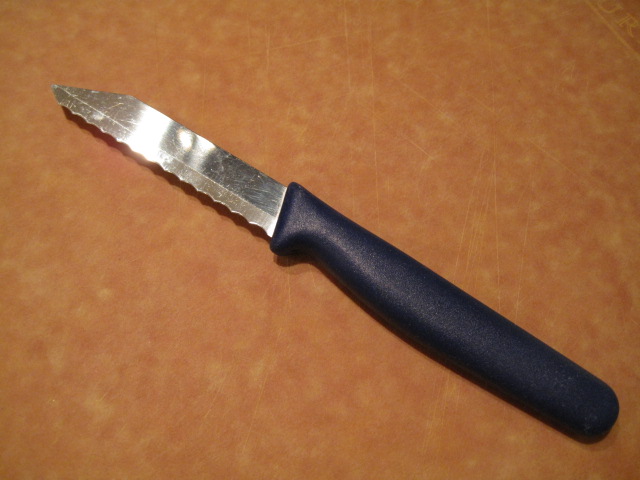
Serrated knife
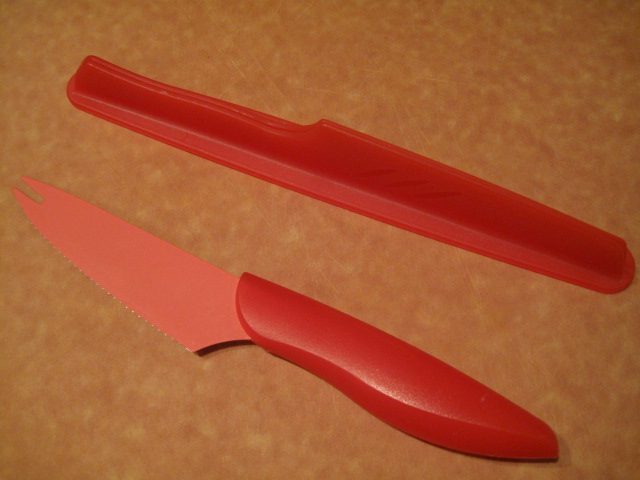
Tomato knife
These are examples of serrated, straight bladed knives. The first one is made expressly for scoring breads. The second one is manufactured as a “tomato knife,” but it is very sharp, holds its edge well and has been found to work very well for scoring bread.
Straight bladed knives are preferred for cuts made with the blade held perpendicular to the loaf's surface. This sort of cut is generally used for round loaves (“boules”). However, they can be used for the same kinds of cuts described above as well.
The angle the blade of the knife makes with the surface of the loaf is important in determining how the cut will open up. If you want the cuts to spread equally from the cut and to open quickly, the knife should be held vertically – at 90 degrees to the surface of the loaf. This type of cut is usually made ¼ to ½ inch deep.

If you want the cuts to spread more slowly and create an “ear,” the knife blade should be held at a shallow angle with the surface of the loaf, like this:
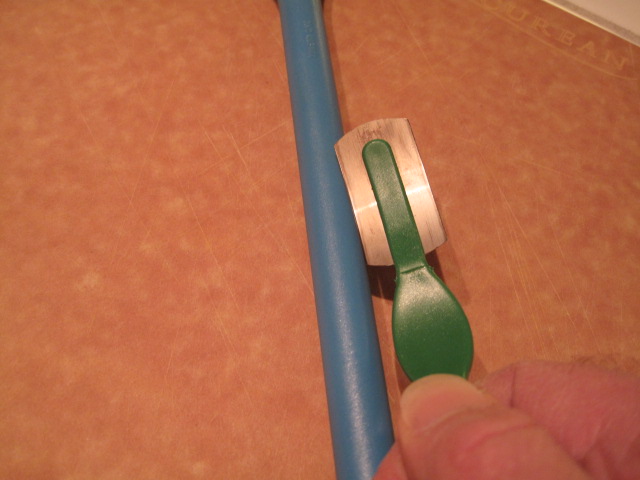
This type of cut should be shallower than the cuts made with the blade vertical to the loaf – about ¼ inch deep. A deeper cut will result in the flap closing from its own weight rather than separating from the surface of the loaf to form an “ear.”
The scoring stroke should be firm, rapid, smooth and decisive. For the beginner, it may help to take “practice swings” or to visualize the movements and totally focus one's attention before making the cuts. Understanding the functions of scoring and the effects of the variables described can help, but there is no substitute for experience. In this respect, scoring bread is no different from an athletic skill or any other art or craft. (Tourist: “Please, sir, can you tell me how to get to Carnegie Hall?” New Yorker: “Practice, practice, practice.”)
The effect of scoring on loaf shape
Michael Suas, in his book "Advanced Bread & Pastry," provides some information about how scoring patterns influence loaf shape. Scoring is not just to make a visually pretty design on the top of a loaf. It is also how the baker controls the direction in which the loaf expands. This impacts the shape of the loaf cross section (rounder or more oval), the height of the loaf and, for a boule, whether it stays round or ends up more oblong.
According to Suas, long loaves like bâtards and baguettes are traditionally scored parallel to their long axis. This may be a single long cut or multiple cuts that are almost parallel and overlap somewhat (for ¼ to 1/3 of their length, generally).
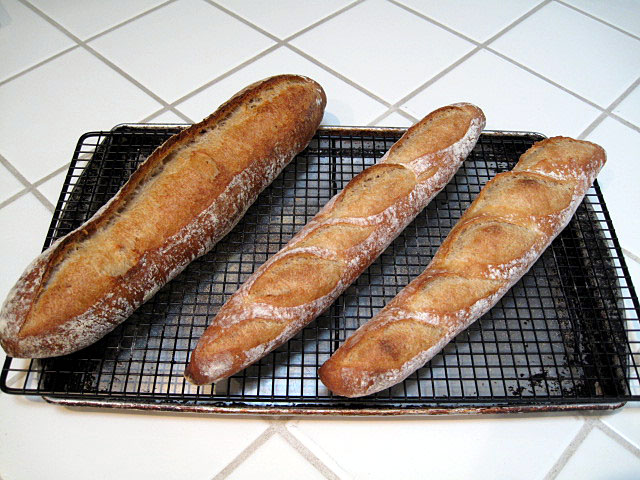
Classic Cut – Single and multiple cuts
However, for breads with high-rye content which have lower gluten and less oven spring, the traditional objective is to encourage a higher rise in the oven spring resulting in a rounder cross section. This is achieved by "sausage" or "chevron" cuts.
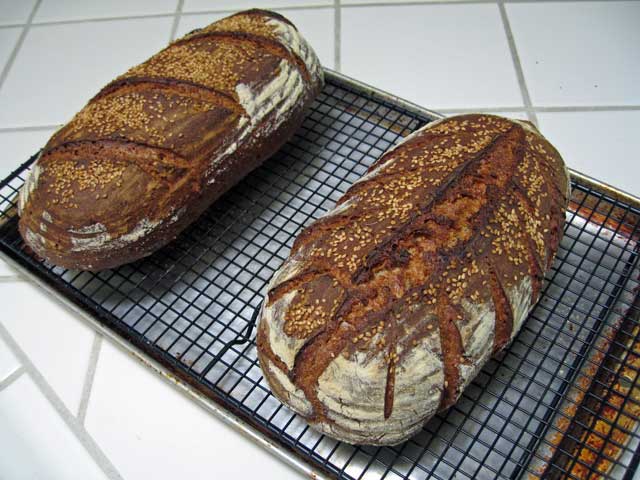
Sausage cut (on the left) and Chevron cut (on the right)
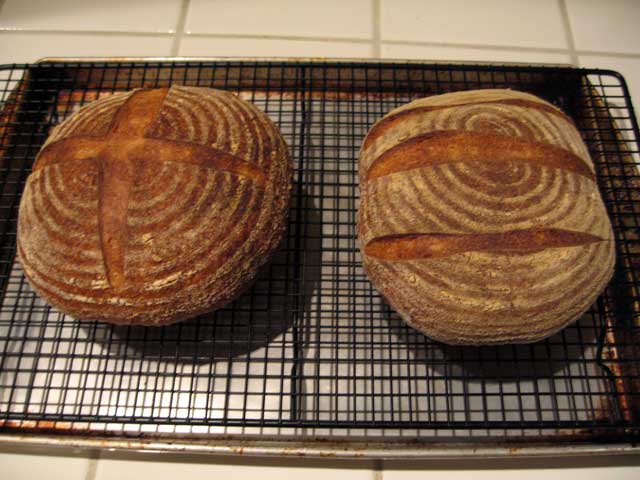
Boules are scored in a variety of patterns, again with differing effects on how the loaf expands. The common "tic-tac-toe" pattern and a simple cross will direct the expansion upward. More complex patterns like diamonds result in a relatively flatter loaf.
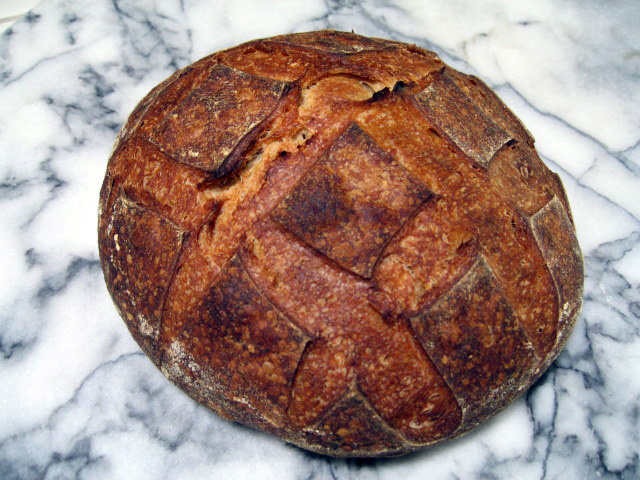
Boule scored with “tic-tac-toe” pattern
One of most interesting effects is that scoring a boule with multiple parallel cuts encourages expansion at a right angle to the cuts. This results in an oblong loaf shape.
What's the point of an ear? Controlled bloom!
This topic is not about the auricular anatomy of elves (or Vulcans). It's about scoring breads.
Scoring loaves creates a visually pleasing pattern, and it helps control the expansion of the loaf as it bakes.
These San Francisco Sourdough breads illustrate a more "advanced" aspect of scoring that is alluded to by both Hamelman (in "Bread") and Suas (in "Advanced Bread & Pastry.")
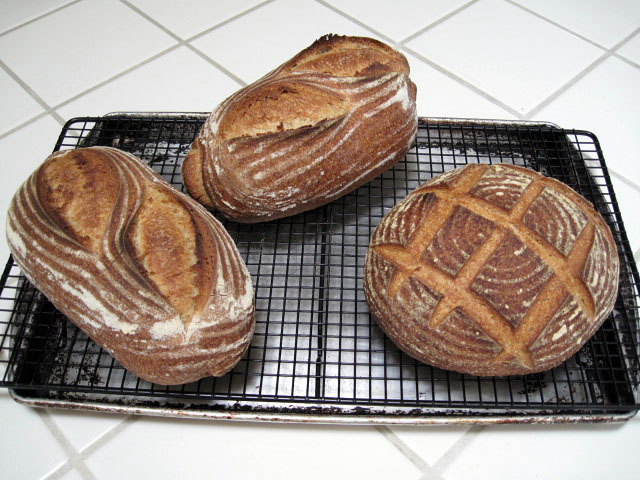
San Francisco Sourdough Breads (from Peter Reinhart's "Crust & Crumb")
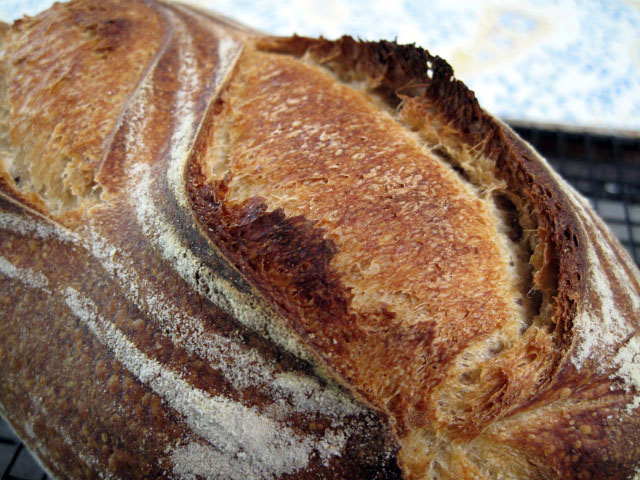
Detail of bâtard crust, with "ear," grigne" & "bloom."
What Suas called "the classic cut" is parallel to the long axis of a baguette or a bâtard. The cut is made with the blade at a shallow angle to the surface of the loaf. The cut should be shallow - about 1/4 inch deep. Paradoxically, this shallow cut results in the flap lifting better than a deeper cut would, thus forming a nice "ear." Hamelman (pg. 80) points out that "a deep cut will simply collapse from its own weight."
The angle is also important. "If the angle is not achieved and the cut is done with the blade vertical to the loaf, the two sides of the dough will spread very quickly during oven spring and expose an enormous surface area to the heat. The crust will begin to form too soon - sometimes before the end of oven spring - penalizing the development of the bread. If the cut is properly horizontal, the sides of the loaf will spread slower. The layer of dough created by the incision will partially and temporarily protect the surface from the heat and encourage a better oven spring and development." (Suas, pg. 116.)
The second photo, above, illustrates a fairly nice "ear," but it also shows that the bloom occurred slowly, as it should. Notice that the color of the crust in the opening has 3 distinct degrees of browning, decreasing from left to right. The darker part on the left obviously opened first and was exposed to the direct heat of the oven for longer. If the bloom occurred too rapidly, it would have a more even coloration.

This boule was slashed with the blade held at 90 degrees to the surface of the loaf. Note the even coloration of the bloomed crust.
In summary, in order to achieve an optimal bloom in baguettes and bâtards, one must attend to 3 variables when scoring them:
The cuts should be almost parallel to the long axis of the loaf.
The blade should be held at about a 30 degree angle to the surface of the loaf.
The depth of the cut should be shallow - about 1/4 inch.
Variable shading of the bloomed crust confirms that the desired slow but prolonged opening of the cut during oven spring occurred.
Happy baking!
David
P.S. I have made a video version of this tutorial. It was my first attempt at editing a video. I am not delighted with the quality, but I hope I can show it and, maybe, get some help improving it. Here is the link:
http://video.google.com/videoplay?docid=-4381896920195658969&hl=en (for slow connections)
http://video.google.com/videoplay?docid=6866686363544546201&hl=en (for broadband, e.g., DSL or cable)


Comments
Thanks for that tutorial, David. The video was good, except that due to low resolution I found it hard to read some of the text. I was just practicing baguette scoring last night and did find that my hands were much more adept by the time I scored the fourth baguette.
David, I so much enjoyed your video and did learn from it...thank you so much for your time and effort put into this project. Great write up too!! Your breads are so beautiful! Thank you kindly,
Sylvia
Very well done, David.
I agree that the resolution of the video is a bit low and that the text disappears too quickly in a couple of shots, but it is still very informative and a great first attempt. Thank you!
I just pulled three Hamelman sourdough batards from the cooler so I have something to practice with. While this dough is pretty easy to score, I've found I don't do it deeply enough. I'll focus, take a deep breath, and see if I can improve my trusty tomato knife technique.
Thanks for the photos and instructions. The video was perfect for me, since my internet is slow. Your low resolution allowed it to come in with out the stops and starts that sometimes make me just give up trying to watch. They were very helpful. I don't know that I have anything as sharp as your lame in my house.
...What a guy! :-)
Well, I scored more deeply, placed the cuts where I wanted them to be, and the loaves looked quite fantastic before they went into the oven.
Ah ha! Finally, I'd get some nice ears and grigne. Wishful thinking because it didn't happen. The oven spring took care of that, leaving me with mini-ears....if that.
The scored bread looks quite nice and I'm sure will taste as good as ever, but they didn't turn out as I had hoped. Now that I think of it, the same thing happens with my baguette scores.
How does one avoid this? Is it time to get out the compass, ruler, and playdough to work on the angle of the cut?
Lindy, you are so funny!
What you describe could be due to holding the blade too vertical. Deeper cuts is not the answer, according to the "pros." If your blade was really held at 20-30 degrees from flat, then, according to Hamelman, too deep a cut could cause the ear to collapse.
So, try holding the blade as if you were skinning a fish and cut only 1/4 inch deep. It may be counter-intuitive, but that's what Hamelman and Suas prescribe. And, as Pat once said, "If Hamelman and I disagree, Hamelman's right."
David
for seeing the angle at which you slashed the batards. I don't have a problem with my boules, but I could never get the ear/grigne that you do. Now I know why. As many times as I 've heard 20-30 degrees, I was holding the blade at a much higher angle. Now I can't wait to give it a go. I baked SteveB's Corn Bread today, maybe it's time for some sourdough. I'll have to give it away, we've started the New Year with a resolution to whittle off the last 20 loaves of bread that have settled around our middles!
Thanks for both the video and excellent write up.
Betty
I was unhappy with the video's resolution. I made it with iMovie and saved it for "streaming video." Cordel's comment shows the advantage of low resolution video for slower connections.
Maybe I'll try to save the video at higher resolution and provided links to both version, so others can choose what fits their setup best.
There are iMovie quirks .... errrrr .... features I have yet to discover. I did spend most of yesterday on the video. The next one (assuming there is one!) will go faster. Practice, practice, practice. ;-)
David
Hi David,
Thank you for such a wonderful video! I noticed that your dough was pretty firm. My sourdough tends to be more on the wet side. In fact, it doesn't even keep its shape very well even after proofing. Once its in the oven, though, its springs nicely.
Do you have any advice for scoring dough that tends to be wet?
E
Hi, E.
Well, if the dough is around 70-75% hyderation, you can score it in the usual manner. It's just more important to wet the blade and use much faster strokes than those in the video when you move to the wet side.
Somewhere around 75-78% hydration, I give up on scoring altogether.
David
David
I thought your video was quite helpful. Sequential texts were a bit too quick in a couple of places but it clarified your article quite nicely. Thank you.
Thanks so much David. Your explanations are so clear and helpful. The video was just fine. I think I prefer the little red tomato knife. I bought one when you mentioned it awhile back. It is so sharp and the serated edge does not seem to drag as much as the lame does for me. Thanks again for all your help to this wonderful site.
Fran
Thank you so much david! The video was great, exactly what I was looking for, very clear and helpful. I can't wait to put what I learned into practice.
Regards
Ben
David, thank you so much for this summary on scoring. I put it right away into 'my favorites'. I had just been reading a book about knitting, my next to-learn-better project, and realized that in bread baking and all my hobbies or favorite pastimes, I will always be learning something. Plus those insider secrets are extra special! Your blog and many others on TFL help so much. Thanks! Anet
Would you stick with a hobby that didn't allow you to keep learning and improving? I know I wouldn't.
The "insider secrets" to which you referred are all very public - right there in books many of us have. But, it takes time and experience before you realize the importance of some of the instructions.
David
David,
You did a great job (tutorial and video) and a great service to the bakers on this site.
Thanks,
Howard
Your explanations are so clear and easy to follow. I've been playing with slashing angles, but haven't been able to gather enough information to come to conclusions yet. You've saved me time and answered some of my questions. I will now stick with slashing my boules so that they rise upwards - with crosses and tic-tac-toes, as well as a star or flower that I have found makes them rise upwards too.
I haven't had time to view your video, but I look forward to it. Thanks so much again for sharing your knowledge and the results of your experiments.
Marni
It looks like the holidays were good to you. More hair. More hat.
David
David,
I deleted my original photo to replace it and, because the new system has a more limited pixel requirement, I was having problems uploading a new color photo and was fiddling around with size/pixels on this thumbnail (from an old e-mail attachment "vigilantes of Dodge City") and it worked, so I just left it.
Maybe after I use my new holiday gift certificate for the face lift, hair transplant and new ball cap I'll post a new "updated" Wayne Newton look :>)
Howard
This is extremely useful! Thank you so much for putting it together.
-Elizabeth
P.S. The videos are very good. One small quibble though: the text doesn't stay long enough on the screen in some of the sections (phrases with more than two or three words, especially in the batard scoring section). Perhaps you could have the words in subtitle form and leave them there for the whole batard scoring section? But let me hasten to add that the video itself is very easy to follow and the images are beautifully clear. Thank you once again!
The timing of the text display gave me more headaches than anything else in making the video. I think I understand the concepts in iMovie, but haven't mastered the execution by any stretch!
I'm happy you found the videos helpful, in spite of ...
David
David, I think my obsession with scoring is leading me in the wrong direction. I made another batch of poolish baguettes yesterday and while the shape and the crumb were great, the scores all but disappeared. I've never had this problem before. I think I was concentrating on the angle of the cuts too much and didn't score deep enough, so the oven spring really smoothed them out. They were definitely proofed well. On to another batch, another try.
Hi crunchy.
Do you mean the cuts didn't open up? No bloom?
Cutting too deep is a more likely a cause of this than not cutting deeply enough. I know it seems counter-intuitive, but that's what I've read.
Keep working on it. It will come.
David
Thanks for your help, I appreciate it. I mean that there were no ears at all. The cuts opened up nicely, but they were completely level with the surface of the baguette. I may take some pictures tonight to show them to you. Maybe I should start making 8 baguettes at a time to have enough replications for a thorough analysis of where things went wrong?
David, this was very helpful. I've been making bread for years and my slashing has definitely improved with practice over the years in their neatness and placement, but I never achieved the "ear" as well as yesterday after reviewing your video and "counter-intuitive" instructions on depth of the shallow-angled slash. It realy works, even on a very slack dough!
Thank you, this site is such a great place to continually learn new things, even after lurking for a few years now!
--Mountaindog
Thanks for the positive feedback. If the tutorial helped you get your ears, I'm happy.
David
David,
I may be a little late in voicing my input, but this is without a doubt the best summary of scoring I've ever seen. Very detailed, informative, and analytical as usual. Plus the photos and videos are great compliments to your narrative.
-Mark
Such nice compliments from the bread baking instructional video maestro! I am flatterred.
Thank you!
David
Hi David,
I have been offline for a while, but better late than never. Your written and video tutorials are excellent. Thank you so much.
Chaya Rivka
David
This is the information that you just can't seem to find in many of the best bread books. They usually touch in on scoring and steaming and leave it fast.
I will certify that all that makes your cuts work is lots of practice. and i've strangely found my girn with an approach a little different. So I suppose I have a question.
So i am a baker professionally and have been a bread baker for three years and its taken a lot o f practice to finally start liking my finshed product. I tried everything in the book. all the different angles, curved/str8 and a little with serrated. i do prefer a lame in almost all cases but like a str8 blad for some bread and a curved for others(mostly long baguettes).
But i've cut with the concave side down and have better results gettting grin. i still turn the blade to get a sharp angle across the loaf. for some reason i feel this works because its going more with the grain of the shape??? i don't know if that can makes sense without a picture. okay so maybe its more of how i've pulled off grin and thought i'd throw it in, not really a quesiton.
I love the tutorial i think its great for new bakers and old.
Thanks
josh
And welcome to TFL!
I can't recall reading anything about which way to hold the lame blade - concave side up or down. I found out it is held concave up from videos of professional boulangers scoring loaves.
I also noticed in the video of Professor Calvel I purchased from the Culinary Institute of America (CIA) web site that he does a subtle wrist twist at the end of his cuts. I have not tried the variations systematically myself, but that's on my to do list. On page 43, as I recall.
Bottom line, though, is if it's working for you, keep doing it.
David
wrist twist? sometimes i think a lot more goes on a good cut and its similar to playing sports. you can only explain what your doing to an extent and the rest is so fast and learned from practice. i think its all about finding the perfect angle and the perfect spot against the shoulder to get a really nice ear. others i work with don't care as much about the ear as i do. i think it makes a baguette oh so much better. why ? CRUNCH
Hi David,
Great tutorial, very helpful as your other posts.
I am experimenting now with 20% rye sourdough , getting great tasting bread BUT while in the oven (first 10 minutes) the bread "skin" tears around the slashes very fast resulting in that most surface area is not the original crust but the "inside" getting browned. My hunch is that the skin is not elastic eough but I don't know why. Thanks for your help.Gil.
Hi, Gil.
I'm glad you find the tutorial helpful!
From your description, it sounds like you are getting dramatic oven spring. Generally, that's a good thing. A photo might help with the diagnosis.
If you want more modest oven spring, you might try proofing your loaves more completely before baking them.
Again, a photo of your loaf along with the recipe you are using would be helpful.
Try posting these as a new topic. I bet you get lots of good suggestions.
David
just reading this tutorial now. don't think I saw it when you first posted it. wow, this is going to help me a lot when I begin making sourdough next year! thanks for the valuable ideas.
David, thank you for caring enough to provide such a fine tutelage. Books on bread and baking abound but what you've shared is as complete and concise as any thing i've seen, and the appearance of your breads belie your expertise.
TFL instructions and photos are great. I learned something. I appreciate the time you have taken with your posts. I always learn something. The video showed me I am not the only one to hold the loaf while scoring. Words blurred and to high but the instruction great. I look forward to more. Thanks again.
Mariah
And the video was good, usually I have to wait for the video to load, but its all there for me at the same time this time, no fits and starts.
I think I see one of my problems scoring, I'm a bit too tentative, and then get a bit too deep, so already its helping. I really must go and try baking some more bread, have been not doing so, as I've been still working on the yard after the snowfall in May, and then I managed to kill a toenail which I had to have removed on Monday! ARG, but its likely to be a good day to bake on Sunday (and it would be nice to have some bread for when DH makes it home on Monday) so will have to go check out a recipe and get it all set up for baking.
Thanks to your tips, I could make "bloom" or "ear" or " grigne" finally. But I don't know why only the edge has " bloom" . This bread is 80% hydration that based on "The Bread Bakers Apprentice", and It has not enough air as much as I expected.
Hi, teketeke.
I'm glad you found the Scoring Tutorial helpful. However, your message suggests some confusion regarding terminology. This is not surprising, since we use both English and French terminology to describe the results of scoring loaves.
The English term "bloom" and the French term "grigne" both describe the opening up of the crust along our cuts during baking. The term "ear" refers to the flap that is lifted off one side of the expanded loaf due to our holding the blade at a shallow angle when scoring.
I hope this helps.
In regards to your crumb: 80% hydration is rather high. Is the BBA recipe you used the one for Pain à l'Ancienne? If so, you're correct. The crumb should be more open, that is full of large and small holes. The relatively un-holey crumb could be due to any combination of 1) inadequate gluten development during mixing, 2) inadequate fermentation, 3) rough handling during dividing or shaping.
Happy baking!
David
I thought those words(ear,bloom & Grigne ) were the same meaning. Now, I understand why.. I appreciate your work to show me the picture that I clearly understand!
And, This is my recipe: 1 baguette
poolish
Cold water 80g
Yeast 1.5g
Molasses or Honey 3g + Malt vinegar 1g ( I don't have malt syrup )
Arthur King All purpose flour 90g
Final dough
Yeast 0.2g
Cold water 72g
King Arthur All purpose flour 100g
Salt 2.6g
1 Mix all poolish and sit for 2 hours → Mix → Refrigerator for over night
2 Add the final dough : yeast, cold water into the poolish → Mix → Put the rest of ingredient: flour and salt → Mix → sit for 20 minutes
3 Knead ( by FP or hand ) until smooth and shiny
4 Ferment at 68-70 F room temperature for 3 hours ( hold 2 times : every 1.5 hours)
5 Gently remove the dough from the bowl →sit for 30 minutes ( covered with plastic or so)
6 shape → place on the baking sheet in a baguettes pan
7 Proof for 30 minutes ( I usually put in a dish washer after running for 2 minutes and wipe the water out.) over 40 minutes → over proof! → the baguette will shrink after scoring.
8 Preheat 470F ( 500F is the best )
9 Scoring and spray water to the dough and the pan
10 bake for 10 minutes at 460F → Take the pan and sheet out of oven →decrease 450F bake for 10 more minutes or until golden brown.
I tried Molasses and honey (2g) that were less holes and thicker crust. They are not so sweet. When I put poolish at room temerature for over night, It turned out that they are too sweet.
My recipe is on " cookpad. com " that is like " Allrecipes. com"s japanese version.
http://cookpad.com/recipe/1168515 ( my name is CHI-CHI on the site )
My problem is the oven that I broke the inner glass and it's element 2 times 4 weeks ago or so. since then I was not able to make baguettes have bloom and ear, I can't use water to pour in or preheat 500F.My husband told me not to use. But as I told you, thanks to you, I could make "ear" and " Bloom or Grigne" :) without using water and preheat 500F.
Thanks again,
Teketeke.
.
The bread scoring tutorial was updated with new videos. Please go to:
http://www.thefreshloaf.com/node/31887/scoring-bread-updated-tutorial
Happy baking!
David
Thanks David, I know I'm VERY late to this thread but just received my new lame from this site (along with dough whisks, baskets etc.) today. I've tried watching the first videos you posted but both now show with an error...you've probably taken them down...and I just watch the one you posted April 18th but it only shows the scoring tools. What I really need is a close up of you scoring a baguette. Is there a video you've done that I can watch or one that you might recommend? I've been baking bread since I was a child but have just recently, the last 2 years, started baking artisan type breads and I must say with some success. If I can get a visual on the scoring, preferably in video form, I'll get to practising right away.
Thanks again
Hi, carrie.
If you had read the other messages in this topic, in particular the one just preceding yours, you would have discovered that the tutorial has been updated in a new blog entry as well as in the TFL Handbook.
Please click on this link: Scoring Bread: An updated tutorial
I have not done a video on scoring baguettes, however there are excellent videos of this on youtube.com. Look for those by Cyril Heitz. Also look at the videos on the King Arthur Flour web site. The principles of scoring baguettes are covered in my updated tutorial.
Happy baking!
David
Ah, I'm learning more and more. My next bake will benefit.
Regards,
Tom
All very helpful hints.
Pages