
Why is my home-milled bread falling?
Last week, I bought a home milling machine (it's a WonderMill). I bought Hard Red Wheat, and ground it per instructions. I followed a recipe that was provided by the bake shop where I bought the mill & wheat, and it wasn't any different from my regular bread recipe, EXCEPT for three things:
Added Gluten
Added Lecithin
Sweetener is honey, not table sugar.
The bread is delicious, but so far, in the two bakings (five loaves total) ALL the bread has fallen. Here's the before and after baking pictures:
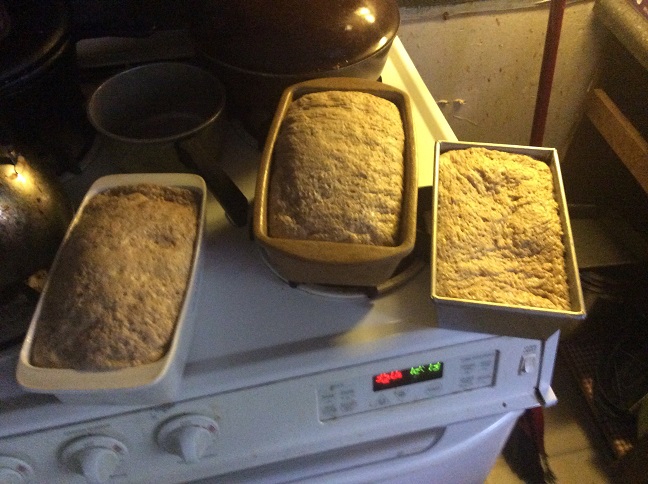
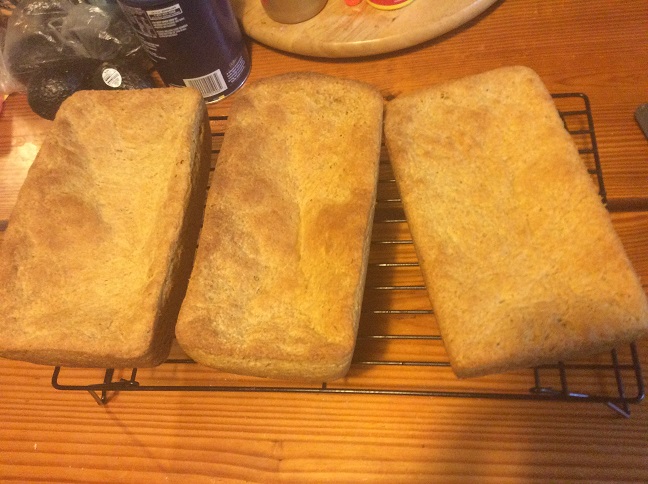
In the top picture, taken immediately before I put the loaves in the oven, the loaf on the right had JUST collapsed as I watched it. The others were still nice and puffy, but when they were baked, they had fallen hard. The loaf on the right, which fell as I watched, looked the least damaged after baking.
I'm a bit frustrated, because I figured if I start with wheat, and mill it myself, I ought to get perfection, right? Well, it does TASTE great, but it looks pitiful.
What might be going wrong?


Having one collapse before baking and the others during baking points to dough that was stretched beyond its limits to hold gas.
The question, of course, is why?
The biggest change in this picture is the flour. Perhaps the flour, because it contains all of the components of the whole wheat kernels, is more nutritive for the yeast and leads to a higher rate of fermentation. Perhaps the flour is warmer coming from the mill than your other flour stored at room temperature, which would also push fermentation rates. Perhaps the flour grind is coarser than what you used previously and couldn't form as smooth a gluten network to trap and hold gas. Perhaps, purely coincidental to the adoption of the new flour, your kitchen temperatures are warmer and the same thing would have happened with your other flours.
Some additional information about your recipe and process would make it easier to diagnose the root cause. I'm sorry that you had such a frustrating outcome.
Paul
Fresh milled flour generally ferments and proofs faster than commercial flour. Just adjust your fermentation and proofing times down a little and realize that the dough can go from properly proofed to over proofed fairly quickly.
All the things Paul mentioned are true,also. Home milled flour is generally coarser than commercial (unless you go through extensive sifting with progressively smaller-holed sieves) so that may make you crumb texture a little coarse. Your dough will greatly benefit from some form of a soak,autolyse,biga,sponge,preferment, etc-whatever floats your boat.
The change in flavor is well worth the additional learning curve. Have delicious fun!
Rookie question: how do I know when it's properly proofed? I've just been using time, and also with the initial rising, the instructions said it should double in size. The increase in size I just guessed at, but it was when the dough filled my 4 quart mixing bowl.
With respect to the coarseness of the flour: the mill I have has three settings. According to the manual, the finest is for pastry flour, the middle setting (the one I use) is for bread, and the coarse setting is for large grains and beans. I can't tell any difference in the flour I grind and Gold Medal Bread Flour by feel. If I had to do a lot of sifting, etc, I probably wouldn't, just for bread. Maybe if I was baking my granddaughter's wedding cake, or something.
Have you considered using white flour mixed with your whole milled grain? You could start with 20 - 30% whole grain and work your way up as you succeed with your bakes. I think this will help your learning process.
You are going to really enjoy your mill as you gain experience.
Dan
It never occurred to me to mix the flour I mill with the bread flour I buy. I didn't go into a LOT of detail with the people at the bakery store, but the recipe book they gave me and the mill manual didn't mention that. Is the mix a likely solution to falling loaves?
I’m not sure what your problem is will the falling loaves, but 100% whole wheat can be challenging. Especially for a baker that has not used whole wheat at all.
Set yourself up to succeed. Start out with 20% home ground wheat. Believe it or not that small amount will make a noticeable difference in your bread. The flavor will be noticeably different as well as the texture overall appearance. Once you are able to bake that bread successfully you could the increase the amount of whole grain.
I learned to bake 100% home ground whole wheat using this book. https://www.amazon.com/Laurels-Kitchen-Bread-Book-Whole-Grain-ebook/dp/B004HFRJS0/ref=sr_1_1?ie=UTF8&qid=1526511435&sr=8-1&keywords=laurel+robertson The chapter called, “a loaf for learning” is how I learned. If you follow the instructions you should succeed.
HTH
Dan
2 cups hot water (from tap, it's 110-120). Add to that
1/3 cup butter, lard, or olive oil - I used lard the first time, butter the second time.
1/3 cup honey
2 tsp salt
2 tbsp rice bran extract (lecithin alternative)
1 tsp gluten
2 tbsp yeast
I stirred all that up, and let it sit until it had a nice head on it.
Started with 2 cups milled flour from Hard Red Wheat, and added four more cups, for a total of 6.
Kneaded it until I liked the way it felt.
Covered & set in a box with a small electric heater, thermometer ranged between 100 & 120 degrees. After an hour, the dough had doubled.
Pounded it down and divided into three dough globs. I weighed each, and they were all 1 pound 2 ounces +/- 0.2 oz.
Pounded each dough glob flat, and rolled into a loaf the length of the bread pan.
Covered and placed in a box with a small electric heater again for an hour. Temp was between 100 & 120.
All three loaves rose; one collapsed, just as I was putting it into the oven.
Put all three loaves on the same rack in a 350 degree oven for 25 minutes.
I wonder if I am kneading the dough too long? The kneading is partially therapy for my stiff & painful fingers.
I wonder if I should dump the yeast/honey/water in the flour earlier?
Except for milling, the lecithin & the gluten, this is the same recipe I was using when making bread with the Gold Medal Bread Flour. The only problems I had with that was in burning the loaves, because that recipe says 400 degrees, and I found that to be too hot.
I didn't get a hollow thump, which I guess I wouldn't, since the loaves had fallen & thus weren't hollow. The bread tastes great, though.
Dan's suggestion to use a portion of commercial flour in your recipe is a good one. I started using a 60/40% milled-commercial mix, a slightly heavier portion of milled flour than he used, and I've managed to take off the 'training wheels'. The things that have made the biggest difference for me are giving the flour, water and salt time to get acquainted before adding the yeast, sweetener and butter; breaking up the kneading into two 'sessions' with a 10 minute break between; and watching the dough not the clock. I've found that freshly milled flour needs very little assistance temperature wise to rise and proof. I've also found that milled flour is thirstier than the stuff from the store but it does need a little more time to drink its fill before it moves on to using the yeast and other ingredients. Try mixing just the flour, water, and salt first and letting them sit undisturbed for 45 minutes to an hour. After that add in your yeast, sweetener and fat or oil. Break your kneading into two sessions with a 10 minute rest between. I always make an effort to handle the dough gently while shaping it for the pan. With all the bran in freshly milled flour the gluten can be fairly delicate. Hope this helps.
If you want to prevent collapse of the dough using your current recipe, then just decrease the amount of time letting the dough rise once it is in the pan (this is called the final proof). Put it in the oven when the dough of the proofing loaf is just slightly over the level of the edge of the pan. It will NOT look like the shape of the final,baked loaf-that is supposed to happen in the oven. It should take 15-30 minutes with that amount of yeast and at those temps especially with freshly milled flour to reach proper proof before putting into oven.
Search "finger poke". It is not foolproof but it is a help.To tell if your dough is properly proofed use the finger poke test. This is when you poke the dough firmly about 1/2 in.indent.
*If it indents and STAYS indented, the dough is overproofed. Re-shape, put it back into pan and re-proof.
*If it indents and bounces back fast and completely, it is underproofed and needs to sit a few minutes longer.
*If it indents and slowly fills in almost completely, it is properly proofed. Put into oven immediately.
What you are testing is the strength of the gluten strands. When the dough indents and deflates or stays indented,you are actually breaking the walls of the bubbles because the gluten has weakened and isn't strong enough to hold when you stretch it that little bit with a poke. Think of a balloon that was inflated and now the rubber is rotted but still holding. If you try and poke or squeeze, the balloon bursts.
If the gluten strands are really strong and bounce back fast, they are too strong to allow the dough to expand in the oven and the loaf is moist and dense.
You want to hit the sweet spot of the gluten strands being weak and stretchy enough to expand but strong enough to still hold. The things that affect this gluten strength are many-the presence of acid, amount of yeast, hydration, salt levels, sweeteners, etc. That is why making bread can be so complicated. Work with one recipe and master it with understanding.
100-120 is too hot for bulk fermentation (rising to double in mixing bowl) and for final proof( the rise done when the dough is shaped and in the pan). 80-100 would be better. Yeast ideal temp is 80-84F.
Using 100% fresh milled whole wheat is NOT a direct substitute for AP bread flour. You WILL make a loaf of bread but it will not be the best it can be. At the worst it will have a crumbly texture when you try to use it for sandwiches. All ingredients have different characteristics. If you want to have a 100% WW loaf, continue to make your recipe but learn the different (and not difficult) handling techniques for WW. DanAyo and Justanoldguy are spot on with their recommendations (soaking,thirstier, kneading twice,etc).
I do disagree that you can learn about WW by adding increments to AP flour. You can add up to 25% WW to a white bread dough as an additive without too much change in the loaf outcome but anything over that and you really have to use the WW handling techniques to have a good outcome.
So the simple advice for collapsing loaves is to decrease the proof time. If you have other questions regarding flavor, texture or technique-that would be different advice.
Happy Baking!