
My Quest for Oven Spring (in-depth information)
Hello, everyone.
I'm really new to baking (like one month or so) and I am really in love with this universe. I watch lots of videos on Youtube and read lots of stuff online (mostly on these forums). I decided to start by trying Jim Lahey's no-knead method. Things are improving but still can't get a really nice oven spring along with a few other problems, so I'll walk you all through my troubleshooting process in the hope that someone can help me figuring out what's possibly keeping it from rising properly.
The recipe:
- All purpose flour: 400g (brand: Rosa Branca)
- Water: 300g (will specify the temperature)
- Salt: 1 1/2 tsp
- Instant yeast: 1/4 tsp
I will now describe my first attemps (but will go in-depth only in the third and last one).
First attempt:
I just mixed all the ingredients and allowed the dough to rise for 12 hours (overnight). I used tepid water. In the morning, the dough had tripled in size and was really sticky. I just folded it a few times (had to use lots of flour), tried to give it a round shape (like shown in Jim Lahey's video for The New York Times from 2006: https://www.youtube.com/watch?v=13Ah9ES2yTU ) and proofed it for 1 hour (in a floured kitchen towel inside the bowl). When I tried to take it out to bake, it stuck to my hand (I flipped the bowl over directly onto my hand) and it ended up sloppy and flat when I placed it into the cast iron skillet (will get to this later on).
30 minutes lid on. 15 minutes lid off. It tasted good, but was very flat.


Second attempt:
I wondered why it was so sticky and didn't rise. So I did some research and thought it might have been - since I live in a tropical country and room temperature is pretty high - that the dough over proofed during bulk-fermentation and collapsed. So I decided to try using cool water and allowing it to rise for 4 and a half hours (the dough had already doubled in size). After the first rise, it was as sticky as before. I shaped it just like I've done previously and proofed for one hour. It stuck to my hand again and its shape was all messed up. I ended up with a loaf even worse.


Third attempt:
Since I leanrt from previous experience that over proofed dough wasn't what's keeping it from rising in the oven, I went back to longer bulk-fermentation (only 10 hours because I wasn't taking any risks, anyway). Room temperature was 24~26 Cº; and humidity: 85%.
Now I decided to focus on shaping it as round and tight as I could, so I bought a smaller bowl (21,5 cm wide) for proofing to help keeping the shape (I had been using a larger and deeper one) . I know a banneton would work out better, but they are hard to find in Brazil.
Another change: In the previous attempts, I proofed it seam side up and baked it seam side down (I tried scoring, but it was too sloppy). Now I wanted to follow the recipe to the letter and proofed seam side down and baked seam side up (without scoring).
I made some videos and took more pictures to show exactly how things went.
- Mixing:
Mixing all the ingredients: https://www.youtube.com/watch?v=gE2tQhm6wWI
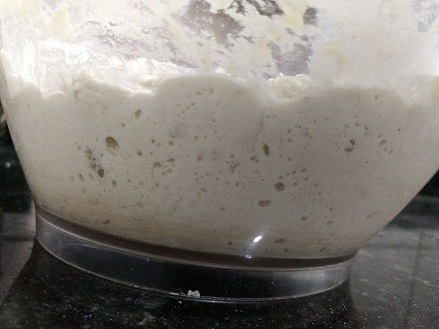
After 12 hours of bulk-fermentation:
- Shaping #1:
Trying to get a tight round shape: https://www.youtube.com/watch?v=75QBCLsDn2I
As you can see, it was sticky and didn't keep the shape well. I did the best I could anyway.
- Proofing:
Then I set it into the bowl to proof.


Denting test after proofing for one hour: https://www.youtube.com/watch?v=qb97Oo1BBk4
I decided it was time to bake and... :(
Taking it out of the bowl: https://www.youtube.com/watch?v=oCPufByaaQw
Very flat and sticky dough: https://www.youtube.com/watch?v=GkyI9mOTkYI
Total disaster! It stuck to the kitchen towel and was really sloppy and flat, just like previous experiences. I told myself I wasn't gonna bake that mess and decided to shape and proof it once again (I wasn't even sure if that should be done)
- Shaping #2:
Trying to get a decent round shape: https://youtu.be/zkkO_y5Y_5g
After doing some folds it felt surprisingly better. I used exactly the same technique I did in the first shaping, but now it seemed to be stronger and tighter and hold the shape a lot better.
- Proofing #2:
Denting test after proofing it for the second time (also one hour): https://www.youtube.com/watch?v=qb97Oo1BBk4
- Baking:
Then I took it out of the bowl and set it into the cast iron skillet (preheated for 30 minutes): https://www.youtube.com/watch?v=rBQzW9SrgYo
At this time, it didn't stick to the kitchen towel nor my hand. It wasn't as round and tight as I wanted it to be, but at least it wasn't too flat.

After 30 minutes with the lid on:

Then I baked it for 15 more minutes with the lid off and...
- Final loaf:


Heads-up:
I've learnt about some other methods that may be more efficient to develop gluten and would enrich flavor (like autolyse; stretch and fold; retarding bulk-fermentation; etc), but I don't want to get to them until I'm done troubleshooting this one and get the oven spring.
A few questions:
- What would you say just by looking at the baked loaf and watching all the steps?
- Am I right to come to the conclusion it's not over proofing during bulk-fermentation and therefore has nothing to do with collapsed dough?
- Why is my dough always far more sticky than Lahey's when I take it out of the bowl after bulk-fermentation?
- Since it rose higher when I was able to shape it tighter I assume it must have something to do with that. But Lahey doesn't even shape it tight, he just do some very gentle folds, it's flatter than mine and still it rises soooo much more. Why?
- Besides shaping I can only think of two more things: The flour (I've been using all purpose and I'm not sure about its quality, but it's not fancy at all) and what I've been baking the bread on (will show pictures and explain below*).
- Should I try decreasing hydration? If so, why?
* I am using a cast iron skillet and a baking pan as a lid. It certainly doesn't provide a very tight seal:

Another problem:
The crust underneath is really thick and tastes burnt. Honestly, I cut it off before eating the slice. By the way, I am not sure about the oven temperature, but I'd guess something about 220 Cº (I will buy a thermometer).


It's hard to overproof at bulk especially considering you are starting with a decent low quantity of yeast. You could punch down that dough and do 3 more bulks before the yeastof food. Over proofing happens at the final proof where ima short time the gases start permeating the cell walls - one hour is a long time to final proof a yeastrd bread and in a warm environment you could probably go to 25 minutes. I will final my dough for 30-40 minutes at about 70f while the dough is sti cold from refrigerated bulk and of I go 5-10 minutes too far the loaf will flatten out. One thing you need to remember with commercial yeast is that you need to control that last phase with impeccable timing and of some right it will explode upwards. Keep in mind that if you do space out and go over you can always reshape and start the final again. Seriously 1 hour at 85f I would expect pancakes !
Thank you very much, kendalm, your observations were of great help. I will definitely watch my final proofing and oven temperature.
(deleted clone post)
Btw looks like you are making progress and the loaves look good you got the determination that is required and you are show to hit the spot soon. Point number one, big loaves are only going to add to the challenge maybe try scaring down on size. Next about oven temp, there's no mention of temp - keeping in mind the hotter the better especially for the first phase of the bake it almost as though you can go too high, crank it up to 475 or more (depends on your equipment but often time of the dial reads 450 there's a good chance it's 375 after all the fussing that goes with loading etc
Ok sorry you did mention 220c. That's actually on the low side - 250 is more ideal - what are you baking on - if the bottom requires cutting because it's burned that sounds like its been baked on steel. Ideally a stone heated to 480f / 250c should do the trick ;)
Souz, it is obvious that you are extremely serious about learning to bake bread. I am no bread master, but I have turned out some nice loaves. Kendal is very accomplished baker. We can all learn from him.
I like the videos that Trevor Wilson puts out. The video link below is using a 65% hydration, which would be a good place to start. You may want to take a look. He works with a lot of wet doughs, but wait until to learn the basics before trying them.
https://youtu.be/WxfbiGto4R8
It appears to me, from watching your videos that you need to concentrate on developing stronger gluten development. The video I referenced above should help. The dough is over proofed. When testing don’t push too hard. You wouldn’t want to degas the dough any. And the depression in the dough should mostly come out in a few seconds. If the dough looses its spring it has lost too much of its gas and it won’t rise in the oven. It may even collapse. It’s much better to under proof than over proof because the bread should rise (spring) in the oven.
Suggestion; I noticed from your video that you dump the banneton over onto the bench. I think you’ll get better results if you lift the dough by the cloth and remove it from the basket. Then you can gently turn the dough out onto the bench. After that, carefully peel back the cloth from the dough.
I’m also thinking that the dough hydration may be a little too wet for a new baker trying to learn. Hopefully others will comment about this. Wet dough is a challenge.
Maybe bread flour, which would make a stronger dough migh be a good idea at first.
It’s Christmas day so help may be delayed.
We are here to help. Good Luck.
Dan
Thank you!
---
I watched Trevor Wilson's video you've suggested and subscribed to his channel. I liked it very much.
---
Your comments along with kendalm's made it very clear why it spreads out when I take it out of the basket. When I allowed it to proof for one hour I was following Lahey's instructions (1~2 hours), but now that I see it collapses by the end of it, I will watch it very closely.
You said I was pushing too hard when testing. I learnt that from Ken Forkish: https://www.youtube.com/watch?v=6oAfl1u0fIw but will be more careful next time.
---
I will try your suggestion and/or try and come up with other more careful methods. I also learnt it from Forkish: https://www.youtube.com/watch?v=rtoMhY0vS9E lol
---
You pointed out the dough needs stronger gluten development. I was already familiar with the video you suggested that explains gluten. I am also becoming familiar with the concepts of gluten development and had a clue mine was very far from decent. You've mentioned a few methods to develop gluten, but like I said in the initial post, before I get to them, I want to figure out what's wrong and make it work out the no-knead method by Jim Lahey.
Very very important: I try to be fairly consistent with the method, quantities, brands, etc and make only one or two changes at a time to really understand the effects of each in the dough. I know I'd get gluten developed more easily by stretching and folding, for instance, but I'm really curious to find out why Lahey gets it by doing nothing and I can't seem to achieve that.
You and the others made me realize my main problem is over proofing and I will try and fix that, but the thing is: right after bulk fermentation (therefore, previous to over proofing) my dough doesn't have desired gluten development and his does. Same recipe (and hydration) and same bulk fermentation time (the only easily noticeable difference room temperature, that in my case is higher). He used all purpose flour for that video, but I guess it's far higher quality than mine. Could that be it?
You've suggested using bread flour. I will try it once more with the same flour brand and type and make changes in other steps. If it still doesn't work, I will try changing flour.
---
I've already learnt how to do the math. I will try lower hydration and increase it as time passes by like you've all suggested.
---
Just for the sake of better organization, here's what I'm gonna try for my next bread:
I will come back in a few days to show how it went.
Thank you very much for your help and interest!
after watching just two videos.
hydration way too high for a beginning baker.
way too much flour on the bench when folding. You are introducing fresh flour into dough by picking it up from the bench and folding it in. This prohibits the dough from forming bonds across the Folds, which is half the purpose of the Folds. the other half is to redistribute the gases.
try using a coating of water on the bench instead of flour.
use a curved plastic dough scraper to release dough from the bowl. You are tearing the dough. after the initial mixing, spray a light coating of oil into the fermenting bowl which will allow the dough to release from the bowl without tearing.
during final shaping there is so much flour on the workbench that the dough is sliding across it instead of the bench catching and tightening the boule.
Hello, alfanso.
Will try lower hydration rate.
Will definitely watch that! Thank you for pointing it out and explaining the reasons.
I had actually already watched people doing that over clean surface, but I was afraid of the dough sticking. I will dust it off next time.
Thank you!
Hi. Another new baker/user over here. I would recomend you to go for a lowest hydratation recipe. Wet dough are specially dificult for beginners, as Trevor Wilson say in his open crumb with stiff dough video. It requires time to adquire the skills to work with high hydratation doughs and is easy to make poorly formed loafs with bad structure that will not retain gases and get overproofed, resulting in bad ovenspring... Have been there. Don't know if that's your proble, but it will be good to consider it.
kneading the dough actively (traditional method or slap and fold) is also pretty usefull. In a few bakings you would be able to realice when the gluten is well developed and how long it takes to.
Hope this helps. Greetings from Venezuela. (Sorry for possible bad english).
I will try lower hydration rates.
---
I will just paste what I said to DanAyo about trying other methods:
---
Thank you. Not bad english at all, I could understand you just fine.
Forgot to advice to use 65% hydratation doughs to start baking, as Trevor Wilson says. Then, when feeling comfortable with the feeling, increment the dough by 5%, and so. That's the way i'm doing it, and it works for me.
I rechecked my post above. The initial video link showed Trevor working with a very wet dough. I changed the link to a version that works with 65%. Good idea.
Dan
I can't help you with the oven spring since I'm struggling with that myself but I must say your crumb looks really good!
I just came upon this video. https://youtu.be/zDEcvSc2UKA It visually teaches us about gluten.
When the gluten in the dough is well developed, this elastic like membrane is what gives the dough structure, the ability to hold it’s shape. Dough that has well developed gluten will hold it’s shape. It will not want to spread out too much. The video shown in the initial post show a very slack and extremely under-developed dough. Developed gluten also keeps the gasses that the yeast make from escaping out of the dough and into the atmosphere. Gluten can be developed in a number of ways. Autolyse (allowing mixed dough to sit and rest for a while), kneading (either by machine or hand kneading), and stretch and fold are some methods that come to mind.
Some have mentioned that the hydration is too wet for a beginning baker. As you learn through experience (and you will if you stick with it) you can gradually increase the hydration and enjoy some wonderful success.
If you want to try this recipe or any other in a lower (drier) hydration we can suggest changes to the ratio of the water and flour. Just ask and let us know.
Dan
By the way; Leolo makes a good point. I mentioned Trevor Wilson’s videos. He makes a lot of wet doughs. He is very experienced. Don’t try the wet stuff first. Learn with a little drier dough to make success easier at first.
Thank you! (although I am far from satisfied lol)
I will take a look at your topics to see your loaves.
To everyone:
Thank you all for the very useful information! I will apply some of the changes suggested by you and write a new post in a few days to show how it went.
Especially considering that these are your first loaves! Any loaf that you can eat is a good loaf!
I've been a strict devotee of Jim Lahey (mostly because of a lack of time) and have used his technique for years. Now years later what I teach people is to follow his instructions extremely precisely. There is no need to go crazy with folding, kneading, or anything else. Its a minimalist technique that works extremely well.
At forst I will suggest that you watch his video ver and over, and even watch his updated video (the one with a tiny amount of red wine vinegar). Compare that to what you are doing. In my experience 99% of folks are varying something that is causing their problem and once they correct that error the loaves come out just fine. This recipe is designed for high hydration doughs, it needs all that sedan inside the Dutch Oven to work properly. I have done this exact recipe, varying only the hydration from 65% to 85% and all my loaves came out fine. I prefer the 75% to 85% loaves but that is a matter of personal taste. All high hydration loaves are a sticky mess, they are supposed to be exactly hat, theres is noting wrong with your dough. More likely the problem is the high temperatures in your kitchen or your handling. When most beginners try to transfer the dough and do the simple folds they mess it up. Either they handle the dough a lot or they don't flour the kitchen towel that is used for the transfer. You definitely don't want to add a lot of flour to outer the stickiness because eaten makes the duration level drop a lot, just dust the towel with barely enough so it doesn't stick during the transfer. I now don't even bother with those folds, I just transfer it and get great loaves with heat rise.
There is another way to combat the heat (I love in a high altitude desert and have no problems baking when its very hot outside) but what I suggest is that you keep practicing, if you can't make to work the way you want it the let me know and I'll offer you an alternative method (still based on Lahey's technique) that might work better in your conditions.
I expect it to be wet, but it soooooo much stickier than his after first rise and it's undeveloped and therefore weak. Considering everything that was observed by some of the others and my own experience, I'm assuming main reasons for it not to work out is high room temperature (so not able to long bulk fermentation which would allow gluten to develop properly) and poor quality flour.
I don't plan to stick with his method since I wanna try other ones that I assume are able to produce richer and more complex flavor. I may try it once again when I get bread flour just for the sake of investigation.
Thank for your comments and offering to help. I'd ask you to read my last post where I show and explain my latest loaf and let me know what you think, if you have the time.
Hello, friends. I tried baking another loaf with a couple of changes and here is how it went:
I decided to decrease hydration level a little bit (from 75% to 70%) so that I would possibly be able to handle the dough better. As some of you pointed out one of the problems was my dough didn't develop gluten well enough, I decided to do a S&F one hour after I had mixed all the ingredients, to see if that would help (I did only one S&F there in the beginning because I wanted to work it as little as possible to see if I could get oven spring using Lahey's method). I allowed it to rise overnight for 10 hours in room temperature (26 ~ 28 Cº) and when I checked in the morning it had almost tripled in size; as I had something else to do and couldn't work it right away, I put it in the fridge for one more hour.
I waited about 30 minutes to allow it to warm up a little bit and when I was taking it out of the bowl I noticed it was holding together and felt stronger then in my previous attempts. Since in my last attempt I observed the dough felt stronger after I accidentally reshaped it (because it was overproofed in the second rise), I decided to do a S&F right away and let it rest for 25 minutes before shapping.
In my last attempt, as many of you have pointed out, my main problem was overproofing the dough by letting it rise for 1 hour (too long for the high room temperature in my house), so I decided to try 25 minutes, as suggested by kendalm. It didn't seem to collapse when I tested as it did before. Can you please check if it was underproofed, overproofed or just right?
Here's a video: https://www.youtube.com/edit?o=U&video_id=QWMhPcCo1Ok
I baked it for 30 minutes lid on and 15 minutes lid off (unfornatelly, I don't have a thermometer yet, but I rose the oven temperature a little bit, as also suggested by kendalm.
I was surprised when I took the lid off! The loaf finally seemed to have shown some oven spring and looked so much better! It was 8,5 cm and taller than the last one (which was 7,2 cm).
I would appreciate it very much if some of you could comment on those:
I think now I'm done with Lahey's no-knead bread and move on to different methods. I'm assuming my dough won't develop as well as his because of high room temperature (thus I cannot allow it to rise for so long during bulk fermentation) and poor quality flower. Maybe I will try it just once when I get bread flour, just see if it would work better.
Looks like you are making good progress. The improvement from the first bread you posted and this one is remarkable. It rose well and the crumb is opening up. This is a great start.
How does it taste?
I’m not sure about the strength of your flour, but you should expect to bake good bread with your room temperature. You can reduce yeast or starter, use cold water, use your refrigerator for some of the time during bulk ferment or proofing, keep your bowl in a cool place as low as possible (cooler down low). These are some of the things that come to mind.
As for as flour strength. Try to find a local bakery, tell them what you are doing. Ask to buy some of their flour, maybe.
Consider this - - - I know how exciting it is to try different recipes. But if you want to sharpen your baking skills in the most efficient manner, I strongly suguest that you find a recipe that you want to bake and the stick with it until you are confident that you can consistently bake it well. It’s really the best way to learn.
I’m excited to see your progress. Determination is a required characteristic that all successful baking must posses.
Your latest YouTube link does not work for me.
Keep us informed.
Dan
Sorry. Here's the correct link: https://youtu.be/QWMhPcCo1Ok
Please, tell me if it's underproofed, if you can.
It tastes flat, so one more reason to change things. It tasted much better in one of my previous attempts, but I can't remember which one. In one of them I forgot adding the salt and kind of ended up doing autolysis and I also remember letting it sit for a little more than 12 hours for bulk fermentation (not sure if in the same attempt or different ones) so I think better taste in the past was due to that.
I'm already trying some of those (using cool water, doing the first rise during the evening, not placing the bowl inside the oven, etc).
National flours won't provide information on strength and there aren't really good bakeries in my city (except for one, but I'm afraid they wouldn't provide information), but I will do research soon and buy it online.
That's kind of what I did with this recipe, but I really like I'm done with it and it's time to move on to a different method that will provide better gluten development and richer flavor.
Actually, I started a bread last night, but I not following any specific recipe, I'm just incorporating different methods and trying to come up with something that would work for me:
70% hydration. Autolysis for one hour. 4 sessions of S&F (20 minutes between them) after I incorporated salt and yeast. Then I put it in the refrigerator to retard bulk fermentation as much as I can. I'm curious to see how gluten will develop and it the long fermentation process along with the folds will enrich flavor to satisfactory.
Do you think I should post post pictures of the final loaf on this thread?
After viewing the video, I like the way your dough looks. I’d bake that. But I am not an authority and I’m forever learning myself. If anything it looks like it might be very, very slightly underproofed. I always err on going a little underproofed if in doubt. A slightly underproofed dough will spring in the oven, but a dough that is overproofed has spent all of its energy. It can’t rise anymore; not on the bench, not in the oven.
In the future, I f you find that your dough is overproofed you may be able to rescue it by reshaping and reproofing. It’s worth a try. But by far the best thing is to not overproof.
In your last post you said, ”Actually, I started a bread last night, but I not following any specific recipe, I'm just incorporating different methods and trying to come up with something that would work for me:” You seem adventurous. I hope that works well for you.
Pictures are always informative and good.
Wishing you great success!
Dan