
Brown Bag Bread
Brown Bag Bread
It is funny how some experiments start. We had some friends over and I showed them how to make my 24 Hour Sourdough Bread (recipe included at the end). While describing the process I mentioned that this bread is baked in a Dutch Oven. They said that they did not own a Dutch Oven or anything like it. That got me thinking (yes I know, a dangerous situation) as to how this bread could be adapted to not use a Dutch Oven but to still get similar results.
Warning: I may be over simplifying or making some wrong conclusions as I set up the basis for my experiment. Proceed at your own risk. : )
There seems to be two major techniques for baking Artisan Bread at home:
Create steam in the oven and bake on a stone, or
Use a covered container to trap the steam coming off the baking bread.
The main idea for using a covered container, like a Dutch Oven, is to hold the steam in so as to get a nice crust, also serves as a baking stone. Note: Not everyone who use a Dutch Oven pre-heat it. There are many here on The Fresh Loaf who start with a cold Dutch Oven.
Since many people have written up different methods to create steam in a home oven (use the search box to find these), I will only address an alternate to a Dutch Oven.
I came up with the idea of letting the dough rise in a Brown Paper Bag, then closed it up to hold in the steam, and then just bake the bread in the bag. The experiment presented here is just using regular large grocery bags (12” Length, 7” Width, 17” Tall). I really like the size of the loaf that they make (almost 5 pounds) and maybe some time I will try different size bags. Because of the size of the bags I used I had to double the amount of dough from my 24 Hour Sourdough recipe (2,224 grams).
Note: Paper in an oven. We use parchment paper to bake on all the time. Paper starts to burn at 450°F. The burning that I see is just color change not bursting into flames and did notice some color change while baking in grocery bags.
Problems I see with baking in a bag:
How to keep the dough from sticking to the bag?
How to seal the bag so that the steam is trapped inside during baking?
Is it necessary to bake the bread on a baking stone?
First Batch
I made a double batch of my 24 Hour Sourdough Bread (2224 grams). I followed the steps as written in Instruction Steps 1 thru 6.
Step 7: Then my first approach for the sticking issue was to Pam the inside of the bag, then throw in a hand full of flour, and shake the bag so that the inside of the bag gets coated to prevent sticking. I then shaped my dough into a log, placed it into the bag, temporarily sealing the bag with a clip and then (Step 8) let it raise overnight in the bag. In the morning, (Step 9), preheated the oven to 450°F, I took the clip off, scored the dough, folded over the top of the bag twice and Stapled it closed to seal the bag. I then placed the bag on a baking stone in a 450°F oven. I followed the same baking times that I use when using a Dutch Oven (30 minutes with the cover on and 15 minutes with the cover off), after 30 minutes I cut the top of the bag off with scissors (Note: be careful of the escaping steam) and then let the bread bake for another 15 minutes. At the end of the normal baking time I noticed that the bread was not as dark as it usually is so I let it bake for another 5 to 10 minutes. I then removed the bread from the oven (Step 10) and tried to take the bread out of the bag. The bottom of the bread stuck to the bag in a few places and I had to tear the bag (not a big loss).
Here are pictures showing various steps of the first batch.
Shaped dough placed in bag. Note stain on bag from the Pam. I trimmed off some of the top of the bag so that when the top is folded over and stapled the total height of the bag was such that it would not touch the heating element in the oven

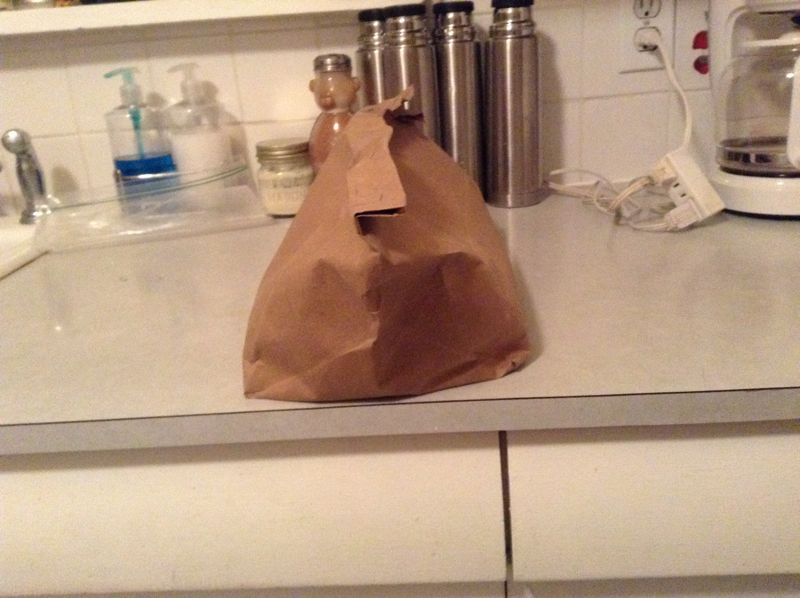
Bag closed for overnight rise on the counter.

Bread scored and ready for baking. Because you are reaching down into the bag to score the dough your scoring options might be limited, this is how I did it.

Bag sealed (stapled) and ready for the oven.

Side view of bag ready for oven. I should have been more careful with the folding and smoothing of the bag. But it turned out nice anyway.
Start of bake. Note: Bag is not touching the heating element in the oven.

Top of bag removed for last 15 minutes of baking.

Cooling.

Bottom view. There is some paper stuck on the right side.

Results of first test:
The bread took longer to bake than in a Dutch Oven.
The dough stuck to the bag.
The loaf turned out well (very similar to using a Dutch Oven).
Second Batch
As I was not happy with everything in the first experiment, I thought that I would try a few things differently.
This time to address the sticking issue:
I cut a piece of parchment paper and lined the bottom of a new grocery bag with it. I then cut strips of parchment paper and stapled them to cover the inside sides of the bag.
This time to address the sealing of the bag issue:
Instead of folding the top of the bag that the bread will be baked in to seal in the steam, I trimmed it to be about 6” tall.
I took a second bag, cut it up the side a bit, and slid it down over the main bag holding the dough to trap in the steam. The cut up the side made flaps that I tucked under the bag holding the dough. The second bag that I used as a cover could be used the next time.
Miscellaneous issue:
Not everyone has a baking stone so I tried baking this bread on just a regular cold cookie sheet.
Here are pictures showing various steps of the first batch.
Raised dough in parchment lined bag.
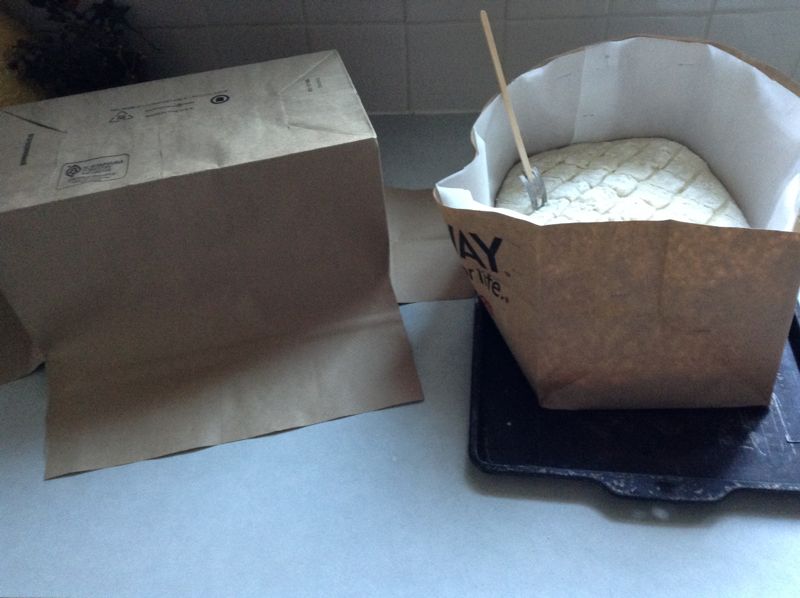
After scoring. Note: Bag was not as tall so it was easier to reach in and score the dough.

Next to 2nd bag that will act as a cover.
2nd bag in place before folding under flaps of cover.

Start of bake, bag on cookie sheet in oven.

Final 15 minutes with cover removed.

Bread cooled and ready to slice.

Sliced bread.

Results of second test:
It was easier to score the bread this time as the bag that held the dough was not as tall.
The bread baked just as well as on a stone (just took a bit longer – 10 to 15 minutes longer than the Dutch Oven).
The bread stuck to the bag at the bottom where the sides met with the bottom layer of parchment paper. Note: next time let the sides be longer to overlap the bottom.
Conclusions:
Baking in a bag seems to work well as an alternate to a Dutch Oven.
Bags are much cheaper (free) than a Dutch Oven.
Now to take advantage of this large Bread Baking Community. Here are some questions:
What other techniques might I try to keep the dough from sticking to the bag?
What other techniques might I try to seal the bag?
Are there and special considerations when baking larger loafs?
------------ Recipe that I used for the above Experiment ------------
24 Hour Sourdough (Mutant Variant of 1, 2, 3 Sourdough) Experiment
Note: This first started as a single bake but then turned into a longer experiment.
I wanted to make some sourdough bread but I did not have enough starter to make the amount of dough that I wanted to, using the 1, 2, 3 Sourdough recipe. So I did what everyone here would have done, I cheated. I only had 100g of starter (instead of 200g, it should be close enough). So this is really 1, 4, 6 Sourdough.
Mis En Place: Everything in its place (Utensils, Bowl, scale, measuring cups, ingredients)
Recipe:
|
| Measure | Grams | |
Ingredient | Baker’s % | Original | 1 Loaf | 2 Loafs |
Flour (All Purpose or Bread) | 100 | 5 cups | 600 | 1200 |
Water | 67 | 1 ¾ cup | 400 | 800 |
Sourdough Starter | 17 | ½ cup | 100 | 200 |
Salt | 2 | 2 tsp. | 12 | 24 |
Total Grams |
|
| 1112 grams ≈ 39 oz. ≈ 2lb. 7oz | 2224 grams ≈ 78 oz. ≈ 4lb. 14 oz. |
Calories/Cost |
|
| 2100 $0.55 | 4200 $1.10 |
Instructions:
1. Mixing -Dist. Ingr. -Dev. Gluten -Init. Firm. 5 mins. | 5:00 A.M. – In a large bowl mix water and starter together until dissolved. Add the dry ingredients to the bowl and mix until all the ingredients are incorporated. Cover bowl with plastic. 5:15 A.M. – With wet hands do in air stretch and folds. Return to bowl. 5:30 A.M. – With wet hands do in air stretch and folds. Return to bowl. 5:45 A.M. – With wet hands do in air stretch and folds. (Maybe add another Stretch and Fold) |
2. Prim. Firm. 8 hours | Return to bowl. Cover with plastic wrap and put it in a safe place to rest for the day. Cool place, not too warm. |
3. Punching Down 1 min. | 5:00 P.M. – With wet hands do in air stretch and folds. Return to bowl. |
4. Dividing 0 min. | N/A |
5. Rounding 0 mins. | N/A |
6. Benching 0 mins. | N/A |
7. Shaping & Panning 5 min. | 9:00 P.M. – Turn out onto the floured work surface. Shape into a boule, make sure that it is nice and tight. Place boule onto a bowl that has been line with a couple of strips of parchment paper. Cover bowl with plastic. |
8. Proofing 8 hour | Let proof overnight.
|
9. Baking 450 45 min. | 4:30 A.M. – Preheat oven and Dutch oven to 450°. 5:00 A.M. – Make another batch of dough using the instructions above. 5:00 A.M – Score the bread. Using the parchment paper as a cradle transfer the dough to the Dutch Oven. Place the lid on and place in the oven. Bake for 30 minutes and remove lid. Bake another 15 minutes or until internal temperature reaches 200°. |
10. Cooling 1 hour | Take out and let cool on a wire rack. |
11. Storing & Eating | Great toasted or used for a Grilled Cheese Sandwich. |
Off-Roading – Things to do when you want to try something a little different:
Add – Diced Apples with Cinnamon, Dried Fruit (Apricots, Cherries, Raisins), Nuts (Pecans, Walnuts, Hazel nuts), Seeds (Poppy, Sunflower), Olives, Garlic, Onions, jalapeños, Cheese
Different Shapes:
English Muffins
Rolls


Good looking loaves too.
Just to note that when I started bread making in earnest, I simply used small steel trays lined with parchment. No oven stone, just placed them directly on the grids. (with a splash of water in the bottom of the oven) I think the steel was thin enough to let the heat in the oven get through fairly quickly. I now use silpain mats (perforated silicone things) for loaves rather than the tins (which I use for focaccia, etc)
There are also thin wooden boxes and liners sold for bread making too - e.g. http://www.panibois.co.uk/ bit pricey though.
Those grocery bags aren't very common here in the UK though.
Cheers,
-Gordon
Gordon,
Thanks for the wooden boxes and liners link, those are some interesting ideas and for gifts they would be great. I have also made great bread with cookie sheets covered with parchment paper and steam. My bread improved a lot when I went to a Dutch Oven (I have also used a corning ware covered casserole dish) and I was just fooling around with an alternative in this experiment.
Out of curiosity, what do you use instead of paper grocery bags there in the UK, Plastic Bags?
Thanks for your comments,
Dwayne
Yes, plastic.
However there are moves to cut down on their use and in Scotland they've already started to charge for them (5p a bag I think) and that will be coming to England and the rest of the UK in the next few months I think.
Paper bags with handles are typically used by fast-food shops to take the food away in, but I don't think I've ever seen the grocery sacks typical of the US here in the UK. (I lived in the US for a few years some time back and was initially surprised when asked: Paper or Plastic?)
I always take reusable cloth bags now
-Gordon
How about using crossing parchment slings that reach from one edge to the other? One would go through a lot of parchment to bake a loaf of bread. How about using whatever casserole dish they have on hand and use the paper bag cover over it?
Kathy,
I think you are right with the sling idea it would be the best way to line the bag, I use that method when using a Dutch oven. I was initially thinking the way I tried it in the experiment would use less paper so I went that way. However, it took me more time to line the bag that way. Casserole Dishes work fine but our friends did not have any.
Thanks,
Dwayne
Way to go! Whole Foods is the place to get brown bags here- the rest of groceries use plastic. Thankfully I get Kamut, Rye, Spelt and other grain berries there.sine they aren't available anywhere else.
:Loved the post and the SD bread looks grand too! Well done and
happy baking
DBM,
Here in Washington State they seem to be available in all grocery stores that I've been in. I also like Whole Foods for their having a wide variety of items, it was the only place that I could find Malt Syrup for making Bagels.
I'm waiting for the weather to get a bit cooler so I can do a few more experiments with sour dough. It must be rough on you there in AZ, I live below Yuma as a kid.
Thanks,
Dwayne
The high temperatures make for a more sour bread. After tasting my bead, no one ever asks - Is this a sourdough? Couldn't make a mild one if i tried.but i might try some day:-)
I guess that I must have had it backwards. I thought that the Lactic Acid Bacteria were more active at lower temperatures than the yeast so that during cooler weather the rise time was longer and the LABs busier than the Yeast. I read a couple of discussions here ("The Source of Sour" and some other one which I can't find right now) and I'm sure that I did not get it all. I meant to ask for an example.
So I'll as you, If one was using a recipe similar to the 1-2-3 Sourdough what would be the effect of temperature?
Let us assume 70°F is normal, can you fill in the Sourness column?
Room Temp Rise Time Sourness
50°F Longer
60°F Longer
70°F Normal Normal
80°F Shorter
90°F Shorter
100°F Shorter
Thanks,
Dwayne
besides Debra Wink did a study on reproductive rates of LAB and yeast in SD cultures an how they were affected by temperature, ethanol in the mix produced by yeast mainly, acid in the mix priduced by LAB and salt in the mix
Here is the chart of his data
The highest reproductive rate for yeast was around 80 F while the highest reproductive rate for LAB was 90 F. What is more important for bread makers is the LAB to Yeast reproductive ratio in the last column. Between 70 and 75 F(room temperature) the LAB to yeast ratio is the lowest meaning that both are reproducing at nearly the same rates.. Since it is the yeast that produce CO2 these are the temperatures that yeast will raise the dough the fastest to be ready to bake while the LAB are at their lowest comparatively. These are the temperatures where the bread will be less sour.
Any temperatures above 82 F and below 61 F the LAb LAB to Yeast reproduction rates really start to favor the LAB. Mire LAB in the mix means more sour. It really starts to kick in above 90 F and below 40 F where LAB are out producing yeast at more than 3 to one.. At those temperatures the LAB reproduction rates are restricted from their peak temperature but the yeast is restricted even more from its peak temperature.
The problem with low temperatures is that both LAB and yeast reproduction is very, very slow. So, to get any real benefit for sour you have to keep it there for a very long time - weeks. for the NO Muss No Fuss Starter. At very high temperatures the LAB can run through the fructose available and produce ethanol and CO2 instead of acid - which sort of defeats the overall premise of restricting yeast reproduction at high and low temperatures thus slowing proofing times down and allowing the LAB more time to produce acid to make the bread more sour.
It is tough to beat 90-92 F when trying to make sour bread and my personal experience has supported that as well.
Happy Sourdough baking Dwayne
Thanks for the information. I am planning a bake for the weekend even though it will not be that warm (81°F). I'll try and get the dough to proof and raise at a higher temp and see how the flavor differs.
Dwayne
ferment and proof of the dough is helpful, the real sour comes from building the starter at high temperatures, retarding the starter for many weeks and then building a levain from it at high temperatures. If your starter and levain have more LAB than yeast than the normal SD culture to start with, then you bread will ferment and rise rise more slowly because of less yeast making CO2 which allows the extra LAB more time to to really kick into gear and make some acid to sour the bread.. But,it fun to try each section on its own, dough, levain and starter to see how each makes a difference in flavor and sour. it is just science, so I say.... experiment away and have some fun.
Happy Baking
for baking is very 'in' at the moment in Germany.
There is a DYI instrution here: http://www.smarticular.net/perfektes-brot-backen-mit-dem-selbst-gemachten-backrahmen
It's in German, but the pictures and measurements are self-explanitory. Just untreated wood only, of course.
Ingrid,
Thanks for the link. I've not see this before. I wonder how the insulating properties of the wood affect the baking? Might be something else to try.
Thanks,
Dwayne
but for cakes. it works really well, I usually bake at a slightly lower temperature thouh. I find the outside of cake doesn't have as much "crust" which is great for a cake. I use it for my Christmas cake too and it is really. good in the long slower bake (form is well lined too though)