
ACME baguettes from Glezer's Artisan Baking
I've only had the pleasure of visiting San Francisco twice, and both times it was on business. But I made sure to stop by the ACME Bread Co. store at the Ferry Building to pick up a small boule of that famous local sourdough, or perhaps a walnut or olive levain.
I'd never tried their baguettes, however, and, since I've recently been very much in the mood for a baguette, and since I'd not made a single recipe from Maggie Glezer's well respected Artisan Baking, this seemed like a natural for the weekend.
I was mightily impressed. The flavor was excellent, just as good if not better than the single step baguettes I made last week. If only I'd gotten ears all over the bread like the one at the top of the bottom loaf!
The recipe makes 2 lbs of dough, which gets split into two 8 oz. baguettes and a 1 lb boule. But I just divided it into three and make three 10+ oz baguettes. Because I shaped my last baguettes a bit tool long for the stone and had them drooping off the ends, I erred on the other side, and made these a bit too short, so they ended up looking a bit more like sub rolls than baguettes ... but heck, I called them baguettes, so baguettes they are!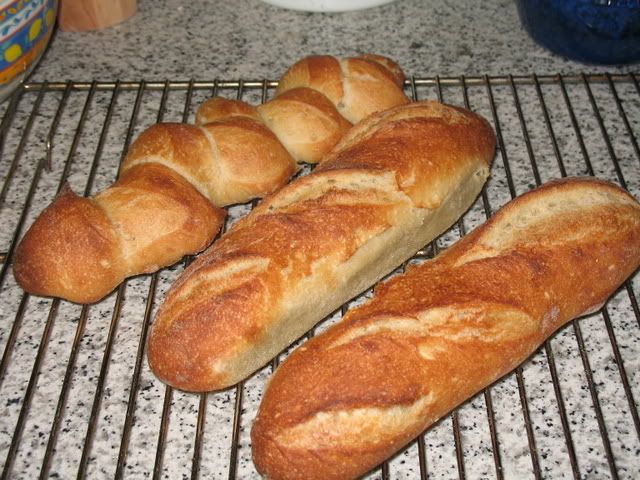
I was particularly impressed by the crumb, which I got a good shot of the next day, as I made sandwiches. The internal structure was remarkably open given that the overall hydration is just a notch above 66%, a hydration at which the dough is very easy to handle.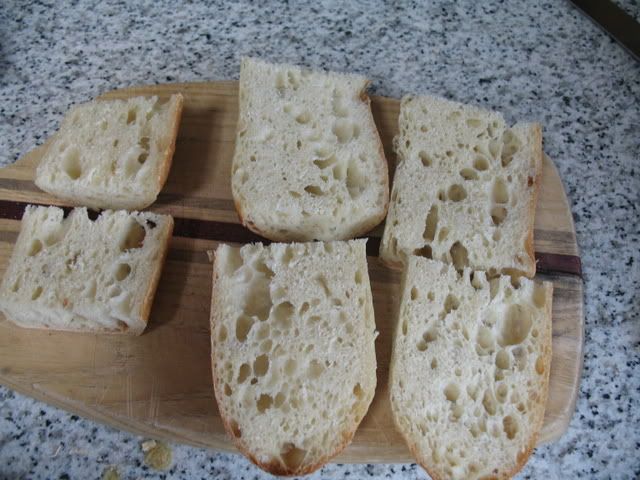
It's an unusual dough in that it uses two different pre-ferments: a poolish and a pate fermente (also known as old dough). It's worth the trouble though.
Old dough
- Instant yeast: 1/4 tsp
- Water at 110 to 115 F: 1/2 cup
- Unbleached all-purpose flour (I used Giusto's Baker's Choice):3/4 cup or 115 grams
- Salt: 1/4 + 1/8 tsp or 1 gram
Sprinkle the yeast in the warm water and let it dissolve, which takes about 5-10 minutes. Mix the flour and salt, then add 1/3 cup of the yeasted water (reserve the rest -- you'll need some for the poolish). Mix it and knead it for about 5 minutes. Let it rise for about 3 hours, and then pop it in the fridge.
Poolish
- Instant yeast: 1 Tbs of the yeasted water
- Flour: 1 cup or 150 grams
- Lukewarm water: 2/3 cup or 135 grams
The Final Dough
- Flour: 2.25 cups or 340 grams
- Instant yeast: 1/4 tsp
- Lukewarm water: 3/4 cup + 2 Tbs or 180 grams
- All the poolish
- All the old dough
- Salt: 1.75 tsp or 9 grams
Step One: Autolyse
Mix the flour and the yeast together. Then, add the water to the poolish so it will come out easily from the bowl, and pour it into the flour. Stir it up until everything is hydrated, then knead it a few times to ensure everything is well combined. Cover and let it rest for about 20 minutes.
Step Two: Mixing
Break up the old dough, then add it along with the salt. Knead until you get a smooth dough that can pass the windowpane test, which is about 10 minutes or so. Cover and let it rise for about 3 hours, until it has at least doubled and you can see large bubbles. Give the dough a good stretch and fold at 20 minutes, 40 minutes and 60 minutes. Then let the dough rise for the remaining 2 hours.
Step three: Pre-shaping
Before you begin, pre-heat the oven to 450 F. If you've got a stone, make sure it's inside and also place a steam pan on the bottom rack. Glezer recommends you form it into a stubby batard. I just formed a boule. Either works, I'm sure. Let it rest for 30 minutes. This seemed like a long rest to me, but it made a big difference in my being able to easily shape the dough.
Step four: Shaping
This is where she asks you to shape the baguette. I wish I could describe how to do it, but really, you need to see photographs. Essentially, you pat it gently into a rectangular shape and then fold the top long side into the middle, and seal it, gently, but firmly. Do the same for the bottom. Then pull the top completely over the bottom and seal. Finally, with a rocking motition of your hands, start in the center, and gently, but rapidly, move outwards, stretching the dough to its proper length.
Let it rise for about 30 to 60 minutes. When it's ready, the dough will slowly spring back from a gentle nudge with your finger.
Step five: Scoring and baking
Score the baguettes with a blade at a 45 degree angle, with slashes that run primarily down the length of the loaf. Bake with steam at 450 F for about 25 minutes, until the inside of the loaf reaches at least 205 F. Let cool 30-60 minutes before devouring.


Comments
Gorgeous--and look at those epis! I can just hear the crunch.
I've been wanting to try cutting an epi for so long. Sometimes the directions are vague about where to do the first cut and that's what has stalled me. Your bread looks great, crust and crumb. weavershouse
I don't know about their San Francisco store, but if you take a small container to their Berkeley bakery, they will give you some of their starter. -Larry
Well, I've been baking almost exclusively sourdoughs or sourdoughs with a commercial yeast boost. I hadn't made a classic French bread in a long time, and thought it would be fun.
It was!
This is really great information, particularly Wetter Is Better... Amen.
JMonkey, I've made this recipe many times because it is such a flavorful one. I love it! You did a great job and that crumb is perfect. Sometimes I just love the flavor of a delicious yeasted bread in the midst of all my sourdoughs.
I must try an epi, too. I keep meaning to but you know how that goes. We all have such long lists of "must try" breads and styles.
Btw, here is a great little video worth resurrecting which shows how to cut an epi. Go to "videos" on the left side of the link below and then scroll down to "la scarification" and watch the last video on the page called "la coupe en epi" to see a master at work.
http://lepetitboulanger.com/I've made this recipe twice and both times, made 2 batards from a single recipe. They've come out great despite the poor instructions in the book. JMonkey - your instructions are more clear, but what I see in the book is 90 minutes of final rise in 3 30-minute segments. In addition, the book's instructions for making a batard are really lacking (overall, I think this book's instructions are poorly laid out).
The first time, I rose the loaves in a fake cloche (heavily floured linen napkins) for 90 mins. The 2nd time, I shaped into a fat stubby baguette for ~30 min and then stretched into a long-ish batard for another 30-ish mins (in heaily floured linen napkins).
I'm happy that they've come out good (excellent crust!), but at the same time, I prefer not to be in the dark on the proper method, especially if I can do the final rise in less time.
Any thoughts?